 GKVKs – Gardening Tips and Store Gardening Tips and Store
Related Articles


In Today’s post, we will build a simple cheap DIY 2-in-1 soil-less plant cloner device cum a simple yet effective hydroponic system to grow your plants or propagate your plant branch cuttings with a high success rate and the scientific reason behind this technique.
This Hydroponic two in one plant cloner can be a very nice school project for kids and instil an interest in them in gardening.
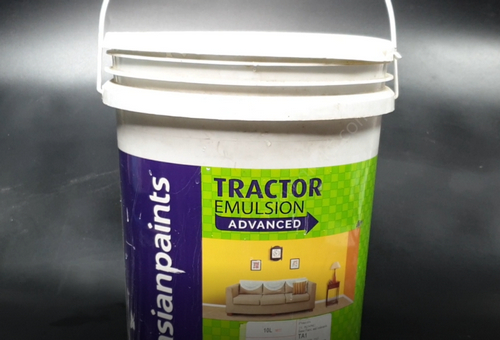
First of all, you need at least a 20 litre or a 5 gallon plastic bucket with a lid. The cheapest solution to this is to use a 5 gallon empty paint bucket which is easily available from any junk store or perhaps from your store room.
Take out the lid and carefully drill some holes on it. Firstly you need to mark the diameter of these holes on the lid. First decide, what you want to insert, 1 inch hydroponic collars or your own diy foam inserts or 1 inch net pots or 2 inch net pots, depending on what you want to grow.
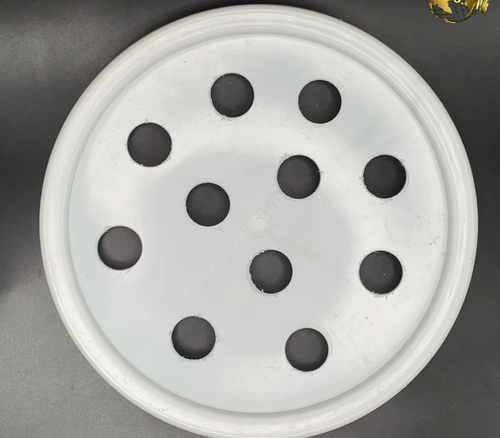
Here I want to insert 1 inch foam inserts or 1 inch net pots, so that I get more number of slots to insert. So, mark the slots on the lid properly spaced and as many as you want. Make sure, the diameter of each hole should not be more than the diameter of the pot. The top diameter of this pot is max 3 cm, and the bottom is 2 cm. So 2.5 cm or 1 inch is the ideal cut out for inserting these pots.
Now using a 1 inch hole saw bit or door knob drill bit or whatever you call it, carefully make as many holes you want. 5 or 10 or whatever number you want. Do not make them too close to each other, the first reason is because, this can make the lid weaker and secondly there can be root entanglement underneath the lid once the plants start to grow.
Now if you want to use it as a plant cutting cloner or plant propagator, you need to make few 1 inch foam collars to insert your branch cuttings. These are readily available to purchase – like these Neoprene hydroponic collars or you can easily cut out any thick foam – that’s recycling some packaging foam from your junk. Try to carefully cut the sizes, and the top diameter should be little more than 2.5 cm. If you have a thinner foam sheet, you can cut and paste multiple pieces with glue and make these foam collars to insert cuttings. Making a cut from one side towards the centre is better to easily insert your cuttings without damaging the nodes, rather than making central holes into the foam, because the thickness of the cuttings also can vary.
So you can insert these foams to make it a plant cloner device or install net pots to use it for hydroponic growing.
Now let’s look into setting up pipes inside this bucket. You just need a 16 mm drip irrigation pipe like this and a T-connector. I got this again from my store room from my left over stuff I used for my drip irrigation for home done for my terrace garden.
Now measure the inner circumference of the bucket, 1 or 2 inches below the rim. Cut a 16mm pipe of this same length and make a circle using 16 mm pipe into the inner side of the bucket. Connect this T-connector to complete the cirlce.
Now fix or place a small pump like this at the bottom. This is again very cheap submersible pump. You can use a 12 watt or 18 watt pump depending on the size of your bucket. If you want to make a larger hydroponic system, you can use 18 watt or more.
Now measure the vertical dimension left between the pump and the t-piece and cut out 16mm pipe piece and connect one end to T-piece bottom and the other end to the pump.
Now Punch some holes into this 16mm pipe circle using the drip hole-maker and insert these little sprinklers or sprayers uniformly – like each around 2 inches apart or some 8 to 10 of them.
Optionally, fix this loop to the bucket with some cable ties or twist ties. Then take out the wire of the pump from the top of the bucket to avoid leakages.
Now pour water into the bucket, about half or less than half to test the system or the sprinklers by connecting the pump to power supply.
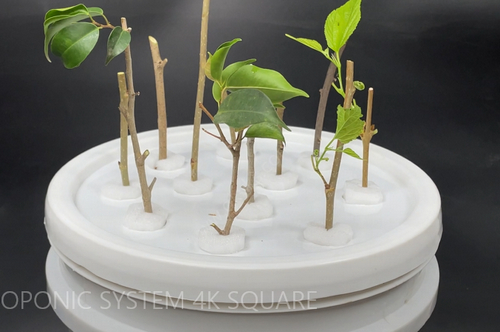
Now let us take some plant cuttings, a few ficus cuttings, a few mulberry tree cuttings. You can try any cuttings. Please follow the basic rules of taking cuttings like 45 degree cutting angle and other stuff we have already discussed in one of our post on 10 rules of cloning plants.
Now insert these cuttings, first into the foam collar and then insert the foam collars into the holes and keep it turned on.
Now let’s look into the results on Day 8 and on Day 15.
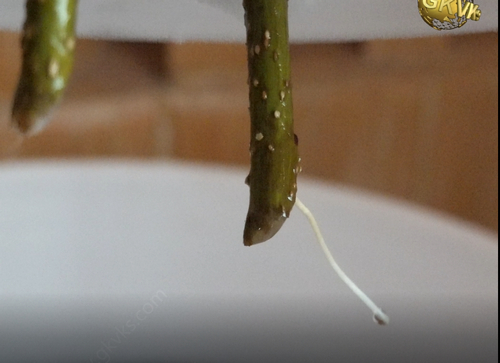
On Day 8, You can see rooting has already started in most of the cuttings. In this setup roots develop faster, the main reason is oxygen supply which is directly taken up from the air. If we go into the details of hydroponic and its types, we are using Nutrient film method in this setup. You can also add nutrient solutions to this water, like mainly phosphorous to start rooting faster. Once rooting starts, introduce Nitrogen and Potassium into the water like how you do in hydroponic farming. Another hack to induce rooting faster is to add half or 1 tablet of Aspirin 350mg dispersible tablet into the water. Aspirin is acetyl salicylic acid and induces rooting faster.
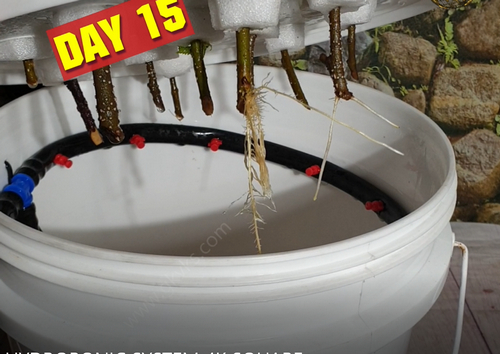
On Day 15, you can see more roots have started growing, with nice new set of leaves growing in to start photosynthesis. This is really fast when compared to conventional method of growing a cutting in soil, which usually takes 4 to 6 weeks time. You can also see some cuttings have progressed faster with more root formation and healthy roots. And you can also see nice foliage growth and even fruit formation in these mulberry cuttings. One simple tip here is: Snip off any fruits early to redirect the plant energy or rather conserve the energy for root and leaf development for now.
You can repot these into independent containers after 4 to 6 weeks once sufficient roots develop.
Few years back we made use of the Deep Water Culture type of hydroponics to make our plant cloner by using air stones.