 GKVKs – Gardening Tips and Store Gardening Tips and Store
Related Articles


In Today’s post, we will see 15 mind blowing gardening hacks recycling some old plastic bottles.
- Fruit Picker – Model 1 :
Take a 2 litre plastic bottle. Remove any labels or stickers on it.
Make markings at the base of the bottle. Mark a cross at the base to divide it into 4 equal flaps. Carefully cut it out with a saw blade or hot knife. You should get 4 equal flaps. Then make holes on each flap. Make holes near the bottle neck exactly in line with the bottom flap holes. This is important for equal opening of flaps for fruit picking.
Now take some nylon strings like these. Fix one end of the string to the flap hole by tying a knot and take out of the bottle mouth through this other hole. Do this for the remaining three flaps. Tie all four strings together. Check the movement of the flaps as you pull the string knot. Adjust accordingly if any issue.
Optionally you can paint and decorate the bottle as per your wish. Now take two pvc pipes. One is a 3/4th inch diameter pipe – the length depends on the height of the trees. Another pipe about 1 foot long and 1 inch diameter. The smaller diameter pipe must slide easily into the larger pipe. Now tie another large string to this junction and bring it out through both the pipes. Fix the pipe to the bottle opening with screws.
At the lower end of the pipe put a bottle cap with the string out through a hole in the cap. Tie a knot to prevent string slipping out.
Your fruit picker is ready to use. Just slide the bottom pipe outwards to open the flaps and pick fruits.
- Fruit Picker Model 2:
Take a 2 litre plastic bottle
Remove any labels or stickers on it.
Mark a circle with a diameter of about
3 to 5 inches depending on the fruit you wish to pick.
Mark a beak on the circle towards the bottom of the plastic bottle.
Cut this out carefully to create a hole of this shape.
Fix the bottle to a pole or a pvc pipe of your desired length. Your simple fruit picker model 1 is ready to pick fruits.
- Air Pruning Pot:
Air pruning means when root tips are exposed to air, the root tips are effectively “burned” off, causing the plant to constantly produce new and healthy branching roots. promoting more branching of roots. If roots are not exposed to air, they continue to grow around the container in a constricted pattern making them root bound. Hence air pruning promotes better growth of plant within a limited space.
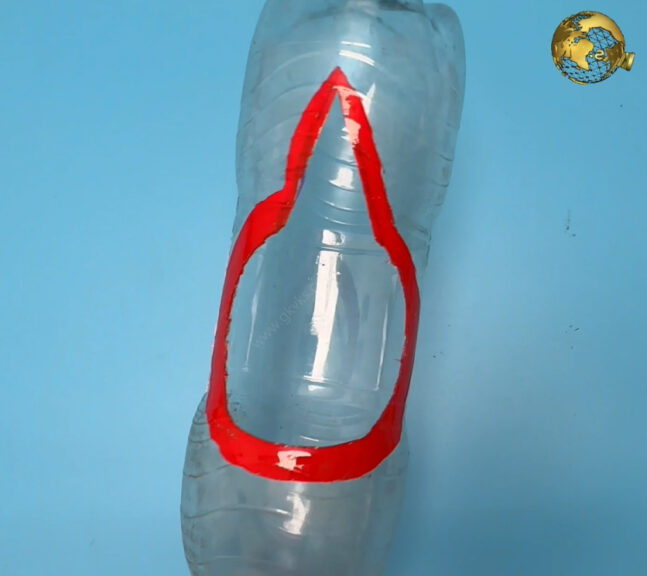
To build an air pruning pot you need a larger plastic bottle like atleast a 5 litre can. Remove any labels or stickers. You also need a pvc pipe of about 1 inch diameter and 1 foot height. Mark a circle on the bottle cap and cut it out. This is to insert the pipe through it. Make multiple tiny holes on the pipe. Any number of holes, the more the better. Put a cap at the bottom of this pipe. Take another smaller plastic bottle. Mark and and cut out a funnel. Fix this funnel to the upper end of this pipe. Screw it tightly.
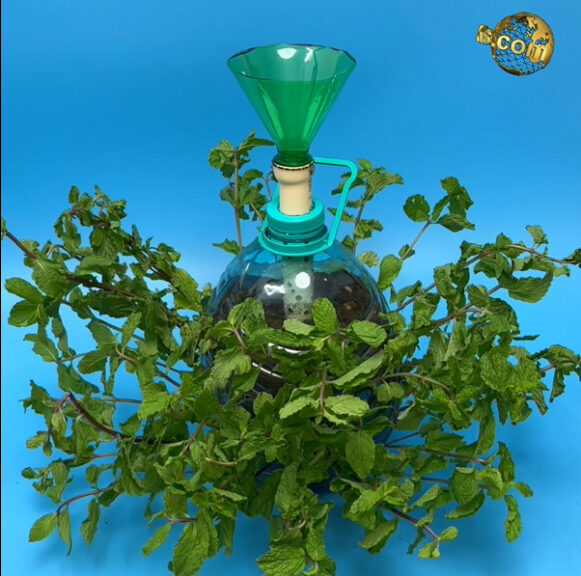
Now cut a small window of any shape on the bottle. Then make multiple holes to insert your cuttings over the bottle below the level of this open window. Insert the pipe into the bottle and cap it. Add potting mix into the container. Make sure it contains atleast 30 to 40 percent compost. Your air pruning pot is ready. Now you can insert some mint cuttings into these holes. You can water every alternate day through the top funnel. You should see nice and fast mint leaves growing in about 2 weeks using the principle of air pruning.
- Easy Plant Cloner:
You can root your cuttings faster using this simple plant Cloner. Take any plastic bottle. Remove any labels and stickers. Punch multiple holes around the bottle, large enough to insert cuttings easily. Take some of your plant cuttings. Make sure you make a cut at an angle of about 45 degrees for faster rooting. Insert the cuttings into the holes. You can tape the cuttings to hold in place or tie a string around the bottle to hold the cuttings. Pour water into the bottle. Add a little bit of rooting hormone powder if you have. You can also add about half a tablet of Aspirin 350 mg dispersible tablet to induce faster rooting. If you want to further accelerate the rooting process, place air stones into the water and connect to an aquarium pump. Switch it on for few minutes for atleast twice daily. This oxygenation helps promote rooting faster. We have made similar advanced Cloners earlier using the principles of hydroponics. You can check HERE.
Simplest method of slow drip irrigation is using one bottle per container. Just make a tiny hole into the cap. Full the bottle and insert into the pot for vacation watering of already 7 days. Make sure you make a small hole at the top of the inverted bottle for drip to flow through.
Another alternative is to use these little bottle attachments with a drip control knob to adjust the number of drops per minute. Just fix it to the bottle and insert it and adjust the drip knob.
- Easy Plant Watering Systems.
Model 1: this nozzle can is recommended for your expensive succulent plants for careful watering without wetting the leaves and thus avoid fungal rot. Take any plastic bottle. Make a hole in the cap and fix a pipe into this hole and glue it from the inner side.
Model 2: this is just a simple shower bottle. Make multiple tiny holes in the bottle cap. That’s it. This is especially useful to water your seeds and seedlings and avoid heavy pressure of your garden hose damaging the seeds or the little seedlings.
- Easy Spray Bottle:
Model 1: take any plastic bottle and fix this type of simple hand pressure trigger nozzles to spray pesticides or foliar feeds on your indoor or outdoor plants.
Model 2: you can also attach an adjustable pressure nozzle or pump type of nozzle easily available online at amazon.
- Ring Guard:
Cut out few rings like these from plastic bottles. Use these around seeds and seedlings to prevent Slugs and Snails crossing over and eating your little plants.
- Mini Greenhouse:
Cut the tops off the plastic bottles. Remove the caps and cover these over seeds. This creates a mini greenhouse effect with nice humidity to germinate seeds faster.
- Easy Funnel:
Cut the tops off the plastic bottles as done in the previous hack. This is an easy funnel to transfer either seeds into a container or potting mix or even watering, mixing pesticides and so on.
- Self-Watering Pot:
You need one large plastic bottle. Make the markings and cut it through. You get two pieces. The bottom one is the water reservoir and the upper part is the actual pot to grow plants or seeds. Optinally you can paint this for good looks. Now take a piece of cotton rope. Make two holes in the bottle cap and insert the cotton wick through it. The lower end of the wick should be placed in the water reservoir.
You have two cotton wicks now. Now fill with some potting mix to about half and bury one wick. Then add more potting mix and then bury the other wick. You can plant seeds or small plants into this. Whenever the soil gets dry it will suck the water through the string and keep the soil moist.
12. Plant Labels:
Just cut some strips off the plastic bottle and use them to label your seeds or plants.
- Seed Storage:
Plastic bottles are excellent for storing your left-over seeds. Just pour the seeds in a bottle and close the cap. Make sure you place a small sachet of a silicon desiccant for any moisture absorption to prevent fungus.
- Bird Water Feeder:
Take a plastic plate or a small tray. Fix the bottle cork to the center of this tray. Bolting this is a good idea to make it sturdy. Also try to prevent any leaks by sealing with glue. Make holes like this near the bottle mouth. Fill the bottle and cork the tray to the bottle and invert this set up. You can hang this simple DIY water feeder for birds in your garden using some strings and attract beautiful birds to your garden.
- Easy Planters:
Model 1: For growing Greens. Take a large bottle and cut out horizontally. You get a wider container for growing your greens. Fix a cap at the bottom with the help of some screws. Optionally Paint it or decorate it as per your wish. Make few drainage holes at the bottom. Fill it with potting mix and plant your seeds.
Model 2: Cut a bottle near its base like about 5 to 6 inches from the bottom. Optionally pain it or decorate it as per your wish. Make some drainage holes. Fill it with potting mix and grow seeds or some small plants.