 GKVKs – Gardening Tips and Store Gardening Tips and Store
Related Articles


In Today’s post, we will learn how we can convert the waste-water discharge from RO purifiers into green gold! Yes, it is really simple to build and maintain a simple low cost hydroponics system to grow your greens at home. You will be surprised to see how effective this is.
1. Here is the list of things required for the frame: A 3 to 4 feet long and a 3 inch calibre PVC pipe. 2 elbows of 3 inch for this pipe and some threading or plumbing tape. I am going to show how to build this setup in a kitchen window. You can use your own custom length of the pipe, based on where you are going to build it.
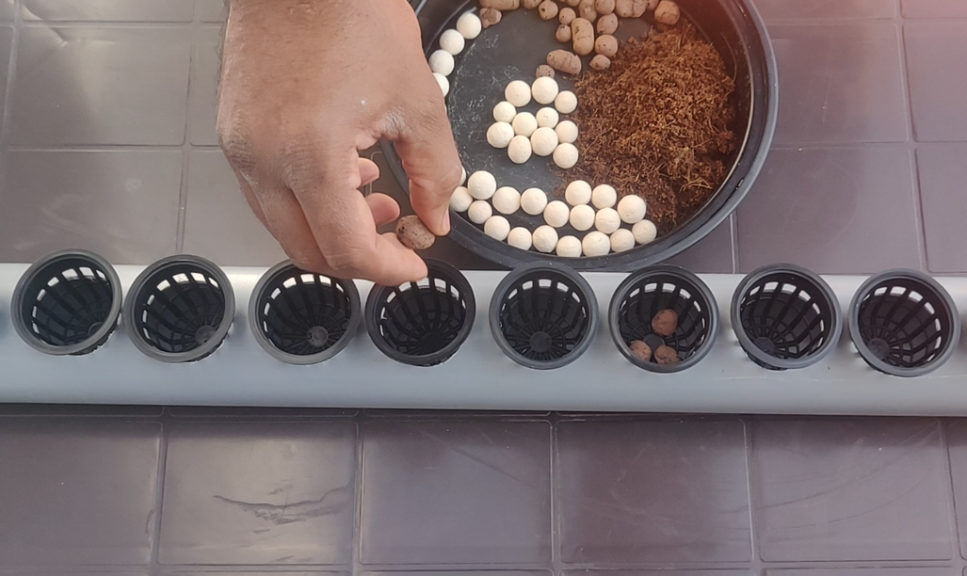
2. Next you need a power drill and a hole saw of about 1 inch, if you are using one inch net-pots. These netpots are hydroponic baskets where in we plant the seeds. We are going to plant 15 hydroponic baskets into this pipe, so marking the same on the pipe after measuring to divide the space equally. You need a hole saw of the same circumference as the middle of the basket itself. We need to make sure that the basket is only about halfway into the insert we are about to make.
3. Once done with all the 15 inserts, let us put some threading tape at the edges and stick the two elbows in place. You can also purchase pipe head closers, but I found elbows to be cheaper and much more convenient. Stick around towards the end of the video and you will know the reason behind this?
4. That’s it, our setup is ready. All we need is some clay pebbles, cocopeat or peat moss and these plastic net pots. These are actually very cheap to purchase online.
PURCHASE LINKS:
Net pots https://amzn.to/3snnJfg
Nutrient Solutions https://amzn.to/2ZOMjZW
Hydroponic Full Kit https://amzn.to/3uqqgHf
Let us get to planting the seeds now. First let’s insert the net pots into these slots. Let’s drop 3-4 clay pebbles in each basket. These pebbles not only give easy access to roots into the water but also maintain the humidity and help in keeping the pH of the water in check. Now let us add some cocopeat in each basket.
Now we can start sowing the seeds. We are planting Spinach, Coriander and Amaranthus seeds.
5. Once the seeds are dropped, let us now install the frame in place, on the kitchen window. Any place with indirect sunlight and good ventilation will do. Make sure that the setup is perfectly horizontal, so the water doesn’t flow to any one side. I am just putting a zip-tie on mine to hold it in place. Spray some water collected from the RO discharge outlet using a bottle sprayer till the coco peat is nicely moist.
6. Within 5-6 days we can see the seeds have sprouted and are 2-3 inches long. Amaranthus is doing very well as you can see in the video below.
7. A week after the setup was put in place, start checking for signs of roots underneath the baskets. They are extremely delicate so be careful not to damage these. Once you spot the roots you are ready to start the hydroponics.
8. Let us get our nutrient solution ready now. Before we start preparing nutrient solution, you need to know few basics of RO water purifier. We all have this RO water purifier installed in our homes. The main drawback of this is excessive water waste. everse Osmosis (RO) purifiers use membrane technology to filter dissolved impurities, the impure water is filtered out and is often called waste water or reject water. Because of the high level of impurities and dissolved solids, this reject water is not fit for drinking. But this water can be used for watering your plants.
So, to make the nutrient solution, All we need is 1.5 liters of water collected from the RO purifier discharge outlet. You will need to add 1.5 ml of Nitrogen, 1.5ml of Phosphorous and finally 1.5 ml of Potassium solutions to the water. These liquids are easily available from many online sellers. If you want to go completely organic hydroponic nutrient solution, you can use about 1:50 dilution compost tea made out of organic fertilizers like decomposed cowdung or vermicompost. We will discuss this in detail in some other post.
Well, now give it a good mix and pour it into the elbow opening of the pipe so it’s evenly spread out. We will also drop a small air-stone connected to an air pump into the pipe to maintain the oxygen level of the solution. And cover the open outlets of the elbows with some paper cups to avoid insects or dust getting in.
9. Here is the progress after two weeks. As you can see the leaves are healthy and green with absolutely no disease. This is one of the major advantage of using hydroponic system for growing greens! Now Let us look at the roots. The roots have grown a lot too and appear absolutely healthy. So, This is working as expected.
10. After 2 weeks, it’s time to change the water solution and this is where I feel the elbows make it so much easier to change the water. No need to remove the setup from place, simply place a bucket under one of the openings and gently turn the pipe around. The water should flow out into the bucket and you are Done!
Prepare the same solution as earlier and pour it back in.
11. This is what our plants are looking after 3 weeks now. The spinach has reached the stage of harvesting.
12. And finally, this is what our beautiful plants are looking like after the 4th week of sowing. We have beautiful spinach ready to be harvested. You can see the Coriander leaves too.
13. To harvest all you need to do is snip the leaves using a small scissor. You can expect more leaves to regrow every time you harvest as the root system is now healthy and well grown to support leaf growth.