 GKVKs – Gardening Tips and Store Gardening Tips and Store
Related Articles

In Today’s post, we will look into 10 secret tips & tricks on How to grow rose from cuttings successfully and faster. We will also show you two simple and unique hacks to get one 100% success rate in rooting rose cuttings. We also discuss some very important factors like: Where to keep these cuttings for rooting? When to take out and repot them independently? And how frequently and how much to water these cuttings?
I am sure most of us have failed many times trying to propagate roses from cuttings. Rooting Rose stem or branch cuttings needs some special care and application of certain hacks and tricks unlike other plant cuttings which are easy to grow. And you get a genetically identical copy of your Parent tree which is not the case with seed grown plant, which differs significantly from its Parent plant.
Whether you are growing rose cuttings in water or in soil, use these common tips and tricks that will give you the best results.
- The Best Cuttings: – The first and foremost criteria to choose cuttings is selecting a disease-free branch. Make sure you choose a healthy branch free of any disease like rose die-back disease or any fungal black spots or white spots. If you choose a diseased branch, the rooting will certainly fail. Secondly always choose semi woody cuttings from the branch which is healthy with young shoots and leaves at its tip. Semi woody means – neither too hard nor too soft and young.
- Length of the cutting: This is very important and should neither be too long nor too short. An ideal length for best results would be 6 to 8 inches or max 10 inches. This length also depends on the internode distance of a branch which varies with the plant species. Remember one rule of thumb: the success rate of rooting is inversely proportional to the inter-node distance. That means the lesser the internode distance, the greater the chances of success.
- Cutting Tricks: – Firstly the Cutting Tool: A clean and sharp cutting blade or pruner is important. So, disinfect it using hydrogen peroxide swab or any household disinfectant you have. A germ-free cutting is shown to produce great results.
- Secondly the Cutting Point: Make a sharp cut about half to one inch below a node. This is where the rooting starts. Do not make a crushing cut which can damage the plant tissue and the outcome may be poor.
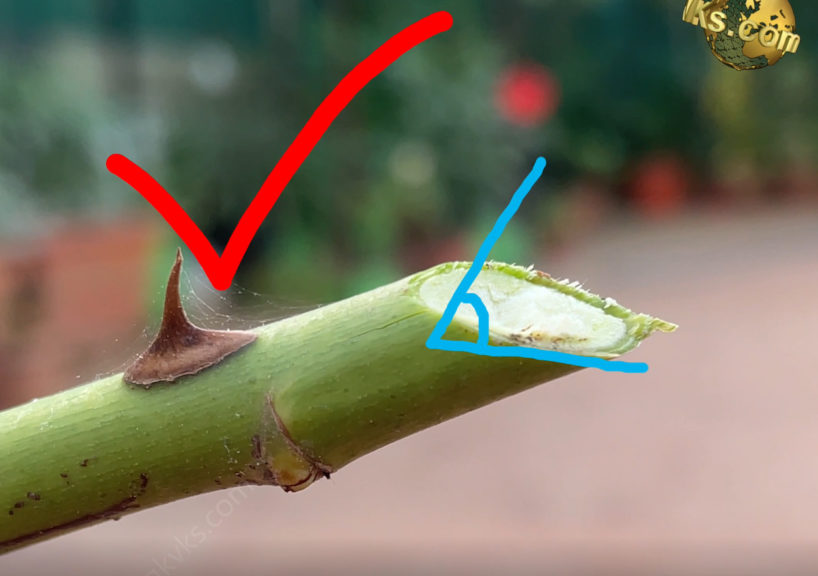
- Thirdly the Cutting Angle: A 45 degree cutting angle using a sharp and a clean cutting tool is shown to provide the best results and faster rooting because this gives the maximum surface area to produce roots and also it helps the cutting to absorb water quickly.
- Removing Leaves & Flowers: Remove the lower leaves and leave only a pair of top leaves. Cuttings do not have the root system to take up water yet, so fewer leaves means less stress on the cutting. Also Remove any flowers on the branch by snipping of dead or any flowers along with its twig. This is to divert energy to root development.
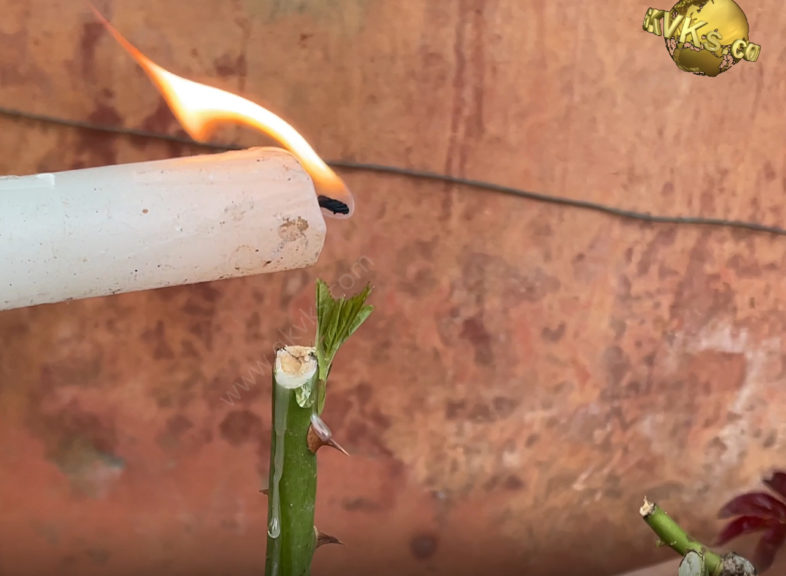
- Sealing the Top: This simple hack gives best results by retaining the moisture within the cutting and thus increasing the success rate. Simply light a Candle and pour on few drops of wax on the upper end of the cutting to seal it to prevent moisture loss from this top end. Check out my 100 Gardening Hacks Post.
- Orientation: Make sure you insert the cuttings in proper orientation and not reverse, especially if the cutting does not have any leaves on it. You can identify this by looking at the orientation of thorns and nodes.
- The Growing Medium: This is very important. If you are rooting in water, the container water should be changed every 4-5 days or at least weekly to prevent contamination and infection. If you are using Potting soil, use a loose or well-draining soil for faster root development. You can choose a sandy soil, cocopeat or peat moss, perlite and stuff like that. Or you can make your own potting mix using all these stuffs or whatever available.
- Insertion depth: How deep should I insert the cuttings. This is another important factor to consider. An insertion depth of 2 inches is considered better, one reason perhaps is better anchorage into the soil and keeps the cutting less disturbed.
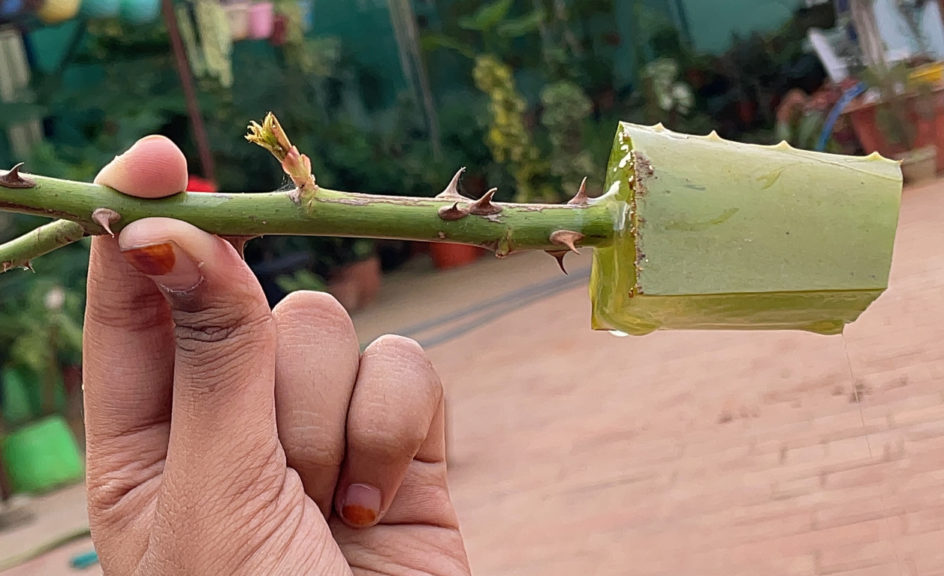
- Rooting Hack: This simple rooting hack will help not only get faster results but guaranteed results. If you have rooting hormone powder like Indole Butyric Acid (IBA) or Naphthalene Acetic Acid (NAA), that’s great, you can apply this to the cuttings. But, If you do not have it, you can use a lot of natural rooting agents. One such stuff is Aloe vera. Yes Aloe vera has anti-microbial and rooting properties. You just cut a fleshy piece of aloe vera leaf, split it and place the cutting or just insert the lower end of the cutting into this piece and then insert into soil. The success rate using this method is great. You can also use this trick for air layering.
- Growing Conditions: Where to keep these cuttings? When to take out and repot them independently? And how frequently and how much to water these cuttings? These factors are very important and matter a lot for achieving best results. One common mistake people do is – taking out the cutting too early to check for roots. This happens because, when they see fresh shoots and leaves coming, they think adequate roots would have formed and they tend to remove it for transplanting. This is not right. Minimum period of at least 4 to 6 weeks or even more, is must, before sufficient roots have formed. Other factors like, A warm and humid environment is very important for rooting. Do not keep the cuttings in direct sunlight to avoid moisture loss before rooting. Keep them in indirect bright light. To maintain humidity and prevent moisture evaporation you can cover with a polythene bag and make some small holes for air circulation. You can water them only if the top soil is dry on touch or finger dip, or roughly you can water once every 2-3 days for best results depending on the climate. You can check my post on How to care for your Rose bush and get maximum flowering in Rose plant from this LINK.
Happy Gardening!