- Fruit Picker – Model 1 :
Take a 2 litre plastic bottle. Remove any labels or stickers on it.
Make markings at the base of the bottle. Mark a cross at the base to divide it into 4 equal flaps. Carefully cut it out with a saw blade or hot knife. You should get 4 equal flaps. Then make holes on each flap. Make holes near the bottle neck exactly in line with the bottom flap holes. This is important for equal opening of flaps for fruit picking.
Now take some nylon strings like these. Fix one end of the string to the flap hole by tying a knot and take out of the bottle mouth through this other hole. Do this for the remaining three flaps. Tie all four strings together. Check the movement of the flaps as you pull the string knot. Adjust accordingly if any issue.
Optionally you can paint and decorate the bottle as per your wish. Now take two pvc pipes. One is a 3/4th inch diameter pipe – the length depends on the height of the trees. Another pipe about 1 foot long and 1 inch diameter. The smaller diameter pipe must slide easily into the larger pipe. Now tie another large string to this junction and bring it out through both the pipes. Fix the pipe to the bottle opening with screws.
At the lower end of the pipe put a bottle cap with the string out through a hole in the cap. Tie a knot to prevent string slipping out.
Your fruit picker is ready to use. Just slide the bottom pipe outwards to open the flaps and pick fruits.
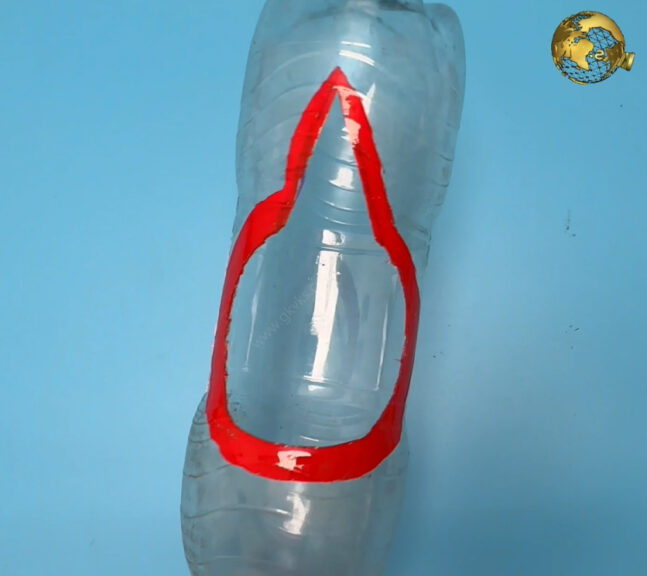
- Fruit Picker Model 2:
Take a 2 litre plastic bottle
Remove any labels or stickers on it.
Mark a circle with a diameter of about
3 to 5 inches depending on the fruit you wish to pick.
Mark a beak on the circle towards the bottom of the plastic bottle.
Cut this out carefully to create a hole of this shape.
Fix the bottle to a pole or a pvc pipe of your desired length. Your simple fruit picker model 1 is ready to pick fruits.
- Air Pruning Pot:
Air pruning means when root tips are exposed to air, the root tips are effectively “burned” off, causing the plant to constantly produce new and healthy branching roots. promoting more branching of roots. If roots are not exposed to air, they continue to grow around the container in a constricted pattern making them root bound. Hence air pruning promotes better growth of plant within a limited space.
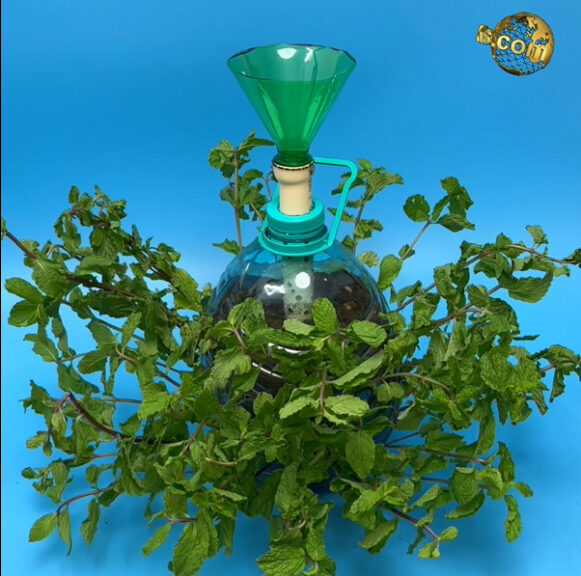
To build an air pruning pot you need a larger plastic bottle like atleast a 5 litre can. Remove any labels or stickers. You also need a pvc pipe of about 1 inch diameter and 1 foot height. Mark a circle on the bottle cap and cut it out. This is to insert the pipe through it. Make multiple tiny holes on the pipe. Any number of holes, the more the better. Put a cap at the bottom of this pipe. Take another smaller plastic bottle. Mark and and cut out a funnel. Fix this funnel to the upper end of this pipe. Screw it tightly.
Now cut a small window of any shape on the bottle. Then make multiple holes to insert your cuttings over the bottle below the level of this open window. Insert the pipe into the bottle and cap it. Add potting mix into the container. Make sure it contains atleast 30 to 40 percent compost. Your air pruning pot is ready. Now you can insert some mint cuttings into these holes. You can water every alternate day through the top funnel. You should see nice and fast mint leaves growing in about 2 weeks using the principle of air pruning.
- Easy Plant Cloner:
You can root your cuttings faster using this simple plant Cloner. Take any plastic bottle. Remove any labels and stickers. Punch multiple holes around the bottle, large enough to insert cuttings easily. Take some of your plant cuttings. Make sure you make a cut at an angle of about 45 degrees for faster rooting. Insert the cuttings into the holes. You can tape the cuttings to hold in place or tie a string around the bottle to hold the cuttings. Pour water into the bottle. Add a little bit of rooting hormone powder if you have. You can also add about half a tablet of Aspirin 350 mg dispersible tablet to induce faster rooting. If you want to further accelerate the rooting process, place air stones into the water and connect to an aquarium pump. Switch it on for few minutes for atleast twice daily. This oxygenation helps promote rooting faster. We have made similar advanced Cloners earlier using the principles of hydroponics. You can check HERE.
Simplest method of slow drip irrigation is using one bottle per container. Just make a tiny hole into the cap. Full the bottle and insert into the pot for vacation watering of already 7 days. Make sure you make a small hole at the top of the inverted bottle for drip to flow through.
Another alternative is to use these little bottle attachments with a drip control knob to adjust the number of drops per minute. Just fix it to the bottle and insert it and adjust the drip knob.
- Easy Plant Watering Systems.
Model 1: this nozzle can is recommended for your expensive succulent plants for careful watering without wetting the leaves and thus avoid fungal rot. Take any plastic bottle. Make a hole in the cap and fix a pipe into this hole and glue it from the inner side.
Model 2: this is just a simple shower bottle. Make multiple tiny holes in the bottle cap. That’s it. This is especially useful to water your seeds and seedlings and avoid heavy pressure of your garden hose damaging the seeds or the little seedlings.
- Easy Spray Bottle:
Model 1: take any plastic bottle and fix this type of simple hand pressure trigger nozzles to spray pesticides or foliar feeds on your indoor or outdoor plants.
Model 2: you can also attach an adjustable pressure nozzle or pump type of nozzle easily available online at amazon.
- Ring Guard:
Cut out few rings like these from plastic bottles. Use these around seeds and seedlings to prevent Slugs and Snails crossing over and eating your little plants.
- Mini Greenhouse:
Cut the tops off the plastic bottles. Remove the caps and cover these over seeds. This creates a mini greenhouse effect with nice humidity to germinate seeds faster.
- Easy Funnel:
Cut the tops off the plastic bottles as done in the previous hack. This is an easy funnel to transfer either seeds into a container or potting mix or even watering, mixing pesticides and so on.
- Self-Watering Pot:
You need one large plastic bottle. Make the markings and cut it through. You get two pieces. The bottom one is the water reservoir and the upper part is the actual pot to grow plants or seeds. Optinally you can paint this for good looks. Now take a piece of cotton rope. Make two holes in the bottle cap and insert the cotton wick through it. The lower end of the wick should be placed in the water reservoir.
You have two cotton wicks now. Now fill with some potting mix to about half and bury one wick. Then add more potting mix and then bury the other wick. You can plant seeds or small plants into this. Whenever the soil gets dry it will suck the water through the string and keep the soil moist.
12. Plant Labels:
Just cut some strips off the plastic bottle and use them to label your seeds or plants.
- Seed Storage:
Plastic bottles are excellent for storing your left-over seeds. Just pour the seeds in a bottle and close the cap. Make sure you place a small sachet of a silicon desiccant for any moisture absorption to prevent fungus.
- Bird Water Feeder:
Take a plastic plate or a small tray. Fix the bottle cork to the center of this tray. Bolting this is a good idea to make it sturdy. Also try to prevent any leaks by sealing with glue. Make holes like this near the bottle mouth. Fill the bottle and cork the tray to the bottle and invert this set up. You can hang this simple DIY water feeder for birds in your garden using some strings and attract beautiful birds to your garden.
- Easy Planters:
Model 1: For growing Greens. Take a large bottle and cut out horizontally. You get a wider container for growing your greens. Fix a cap at the bottom with the help of some screws. Optionally Paint it or decorate it as per your wish. Make few drainage holes at the bottom. Fill it with potting mix and plant your seeds.
Model 2: Cut a bottle near its base like about 5 to 6 inches from the bottom. Optionally pain it or decorate it as per your wish. Make some drainage holes. Fill it with potting mix and grow seeds or some small plants.
Having a beautiful, lush green lawn is every gardener’s dream. It really makes your home and garden landscape look beautiful.
We would all like to have that best-looking perfect lawn, but it is not always easy to achieve. Here in today’s episode, we will show you step by step, how to grow lawn grass successfully from seeds without the need of hiring a landscape designer and stuff like that.
Whether you want to fill a bare spot in your lawn or grow a brand-new lawn grass from the scratch, please read till the end, as it might surprise you with lots of useful tips and tricks. Let’s begin.
- Type of Lawn Grass Seeds?
This is the first important step where most inexperienced gardeners and home owners get deceived while purchasing grass seeds.
PURCHASE LINKS:
BERMUDA GRASS SEEDS: https://amzn.to/3P5npAr
There are many different grass species which thrive in different climates. Like, there are cool-season grasses which grow best when temperatures are 60-75 degrees Fahrenheit and warm-season grasses which thrive from late spring through summer. You can check the packet instructions and labels for this info.
Well, some of the common grass types to mention are Bermuda grass or doob grass, buffalo grass, bentgrass, ryegrass and so on. In this context I would like to highlight you on this important lawn grass seed scam mostly going on online even at big websites like amazon. Some sellers list out as Bermuda grass and the seeds you receive are some millet seeds like foxtail millet seeds or cattle fodder grass seeds which are actually very cheap. These types of seeds are usually fed as budgie food grains but they are selling as Bermuda grass seeds. You must know how to identify the proper seeds before planting and avoid these types of scams. These are mostly non-returnable items and also amazon does not publish negative reviews when we try reporting these fake items. We will grow these fake seeds in one container and genuine Bermuda grass seeds in another container as well as over the lawn area and show you the results in the end.
PURCHASE LINKS:
BERMUDA GRASS SEEDS: https://amzn.to/3P5npAr
- Preparing the Ground and Soil:
This is a very important step and you should know that the tender roots of young grass plants will not grow well in compacted soils.
Choose the location you want to grow lawn grass whether its your front patio or your back-yard. Optionally, You may also have to level the ground surface by adding some loose soil over your lawn area, days before planning your lawn grass.
Well, Firstly, loosen the top 2-3 inches of the soil. If it’s a small area, you can use a hand cultivator or if it’s a larger area you can dig with a shovel or hoe. After digging, you need to rake it smooth to break up any soil clods and rake the soil out into fine particles. Then you need to water the area thoroughly before planting seeds, because damp soil encourages speedy germination and provides immediate moisture to emerging roots.
- Planting the grass seeds:
For home gardens, you can just use your hand to distribute the seeds, flinging it out over the area. Spread them out evenly over the soil surface, neither too crowded nor too sparse.
- Covering the seeds:
After the seeds are sown, covering them is very much important to protect them from birds and also preventing them from washing away in a heavy rain.
You can just use plain soil to cover the grass seeds after planting. But best thing to do is to use a mixture of soil and a water retaining stuff like cocopeat or peat moss to cover them. Like 50% soil and 50% cocopeat and optionally compost like decomposed cow dung or vermicompost. You can mix all three in equal proportions or at least add some 20% compost. Cover the seeds evenly with this soil-peat mix to about one quarter of an inch but never more than half an inch.
- Watering:
This is most important step for germination.
Keep the top layer of soil moist (but not soggy). Too much water is as bad as too little, and avoid vigorous watering with a hose and stuff like that and this could wash the seeds away. A misting or shower attachment on your watering hose can cut down on the amount of force you use.
Till germination, Water at least once a day early in the morning and depending on the climate again in the afternoon if the sun and wind have dried out the soil.
But, once the grass seed germinates and begins to grow, reduce the frequency of irrigation but water more deeply. Once your new grass is about two inches tall, reduce your watering schedule to twice or thrice a week depending on the climate, but water until the ground is wet down to a depth of about three inches.
- Germination:
We will show you the results of seeds grown in containers as well, including the fake bermuda grass or fodder grass seeds.
PURCHASE LINKS:
BERMUDA GRASS SEEDS: https://amzn.to/3P5npAr
Germination should begin within a week depending on the type of grass seeds. In my case, you can see germination has happened within 3 days. On the third day, you can see these cute tiny grass seedlings popping out.
You can check the results in these containers. On Day 5: This one is the result for genuine Bermuda grass and this one is the fake Bermuda grass seeds. Just look at the grass blades and spot the difference. The fake fodder grass has wider leaves.
Then you can see the results after 1 week in containers and the ground. The whole area should appear green in about 2 weeks’ time.
We will make another detailed episode on how to take care of lawn grass like fertilizing lawn grass, trimming lawn grass and stuff like that.
Bonsai is an increasingly popular art of growing miniature live trees. Many people would love to own and grow a bonsai tree themselves. But You will need the right tools and right techniques to accomplish this. You will find that, most bonsai tools like scissors, shears, rakes, hooks, etc are quite expensive, may be because they are made in Japan or may be the demand and supply issues.
Let’s begin!
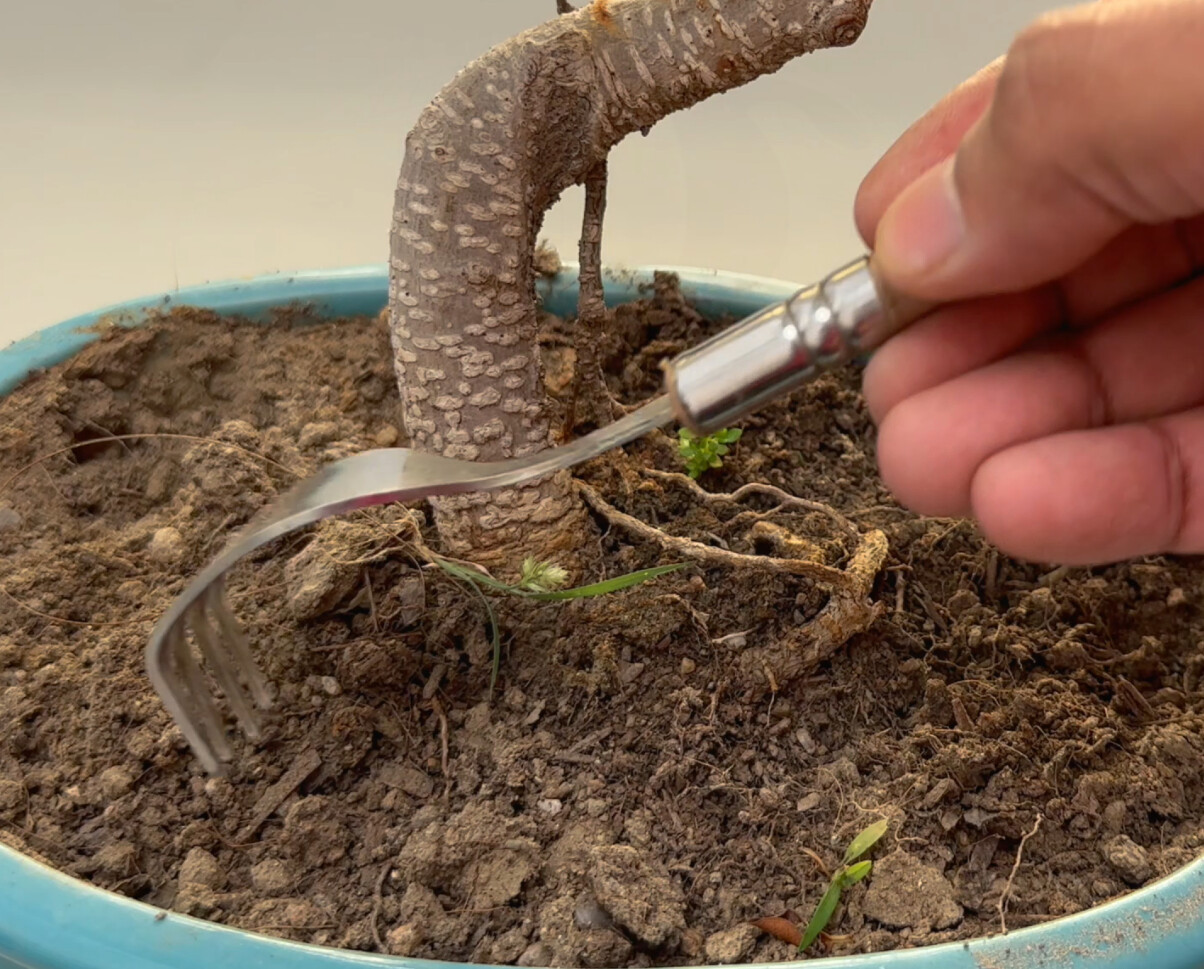
- Bonsai Rake Tool Hack: A stainless steel bonsai raking tool is an expensive tool. Simple free solution to this is to convert a stainless-steel dining fork to make a bonsai rake. Just insert the fork tines under a door or any sturdy slot and then gently bend it to your desired level to make a bonsai rake tool. Raking the top soil is a healthy gardening practice which has a lot of benefits.
- Wound Sealant Hack: Bonsai would sealant paste is very expensive. A simple alternative to this is to use universally available Fevicol paste. If you want to make it more effective, you can add some antifungal powder to Fevicol paste and apply to larger bonsai pruning wounds.
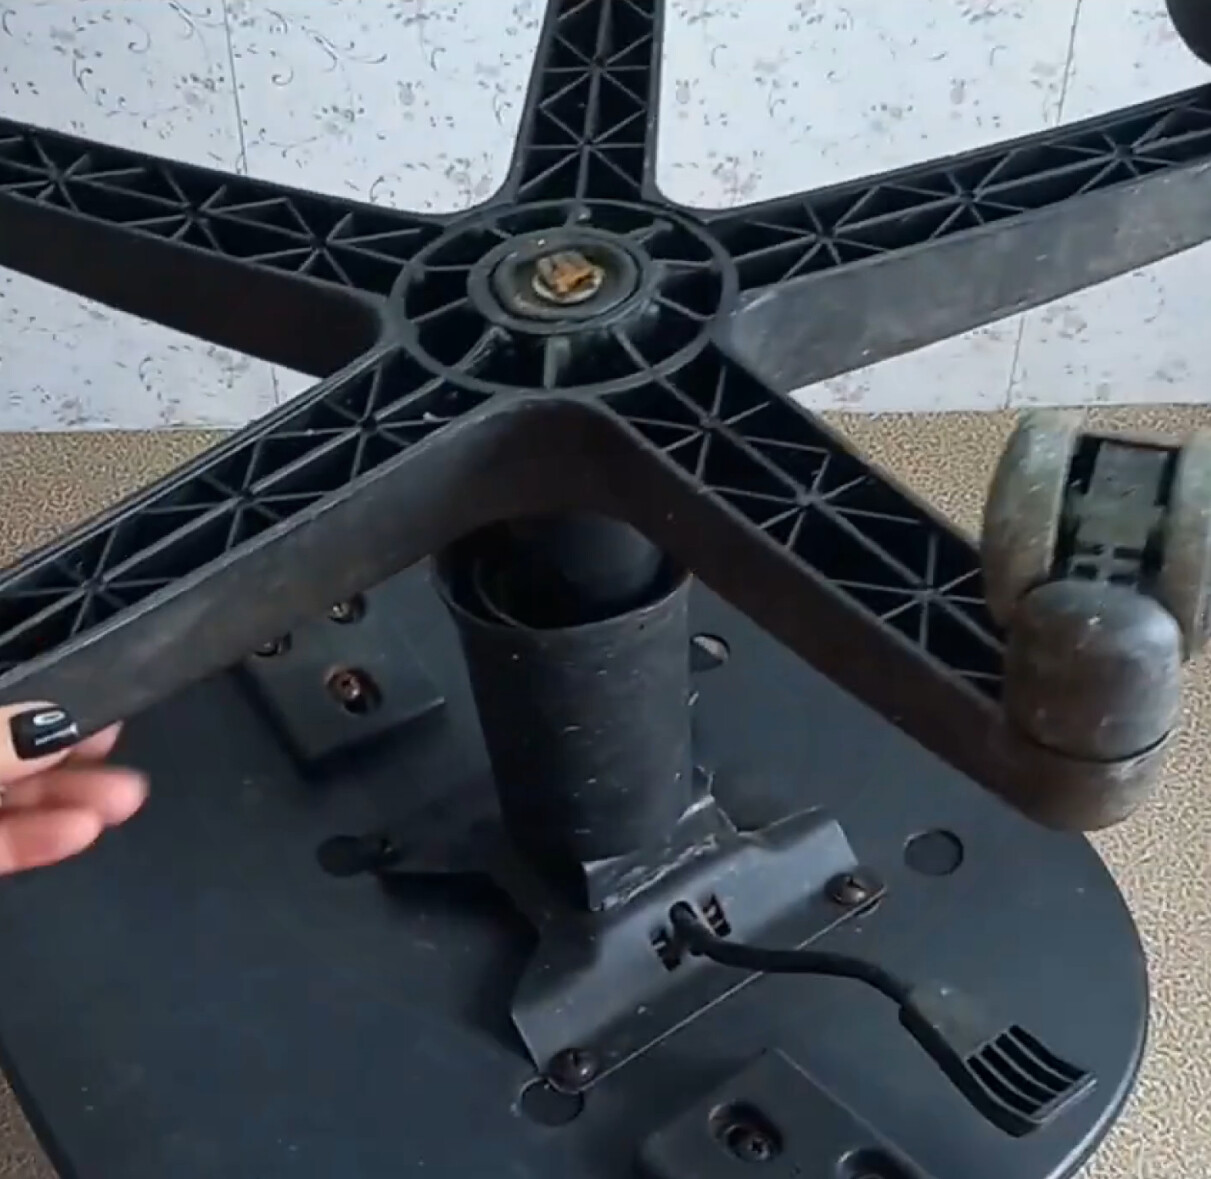
- Bonsai Turntable Hack: Bonsai Turntable is a very useful and a must have tool for anyone working with bonsais. If you do not have a professional bonsai turn-table, the cheapest alternative is a cake turntable which can efficiently work for smaller bonsais. Another hack to make a heavy-duty turntable for larger bonsais is to use the bottom steel base from an old or broken revolving office chair.
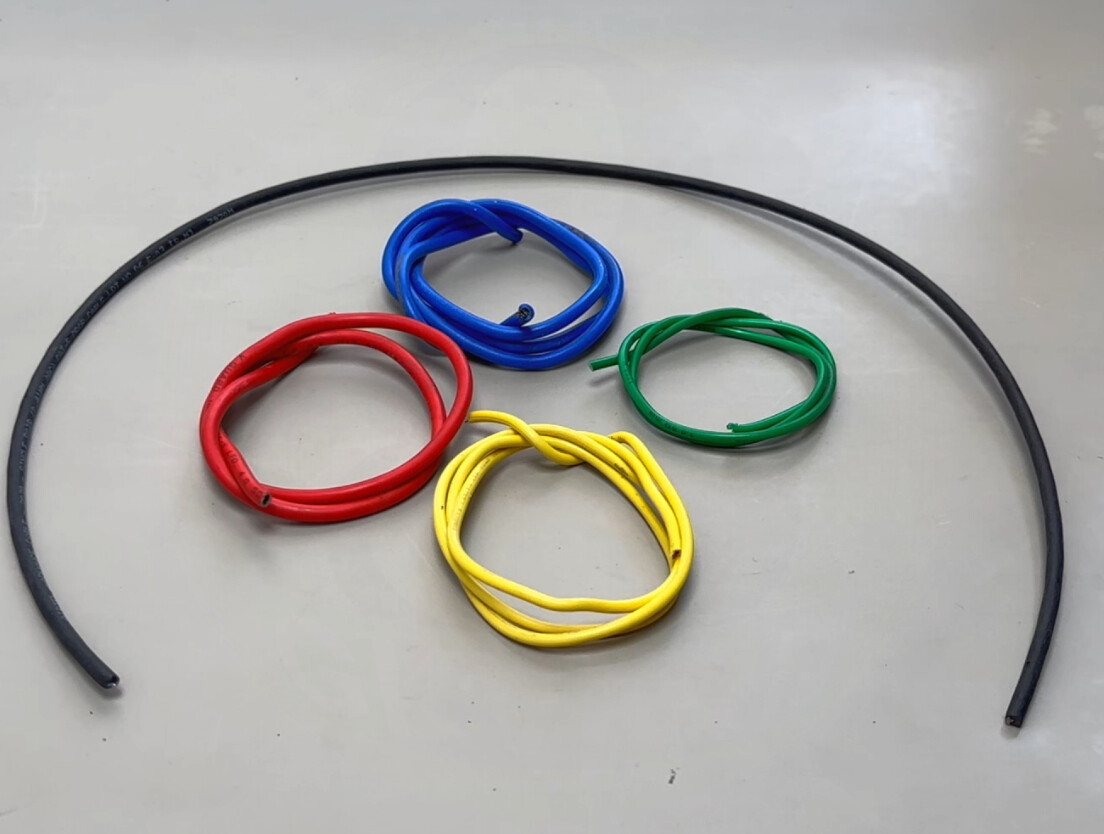
- Bonsai Wire Hack: if you do not have the professional bonsai wire to shape your bonsai branches, an easy alternative is to use thick gauge electric wires. You can use left-over pieces of old electric wire of different gauge, to wire and bend branches easily. But never use a GI wire like this one to wire bonsai, the obvious reasons are they are prone to rusting and difficulty in removing it when you want to, as they can adhere deeply into the stem or branch.
- Thick Woody Stem Bending Hack: It is next to impossible to bend a thick woody stem or a branch. You all know how important are bends or curves in bonsai tree designing. This bending technique is very important for making instant bonsais, especially from air layering technique which we shall discuss it later. If you have a thick branch or stem to bend, you can use a pruning saw or if the stem is not so thick, you can use a simple hack-saw blade to make multiple small wedge shaped cuts with a gap of about 1 inch between the cuts. You can vary the number of cuts or the distance between these cuts depending on how acute you want the bend. Make sure you don’t make too deep cuts, about 50% cut through the stem is fine. Then bend the stem or the branch to approximate or merge these cut wounds. To hold the bent stem in position, use a wire to support this stem or branch. Then wrap the wounds tightly with an aluminium foil first, to prevent moisture loss and promote proper healing of this wound, then wrap a grafting tape or a thin polythene sheet over this and then if you wish, put another layer of tape around it. Keep it undisturbed in partial shade. It should heal in about 4 to 6 weeks and your bonsai stem shape is done!

- Branch Splitter Hack: Bonsai Branch cutters or splitters are indeed expensive tools. In fact, almost all bonsai tools are expensive. You can make a bonsai branch splitter by grinding a cheap nail puller tool available at any hardware store. Carefully look at the image of the bonsai cutter blades and sharpen them in the same way. If you have good grinding skills, you can also make a parrot beak or bonsai concave cutter which is a very useful bonsai tool. Branch splitters are used to split thick branches, which helps to bend thick branches.
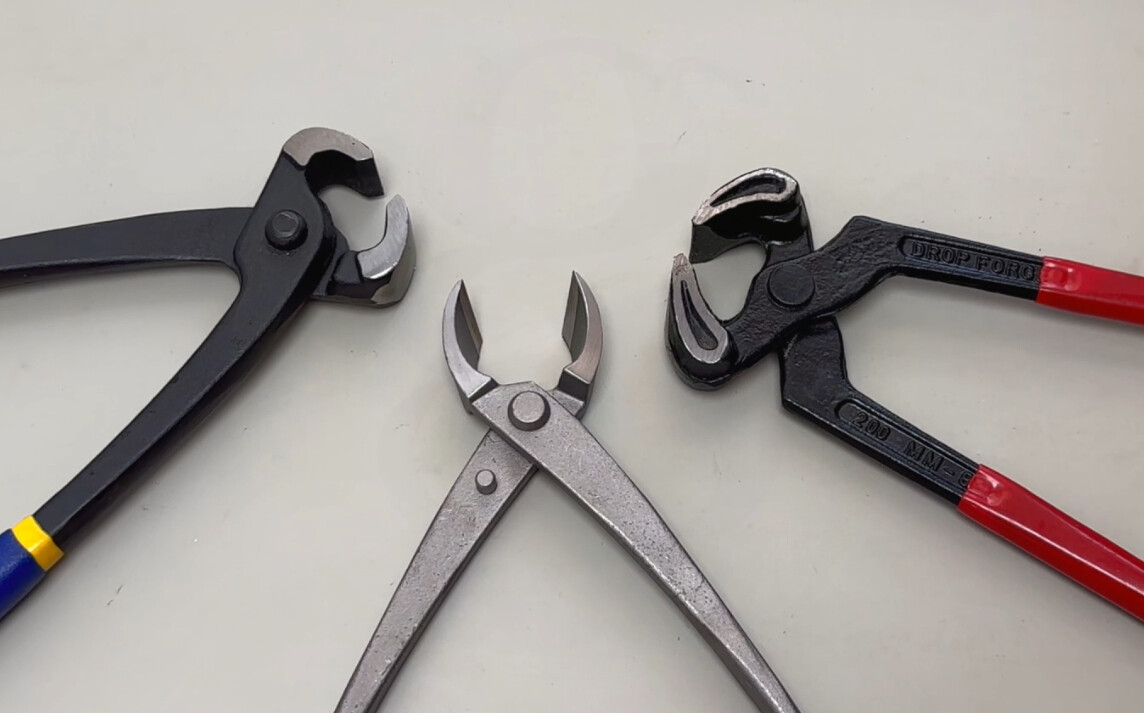
- Bonsai Scissor Hack: stainless steel bonsai shears and bonsai twig scissors are again expensive tools. A simple alternative is, to use surgical scissors with long blades as twig shears. These surgical scissors are very durable and do not rust so easily.
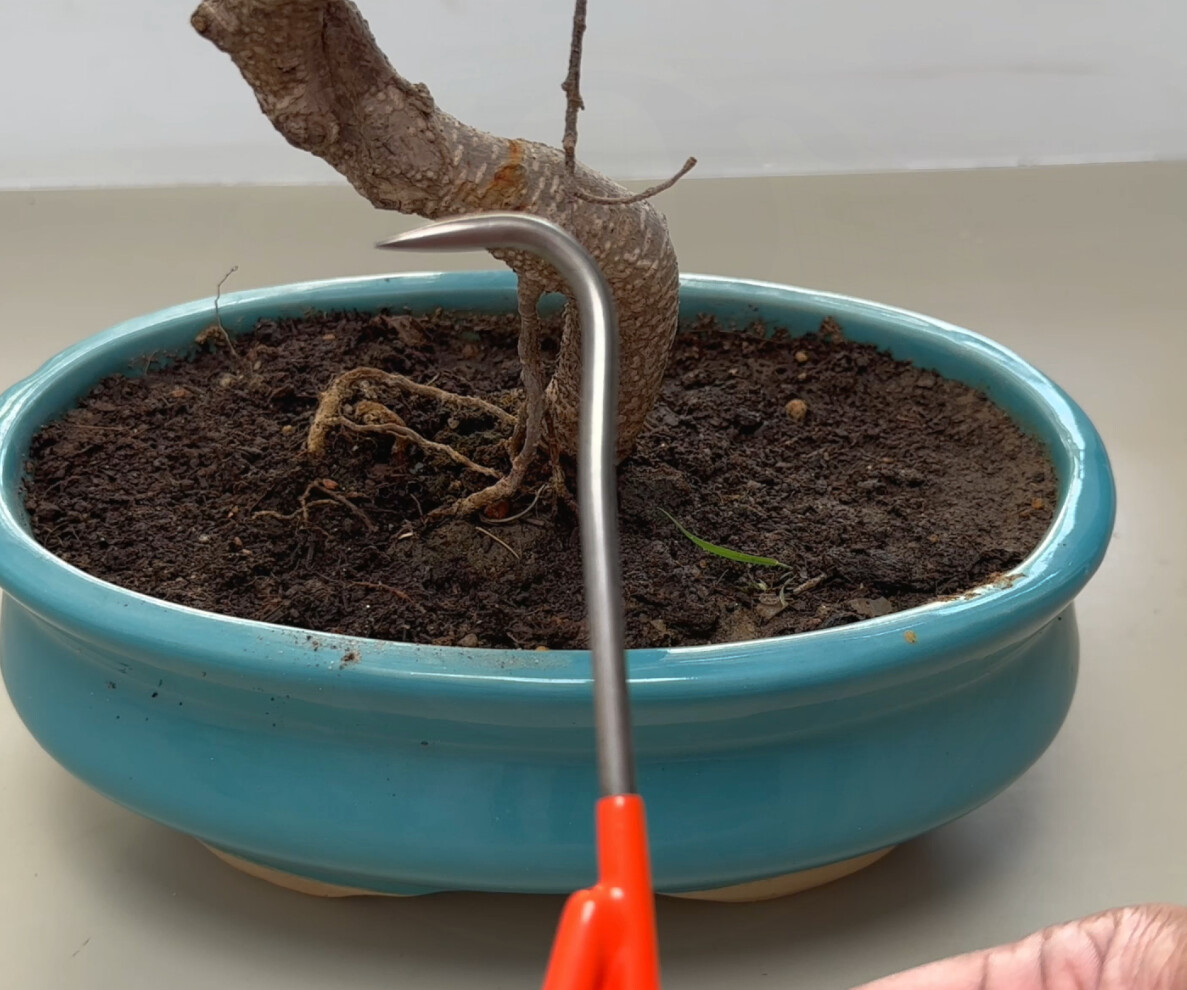
- Bonsai Root Rake Hook Tool Hack: Bonsai root hook is an indispensable tool needed while repotting bonsais. A simple way of making a bonsai root hook is to use large sized J hooks like these, which are cheap and easily available from a hardware store. You can sharpen the working point of this hook to your desired level. Now you need a handle to fix this hook. You can just use any wooden piece to make a handle, but the best solution to this is use a paint brush handle from an old paint brush. Just cut this part and make a hole into this handle and insert the hook and screw it tightly. You can then bend this hook to your desired level if needed. That’s it! Your bonsai root hook is ready to rake the roots.
- Thick Stem Hack: for faster development of a thick stem or trunk of any plant, you can place your pre-bonsai plant pot on a layer of gravel bed over the soil. The plant grows faster and thicker by sending out roots into the gravel bed through the drainage holes.
- Instant Bonsai Hack: As you all know making a true bonsai tree takes many many years if you are starting from a seed or a sapling. The quickest way of making and designing a thick bonsai tree is Air Layering technique which gives you an instant live bonsai tree to work on and save many years of work required to make a bonsai tree. You can check a detailed post and video on 5 different types of air Layering and some air layering tricks and hacks from HERE.
Happy Gardening and Happy Bonsai Making. Watch Full Bonsai Hacks Video below:
In today’s article, we will quickly debunk 20 interesting and unbelievable gardening myths and reveal some extremely useful scientific facts and tips related to Gardening.
- Fresh Cow Dung or Horse Dung is very Good for Plants?
This is absolutely false! Fresh Cow poop should never be applied for your plants, because it not only stinks but contains high levels of ammonia and salts which can burn your plants. It also contains harmful microorganisms like e-coli which are harmful to plants as well as humans. Plus, it also contains weed seeds which can produce a lot of weeds or unwanted plants in your garden. So always use decomposed cow-dung or horse dung for your plants. You can watch a detailed video on 5 hacks to quickly decompose cow dung from a link in description below or from end-screen link at the end of this video. Let’s move on..
- Is it Dangerous to Expose Roots to Light?
Well, This can be a very nice high school project for kids, to grow two similar plants, one in a transparent container and one in an opaque container and then compare these two. As you can see nothing happens to the plant grown in transparent containers. The actual concern is, root exposure to AIR and even the heat from sunlight that can cause drying and can damage your plant. But still you are advised to keep the roots in the dark. This is because of algae growth due to light and your roots are not getting enough oxygen because the algae is stealing the oxygen and nutrients for itself. So light as such does not hurt the roots, but air, heat and algae hurt the roots and kill the plant.
- Do Plants feel Pain?
There are many studies and researches conducted on this topic. Basically, Plants lack a nervous system – that is a brain and other neurological structures like nerves and pain receptors, so they should not feel pain, unlike in humans and animals where we have specialised pain receptors.
But according to some researches, “Plant can know of themselves being eaten” because studies have shown that plants release defence chemicals in response to caterpillars munching on them.
Other points include: Plants fight for territory, seek out food, evade predators and interestingly trap prey like what your see in carnivorous plants like the venus fly trap. They are as alive like any animal, and – like animals – they exhibit behaviour.
- Talking to You Plants will help them Grow?
People who really love plants and gardening will often tell you that talking to plants or even music has a beneficial impact on their overall health and growth. Despite many different scientific studies on this theory, there’s still no conclusive evidence that talking to plants helps them grow. One theory says that since plants take up carbon dioxide, and hence talking to plants releases carbon dioxide when we exhale. So, that explains it all.
- Plants can Die of Old age or aging. The oldest known tree in the world is the Great Basin bristlecone pine in the White Mountains of California which is over 5000 years old. Actually Trees grow indeterminately, meaning that with the right conditions, they can grow and grow and grow. But the only problem that limits them from reaching up to the sky is the food and water transport through xylem and phloem to the growing end from the roots. The taller the tree the more difficult it is to transport water from roots to the foliage near the top. But here what happens is instead of growing taller they increase in width and also branch out more, as you might have noticed some old trees with huge girth of their stems.
- Animal or Human Urine can be used as a Fertilizer. Yes, this is a Fact!For example, cow urine contains loads of NPK – that’s nitrogen, phosphorus and potassium which are the most essential plant nutrients for agricultural use. But it has to be applied in dilution of at least 1:20 in water.
- Is it Dangerous to go near Trees during Night Time? Well, In day time under the presence of sunlight – that’s photosynthesis, plants take up Carbon dioxide and release Oxygen. But during night they take in Oxygen and release CO2 and hence the air near trees will have lesser concentration of Oxygen and higher concentration of CO2. But, this impact will be negligible for small plants and at home gardens and only be noticeable near very large trees or in thick vegetation.
- Naphthalene balls or Moth Balls contain Naphthalene Acetic Acid and can be used as a rooting agent. It’s a Myth. NAA – Naphthalene Acetic Acid and IBA – Indole Butyric Acid are plant auxins or hormones which are entirely different compounds and used for rooting your plant cuttings. These two are entirely different from moth balls which are used to keep insects at bay.
- Watering plants on a hot sunny day will magnify the sunlight through the droplets acting as convex lenses and burn the leaves badly! No doubt, watering plants early in the morning or late in the evening is great! Because less water will evaporate during this time. But This theory that water droplets on leaves can act like mini magnifying lenses, focusing the sun’s rays and causing leaf burn has been completely disproved by physicists.
- Planting by the Moon affects plant growth and yield?
The idea that the Moon affects plant growth is an old one that is believed by many people. This is a myth! No study has proven the effect of moon on plant growth. And the only plants that use moon light for photosynthesis are certain types of phytoplanktons which are not normally found in gardens. - Crushed egg shells are a good source of Calcium to treat calcium deficiency? This is False! Even Powdered Egg shells take a long time to decompose and release that calcium into the soil and make them available for uptake by plants. You can make a water soluble calcium using egg shells by mixing it with distilled Vinegar to make this happen. You can find this detailed video from a link in description or from a link at top right corner of this screen.
- Saplings or seedlings need to be supported to protect them? True or False?
This is False! Many people recommend you to provide support to these young slender plants due to the risk of wind blowing them and things like that. Unless it’s a strong wind, tying a sapling or young plant to a support stick or any kind of support will actually do more harm than good. Research has shown that trees without support, over a period of time will develop thicker trunks, more supportive roots and more resistance to breakages.
- Do Magnets affect Plant growth?
This is a fact. Magnetism affects plant growth and seed germination positively. Studies have shown that when plants are exposed to a magnetic field with south pole facing towards the roots, Seeds germinate faster and plant grow faster and stronger in the presence of magnetic field in the soil. You can check a detailed video on this experiment from a link in description or from a link at top right corner of this video. - Can Harvested or Collected seeds be stored in a Refrigerator or Freezer?
This is not correct! Most seeds that are stored in a seed banks are first dried up so that the moisture content is reduced to about 10 percent and then these can be stored for several years. But if you freeze freshly collected seeds, the moisture content in these seeds will form ice crystals within and can destroy the seed viability. - Growing Fruit Trees in Containers is not possible due to limited space?
This is not true. You can grow them but you need little larger containers or fabric bags like more than 18 or 24 inch. You can watch a detailed episode on the top ten terrace gardening myths and facts from a link in description.
- Does Potting Mix Cause Legionnaires’ Pneumonia in Gardeners? True or False?
Do not worry! This is not True. Legionnaires’ Pneumonia is a severe form of pneumonia or lung infection mostly cause by inhaling the bacteria. Though these legionella bacteria survive in outdoor soil, it rarely causes infections. But still, prevention is better than cure. Better wear a mask while handling potting mix, specially people with weaker immune systems.
.
- How do I know my plant is still alive and how to save a dying plant?
There are many signs to know whether your plant can still survive. If your plant is looking dry and has shed its leaves, most of us think its dead. But actually, it may be alive or can be revived. Please watch my detailed episode on this topic demonstrating how to save a dying plant. I have linked that video in description below.
- Can we grow plants from leaves?
Yes! Some, but not all plants can be propagated from just a leaf or a section of a leaf. Leaf cuttings of most plants will not generate a new plant; they usually produce only a few roots or just decay. There are many ways you can grow leaves into a new plant, like 1. from a leaf petiole, 2. by dividing a leaf into multiple pieces for example fleshy succulent plants like sanseviera or the snake plant and other succulents. Other methods of propagation like cane or stub cuttings, root cuttings, leaf bud cuttings and so on.
- Gardening on Terrace is Bad for the Building. This is not completely true unless your building is too old with a poor construction. Otherwise if wisely planned, a garden on terrace will not be a problem, like placing the heavy containers along the walls on your terrace which are weight bearing or main walls of the building and things like that.
Water proofing the terrace is not always necessarily, unless you plan to build raised bed terrace garden. If you grow in container, you only need to check whether the water draining out of the pots is easily flowing out of the terrace and not stagnant.
- Does Electric Current affect Plant Growth? Well, there is a separate science called electro-culture farming which utilizes this effect. I have conducted a simple experiment on this topic to study the effect of electric current on plant growth. You can watch that episode from an end-screen link or from garden tips channel.
Now let us now install a grow light for our indoor plants. Grow lights are not expensive now a days. You get simple grow light bulbs for smaller plants, full spectrum grow light panels which even support flowering and fruiting. I have shown them all in my earlier episodes on indoor gardening.
Now, coming to this led grow light strip. This is a good option for certain areas in your home and add to the beauty of your home interiors. These led strips come in various lengths like in meters. Depending on the requirement you can order these grow light strips from amazon or any other reliable shopping website. These are waterproof strips and come with a sticker at the back surface. You can see this partition panel and I have created these two compartments for indoor plants. I have done wiring from inside for power supply. The most elegant way to install these led strips is to use these aluminum profile light channels which again come in various sizes. Here I am using 17mm channels. You need to cut a groove for this 17 mm channel.

Now let us first assemble these led light strips. You can measure the length of the strip needed and how many strips you require and make a cut at this point marked on the strip. This not rocket science. Its simple DIY thing. If you want to join two strips together, you can use these connectors of proper sizes to hook in the ends of the strips. Or you can just solder wires to the ends. Make sure you have a color coding for positive and negative terminal and not to reverse the polarity. It’s clearly marked on the strip.
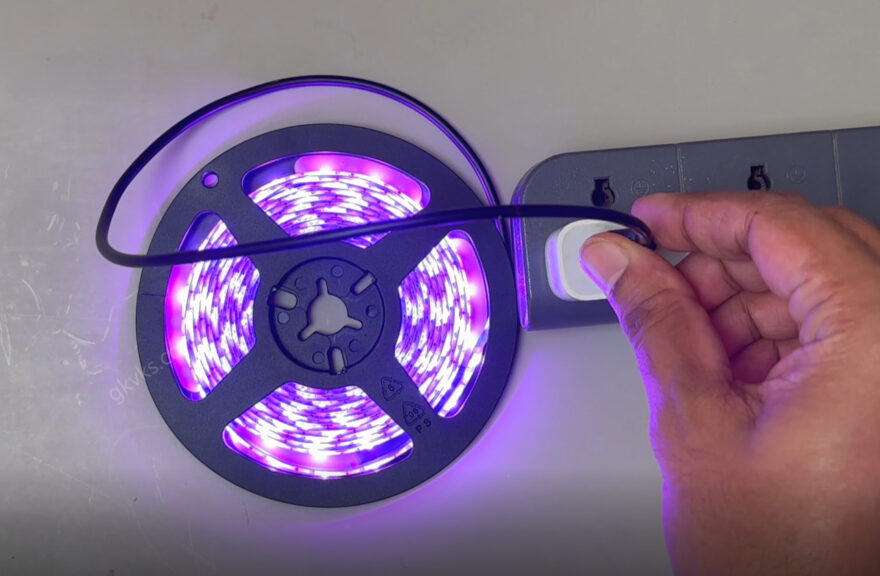
Depending on the specifications of your strip, you need to provide proper power supply, like in this case its 5 volts power needed for this strip for which you can connect it to any mobile charger or a socket with USB charging facility which has 5 volts supply. You can solder or join the wires from any USB cable to this led strip. Then you can stick the strip to the aluminum channel and fix the channel to your plant compartment area. That’s it. You can power these on for 10 to 12 hours a day depending on the plant you are growing under it. Make sure the distance of plant is not too much from light source.
- Simplest method is to use a taut wire on a wall preferably a pvc coated GI metal wire which is easily available at hardware stores. Just fix the ends tightly on a wall and make multiple rows and hang your vertical plastic pots on them.
- Use a mesh – metallic GI mesh like this one and fix it at a convenient place and hang the pots. I prefer pvc coated GI wire mesh like this one for obvious reasons like no rusting and no hassles of painting it frequently. If you have any trees or poles in your garden, just wrap them around and tie some plastic or metallic ties. Then hang your pots in the desired fashion.
- The third option is if you can afford a professional vertical garden setup like this. This is easily available online from amazon and other websites. Depending on the dimensions of your wall you can choose multiple wall panel sets. Each panel is 6 inches wide by 18 inches in length. So first fix these panels by drilling on the wall and then fix it with screws. Then just hang all your vertical pots. These are available in various attractive Colors and these pots are not expensive. Then plant your favourite plants and setup your beautiful vertical garden wall.
Please watch video above.
We all know that Composting can return a significant portion of the nutrients we waste back to the Earth, where they can do so much good for plants, animals and also humans. Conventional methods of composting like Bokashi’s anerobic method or even the conventional method of aerobic composting can take a lot of time like atleast a couple of months, before we can use the finished compost for our plants. And these methods involve quite cumbersome procedures and techniques like turning the compost pile every other day and stuff like that. I have done a detailed tutorial on Composting A to Z like the Basics of Composting, various methods of composting, what are greens and browns, etc. You can check that post HERE.
In this article, we will demonstrate you an absolute fastest way to compost your food waste in less than 24 hours. Thanks to the latest technology by reencle which brings you this Kitchen-to-Garden-Fertilizer-Composter. Its an electric composting machine which can turn food scraps into garden fuel.
Let us unbox and test this fastest composting machine and check how fast it can compost food scraps within few hours. This handy gadget effectively composts up to 2 pounds of food waste every 24 hours and returns 90% of it back to nature!
Now, Let us quickly learn How this gadget works? Reencle’s technology emulates the animal or human digestive system, that’s pretty much similar to how the beneficial microbes in your gut help digest what you eat. The specific microbe that does the job is the Reencle-Microbe , They have just named it as Bacillus. Like in Human digestive system the process of digestion starts by breaking of larger chunks of food by the teeth, this work is done by Reencle mixing rods which chop larger food waste particles into smaller ones. In Human system, the Stomach churns the food, secretes Gastric juices and enzymes that help in digestion – that’s both mechanical and chemical action. In Reencle composter, this job is done by the Reencle Microbe Bacillus which breaks down and transforms food waste into compost. This Bacillus has great ability to decompose organic matter such as Carbohydrates, proteins and even fats.
Now, Lets quickly look at the this Elegant gadget. What’s in the Box?
When you order a Reencle, you get 1 x Reencle Prime Composter, 2 x Reencle Prime – Carbon Filters (1 x pre-installed, 1 x replacement filter), 1 x ReencleMicrobe Packet, 1 x Reencle Handy Shovel, 1 x Power cable, A user manual with 1-year warranty, and also a composting guide sheet.
Let me show you the parts of this composting gadget. This is the Small lid, The bid lid, the stirring or the mixing tank with rods and blades. These are the touch buttons. This is a foot motion sensor which automatically senses and open the door when you approach near the machine. This one is Purifier carbon filter behind, you get another spare filter with your order. These knobs on either side for lifting the composter. You can check complete details and order at Reencle website reencleus.com. You can find the link in the description below. This is not a very expensive gadget. It costs about 499 dollars with the new year sale going on.
Now let’s Start Composting using Reencle.
The first thing to do is to prepare or activate the composting microbes. This looks like saw dust powder initially with lot of useful stuff in it. You can also see paddy husk, activated charcoal pieces and lot of stuff. Just open the lid and pour the entire packet of this microbe powder into the machine and then add about 1.5 litres of clean water to it and close the lid. Turn the machine on and leave it for 24 hours. After few hours you can open the lid to check. If its looking too dry, then add or spray some more water. Water condensation on the underside of the lid is a good indicator of sufficient hydration of the compost mix.
After 24 hours, you are ready to start making your first compost. Simple concept here is – the new activated microbes are not strong enough to digest too much of load and all types of food waste in the initial 3-4 weeks. You start with lighter foods like Rice and bread first. Also its better to make smaller pieces of the food items for faster and smooth composting.
Now, After 12 hours, you don’t see any food waste, its all disappeared. Its really fast. It completely composted after 24 hours. So this way for initial few weeks you can add lighter foods.
After this period, you can add most of the food waste, except a few items which I shall mention shortly. Make sure you cut large-sized food waste into smaller pieces. Also rinse and put salty and seasoned food waste.
Acceptable food wastes which can compost faster include – Fruits, Vegetables, Cooked Meat and Fish, Grains, Noodles, Cookies, Bread, Cooked egg, etc.
Acceptable Food Wastes that can slowly decompose include – Pizza Crust, Watermelon peels, banana peels, Radish, Cabbage, Cucumber, Sweet potato and other Raw vegetables.
Unacceptable Waste includes – obviously plastics, Bones, Butter, Cream, Oils, Raw Meat, Roots, Uncut Fruit and Vegetables, Large seeds of Stone Fruits, Hard shells like walnuts, Egg shells. Eggshells will not decompose but will only be broken down into small pieces. Egg shells take a long time to decompose. You can check my detailed post on egg-shells and its uses in garden.
I am sure, you will have a lot of questions in your mind about Reencle composter. You can check their website and an online guide book that answers most of these questions.
If you want to take composting to the next level and generate a 24 hour supply of nutrient rich fertilizer for your home garden, this is a great gadget to invest and I would certainly recommend this product. You will be really happy to see the compost ready in 24 hours which can never happen in conventional methods of composting. I shall use this compost on my plants, experiment more on this and get back to you with an update later on.
Happy Gardening and A very happy new year!
Aloe vera is sometimes known as “the plant of immortality” – because of its properties to heal, soothe, and refresh. This is because Aloe vera is rich in nutrients, enzymes, and antioxidants that offer numerous benefits to the human body. So, what if I told you that aloe vera can provide many of those same benefits to plants too? Yes! It’s true! Let’s list out the top 6 benefits of Aloe vera for plants and your garden.
6. Seed Germination: Aloe vera is not only a rooting agent, but also promotes healthy seed germination and strong seedlings. Watering your seeds and seedling once in a week will improve the overall growth and yield. Mix 1 teaspoon of aloe vera gel per litre of water or 1 table spoon per gallon. Spray this over the seedlings or water them once weekly.
5. Plant Immunity: Aloe vera gel is fully loaded with over 75 beneficial useful nutrients and enzymes like amino acids, antioxidants, calcium, magnesium, zinc, salicylic acid and so on. High levels of acemannan and saponin found in aloe vera both provide antibacterial, antifungal, and antiviral properties. This helps to protect plants and confers resistance or immunity against certain harmful microbes, fungi, yeast, mold, blight and so on. Just water the plant once in a while – like once in a month with aloe vera solution and see the difference. It not only gives resistance against diseases but also boosts overall growth and health of the plant. Add 1 table spoon of aloe vera gel per litre of water or a quarter cup per gallon of water, mix it well and water your plant. If you start this in early growth stage of a plant, it’s actually much beneficial in the long run.
4. Transplant Shock: Certain high levels of antibacterial, antifungal, and antiviral compounds found in aloe vera help plant recover from transplant shock. A plant goes into Transplant shock when you repot it or transplant it from one place to another. The plant looks wilted and unhealthy after transplant. To help recover from this shock, you can water your plant with aloe vera solution at least once after repotting. Repeat after 3 – 4 days if necessary. Add 1 table spoon of aloe vera gel per litre of water or a quarter cup per gallon of water, mix it well and water your plant.
3. Fertilizer: You can either make a soil drench or a foliar spray. To make a soil drench, take some fresh aloe vera leaves and cut them into pieces and throw them into the blender and add some water. You don’t need to peel them. Add half a cup of this gel to one gallon of water or 2 table spoons per litre of water and water your plants with this solution once 15 days. Make sure you drench this within half an hour of making, because if exposed to air, fresh aloe vera quickly ferments and begins to degrade.
The second preparation is a foliar spray or foliar feeding your plants to help them absorb these beneficial nutrients directly through the leaf stomata. You need to make a fresh aloe vera solution like one table spoon per litre of water or quarter cup per gallon. You can sieve this to prevent your sprayer getting clogged. Mix it well before spraying. Spray more on the underside of the leaves because leaf stomata or openings are more concentrated on the underside. Spray this in the evenings to avoid quick evaporation in the presence of sunlight.
2. Natural Rooting Agent: The salicylic acid and other anti-bacterial and anti-fungal compounds help promote rooting faster. There are many methods to use aloe vera for rooting: Let’s look at them one by one:
a. Dipping the cuttings into fresh aloe vera gel and inserting into soil. I recommend you soak the cutting for few hours into aloe vera gel and then plant the cuttings into soil. This will not only promote faster root development but also the success rate of rooting cuttings is high because aloe vera fights fungal rot.
b. Second method is just inserting the cutting into a small piece of aloe vera leaf and plant the whole thing into the soil to achieve the same results.
c. A piece of aloe vera can be used for Air Layering to multiply your favourite plants with great success rate. Just wrap a piece of aloe vera leaf and wrap around soil or toilet paper and tie the ends.
1. Pesticide: Aloe vera alone may not act as a potent pesticide to fight all pests and diseases. You need to other natural agents to make it a powerful organic pesticide that fights common garden pests like aphids, mealybugs, whiteflies and so on. Let’s quickly learn how to make this organic pesticide using Aloe vera leaves plus 5 more ingredients from your kitchen.
– Take Fresh Aloe vera leaves and cut into small pieces and drop approx one bowl into your blender.
– Drop four to five green chilies.
– Add 1 large onion.
– Add 1 full garlic.
– Add one bowl of Neem leaves if you have.
– Add 2- 3 teaspoons of Turmeric powder or fresh turmeric rhizomes if you have.
– Add a cup of water and blend into a fine paste.
– Sieve this solution and collect the extract.
– Mix 100 ml of this to one litre of water or 300-400 ml of it per gallon and spray it on the affected plants. Repeat this after 4 to 5 days.
- What is an Insecticidal Soap?
Insecticidal soap a.k.a soap salts, is an organic pesticide made of potassium salts of fatty acids and is derived from plant oils like coconut oil, olive oil, etc.
The difference between soap salts and regular soap is the alkali used in making this. In bar soap, they use sodium hydroxide, whereas in insecticidal soap they use potassium hydroxide to make potassium salts of long chain fatty acids which are considered safe, non-toxic and eco-friendly and infact approved for use as an organic pesticide. As always, we always recommend you not to use hazardous chemical fertilizers and pesticides in our website.
PURCHASE LINKS:
Insecticidal Soap (Potassium Soap Salt) Concentrate: https://amzn.to/3vBBzzk
GardenSafe Ready to Spray Insecticidal Soap: https://amzn.to/3hD9MWV
- What is the mechanism of Action of Insecticidal Soap Spray?
Insecticidal soap acts by contact. It kills insects in three ways:
- It damages their cell membranes, causing the contents of the cell to leak out, leading to dehydration and death.
- It melts the protective wax that covers certain insects (mealybugs and other scale insects) and this leads to dehydration from evaporation.
- It blocks the pores through which insects breathe, leading to asphyxiation and death.
The pest treated usually dies very rapidly, within minutes of treatment.
- What are the insects and pests that are sensitive to Insecticidal Soap Spray?
Insecticidal soap is most effective on soft-bodied arthropods, a group that includes most plant pests like Aphids, Earwigs, Leafhoppers, Mealybugs, Sawfly larvae, Spider, mites, Thrips, Whiteflies and even Small caterpillars. Apart from these, insecticidal spray is also recommended and very effective for treating powdery mildew disease. Identify Various Pests here!
- What are the insects that are not harmed by Insecticidal Soap?
Normally, the pollinator insects like bees, butterflies, ladybugs, lacewings, etc. are not harmed by insecticidal soap.
- Ready to Buy Formulations of Insecticidal Soap:
You have two options to choose. One is Ready-to-use insecticidal soap spray that comes packaged in a spray bottle. The second option is to buy a concentrated solution. You have use some 5ml per liter of water and then spray on your plants. Many gardeners like the idea of the ready-to-use product because it’s already mixed in the correct proportions so there’s very little risk of plant damage. The bottle may be labeled as “Suitable for Organic Use,” or “Safer for Plants and Vegetables,” but if it is a true insecticidal soap, its bottle will list “potassium salts of fatty acids” as ingredients. Please check this composition before purchase.
PURCHASE LINKS:
Insecticidal Soap (Potassium Soap Salt) Concentrate: https://amzn.to/3vBBzzk
GardenSafe Ready to Spray Insecticidal Soap: https://amzn.to/3hD9MWV
- How to use these Insecticidal Soap Sprays?
Before we go to making your own powerful insecticidal spray, let’s learn how to use these commercial formulations. The ready to spray bottle is simple to use. Just shake well before use and start spraying thoroughly on the affected areas of your plant. If you have the concentrated solution of the insecticidal spray, use 5ml per liter of water or as directed in the bottle usage instructions. Mix well and spray the plant thoroughly or wet the plant completely, because It is effective only when it is wet and has no residual effect. In other words, it loses all its effect once it dries out. But the pests usually die very rapidly, within minutes of treatment. You may also perform a patch test before using it for the first time. We will discuss about it later.
- DIY Powerful Pesticide Recipe:
The active ingredient in insecticidal soap is the soap, itself. While many homemade recipes may tell you to add additional stuff, such as garlic, chili powder, etc, the insecticidal soap is actually the main ingredient. We will make the recipe for 1 liter of water in this demonstration.
- Take 1 liter of water in a container which can be closed (Distilled water is best. Do not use hard water)
- Add 1 full teaspoon of mild liquid soap – like hand wash liquid. Do not use stronger ones like dish wash soap. Liquid soaps contain potassium salts of fatty acids which are soap salts.
- Add 1 full teaspoon of vegetable oil like coconut oil to this. Now this will be your home made insecticidal spray. But to add more power to this, you need to add Neem oil to it, like about 5 ml, especially if the pests infestation is too extensive or resistant to any of the treatments.
- Mix it well by closing the cap and shaking it well for few minutes.
- Fill your spray bottle and shake every time before you spray.
- Both the liquid soap and the oil act as surfactants to help keep the solution from quickly running off the plant’s leaves when sprayed. The longer the solution remains on the plant’s foliage, the better the chance of killing the pests.
- What is Patch Test?
Whenever you make or use a pesticide for the first time, always do a patch test on a leaf first before spraying on the entire plant. You never know, how strong it is and may damage your plant. So, first spray it on a leaf or branch and wait for 1 or 2 hours. If the leaves start wilting, then its too strong to use. Dilute it accordingly and use.
- How often Should I spray?
For pest prevention, spray plants thoroughly with insecticidal soap once in 10 – 15 days. For treatment once weekly or max twice weekly. And after a heavy rain, you have to reapply the spray.
- Can I store this solution once prepared?
You can refrigerate it to store. But always better to make fresh solution every week.
PURCHASE LINKS:
Insecticidal Soap (Potassium Soap Salt) Concentrate: https://amzn.to/3vBBzzk
GardenSafe Ready to Spray Insecticidal Soap: https://amzn.to/3hD9MWV
- Rooting Hack: For faster and guaranteed rooting of stem or branch cuttings, take a small piece of fresh aloe vera leaf and insert the cutting into it and then plant into the soil. Roots grow as early as 10 days depending on the plant you choose.
- Candle Hack: Seal the upper cut end of your plant stem or branch cutting using few drops of candle wax. This helps prevent moisture evaporation and result in faster rooting.
- No Browns for Composting? Use a paper shredder and use the shredded paper and card board to add into your compost bin for faster and smell free composting.
- Easy Tomato Stakes: Tomato plants require support to avoid awkward bends and also to get the best yield. String Support your Tomato plants using a small piece of GI metal wire. Make it into a U-shaped loop and insert it near the roots. Tie one end of a string to this and the other end to some support at the top.
- Banana Peel Fertilizer for Flowering: To make banana peel tea, soak pieces of banana peels in water for 2 to 3 days. Dilute this liquid with water in 1:5 ratio and water your plants to provide potassium to your plants which increases flowering in plants and also makes the flower size bigger.
- Anti-Gravity Plant Support: While growing climber veggies, do not take them to a height above 6 feet, but instead support in a slope like fashion, like take it to a height and then slope the growing ends downwards to assist in long-distance transport of water and nutrients for healthy growth. The arch like trellis is the ideal support fence for growing climber or creeper veggies.
- Hairs to Roots: Insert tomato seedlings as deep as possible to increase the density of roots formed from tiny hairy projections from tomato stems and this makes the plant stronger to produce the best yield.
- Big Leaves: To get large sized leaves in your money plant, use a moss stick or coir stick to anchor the aerial roots to it. Wet the moss stick whenever you water the money plant.
- Onion + Aloe Vera Rooting Agent: Making a paste using onion and aloe vera gel and dipping the cuttings into it for few minutes before planting in soil will help in faster and guaranteed rooting.
- Spoon Transplant: To transplant your seedlings, use a spoon, dig out as much soil with it including the roots of the plant and hold the leaves of the plant and not the STEM to pull out, because this can squeeze and damage the water and food conducting tubes – xylem and phloem and the little plant may die.
- Grow From Junk: Never throw away a pine apple crown, just remove the bottom leaves and keep the bottom inserted into a glass of water for a week and then transfer to a container. It will bear fruits within a year.
- Eggshell Water: One eggshell contains about 2gms of calcium. When you boil eggs, a small percentage of this calcium and phosphorous is released into the water. Do not throw away this water, but use it to water your plants that require a lot of calcium – like tomatoes and peppers as well as flowering plants.
- Cello Tape Pest Trap: Wrap the cello tape in reverse on your fingers and use the sticky part to touch on leaves infested with pests like aphids, whiteflies and mealybugs.
- Clay Soil Hack: Remove Clayey or sticky soil from roots using this simple Hack: When you bring your plant from a nursery and start repotting, most often you find they have stuffed the plant in a clay-rich sticky soil. You can remove this soil without damaging the roots by soaking the root ball in water for few minutes till this soil dissolves. Then you can repot this plant in a well-draining potting mix.
- Root Teasing: Always Loosen up or tease your roots before repotting into a new container.
- Toilet Paper Cloning Hack: Use Aloe vera and Toilet paper to produce roots faster during air layering your favourite plant.
- Aspirin Hack: During conventional air layering to produce faster and better roots, use one tablet of aspirin 350mg per litre of water and add this water you’re the potting mix and then wrap it around the injured stem for faster and dense root formation.
- Hydroponic Cloner: For faster rooting, make your own hydroponic plant cloner using a plastic bucket and an aquarium pump. Healthy Roots develop within 8 days.
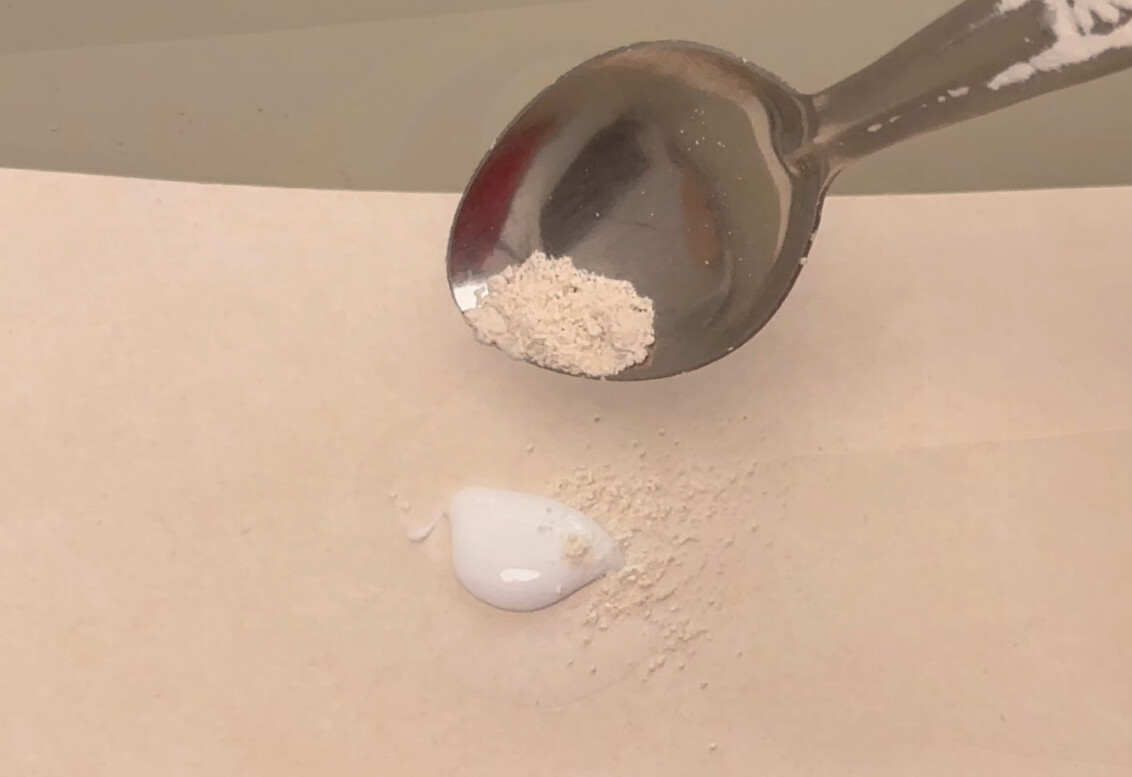
- Free Calcium: Egg shells easily dissolve in vinegar and release free calcium to your plants. Make egg shell powder and the add about a cup of vinegar to a cup of egg shell powder and stir nicely and leave it for any hour. Then dilute this to 1:100 or more to water your plants and treat acute calcium deficiencies which can produce blossom end rot disease in your fruits and veggies.
- Simplest Plant Cloner: Use any container and place a couple of aquarium air stones to pump oxygen into the water. This helps in faster and guaranteed rooting of any plant cuttings in water.
- Wheel-Barrow: No Wheelbarrow to move garden stuff? Do not worry, the cheapest alternative is a large cloth or an old bed sheet. Just load on the heavy objects and drag it along.
- Aspirin for Rooting: When you propagate cuttings in water, do not forget to add a small piece of Aspirin tablet into it for faster and stronger root development.
- Seed Split Trick: Split the Cilatro or Corinader seeds before planting them the sand paper paper method and apply gentle scraping pressure to split the seeds and do not crush or damage them using a heavy objects like these. This helps to grow enormous cilantro harvest.
- Scrape and Sow: Use sand paper to scrape the hard seed cover of certain seeds like apple, chickoo and those with hard seed over for faster seed germination.
- Treat Leaf Curl Virus using Asafoetida: Take 500ml of sour butter milk. Add one teaspoon or about 5 gms of Asafoetida powder to it and mix well. Let it stay for 1 or 2 hours. Sieve this solution and Spray thoroughly over the affected plant including the underside of the leaves. Repeat this, every 3 days for 3 – 4 times to completely cure the leaf curl disease.
- Egg Shell Planter: You can use egg shells to sow seeds. To make drainage holes, scrape with a sand paper and use a thin drill bit to make a hole without breaking the shell.
- Egg Trays: Card board Egg trays can be used as seed germination trays. You can directly transplant the seedling along with the card board into the soil, as this is bio-degradable.
- Chalk Sticks: Chalk is chemically Calcium Carbonate. You can bury a chalk stick into the soil while planting your veggies. This really works wonders for plants like Tomatoes, Peppers, squashes, egg plants and almost any vegetable plant.
- Strong Roots: Strong Roots means a healthier plant with a better yield. In its early growth phase, adding a source of phosphorous like bone meal powder or organic rock phosphate powder will produce stronger roots and produce a better harvest.
- Seed Viability Check: An Easy method to check viability of your larger seeds is to pour them into a bowl of water. If the seeds are floating, this means they are dry and not viable. Discard them and use only those seeds that sink to the bottom.
- No Garden Gloves? Scrape your nails into a soap before working with your garden soil or potting mix. This helps in cleaning your hands easily later on and also the dirt won’t enter into your nail beds.
- Repel Animals: A simplest way to repel Some animals like cats, dogs and rabbits – is to soak a some pieces of cloth with vinegar and stuff them in some areas of your garden. These animals cannot withstand the smell of vinegar and may not return if you repeat this process for few days. Similarly using Asafoetida wrapped in a piece of cloth will deter these animals and certain insects.
- Magnifying Lens: Use a Magnifying Glass to closely examine and diagnose your plant pests and insects to identify them and follow the treatment accordingly.
- Tea Fertilizer: You can also use tea waste or coffee grounds on flowering plants as an organic fertilizer to boost blooms.
- Tea waste compost: Add used tea waste or coffee grounds into your compost bin for faster composting because earth worms digest them very fast.
- Seed Spacing: You can do perfect seeds spacing for Tiny seeds like spreading them apart in a row on toilet paper – for better visibility and even spacing and sowing. You can make a seed tapes either in a row or a square or round seed board specially for carrot seeds for even spacing and better growth and ease of harvesting.
- Over-Ripe: Garden vegetables and fruits that become over-ripe are an easy target for pests. Remove them as soon as possible to avoid pest growth.
- Faster Germination: A simple hack for faster germination and healthy seedlings is to soak seeds in Epsom salt solution for a couple of hours before planting – like half a teaspoon of Epsom salt in 100 ml of water. You can also spray Epsom salt solution on your seeds and seedlings for healthy outcome.
- Pick Small: You can Pick small seeds for sowing with a stick or tooth pick dipped in water.
- Acidify Soil: For Acid loving plants like Rose, Hibiscus or Hydrangeas, use 5gms of Alum powder in 1 litre of water once every 15 days and this will boost flowering.
- Soil PH Test Using Litmus Paper: Mix Water and Soil in 1:1 ratio. Dip the litmus paper and match the color with your color coding chart that came along with your litmus paper kit.
- A Rough Soil PH Test Method: Take a soil sample and pour some vinegar. If it fizzes and bubbles you have an alkaline soil. What if the soil is acidic? Add baking soda one or two teaspoons and mix it with soil. Then wet the soil baking soda mix with distilled water. If it fizzes and bubbles your soil is acidic, because the acidic content in soil reacts with a base or alkaline stuff like baking soda.
- Free Bio Seed Pots: Never throw away the toilet paper card board roll. But use it to make seedling cups which are bio degradable and can be directly planted into soil without disturbing roots.
- Paper pots: You can also make seed pots by rolling newspaper and even this is bio degradable and similarly you can directly transplant with the pot into the soil or into a larger container.
- Mosquito Repelling Plants: Growing plants like Lemon grass, Citronella, catnip, basil, marigolds, eucalyptus and many other plants helps deter mosquitoes.
- Turmeric Treatment: You can use turmeric powder from your kitchen treat and prevent rose-dieback disease after pruning your rose bush.
- Silica Gel Packets: Never throw away these tiny sachets, use them in your seed storage container as desiccants which increases your seed life and protects them from fungus.You can also use these to preserve and protect powdered gardening stuff like bone meal, fungicide powder, rooting hormone, etc. Just tape the sachet to the underside of the container lid and that’s it.
- DIY Watering Can: Take the base of a soda bottle and place it around one end of a pvc pipe. Heat it up with a lighter. It should shrink and clamp around the open edge. No glue needed. Use a pin and poke some holes in the bottle base. Next, cut the edge of the pipe at an angle using a saw blade. Next insert the pipe into the inlet and use some hot glue to hold it in place. Optionally, colour it to get that beautiful look.
- Mini Green House: Use plastic bins or containers as mini green houses or poly houses for faster seed germinations.
- Do Not Kill: Avoid spraying a pesticide on the flowers. This is to avoid any harm to beneficial Pollinator insects like butterflies and honey bees which are essential for pollination and fruit formation.