When it comes to propagating or multiplying plants, our mind usually jumps to taking branch cuttings and trying to root them, but most often end up with poor results. But what if I told you that there are 5 different ways to multiply plants with 100% success results, especially for those difficult-to-root trees or woody or semi-woody branches? Even a newbie gardener can easily succeed in these methods. And moreover, these methods will produce genetically identical new plants which will carry all the characteristics of the parent plant. Let’s start these one by one.
5. SIMPLE LAYERING: This is the easiest method and many a times this process occurs naturally. This can be accomplished by bending a low growing or a flexible branch to the ground. You can optionally injure or strip the outer bark to expose the cambium layer of the branch for faster rooting. You can optionally apply a rooting hormone powder if you have. Then, Cover part of it with soil, leaving the remaining 6 to 12 inches above the soil. You can keep some weight over it to prevent it from coming out of loose soil. Make sure you keep watering your plant regularly. The rooting will start within 4 weeks. Once you see roots, you can separate it from the mother plant and transfer it to an independent container.
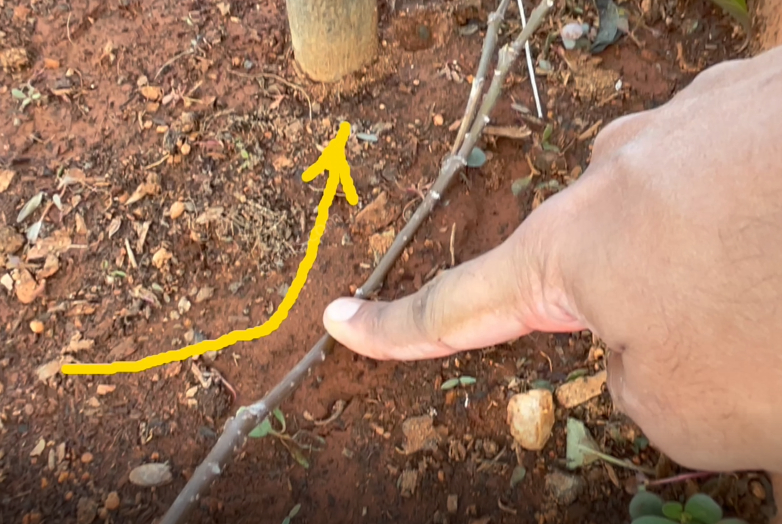
4. TIP LAYERING: This is quite similar to simple layering method. Dig a hole and Insert the tip of a plant branch shoot and cover it with soil. The tip grows downward first, then bends sharply and grows upward. Roots form at the bend.
3. CLASSIC AIR LAYERING: This method has further two variations depending on whether the plant is a Monocot or a Dicot. This is actually very interesting. Quick differences between monocot and dicot trees. Monocot – One Cotyledon, Dicot – Two cotyledons. Monocot – Parallel veins, Dicot – Branching veins, Monocot – Fibrous root system, Dicot – Tap root is must, Lastly Floral petals usually in multiples of three in monocots, whereas in dicots they are in multiples of four or five.
Alternately, if you know the name of the tree, you can simply google it whether it’s a monocot or dicot.
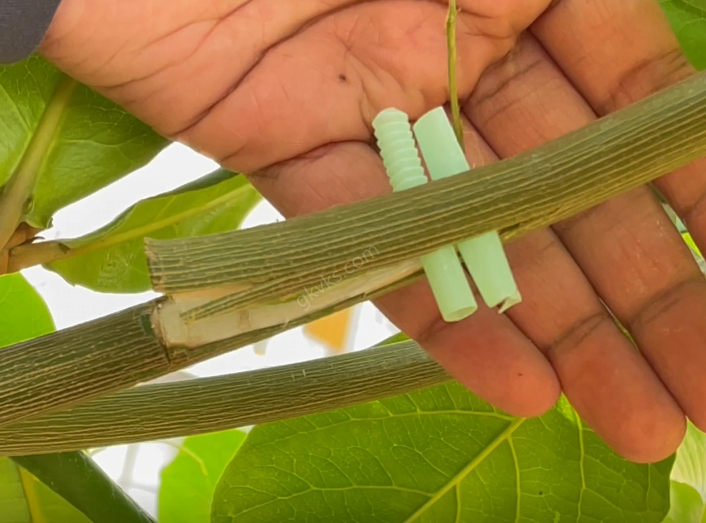
For monocots: Make an upward 1 to 11⁄2-inch cut about one-third through the stem. The cut is held open with a toothpick or wooden match stick or any small piece of plastic. Now you need a growing medium or air layering mix. This can be a simple peat moss, or cocopeat, or sphagnum moss or even just plain soil. Here I am using a mixture of cocopeat and compost. You have to make it fully moist first and then wrap around a polythene sheet and surround the wound with this air layering mix, about a handful of it. Hold in place tightly using anything to tie around at both ends, like with cable ties, twist ties or electrician’s tape, strings or whatever you have. Tie each end of the plastic securely, to retain moisture and to prevent water from entering in. If exposed to the sun, the plastic should be covered by any dark cloth or Aluminum foil if you have.
For Dicots: the process is similar, except a 1-inch ring of bark is removed from the stem. With a sharp knife, make two parallel cuts about an inch apart around the stem and through the bark and cambium layer, just below a node. Connect the two parallel cuts with one long cut. Remove the ring of bark, leaving the inner tissue exposed. Scrape if necessary to properly peel the tissue and to prevent a bridge of callus tissue from forming. Apply some rooting-hormone powder to the exposed wound if you have. But this is optional. Then wrap around a polythene sheet and surround the wound with the same air layering mix. Then tie both ends with cable ties, twist ties or string or anything. If exposed to the sun, the plastic should be covered by any dark cloth or Aluminum foil if you have. Rooting should start within 4 weeks. You can open it after 4 to 6 weeks to see the roots filling in and then cut off this branch below this level and plant it independently.

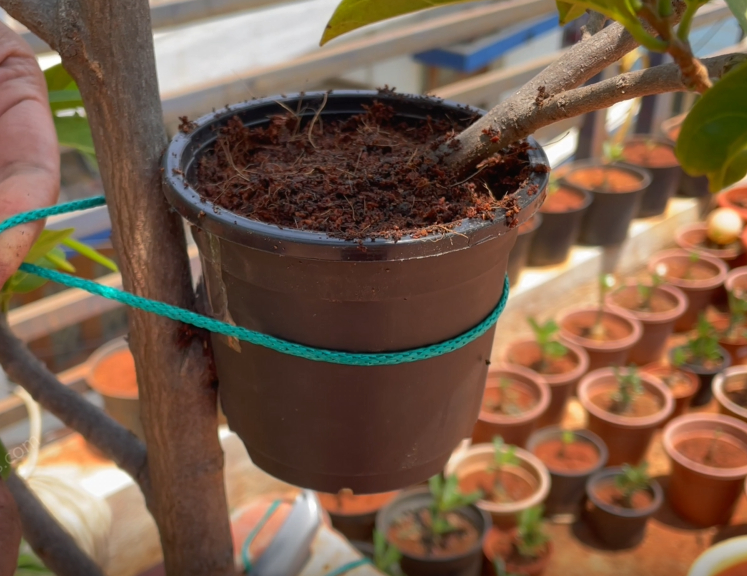
2. POT LAYERING: This is just a variation of classic air layering methods. You use pots for air layering in this method. Just strip off the bark with a sharp knife to expose the inner tissue. Now cut through a plastic pot and fix this to the branch. You can use anything to tie it properly to the branch, like a duct tape, cello tape or strings. Fill the pot with the potting mix. And finally water this and cover it with a polythene cover to retain moisture. Rooting should start within 4 weeks. You can open it after 4 to 6 weeks to see the roots filling in and then cut off this branch below this level and plant it independently.
1. WATER LAYERING: This is another variation of air layering where we use water as growing medium. This is very useful for monocots but also works on dicots. Take any waste plastic bottle and cut a small window at its upper middle part. Now make an upward 2 inch cut about one-third through the stem. Then the bottle is introduced through this cut and fixed using some strings or ties. Fill the bottle with water. Make sure you support the branch with some stick or support or else the branch can break off easily. If exposed to the sun, this can be covered by any dark cloth. You can add a quarter tablet of aspirin 350 mg to this water for faster rooting. Aspirin is acetyl salicylic acid which helps in faster rooting. Roots start as early as 10 days. You can cut of this from mother plant and replant it to an independent container.
The Bonus Tip is adding Aspirin tablet – like one tablet in 1 litre water and mixing it with the air layering mix to make it moist. For bottle or water layering, you can drop a quarter tablet directly into the bottle. For pot layering, you can water the pot with this solution and for classic air layering, you could mix it while wetting the mix or if you have forgotten, you can load it in a syringe and inject into the air layering pouch. You can read a detailed post on the uses of aspirin in gardening here.
If you haven’t watched that yet, please check HERE.
This simple Hack am showing you today will actually overcome one limitation of using air stones or other similar bubblers, That is they get clogged easily, specially if they are of low quality. After watching this hack, you may not feel like purchasing air stones at all. Yes, this is a permanent solution to this drawback of using air stones or similar stuff.
What you can do is: Just take two Ball pens like these. These are the famous Reynolds pens. Am sure all of us know about these pens.
Remove the refills and make tiny holes into the white plastic body by heating a needle. Make tiny holes as many as you want.
Then connect the air tube to the open end of the pens and place them into your cloning chamber. That’s it.
You can see how nicely and uniformly the bubbles are appearing. Also one more point and update is: you need not keep the bubbler continuously switched on. You can switch it on and off intermittently or atleast for 10 minutes 2 or 3 times in a day to get best results.
Also if you have a PH testing gadget, try to maintain the ph of the rooting solution or water to a slightly acidic ph of around 6.0 for best results.