This Hydroponic two in one plant cloner can be a very nice school project for kids and instil an interest in them in gardening.
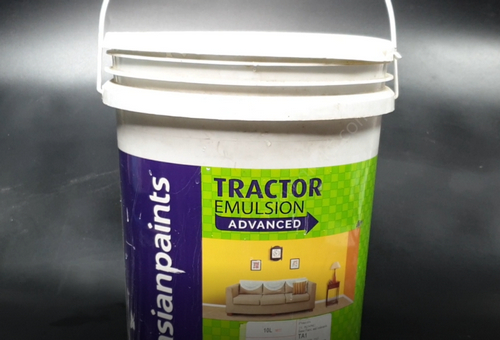
First of all, you need at least a 20 litre or a 5 gallon plastic bucket with a lid. The cheapest solution to this is to use a 5 gallon empty paint bucket which is easily available from any junk store or perhaps from your store room.
Take out the lid and carefully drill some holes on it. Firstly you need to mark the diameter of these holes on the lid. First decide, what you want to insert, 1 inch hydroponic collars or your own diy foam inserts or 1 inch net pots or 2 inch net pots, depending on what you want to grow.
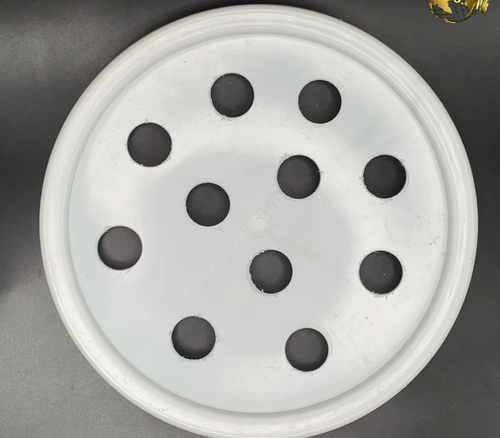
Here I want to insert 1 inch foam inserts or 1 inch net pots, so that I get more number of slots to insert. So, mark the slots on the lid properly spaced and as many as you want. Make sure, the diameter of each hole should not be more than the diameter of the pot. The top diameter of this pot is max 3 cm, and the bottom is 2 cm. So 2.5 cm or 1 inch is the ideal cut out for inserting these pots.
Now using a 1 inch hole saw bit or door knob drill bit or whatever you call it, carefully make as many holes you want. 5 or 10 or whatever number you want. Do not make them too close to each other, the first reason is because, this can make the lid weaker and secondly there can be root entanglement underneath the lid once the plants start to grow.
Now if you want to use it as a plant cutting cloner or plant propagator, you need to make few 1 inch foam collars to insert your branch cuttings. These are readily available to purchase – like these Neoprene hydroponic collars or you can easily cut out any thick foam – that’s recycling some packaging foam from your junk. Try to carefully cut the sizes, and the top diameter should be little more than 2.5 cm. If you have a thinner foam sheet, you can cut and paste multiple pieces with glue and make these foam collars to insert cuttings. Making a cut from one side towards the centre is better to easily insert your cuttings without damaging the nodes, rather than making central holes into the foam, because the thickness of the cuttings also can vary.
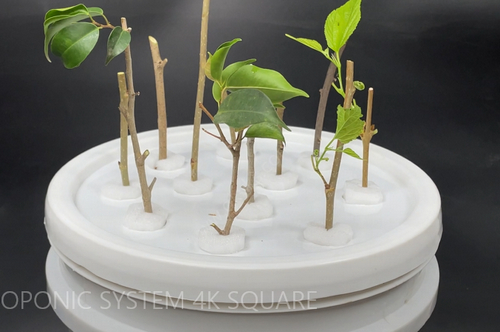
So you can insert these foams to make it a plant cloner device or install net pots to use it for hydroponic growing.
Now let’s look into setting up pipes inside this bucket. You just need a 16 mm drip irrigation pipe like this and a T-connector. I got this again from my store room from my left over stuff I used for my drip irrigation for home done for my terrace garden.
Now measure the inner circumference of the bucket, 1 or 2 inches below the rim. Cut a 16mm pipe of this same length and make a circle using 16 mm pipe into the inner side of the bucket. Connect this T-connector to complete the cirlce.
Now fix or place a small pump like this at the bottom. This is again very cheap submersible pump. You can use a 12 watt or 18 watt pump depending on the size of your bucket. If you want to make a larger hydroponic system, you can use 18 watt or more.
Now measure the vertical dimension left between the pump and the t-piece and cut out 16mm pipe piece and connect one end to T-piece bottom and the other end to the pump.
Now Punch some holes into this 16mm pipe circle using the drip hole-maker and insert these little sprinklers or sprayers uniformly – like each around 2 inches apart or some 8 to 10 of them.
Optionally, fix this loop to the bucket with some cable ties or twist ties. Then take out the wire of the pump from the top of the bucket to avoid leakages.
Now pour water into the bucket, about half or less than half to test the system or the sprinklers by connecting the pump to power supply.
Now let us take some plant cuttings, a few ficus cuttings, a few mulberry tree cuttings. You can try any cuttings. Please follow the basic rules of taking cuttings like 45 degree cutting angle and other stuff we have already discussed in one of our post on 10 rules of cloning plants.
Now insert these cuttings, first into the foam collar and then insert the foam collars into the holes and keep it turned on.
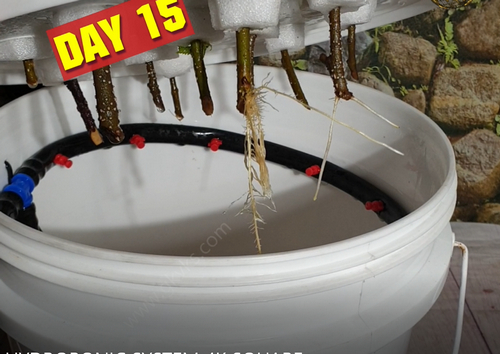
Now let’s look into the results on Day 8 and on Day 15.
On Day 8, You can see rooting has already started in most of the cuttings. In this setup roots develop faster, the main reason is oxygen supply which is directly taken up from the air. If we go into the details of hydroponic and its types, we are using Nutrient film method in this setup. You can also add nutrient solutions to this water, like mainly phosphorous to start rooting faster. Once rooting starts, introduce Nitrogen and Potassium into the water like how you do in hydroponic farming. Another hack to induce rooting faster is to add half or 1 tablet of Aspirin 350mg dispersible tablet into the water. Aspirin is acetyl salicylic acid and induces rooting faster.
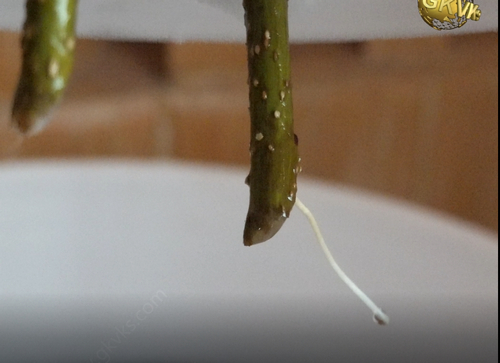
On Day 15, you can see more roots have started growing, with nice new set of leaves growing in to start photosynthesis. This is really fast when compared to conventional method of growing a cutting in soil, which usually takes 4 to 6 weeks time. You can also see some cuttings have progressed faster with more root formation and healthy roots. And you can also see nice foliage growth and even fruit formation in these mulberry cuttings. One simple tip here is: Snip off any fruits early to redirect the plant energy or rather conserve the energy for root and leaf development for now.
You can repot these into independent containers after 4 to 6 weeks once sufficient roots develop.
Few years back we made use of the Deep Water Culture type of hydroponics to make our plant cloner by using air stones.
When it comes to propagating or multiplying plants, our mind usually jumps to taking branch cuttings and trying to root them, but most often end up with poor results. But what if I told you that there are 5 different ways to multiply plants with 100% success results, especially for those difficult-to-root trees or woody or semi-woody branches? Even a newbie gardener can easily succeed in these methods. And moreover, these methods will produce genetically identical new plants which will carry all the characteristics of the parent plant. Let’s start these one by one.
5. SIMPLE LAYERING: This is the easiest method and many a times this process occurs naturally. This can be accomplished by bending a low growing or a flexible branch to the ground. You can optionally injure or strip the outer bark to expose the cambium layer of the branch for faster rooting. You can optionally apply a rooting hormone powder if you have. Then, Cover part of it with soil, leaving the remaining 6 to 12 inches above the soil. You can keep some weight over it to prevent it from coming out of loose soil. Make sure you keep watering your plant regularly. The rooting will start within 4 weeks. Once you see roots, you can separate it from the mother plant and transfer it to an independent container.
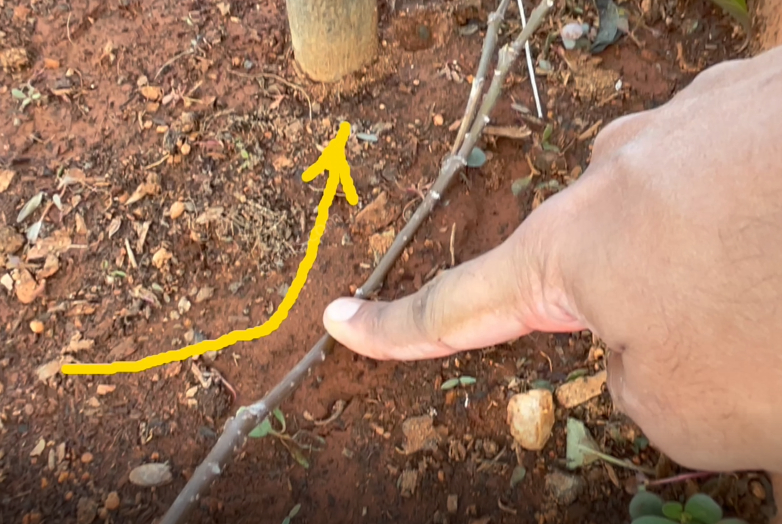
4. TIP LAYERING: This is quite similar to simple layering method. Dig a hole and Insert the tip of a plant branch shoot and cover it with soil. The tip grows downward first, then bends sharply and grows upward. Roots form at the bend.
3. CLASSIC AIR LAYERING: This method has further two variations depending on whether the plant is a Monocot or a Dicot. This is actually very interesting. Quick differences between monocot and dicot trees. Monocot – One Cotyledon, Dicot – Two cotyledons. Monocot – Parallel veins, Dicot – Branching veins, Monocot – Fibrous root system, Dicot – Tap root is must, Lastly Floral petals usually in multiples of three in monocots, whereas in dicots they are in multiples of four or five.
Alternately, if you know the name of the tree, you can simply google it whether it’s a monocot or dicot.
For monocots: Make an upward 1 to 11⁄2-inch cut about one-third through the stem. The cut is held open with a toothpick or wooden match stick or any small piece of plastic. Now you need a growing medium or air layering mix. This can be a simple peat moss, or cocopeat, or sphagnum moss or even just plain soil. Here I am using a mixture of cocopeat and compost. You have to make it fully moist first and then wrap around a polythene sheet and surround the wound with this air layering mix, about a handful of it. Hold in place tightly using anything to tie around at both ends, like with cable ties, twist ties or electrician’s tape, strings or whatever you have. Tie each end of the plastic securely, to retain moisture and to prevent water from entering in. If exposed to the sun, the plastic should be covered by any dark cloth or Aluminum foil if you have.
For Dicots: the process is similar, except a 1-inch ring of bark is removed from the stem. With a sharp knife, make two parallel cuts about an inch apart around the stem and through the bark and cambium layer, just below a node. Connect the two parallel cuts with one long cut. Remove the ring of bark, leaving the inner tissue exposed. Scrape if necessary to properly peel the tissue and to prevent a bridge of callus tissue from forming. Apply some rooting-hormone powder to the exposed wound if you have. But this is optional. Then wrap around a polythene sheet and surround the wound with the same air layering mix. Then tie both ends with cable ties, twist ties or string or anything. If exposed to the sun, the plastic should be covered by any dark cloth or Aluminum foil if you have. Rooting should start within 4 weeks. You can open it after 4 to 6 weeks to see the roots filling in and then cut off this branch below this level and plant it independently.

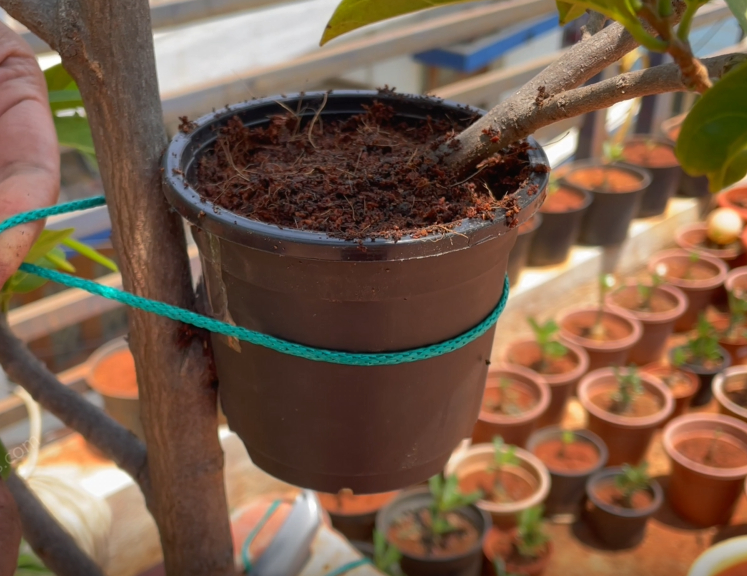
2. POT LAYERING: This is just a variation of classic air layering methods. You use pots for air layering in this method. Just strip off the bark with a sharp knife to expose the inner tissue. Now cut through a plastic pot and fix this to the branch. You can use anything to tie it properly to the branch, like a duct tape, cello tape or strings. Fill the pot with the potting mix. And finally water this and cover it with a polythene cover to retain moisture. Rooting should start within 4 weeks. You can open it after 4 to 6 weeks to see the roots filling in and then cut off this branch below this level and plant it independently.
1. WATER LAYERING: This is another variation of air layering where we use water as growing medium. This is very useful for monocots but also works on dicots. Take any waste plastic bottle and cut a small window at its upper middle part. Now make an upward 2 inch cut about one-third through the stem. Then the bottle is introduced through this cut and fixed using some strings or ties. Fill the bottle with water. Make sure you support the branch with some stick or support or else the branch can break off easily. If exposed to the sun, this can be covered by any dark cloth. You can add a quarter tablet of aspirin 350 mg to this water for faster rooting. Aspirin is acetyl salicylic acid which helps in faster rooting. Roots start as early as 10 days. You can cut of this from mother plant and replant it to an independent container.
The Bonus Tip is adding Aspirin tablet – like one tablet in 1 litre water and mixing it with the air layering mix to make it moist. For bottle or water layering, you can drop a quarter tablet directly into the bottle. For pot layering, you can water the pot with this solution and for classic air layering, you could mix it while wetting the mix or if you have forgotten, you can load it in a syringe and inject into the air layering pouch. You can read a detailed post on the uses of aspirin in gardening here.
If you haven’t watched that yet, please check HERE.
This simple Hack am showing you today will actually overcome one limitation of using air stones or other similar bubblers, That is they get clogged easily, specially if they are of low quality. After watching this hack, you may not feel like purchasing air stones at all. Yes, this is a permanent solution to this drawback of using air stones or similar stuff.
What you can do is: Just take two Ball pens like these. These are the famous Reynolds pens. Am sure all of us know about these pens.
Remove the refills and make tiny holes into the white plastic body by heating a needle. Make tiny holes as many as you want.
Then connect the air tube to the open end of the pens and place them into your cloning chamber. That’s it.
You can see how nicely and uniformly the bubbles are appearing. Also one more point and update is: you need not keep the bubbler continuously switched on. You can switch it on and off intermittently or atleast for 10 minutes 2 or 3 times in a day to get best results.
Also if you have a PH testing gadget, try to maintain the ph of the rooting solution or water to a slightly acidic ph of around 6.0 for best results.
In my previous video titled – the 10 Tips to Cloning plants in water – that is duplicating your plants from stem cuttings in water, we learnt many scientific concepts like the Nitrogen draining concept and the Oxygenation concept. We will use these simple concepts in building our Simple Plant Cloner Device.
So, lets start building this device step by step.
1. THINGS YOU NEED or Parts of this Cloner:
– The CHAMBER (container holding water and cuttings): The dimensions of this container depends on how many insertions or how many cuttings your want to insert into this setup. You can choose any opaque container like a rectangular box or even a bucket with a lid or even a small jar or anything. What I am using is a 12 inch x 6 inch glass Aquarium. Actually roots develop faster in dark and this also prevents algae growth in the container. I am using this transparent container for this experiment for recording purpose. Actually I will be covering this on all sides with a black cardboard paper like what you see in the video. Well! The next component is:
– The Top Platform which suspends cuttings into the chamber: You can use a plastic sheet or any tray or simply a Styrofoam or thermocol sheet. This platform can also be build in such a way to accommodate net pots to plant seeds or even insert cuttings – that will be a two in one plant cloning device plus a hydroponic chamber for growing plants and seeds. If you want to build a sturdy or a more permanent device, you can use a container like this and make holes and accommodate net pots of about 1 inch diameter and you can place your cuttings into the netpot and add some pebbles or clay balls or anything so that the cuttings are held in place properly.
We will build a dedicated hydroponic chamber and discuss on Hydroponics, Aquaponics and Aeroponics in another video some other time. These are actually interesting topics and not so difficult as they sound.
For now, I will show you the simplest form of this plant cloner or bubbler device and how to contruct it easily with various options. Well the next components you need are!
– Air-Pump, Airline Tube and Air-stone. Yes! All these are aquarium stuff. This is based on the oxygenation concept. The cuttings requires oxygen for rooting, instead of daily stirring the water by lifting the cuttings as we saw in our previous video, we can make this a Hands free process using this bubbler apparatus which continuously provides oxygen and hence rooting starts early. You can use either air stones or even an air-stone strip like what you are seeing here as air bubbler. If you use this strip, a single nozzle pump would be sufficient. You can also use an aquarium sponge filter for this.
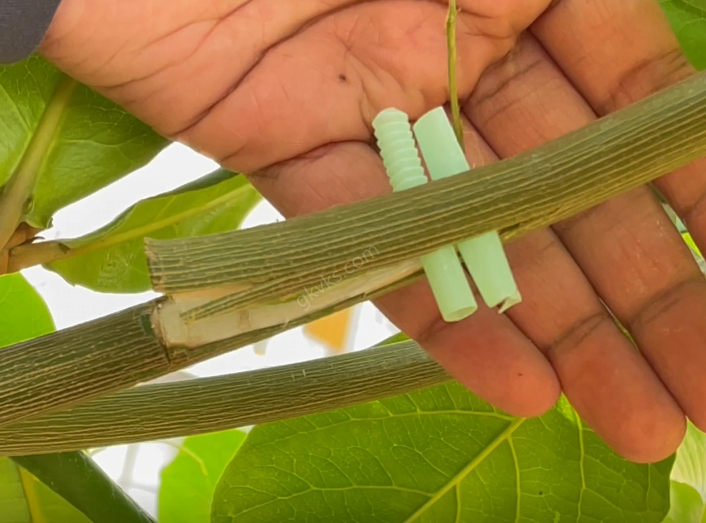
– Then to insert cuttings, you can use any hack and make a hole in your top platform. The main idea is to hold cuttings in place. If you just use a thermocol, you need a thicker sheet and insert cuttings through a hole otherwise it may not fit snugly. And depending on the top platform, you can use anything like netpots, or plastic foam plugs, neoprene collars, and even holders like this. I don’t know what these are called! I think they are table grommets. This is just to hold the cuttings in place. If you have any more ideas on this please share with us in the comment box below the video.
PURCHASE ONLINE LINKS:
Air Pump, Tube and AirStone Pack: https://amzn.to/2AaVecp
Net Pots: https://amzn.to/2AaTG20
Hydroponics Kit: https://amzn.to/2AcwbFM
Mini Drip Irrigation Kit: https://amzn.to/2AaUGTT
The simplest one is just a piece of Styrofoam with holes in it to insert the cuttings. That’s it ! Insert your cuttings and then Just drop this sheet into the chamber and switch on the air bubbler.
Now the time for results and the conclusions.
Well, The most surprising part to me was the result on Day 5 – As you can see one of the cuttings – that is actually a cutting from the rose plant sucker growth. Its has so much potential for rooting and has started rooting in 5 days. Where as the other two neem cuttings did not start rooting till the 8 th day, but this last eranthemum plant cuttings has just started rooting. And One more important point, I have never changed the water till this 8 th Day. This is just the same water with the air bubbler continusouly switched on. And no additional stuff like rooting hormone added. Just dropped on aspirin tablet into the container on day 1. That’s it.
So Now the inferences drawn from this experiment. The rooting process is complex one and depends on many factors like the plant type, genetics, thickness and hardiness of the branch, pathogens, growing medium like water or soil and the oxygen availability around the vicinity of the rooting zone and many other factors.
This method of cloning plant cuttings in water is an age-old practice.
If you want to increase the success rate of growing plants in water or rooting your cuttings in water, you need to follow certain simple tips. The most important advantage of this, whether cuttings are grown in soil or water or even air layering, you get an identical copy of your Parent plant (also called the Stock Plant). But This is not the case with seed grown plant, which differs significantly from its Parent plant.
Please Watch all these Steps and Tips till the end to achieve a great result and have fun with your gardening hobby. Also some scientific concepts specially Tip #4 and Tip #8 like the nitrogen draining concept and the oxygenation concept may be completely new and really interesting to most of us. Also Some of these tips are common when you are propagating cuttings in soil. With these simple tips and scientific concepts, you can achieve a success rate of nearly 100 percent.
- 1. Taking Healthy Cuttings:Yes this is the first and foremost job which is most important to achieve a good successs rate. Take a cutting from a healthy mother plant, which is free of pest and disease and has good active growing branches. Choose Semi-woody cuttings, not hard woody or too soft ones which can easily rot.Making a Sharp Cut at 45 degree angle. A sharp cut with a sharp cutting tool or blade is also an important factor for success. Preferably sterilize the cutter with some disinfectant like hydrogen peroxide or any household antiseptic like Dettol.
Cut about half an inch below a node – this is the area where rooting starts and which is to be inserted into water or your rooting solution.3. Length of Cuttings: This is generally 6 to 10 inches or atleast 2 or 3 nodes above the rooting node. The length depends on the internode distance of a branch. Remember one rule of thumb: , the success rate of cloning is inversely proportional to the internode distance. That means the lesser the internode distance, the greater the chances of success.
4. Drain Out Nitrogen for the Branch: As you all know, nitrogen slows down rooting process. Pouring lot of water on the plant or the branch which is to be cut, is believed to drain out nitrogen. Do this and then take your cuttings from the plant. I don’t know how this happens. but if u know about the concept please let us know in the comments box below this video.
5. Do Not Fertilize your Parent Plant: Applying the same concept of nitrogen drain out, better not to feed the plant atleast 15 days prior to taking cuttings.
6. Prepare Rooting Solution: You can use just plain clean soft water. Better avoid salty water or chlorinated water to increase the chances of success. The second option is to add some ingredients into this water which serves two functions. First, prevents contamination and rot and secondly, it helps accelerate the actual rooting process. You have many options for this:
a. Rooting Hormone Powder with indole butyric acid or NAA (naphthalene acetic acid) – just add half a teaspoon of this to your glass or the container holding the cutting and mix it well. Add this everytime you change the water till the rooting starts.
b. Aspirin or willow water: Aspirin which is chemically Acetyl Salicylic Acid serves both functions, including rooting. You can watch a detailed video on this from a link at top right corner of this video.
c. Fresh aloe vera gel extracted from aloe leaf also contains salicylic acid and other ingredients which help in preventing rot and accelerate rooting.
7. Use Clean Containers and Change Water or your Rooting Solution every 2 to 3 days: Take clean containers preferably transparent ones, so that you can actually see through for the root development.
- Oxygenate the tissues: Yes this is another important tip for succuessful rooting. Lift the cutting out of the water once daily and stir the water atleast once to oxygenate it. Scientists have proved that plants need dissolved oxygen to survive and that the cutting will consume all the dissolved oxygen in the immediate vicinity of its rooting zone, so water needs to be stirred in order to maintain healthy root formation. This is infact the basics of Aeroponics and Hydroponics which will try to discuss in detail in some other episode.9. Submerge the cutting into water or your rooting solution, atleast 2 inches above the lowermost node, that is the rooting area. Keep it Undisturbed preferably on a window sill to receive indirect light and also optionally Suspend the Cutting into the Container through a plug like a piece of foam or a cloth. Also it’s a good idea to cover it with a polythene bag intermittently, specially in night time if its too cool. This is to provide the optimum temperature and humidity levels for rooting.
Now the Question is: what do I feed them: giving nutrients would be pointless until roots develop as the cuttings cannot absorb any mineral content. Once the rooting starts, you can feed with very dilute solutions of water soluble NPK or even very dilute compost tea. But one hack to counter the stress or the shock to these little cuttings. Vitamin B1 that is Thiamine in the rooting solution is thought to help alleviate any stress, like how we use Epsom salt solution to water the plants to counter transplant shock. This effect of vitamin B-1 is actually derived from researches based on tissue culture media. But I am not sure of this and the mechanism of action and the molecular concepts behind this.
10. Transplant into Soil: Once you see multiple roots atleast 4 to 5 roots of atleast about an inch in length, you can carefully transplant into your potting mix.
Well, The name itself sounds so interesting – The Mother of Millions and the Mother of Thousands. These are two different succulent plants and both belong to the same Crassulaceae family and genus Kalanchoe. They are actually considered as Toxic weeds by many, but they are really beautiful ornamental plants if grown with caution, like keeping them away from pets and children. All parts of these plants are poisonous and contain a very toxic steroid known as daigremontianin.
The Botanical name of Mother of Thousands is Bryophyllum or kalanchoe daigremontianum, also called alligator plant, or Mexican hat plant. By seeing this clip, You can easily understand why its called Alligator plant and Mexican hat plant. Sometime its also known as devil’s backbone, though another plant called pedilanthus or the zig zag plant is known as devils backbone.
Now, the mother of millions which is botanically Bryophyllum or kalanchoe tubiflorum. Also known as chandelier plant.
The basic difference between these two is:
- The Shape of their leaves. Mother of Thousands has broad, tear-shaped leaves. These leaves always grow in pairs, each leaf on opposite sides of the stem. If you closely look at the edges of the leaves, you’ll see they have little ridges. That is where their baby plants called as plantlets or buds develop. These plantlets, or buds, grow all along the edge of the leaf. A happy, healthy leaf will have full of babies around its margin. Leaves also rush to grow babies if they are damaged or think they’re about to die.
These plantlets are literally miniature plants. They are already growing and performing photosynthesis, while still attached to their mother. Most even produce roots in addition to their leaves like the one you see in this clip. They eventually fall on the ground and grow as independent plants by this natural process. That’s a huge advantage for these plants, because regular plants have to grow or propagate from seeds by natures process!
- Mother of Millions, on the other hand, has very narrow leaves. The plantlets on these leaves only grow at the end of the leaf, near the tip. Usually there are between 2-4 babies on each leaf. Am not sure though more plantlets per leaf are produced by mother of thousands, and why this plant is called mother of millions. If you know this answer, please let us know by commenting below the video. I think may be, the number of stalks arising from the same plant are more in number than the mother of thousands.
Care tips and propagation techniques, which are common for both these plants:
They are easy to grow succulents, and actually they are very much loved by beginners, because they do not require much care. The care is just like any other succulent plant.
- Watering: They need to be less frequently watered, only if the soil is dry.
- Soil: They grown in any type of soil, but do very well in any well draining soil with some compost to nourish.
- Sunlight: They prefer indirect bright light and do not tolerate direct sunlight.
- Fertilizers: Not actually needed. But once a month feeding with liquid water soluble NPK or compost tea is good for home gardening level.
Propagation: As I have discussed earlier, It is able to propagate vegetatively from miniature plantlets that develop on its leaf margins. This is unique method of propagation of this plant. But this plant also develops flowers and can be propagated via seeds.
Now One Simple hack for this plant: Actually if the plantlets are seen on this plant, it indicates that the plant is healthy and you can separate these plantlets carefully, preferably if roots have developed and then just place them in soil and each plantlet will develop into a new plant. And if there are no plantlets, you can still propagate multiple plants by cutting a mature leaf and half burying it in the soil. Actually in nature, this plant sheds its leaf not able to bear its weight and this develops plantlets and the propagation proceeds.
So, there we have it folks, that was about these interesting succulent plants.