The word ‘organic farming’ has become one of those buzzwords you are hearing everywhere. No wonder! It is tragic that in today’s era of rapid agricultural production, the use of chemical fertilizers and chemical pesticides has brought disastrous effects on public health and our beautiful mother earth is contaminated with all left over chemicals. Organic Farming comes to our rescue. Organic Gardening and Farming is based on using natural methods like the use of natural fertilizers and natural pesticides for plant growth and pest control and a complete NO to synthetic or chemical fertilizers and pesticides.
Having said that, Let us preview two special books on organic farming using unique ultra-low cost methods which are really effective in horticulture. These books are even available in eBook editions at amazon.
The First book: JADAM Organic Farming – The Ultra-Low Cost Agriculture – second edition published in 2016.
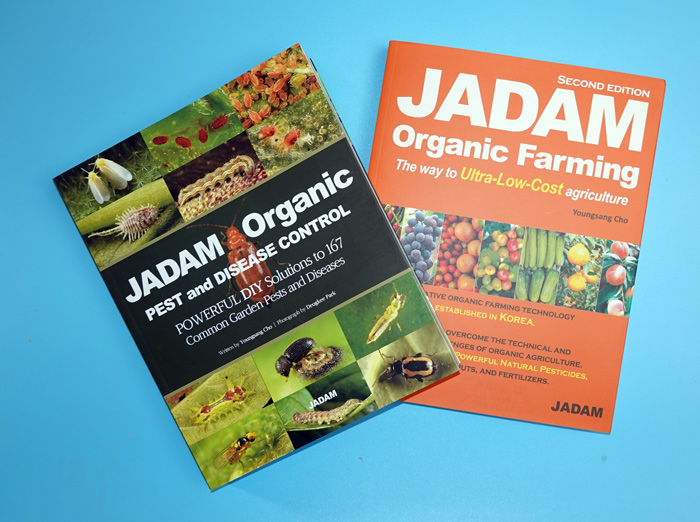
The second book: JADAM Organic Pest and Disease Control with Powerful DIY Solutions to 167 common pests and diseases, published quite recently in June 2021 and probably I am the first to review this book.
About the Author: Dr. Youngsang Cho, from South Korea with over 30 years expertise in organic farming with a Master’s Degree in Horticulture and PHD in Plant pathology. He learnt agricultural technology from his father, Hankyu Cho, who was a founder of Korea Natural Farming (KNF). He started his agricultural research since 1991 and developed several low cost innovative technologies in organic farming and plant pest and disease control. These books are translated into 20 different languages and available worldwide.

Let’s First Preview:
JADAM ORGANIC FARMING – The way to Ultra-Low-Cost Agriculture.
This is the second edition of this book published in the year 2016 and the first edition was published way back in 2013. This book has about 379 pages.
The thing which I like most in this book: are these Four Aims of JADAM Farming Technology: SIMPLE – principles are simple and not complicated, EASY: Easy to make and use, SCIENTIFIC: that’s based on scientific research and results and lastly EFFECTIVE: these are highly effective and ultra-low-cost.
Now let’s check out Contents of this book:
So many interesting chapters starting from basic principles, Soil managment tips, Natural pesticides for all types of pests and much more. We will quickly flip through few pages and see how useful this book is.
- Some new concepts of symbiosis with grass or weeds looks interesting to me. This is explained in detail and scientifically.
- The Current State of our Soil – contaminated by chemical pesticides and fertilizers.
- Leaf Mold Soil, Seed and Seedling Treatment using leaf mold soil.
- No-Till Soil Management method using landscape fabric.
- The Main Chapter on Making Organic Fertilizers – which has topics like Natural Mineral Water, DIY Advanced Irrigation System, DIY electric Power Distribution Board,
- Making of JADAM Microorganism Solution (JMS), JADAM liquid Fertilizer, using boiled potatoes, Grass, Food Waste, Human Excreta, Fish meal and a lot of other stuff, like how we discussed on the Waste Decomposer technology by National Centre for Organic Farming, Indian Agriculture, in one of my episodes. Everything explained with beautiful photographs and illustrations.
- Natural Pesticides. Jadam DIY Water Softener, Then Jadam Wetting Agent, Jadam Sulphur, Jadam Herb Solution and much more.
Let’s quickly Preview the second book by the same author:
Jadam Organic Pest and Disease Control with Powerful DIY Organic Pest Control solutions with proven effectiveness. This book is published recently in June 2021. This book has about 506 pages.
We will quickly look through table of contents: some basic principles, then natural solutions to various types of pests like Mites, Aphids, whiteflies, Thrips, scales, bugs, Moths and other pests and insects. Then about the beneficial insects – that’s biological pest control. Then a detailed chapters on various plant diseases like blackspot disease, mildew, blight, mosaic virus, Damping off and many more and controlling with JADAM natural pesticides. The effect of JADAM natural pesticide has been proven by the National Agricultural Research Institute. This book is beautifully explained with nice clear photographs and illustrations on various pests and diseases.
These books will certainly help bring a revolution in organic agriculture if implemented worldwide without the need of commercial pesticides and can reduce the cost of pesticides by more than 95%. I am certainly going to try some of these methods mentioned in these books and implement them.
If you have any questions about Organic farming, you are most welcome to visit jadam website and ask them through ‘Sharing JADAM’. Another good thing is JADAM has not patented any of its knowledge and technologies but shared it all through seminars, books, and their website. These books are available worldwide at Amazon both as kindle editions and hard copies.
Book Links:
(Sales are good around the world, so stocks are often out of stock.This book stock will be filled right away. E-books are also being prepared.)
– JADAM Organic PEST CONTROL BOOK: (https://amzn.to/3wkYGf7
– JADAM Organic Farming Book: https://amzn.to/3jqEgOf
– Jadam Website: https://en.jadam.kr
What’s in this article?
- A brief Introduction
- Why use this product?
- What are the various uses?
- How to use it for Mass multiplication, As a Bio fertilizer, As a Bio Pesticide,
- For Seed Treatment,
- how to make DIY micronutrient fertilizer using this product.
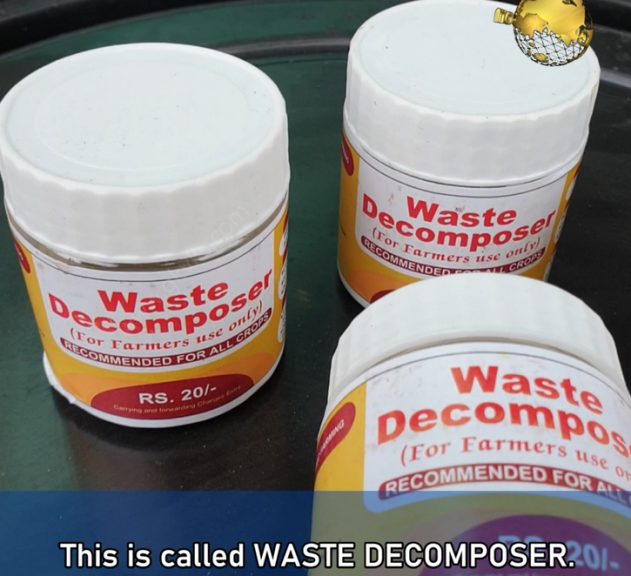
Currently, about 2 billion metric tons of waste is produced annually worldwide and only about 5 percent of this is recycled for composting. This means the waste is not managed properly and instead either dumped or openly burnt which can be really bio hazardous. To overcome this problem, the NCOF, ministry of Agriculture, India, developed a great product which is a consortium of micro-organisms, mainly azotobacter isolated from desi cow dung. And this took 11 years to standardise the mass multiplication technique at the farm level.
So, What is this Product Called? This is called WASTE DECOMPOSER. This is perhaps the world’s cheapest bio fertilizer and bio pesticide made till date. This product comes in a bottle of 30 gms costing just 20 INR per bottle, that’s less than 20 cents for international viewers and you need to buy only once because you can easily reproduce or do mass multiplication of this product and use it repeatedly for ever. A single bottle of waste decomposer decomposes bio-waste of more than 10000 metric tons in just 30 days and this bottle has a shelf life of 3 years. This is unbelievable.
So, Where to purchase this waste decomposer bottle? You can order this online from NCOF website or even amazon and these links below. International users can possibly import this product.
Amazon: https://amzn.to/2Spjj7G
NCOF website: https://ncof.dacnet.nic.in/
Now let’s learn how to use Waste Decomposer?
The first thing you should do is perform mass multiplication of waste decomposer. There is nothing sophisticated about it. It’s really a simple process. I will show you step by step.
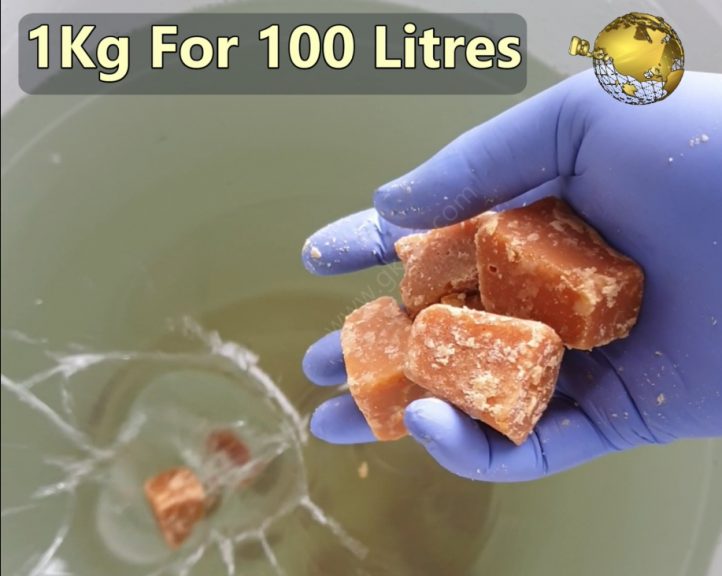
Take a Large Plastic Barrel like this one, preferably a 200 litres container. You can take even 100 litres or whatever you have.
Fill this drum with water.
Now add 2 kilograms of Jaggery for 200 litres of water or 1 kilogram for 100 litres. This is the food for these microorganisms.
Now take 1 bottle of waste decomposer and pour all its contents. Make sure you avoid direct contact of its contents with bare hands. Mix it thoroughly using any stick or any pipe.
Then cover the container with a cloth. You need to open this daily and stir the solution once in 24 hours.
After 5 days or max 7 days depending on the climate, this solution turns creamy which means now you have 200 litres of water decomposer ready to use.
We will discuss on the uses of this solution shortly. To restart mass multiplication, now you don’t need to buy waster decomposer again. After use, Just leave around 20 litres of this solution in the barrel and add water again, then add jaggery again and repeat the procedure to maintain this for ever.
Now let’s discuss on The Various uses of this waste decomposer:
1. SEED TREATMENT: Simply spray or sprinkle waste decomposer solution uniformly over the seeds. You can even soak the seeds if you are doing this on a large scale. This works on all types of seeds. Keep the treated seeds in shade for about 30 minutes and then plant the seeds. Seed treatment with waste decomposer shows 98% early and uniform germination and provides protection against various seed borne diseases and also plays a role in strengthening the plants defence mechanisms.
2. FERTILIZER AND SOIL TREATMENT: Watering with waste decomposer solution significantly changes the biological as well as the physical properties of all type of soil within 21 days of application and it also helps to generate earthworm population in the soil which is so beneficial. You can dilute the waste decomposer in 1:2 ratio with water, that is one part waste decomposer to 2 parts water and water your plants once every 15 days or even once in a month. This is also proven to control many soil borne diseases in crops.
3. FOLIAR SPRAY: It acts as a potent bio pesticide when sprayed on plants.You need to dilute it to 1:3 ration to use it as a foliar spray. This helps control a variety of fungal, bacterial and viral diseases in crops when sprayed once in 10 days for 4 times in the growth cycle of a crop.
4. COMPOSTING: This is a compost accelerator and your compost will be ready within 30 to 40 days depending on the type of waste used for composting. For conventional pile method of composting, you need to sprinkle waste decomposer for every layer of compost and maintain the basics of aerobic composting like maintaining moisture, aeration by turning the compost pile and stuff like that. You can check my 4 episode series on composting from a link in description below. If you do composting at home in small scale, you can sprinkle waste decomposer solution once or twice and get that compost ready within 30 to 40 days.
Now, Let’s prepare the DIY micronutrient rich organic fertilizer using this waste decomposer, as recommended by the national centre for organic farming.
The basic principle of making this micro nutrient fertilizer is: Adding foods that are rich in proteins, vitamins and major and minor elements including Nitrogen, phosphorous, potassium, iron, copper, zinc, calcium, magnesium, boron and so on. Adding these into the waste decomposer results in break down of these elements into soluble forms by the microorganisms, enzymes and organic acids present in waste decomposer.
Well, Now let’s prepare this fertilizer and learn how to use this for your plants.
First of all – Things You Need: We will prepare this in around 25 litres of waste decomposer solution. Do not worry too much on the quantity and over dosage. This is not a problem with organic fertilizers.
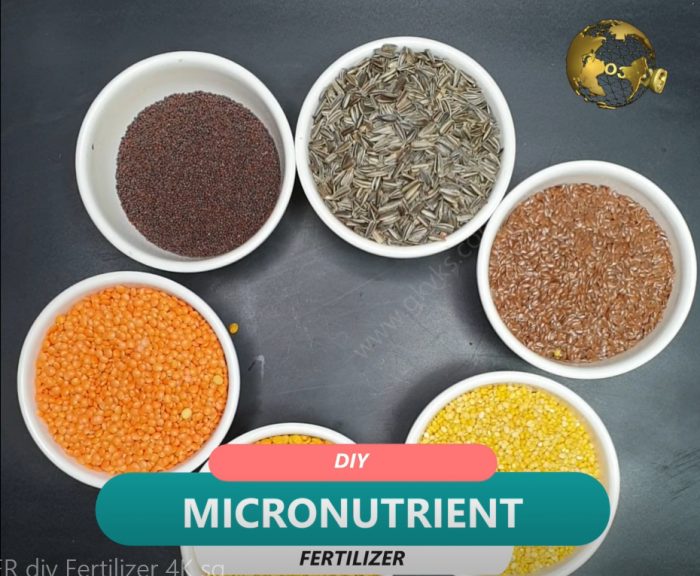
1. Atleast 3 varieties of Oil seeds like 100 gms each of sunflower seeds, mustard seeds, flax seeds, or any other like soya, castor oil seeds, nigella seeds or any 3 varieties.
2. 3 varieties of Pulses or lentils of your choice like Red Lentil (Masoor dal), Yellow or Green split gram (Moong dal), Bengal gram (Chana dal), You can also take Red gram (Arhar dal), Black gram (urad dal) and so on.
3. Some 4 to 5 old iron nails or any small pieces of junk iron stuff.
4. Some copper source – like some old copper wires extracted from wires lying in your junk yard or any old copper vessel if you have one.
5. Some Zinc source – like one or two dry cells which are made up of zinc container.
Firstly, powder these seeds and pulses, this helps in faster decomposition. Add these into 25 litres of waste decomposer. Now add iron nails, then copper wires, then the zinc source. Mix it well and leave it for 10 days. Do not forget to stir this once daily.
After 10 days, your potent nutrient rich organic fertilizer is ready. So, How do we use this. You can use it in 2 ways. One, as a liquid fertilizer to water your plants and secondly as a foliar spray to instantly feed your plants through leaves stomata.
For watering your plants, you need to dilute this to 1:5. That is one part of this liquid to 5 parts of water. Where as for foliar feed, you can dilute this to 1:10 and spray thoroughly on your plants including the undersides of your leaves, because the stomata or the leaf openings are more concentrated at the bottom side of leaves.
When plants and animals die, their molecules become available in soil for use by other organisms like bacteria and fungi. This product is the final break-down constituents of the natural decay or decomposition of plant and animal materials through the biological activities of micro-organisms. This product is commercially available in powdered form as well as liquid form for horticultural use.
How does this work on plants? It chelates the complex nutrient compounds in the soil to convert them to simple forms suitable for plant absorption. This reduces the fertilizer usage by upto 30% and increases flowering and fruiting by up to 70%. So, this is not a fertilizer, but a bio-catalyst and bio-stimulant for the plant. This is an excellent natural and organic way to provide plants and soil with a concentrated dose of essential nutrients, amino acids, vitamins and trace elements.
Before I reveal you the name of this product, let’s quickly know some of the functions or benefits of this powder.
- Improves Soil Structure by providing more space for root growth and beneficial microbial activity. They bind to soil molecules and improve soil structure, and this is especially noticeable in high-clay and compacted soils.
- Reduces Soil Toxins: They don’t just make nutrients easily available for absorption, but also chelate harmful toxins in the soil, preventing them from entering the plant.
- Increases Water Retention in soil by reducing water evaporation by upto 30%.
- Improved Microbial Activity in the soil and chelation of complex nutrient forms to simple forms for better uptake by the roots makes the plant grow healthier with little fertilizer application and increases flowering and fruiting.
Having said that, let’s know what this is called and how to use it properly for best results.
This is called Humus which consists of three components–humic acids, fulvic acids, and humin.
This is available as powdered form and also liquid form. The Liquid is a concentrated humic acid and needs to be diluted with water before applying on plants. Humic acid is easily available at your local garden store or you can even order online.
PURCHASE LINKS:
Now, Let’s learn how to use it. This is particularly beneficial if your plant has nutritional deficiencies due to poor absorption of nutrients from the soil, which manifests as various leaf yellowing patterns.
So, How to use this? Three Methods to use this:
- Soil Application: The Dosage is 1 teaspoon per litre of water. Mix it well and water 1 cup, that’s about 250 ml of it per plant. If you are using liquid humic acid, add 3 ml of it per litre of water. You should see results within 1 – 2 weeks.
- Foliar Spray: You can add one teaspoon of this per gallon of water and spray on the plants. 1 gallon = 3.78 litres. Please check the usage instructions on the product label and use accordingly. If you are using liquid humic acid, add 1 ml per litre of water for foliar spray.
- Compost Tea: You can add 1 teaspoon per gallon to your compost tea while brewing. This will certainly help in better absorption of nutrients. For beginners, Compost tea is made by adding compost like decomposed cowdung or vermicompost into water and allowing it to brew for 5 to 7 days and then you dilute this further like in 1:10 ratio and water your plants.
The three primary nutrients essential for plants are the NPK – Nitrogen, Phosphorous and Potassium. Nitrogen (N) is largely responsible for the growth of leaves on the plant. Phosphorus (P) is largely responsible for root growth and flower and fruit development. Potassium (K) is a nutrient that helps regulate important physiological processes or the functional processes in a plant.
Having said that, now let’s look into what is Rock Phosphate and the difference between Rock Phosphate fertilizer and Bone meal fertilizer.
Rock phosphate, also called phosphorite, is a natural mineral fertilizer obtained by mining from sedimentary clay deposits and rocks that contain phosphorus. Rock phosphate is a long-standing or slow release best organic fertilizer for adding phosphorus to your vegetable garden.
Both Rock Phosphate and Bone Meal are good sources of organic phosphorous for home gardeners. Bone meal is mainly used as a short term phosphorous supply and rock phosphate as a long term phosphorous supply, as it’s slower to break down plus it’s a non leachable source of phosphorous and calcium.
Now let’s look into 5 important benefits of using organic rock phosphate in gardening and How much and how to use it:
- STRONG ROOT SYSTEM: Rock phosphate promotes the development of strong roots throughout the growing stage of a plant and makes your plant healthy and high yielding by accelerating plant maturity.
- RESISTANCE TO PEST ATTACKS: a strong root system and a healthier plant means a plant highly resistant to pest attacks. Applying phosphorous at early growth stage of a plant will confer a great immune system and help resist pests.
- FLOWERING PLANTS: Any flowering perennial plant like rose and hibiscus love rock phosphate as it helps them develop more buds and larger sized flowers.
- VEGETABLES AND FRUITS: Strong roots, healthy immune plant and more buds means more vegetables and fruits. One or two applications of rock phosphate early in the growth stage is important to achieve this.
- Improves Soil Structure and water holding capacity. Rock phosphate is in Powdered form and hence can be mixed with soil and proves very beneficial while you prepare the potting soil before planting.
- EARTHWORMS and Beneficial microbes in soil are not harmed and infact they love it.
- DOSAGE and How to Apply: Best way is to mix the rock phosphate powder in your potting mix along with other stuff like compost, cocopeat or peat moss and others. This is because for proper phosphorous uptake by plants, the soil PH has to be slightly acidic and and adding compost like decomposed cowdung or vermicompost will help achieve this task. You can watch a detailed video on making the best potting soil here.
Well, Now, How to use Rock phosphate in potted plants and plants grown in ground or raised beds.
First of all loosen the soil around the plant by raking or tilling the top layer. For Potted Plants start with 1 teaspoon per container and then add 1 tablespoon after 15 days. For ground plants or raised beds start with 1 tablespoon per plant, preferably in its growing stage and then two tables spoons after 15 days. And this one time application will help your plant throughout its stages of growth till flowering and fruiting.
Before you throw away banana peels to trash, think twice! Banana peel is one of the highest organic sources of potassium. Potassium helps your plants by strengthening the stems and protects them from disease. It also helps the flowering process and is thought to be able to improve the quality of the fruit of your plants. Also in addition to potassium, it also contains phosphorous and calcium which are equally important for plants.
Let’s start the recipe for making banana peel fertilizer and then banana tea.
For Making Banana Peel Fertilizer:
- Collect some banana peels, preferably from ripe bananas.
- Next step is to dry these peels. You can dry whole peels or cut them into pieces for faster drying. You can sun dry them for atleast 2 days so that they become crisp and should break easily when you crush them. You can also dry them in microwave oven if you do not have adequate sunlight.
- Then once they are crispy and black, crush them to make a powder. That is it!
- This powder is our banana peel fertilizer powder.
- You can add one table spoon every 15 days around your plant and then water your plant. Preferably raking the soil before application is recommended. You should see some positive results within 3 months.
Then For Making Banana Peel Tea:
- You can take some banana peels and cut them into small pieces of any size.
- Add them into a bowl or any container.
- Add water to the container to soak these peels for atleast 3 days. All the nutrients from banana peel, mainly potassium is released into this water.
- You can discard the banana peels and use this banana tea in 1:5 dilution to water your plants.
Adding or burying raw banana peels directly into the soil around plants is not recommended, because its not only attracts insects and maggots but also it takes a long time to decompose and in its process of decomposition, it might even steal away nitrogen from the soil and your plant might develop nitrogen deficiency.