1. Here is the list of things required for the frame: A 3 to 4 feet long and a 3 inch calibre PVC pipe. 2 elbows of 3 inch for this pipe and some threading or plumbing tape. I am going to show how to build this setup in a kitchen window. You can use your own custom length of the pipe, based on where you are going to build it.
2. Next you need a power drill and a hole saw of about 1 inch, if you are using one inch net-pots. These netpots are hydroponic baskets where in we plant the seeds. We are going to plant 15 hydroponic baskets into this pipe, so marking the same on the pipe after measuring to divide the space equally. You need a hole saw of the same circumference as the middle of the basket itself. We need to make sure that the basket is only about halfway into the insert we are about to make.
3. Once done with all the 15 inserts, let us put some threading tape at the edges and stick the two elbows in place. You can also purchase pipe head closers, but I found elbows to be cheaper and much more convenient. Stick around towards the end of the video and you will know the reason behind this?
4. That’s it, our setup is ready. All we need is some clay pebbles, cocopeat or peat moss and these plastic net pots. These are actually very cheap to purchase online.
PURCHASE LINKS:
Net pots https://amzn.to/3snnJfg
Nutrient Solutions https://amzn.to/2ZOMjZW
Hydroponic Full Kit https://amzn.to/3uqqgHf
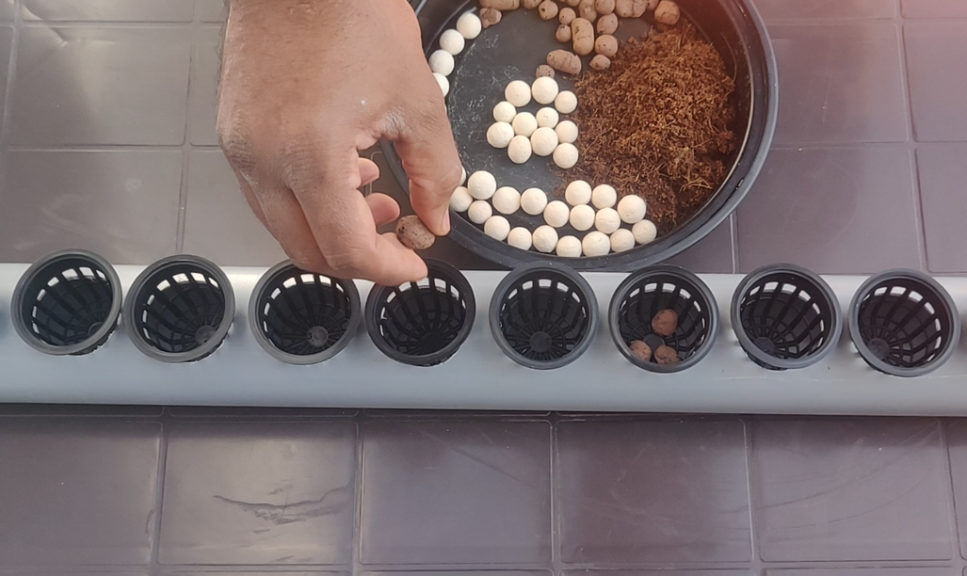
Let us get to planting the seeds now. First let’s insert the net pots into these slots. Let’s drop 3-4 clay pebbles in each basket. These pebbles not only give easy access to roots into the water but also maintain the humidity and help in keeping the pH of the water in check. Now let us add some cocopeat in each basket.
Now we can start sowing the seeds. We are planting Spinach, Coriander and Amaranthus seeds.
5. Once the seeds are dropped, let us now install the frame in place, on the kitchen window. Any place with indirect sunlight and good ventilation will do. Make sure that the setup is perfectly horizontal, so the water doesn’t flow to any one side. I am just putting a zip-tie on mine to hold it in place. Spray some water collected from the RO discharge outlet using a bottle sprayer till the coco peat is nicely moist.
6. Within 5-6 days we can see the seeds have sprouted and are 2-3 inches long. Amaranthus is doing very well as you can see in the video below.
7. A week after the setup was put in place, start checking for signs of roots underneath the baskets. They are extremely delicate so be careful not to damage these. Once you spot the roots you are ready to start the hydroponics.
8. Let us get our nutrient solution ready now. Before we start preparing nutrient solution, you need to know few basics of RO water purifier. We all have this RO water purifier installed in our homes. The main drawback of this is excessive water waste. everse Osmosis (RO) purifiers use membrane technology to filter dissolved impurities, the impure water is filtered out and is often called waste water or reject water. Because of the high level of impurities and dissolved solids, this reject water is not fit for drinking. But this water can be used for watering your plants.
So, to make the nutrient solution, All we need is 1.5 liters of water collected from the RO purifier discharge outlet. You will need to add 1.5 ml of Nitrogen, 1.5ml of Phosphorous and finally 1.5 ml of Potassium solutions to the water. These liquids are easily available from many online sellers. If you want to go completely organic hydroponic nutrient solution, you can use about 1:50 dilution compost tea made out of organic fertilizers like decomposed cowdung or vermicompost. We will discuss this in detail in some other post.
Well, now give it a good mix and pour it into the elbow opening of the pipe so it’s evenly spread out. We will also drop a small air-stone connected to an air pump into the pipe to maintain the oxygen level of the solution. And cover the open outlets of the elbows with some paper cups to avoid insects or dust getting in.
9. Here is the progress after two weeks. As you can see the leaves are healthy and green with absolutely no disease. This is one of the major advantage of using hydroponic system for growing greens! Now Let us look at the roots. The roots have grown a lot too and appear absolutely healthy. So, This is working as expected.
10. After 2 weeks, it’s time to change the water solution and this is where I feel the elbows make it so much easier to change the water. No need to remove the setup from place, simply place a bucket under one of the openings and gently turn the pipe around. The water should flow out into the bucket and you are Done!
Prepare the same solution as earlier and pour it back in.
11. This is what our plants are looking after 3 weeks now. The spinach has reached the stage of harvesting.
12. And finally, this is what our beautiful plants are looking like after the 4th week of sowing. We have beautiful spinach ready to be harvested. You can see the Coriander leaves too.
13. To harvest all you need to do is snip the leaves using a small scissor. You can expect more leaves to regrow every time you harvest as the root system is now healthy and well grown to support leaf growth.
If you haven’t watched that yet, please check HERE.
This simple Hack am showing you today will actually overcome one limitation of using air stones or other similar bubblers, That is they get clogged easily, specially if they are of low quality. After watching this hack, you may not feel like purchasing air stones at all. Yes, this is a permanent solution to this drawback of using air stones or similar stuff.
What you can do is: Just take two Ball pens like these. These are the famous Reynolds pens. Am sure all of us know about these pens.
Remove the refills and make tiny holes into the white plastic body by heating a needle. Make tiny holes as many as you want.
Then connect the air tube to the open end of the pens and place them into your cloning chamber. That’s it.
You can see how nicely and uniformly the bubbles are appearing. Also one more point and update is: you need not keep the bubbler continuously switched on. You can switch it on and off intermittently or atleast for 10 minutes 2 or 3 times in a day to get best results.
Also if you have a PH testing gadget, try to maintain the ph of the rooting solution or water to a slightly acidic ph of around 6.0 for best results.
In my previous video titled – the 10 Tips to Cloning plants in water – that is duplicating your plants from stem cuttings in water, we learnt many scientific concepts like the Nitrogen draining concept and the Oxygenation concept. We will use these simple concepts in building our Simple Plant Cloner Device.
So, lets start building this device step by step.
1. THINGS YOU NEED or Parts of this Cloner:
– The CHAMBER (container holding water and cuttings): The dimensions of this container depends on how many insertions or how many cuttings your want to insert into this setup. You can choose any opaque container like a rectangular box or even a bucket with a lid or even a small jar or anything. What I am using is a 12 inch x 6 inch glass Aquarium. Actually roots develop faster in dark and this also prevents algae growth in the container. I am using this transparent container for this experiment for recording purpose. Actually I will be covering this on all sides with a black cardboard paper like what you see in the video. Well! The next component is:
– The Top Platform which suspends cuttings into the chamber: You can use a plastic sheet or any tray or simply a Styrofoam or thermocol sheet. This platform can also be build in such a way to accommodate net pots to plant seeds or even insert cuttings – that will be a two in one plant cloning device plus a hydroponic chamber for growing plants and seeds. If you want to build a sturdy or a more permanent device, you can use a container like this and make holes and accommodate net pots of about 1 inch diameter and you can place your cuttings into the netpot and add some pebbles or clay balls or anything so that the cuttings are held in place properly.
We will build a dedicated hydroponic chamber and discuss on Hydroponics, Aquaponics and Aeroponics in another video some other time. These are actually interesting topics and not so difficult as they sound.
For now, I will show you the simplest form of this plant cloner or bubbler device and how to contruct it easily with various options. Well the next components you need are!
– Air-Pump, Airline Tube and Air-stone. Yes! All these are aquarium stuff. This is based on the oxygenation concept. The cuttings requires oxygen for rooting, instead of daily stirring the water by lifting the cuttings as we saw in our previous video, we can make this a Hands free process using this bubbler apparatus which continuously provides oxygen and hence rooting starts early. You can use either air stones or even an air-stone strip like what you are seeing here as air bubbler. If you use this strip, a single nozzle pump would be sufficient. You can also use an aquarium sponge filter for this.
– Then to insert cuttings, you can use any hack and make a hole in your top platform. The main idea is to hold cuttings in place. If you just use a thermocol, you need a thicker sheet and insert cuttings through a hole otherwise it may not fit snugly. And depending on the top platform, you can use anything like netpots, or plastic foam plugs, neoprene collars, and even holders like this. I don’t know what these are called! I think they are table grommets. This is just to hold the cuttings in place. If you have any more ideas on this please share with us in the comment box below the video.
PURCHASE ONLINE LINKS:
Air Pump, Tube and AirStone Pack: https://amzn.to/2AaVecp
Net Pots: https://amzn.to/2AaTG20
Hydroponics Kit: https://amzn.to/2AcwbFM
Mini Drip Irrigation Kit: https://amzn.to/2AaUGTT
The simplest one is just a piece of Styrofoam with holes in it to insert the cuttings. That’s it ! Insert your cuttings and then Just drop this sheet into the chamber and switch on the air bubbler.
Now the time for results and the conclusions.
Well, The most surprising part to me was the result on Day 5 – As you can see one of the cuttings – that is actually a cutting from the rose plant sucker growth. Its has so much potential for rooting and has started rooting in 5 days. Where as the other two neem cuttings did not start rooting till the 8 th day, but this last eranthemum plant cuttings has just started rooting. And One more important point, I have never changed the water till this 8 th Day. This is just the same water with the air bubbler continusouly switched on. And no additional stuff like rooting hormone added. Just dropped on aspirin tablet into the container on day 1. That’s it.
So Now the inferences drawn from this experiment. The rooting process is complex one and depends on many factors like the plant type, genetics, thickness and hardiness of the branch, pathogens, growing medium like water or soil and the oxygen availability around the vicinity of the rooting zone and many other factors.