To get started all you need is an empty plastic bottle. Preferably, Not too large, as we plan to hang it. A small piece of PVC pipe and a good quality string/rope.
Let us get started in building our mint planter.
Step 1: Using a heated nail or a soldering gun, make some holes in the plastic bottle. Make sure to not make the holes too close or too many holes. Make two holes opposite to each other close to the base of the bottle.
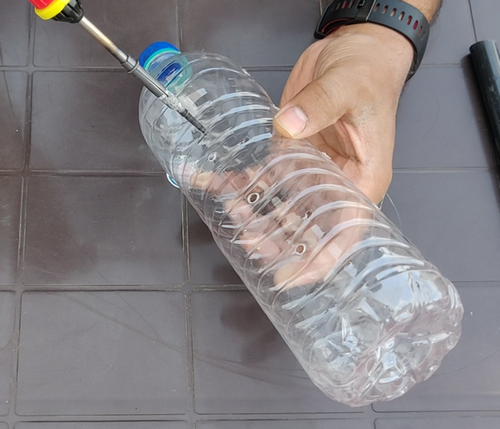
Step 2: Using a blade remove the base of the bottle.
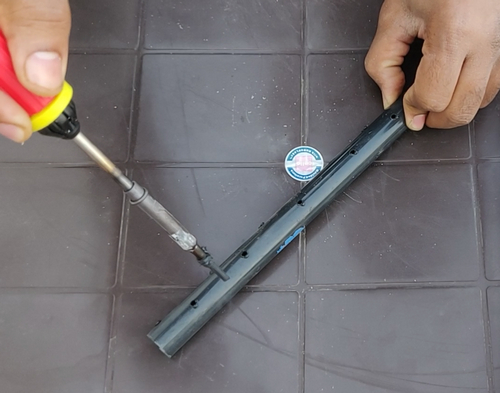
Step 3: Using the same nail or soldering gun, make some holes in the pvc pipe too. Using a flat blade you can shave the excess to avoid blockages. This pipe is going to be the plants lifeline as it will take care of getting water and air distributed equally throughout the length of the bottle. It somewhat works on the principles of air pruning which is so beneficial to grow larger trees in smaller containers. You can check out my detailed post on Air Pruning.
Step 4: Pass the edges of the rope/string through the holes at the base and tie a knot. That is it, they are now ready to hang.
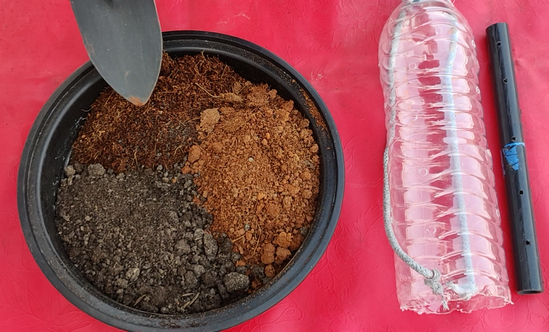
Step 5: To prepare the potting mix, you need to use a mix of plain garden soil, coco peat and dried compost in equal thirds. Place the pipe in the centre of the bottle and start filling the potting mix in around the pipe. Leave some room at the top to prevent soil and water overflow during watering.
Step 6: You need some freshly cut mint stems. You can take out the leaves and use them. All we need is the stems. You can simply start inserting the stems into the inserts in the bottle. Insert them gently and carefully. Do not force the stem as it might damage it. You can avoid it by selectively choosing the stems of appropriate size.
That is it, we are done. Hang the arrangement in a nice shady area and give it plenty of water to start the root generation process.
After about two weeks, you can see the results. Several tiny branches and leaves emerging from the stems we planted. This is good progress.
And here we have the progress after three weeks. The mint cuttings are thriving and so is the root structure. So, there you have it. No space, No fuss, super easy mint supply for your next kitchen adventure by recycling waste plastic bottles.
- TURMERIC IS A TROPICAL PLANT
- CHOOSE YOUR TURMERIC RHIZOMES – Must be Free of Wrinkles, With Visible Eyes,
- CUT INTO MULTIPLE PIECES – EACH PIECE MUST HAVE 2-3 EYES
- OPTIONALLY LEAVE THE PIECES IN AIR FOR HEALING FOR 2 DAYS.
- SOAK FOR 12 HOURS IN WATER
- SOIL PREPARATION: A Well Draining Soil with Atleast 50% compost like decomposed cowdung or vermicompost. Cocopeat + compost or Peatmoss + Compost
- CHOOSE ANY CONTAINER FOR ROOTING. YOU CAN CHOOSE A LARGE CONTAINER LIKE 12 TO 15 INCH CONTAINER OR FABRIC BAG AND PLANT DIRECTLY. MAKE SURE THERE ARE MULTIPLE DRAINAGE HOLES. FILL THE CONTAINER WITH POTTING MIX.
- PLANT TURMERIC PIECES WITH EYES FACING UPWARDS OR SIDEWAYS. ATLEAST 1 OR 2 INCHES DEEP. COVER THEM WITH POTTING MIX.
- WATER THOROUGHLY TILL IT COMES OUT OF DRAINAGE HOLES.
- KEEP IN INDIRECT BRIGHT LIGHT.
- KEEP THE SOIL MOIST BUT NOT SOGGY
- RESULTS: SHOOTS START IN 4-5 DAYS AND CONTINUE TO GROW.
- TRANSPLANT TO LARGER CONTAINERS. ONE OR TWO PLANTS PER LARGE CONTAINER
- FERTILIZE MONTHLY WITH TWO HANDFULS OF COMPOST AND KEEP IN A LOCATION WHICH RECEIVES ATLEAST 4 HOURS SUNLIGHT PREFERABLY EARLY MORNING SUN OR UNDER A GREEN SHADE NET FOR FULL DAY.
- HARVESTING TURMERIC: YOU CAN HARVEST AFTER 8 TO 9 MONTHS WHEN THE TURMERIC PLANTS BECOMES YELLOW AND DIES.
The botanical name of ginger is Zingiber officinale.
- GINGER IS A TROPICAL PLANT
- CHOOSE YOUR GINGER RHIZOMES – Must be Free of Wrinkles, With Visible Eyes,
- CUT INTO MULTIPLE PIECES – EACH PIECE MUST HAVE 2-3 EYES
- OPTIONALLY LEAVE THE PIECES IN AIR FOR HEALING FOR 2 DAYS.
- SOAK FOR 12 HOURS IN WATER
- SOIL PREPARATION: A Well Draining Soil with Atleast 50% compost like decomposed cowdung or vermicompost. Cocopeat + compost or Peatmoss + Compost
- CHOOSE ANY CONTAINER FOR ROOTING. YOU CAN CHOOSE A LARGE CONTAINER LIKE 12 TO 15 INCH CONTAINER OR FABRIC BAG AND PLANT DIRECTLY. MAKE SURE THERE ARE MULTIPLE DRAINAGE HOLES. FILL THE CONTAINER WITH POTTING MIX.
- PLANT GINGER PIECES WITH EYES FACING UPWARDS OR SIDEWAYS. ATLEAST 1 OR 2 INCHES DEEP. COVER THEM WITH POTTING MIX.
- WATER THOROUGHLY TILL IT COMES OUT OF DRAINAGE HOLES.
- KEEP IN INDIRECT BRIGHT LIGHT.
- KEEP THE SOIL MOIST BUT NOT SOGGY
- RESULTS: SHOOTS START IN 4-5 DAYS AND CONTINUE TO GROW.
- TRANSPLANT TO LARGER CONTAINERS. ONE OR TWO PLANTS PER LARGE CONTAINER
- FERTILIZE MONTHLY WITH TWO HANDFULS OF COMPOST AND KEEP IN A LOCATION WHICH RECEIVES ATLEAST 4 HOURS SUNLIGHT PREFERABLY EARLY MORNING SUN OR UNDER A GREEN SHADE NET FOR FULL DAY.
- HARVESTING: YOU CAN HARVEST AFTER 8 TO 9 MONTHS WHEN THE GINGER PLANTS BECOMES YELLOW AND DIES.