Now let us now install a grow light for our indoor plants. Grow lights are not expensive now a days. You get simple grow light bulbs for smaller plants, full spectrum grow light panels which even support flowering and fruiting. I have shown them all in my earlier episodes on indoor gardening.
Now, coming to this led grow light strip. This is a good option for certain areas in your home and add to the beauty of your home interiors. These led strips come in various lengths like in meters. Depending on the requirement you can order these grow light strips from amazon or any other reliable shopping website. These are waterproof strips and come with a sticker at the back surface. You can see this partition panel and I have created these two compartments for indoor plants. I have done wiring from inside for power supply. The most elegant way to install these led strips is to use these aluminum profile light channels which again come in various sizes. Here I am using 17mm channels. You need to cut a groove for this 17 mm channel.

Now let us first assemble these led light strips. You can measure the length of the strip needed and how many strips you require and make a cut at this point marked on the strip. This not rocket science. Its simple DIY thing. If you want to join two strips together, you can use these connectors of proper sizes to hook in the ends of the strips. Or you can just solder wires to the ends. Make sure you have a color coding for positive and negative terminal and not to reverse the polarity. It’s clearly marked on the strip.
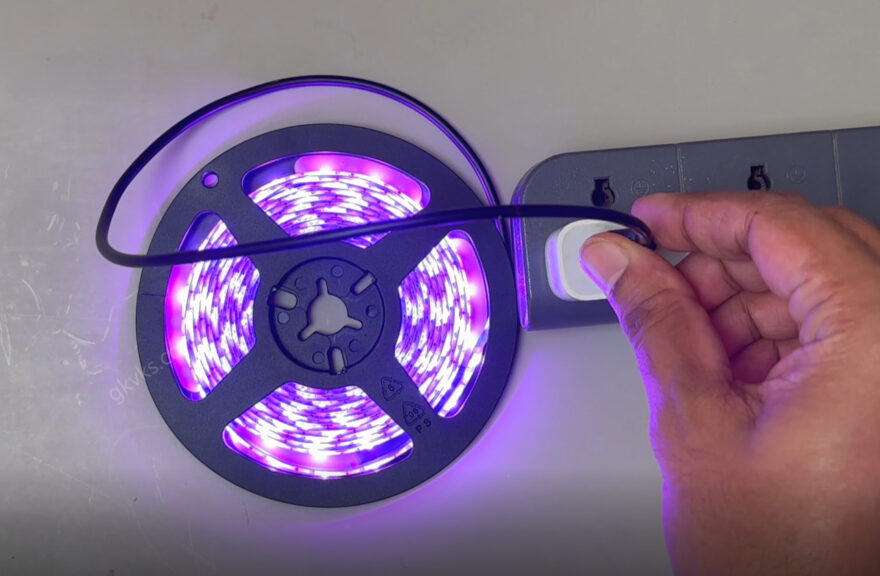
Depending on the specifications of your strip, you need to provide proper power supply, like in this case its 5 volts power needed for this strip for which you can connect it to any mobile charger or a socket with USB charging facility which has 5 volts supply. You can solder or join the wires from any USB cable to this led strip. Then you can stick the strip to the aluminum channel and fix the channel to your plant compartment area. That’s it. You can power these on for 10 to 12 hours a day depending on the plant you are growing under it. Make sure the distance of plant is not too much from light source.
Slugs and snails are actually cute looking creatures, but they eat away a lot of your garden, leaving only plant or leaf skeletons. They are active during the night and really difficult to get rid-off. In our previous posts, we discussed so many natural methods to control slugs and snails like using a Beer Trap, Food grade Diatomaceous earth boundaries, sprinkling Epsom salt, encouraging natural predators like birds, frogs, toads, chicken and stuff like that. But none of these are 100% effective and in fact some of these are difficult to implement.
In this post, we will discuss on the barrier or the fence method using copper wire or copper tape and show you the 100% effective electric fence method. Some of you might be worried hearing the word “Electric”! Do not worry, its 100% safe for humans and pets because we are using just a 9V DC battery which does not cause any electric shock and, it is infact quite inexpensive, permanent and 100% working method. Inexpensive! Yes indeed, because the battery will not be consumed unless the slugs and snails complete the circuit by trying to cross this barrier.
Many companies sell some slugs and snail copper tapes and claim they repel these creatures. No doubt copper is a repellent for slugs and snails, but there has to be a good concentration of copper in the tapes and also the tape has to be more than 2 inches wide to create the copper repelling effect on the snails.
Now Lets quickly build this DIY slugs and Snail electric fence in three simple steps:
But Before
that, lets List out Few basic Things You need:
a. 9V Battery with its connecting wires.
You can also try using a 3 volt battery
for smaller pots. But the best effect is seen with a 9V battery.
b. Bare or non-insulated copper wire or
any bare metallic wire, preferably a galvanized wire because its resists
corrosion. You can also strip some copper wires from old electric wires if you
have some.
c. A small plastic container as a
battery holder. You can even use a small glass bottle to build a water
proof housing for the battery.
d. Optionally you may need a soldering gun, glue gun, wire cutters, staplers particularly
if you are installing on wooden containers or raised beds, then you may also
need some insulation tape and other stuff as required.
Step 1: Water Proofing the Battery Housing: For better durability and water proofing, place the battery into a plastic container and seal any openings to make it water proof using a glue gun or any other method. Try to make a downward loop of the wire, so that water does not get into the unit.
Step 2: Wrap the copper wire around the containers in two parallel lines. Make sure the distance between these two lines is not more than 2 cm and also make sure they do no touch each other. This can even be installed on raised beds or wooden pots using staplers. You can also stick copper tapes in a similar fashion specially if you use plastic containers. These tapes come in one sided stickers and easy to fix on plastic containers. After fixing these two lines, you can solder the wires from the battery, one to each track and fix the battery housing to the container properly to avoid water exposure and any extreme weather.
Step 3: The Connections: It’s simple! Take both ends of the top wire, and “twist” them together, do the same with the bottom wire. Connect one line to the positive terminal of the battery and the other to the negative terminal. That’s it. Its now an open circuit and not consuming any battery power. You can optionally check the continuity of the wires or copper tape if you have a multimeter and also the voltage running through the line.
Let’s see what happens when slugs and snails try to cross this fence. You know these are slimy wet creatures and when they try to cross the track they complete the circuit and get a nice shock and get repelled. Watch Video Below:
If you haven’t watched that yet, please check HERE.
This simple Hack am showing you today will actually overcome one limitation of using air stones or other similar bubblers, That is they get clogged easily, specially if they are of low quality. After watching this hack, you may not feel like purchasing air stones at all. Yes, this is a permanent solution to this drawback of using air stones or similar stuff.
What you can do is: Just take two Ball pens like these. These are the famous Reynolds pens. Am sure all of us know about these pens.
Remove the refills and make tiny holes into the white plastic body by heating a needle. Make tiny holes as many as you want.
Then connect the air tube to the open end of the pens and place them into your cloning chamber. That’s it.
You can see how nicely and uniformly the bubbles are appearing. Also one more point and update is: you need not keep the bubbler continuously switched on. You can switch it on and off intermittently or atleast for 10 minutes 2 or 3 times in a day to get best results.
Also if you have a PH testing gadget, try to maintain the ph of the rooting solution or water to a slightly acidic ph of around 6.0 for best results.
In my previous video titled – the 10 Tips to Cloning plants in water – that is duplicating your plants from stem cuttings in water, we learnt many scientific concepts like the Nitrogen draining concept and the Oxygenation concept. We will use these simple concepts in building our Simple Plant Cloner Device.
So, lets start building this device step by step.
1. THINGS YOU NEED or Parts of this Cloner:
– The CHAMBER (container holding water and cuttings): The dimensions of this container depends on how many insertions or how many cuttings your want to insert into this setup. You can choose any opaque container like a rectangular box or even a bucket with a lid or even a small jar or anything. What I am using is a 12 inch x 6 inch glass Aquarium. Actually roots develop faster in dark and this also prevents algae growth in the container. I am using this transparent container for this experiment for recording purpose. Actually I will be covering this on all sides with a black cardboard paper like what you see in the video. Well! The next component is:
– The Top Platform which suspends cuttings into the chamber: You can use a plastic sheet or any tray or simply a Styrofoam or thermocol sheet. This platform can also be build in such a way to accommodate net pots to plant seeds or even insert cuttings – that will be a two in one plant cloning device plus a hydroponic chamber for growing plants and seeds. If you want to build a sturdy or a more permanent device, you can use a container like this and make holes and accommodate net pots of about 1 inch diameter and you can place your cuttings into the netpot and add some pebbles or clay balls or anything so that the cuttings are held in place properly.
We will build a dedicated hydroponic chamber and discuss on Hydroponics, Aquaponics and Aeroponics in another video some other time. These are actually interesting topics and not so difficult as they sound.
For now, I will show you the simplest form of this plant cloner or bubbler device and how to contruct it easily with various options. Well the next components you need are!
– Air-Pump, Airline Tube and Air-stone. Yes! All these are aquarium stuff. This is based on the oxygenation concept. The cuttings requires oxygen for rooting, instead of daily stirring the water by lifting the cuttings as we saw in our previous video, we can make this a Hands free process using this bubbler apparatus which continuously provides oxygen and hence rooting starts early. You can use either air stones or even an air-stone strip like what you are seeing here as air bubbler. If you use this strip, a single nozzle pump would be sufficient. You can also use an aquarium sponge filter for this.
– Then to insert cuttings, you can use any hack and make a hole in your top platform. The main idea is to hold cuttings in place. If you just use a thermocol, you need a thicker sheet and insert cuttings through a hole otherwise it may not fit snugly. And depending on the top platform, you can use anything like netpots, or plastic foam plugs, neoprene collars, and even holders like this. I don’t know what these are called! I think they are table grommets. This is just to hold the cuttings in place. If you have any more ideas on this please share with us in the comment box below the video.
PURCHASE ONLINE LINKS:
Air Pump, Tube and AirStone Pack: https://amzn.to/2AaVecp
Net Pots: https://amzn.to/2AaTG20
Hydroponics Kit: https://amzn.to/2AcwbFM
Mini Drip Irrigation Kit: https://amzn.to/2AaUGTT
The simplest one is just a piece of Styrofoam with holes in it to insert the cuttings. That’s it ! Insert your cuttings and then Just drop this sheet into the chamber and switch on the air bubbler.
Now the time for results and the conclusions.
Well, The most surprising part to me was the result on Day 5 – As you can see one of the cuttings – that is actually a cutting from the rose plant sucker growth. Its has so much potential for rooting and has started rooting in 5 days. Where as the other two neem cuttings did not start rooting till the 8 th day, but this last eranthemum plant cuttings has just started rooting. And One more important point, I have never changed the water till this 8 th Day. This is just the same water with the air bubbler continusouly switched on. And no additional stuff like rooting hormone added. Just dropped on aspirin tablet into the container on day 1. That’s it.
So Now the inferences drawn from this experiment. The rooting process is complex one and depends on many factors like the plant type, genetics, thickness and hardiness of the branch, pathogens, growing medium like water or soil and the oxygen availability around the vicinity of the rooting zone and many other factors.
You normally throw away the Toilet paper (tissue paper) roll card board hollow.
But those having interest in gardening, can make use of this excellent bio-degradable recyclable waste thing in making our seed starting small pots.
This video show how to cut and make use of these paper pots in seed germination. How to Easily Make your own Bio degradable Planter Pots at home for Seed Germination – DIY (Do It YourSelf).