What’s in this article?
- A brief Introduction
- Why use this product?
- What are the various uses?
- How to use it for Mass multiplication, As a Bio fertilizer, As a Bio Pesticide,
- For Seed Treatment,
- how to make DIY micronutrient fertilizer using this product.
Currently, about 2 billion metric tons of waste is produced annually worldwide and only about 5 percent of this is recycled for composting. This means the waste is not managed properly and instead either dumped or openly burnt which can be really bio hazardous. To overcome this problem, the NCOF, ministry of Agriculture, India, developed a great product which is a consortium of micro-organisms, mainly azotobacter isolated from desi cow dung. And this took 11 years to standardise the mass multiplication technique at the farm level.
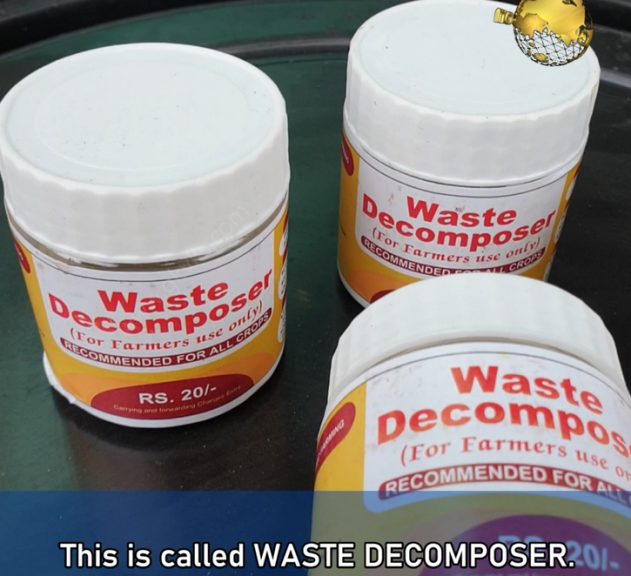
So, What is this Product Called? This is called WASTE DECOMPOSER. This is perhaps the world’s cheapest bio fertilizer and bio pesticide made till date. This product comes in a bottle of 30 gms costing just 20 INR per bottle, that’s less than 20 cents for international viewers and you need to buy only once because you can easily reproduce or do mass multiplication of this product and use it repeatedly for ever. A single bottle of waste decomposer decomposes bio-waste of more than 10000 metric tons in just 30 days and this bottle has a shelf life of 3 years. This is unbelievable.
So, Where to purchase this waste decomposer bottle? You can order this online from NCOF website or even amazon and these links below. International users can possibly import this product.
Amazon: https://amzn.to/2Spjj7G
NCOF website: https://ncof.dacnet.nic.in/
Now let’s learn how to use Waste Decomposer?
The first thing you should do is perform mass multiplication of waste decomposer. There is nothing sophisticated about it. It’s really a simple process. I will show you step by step.
Take a Large Plastic Barrel like this one, preferably a 200 litres container. You can take even 100 litres or whatever you have.
Fill this drum with water.
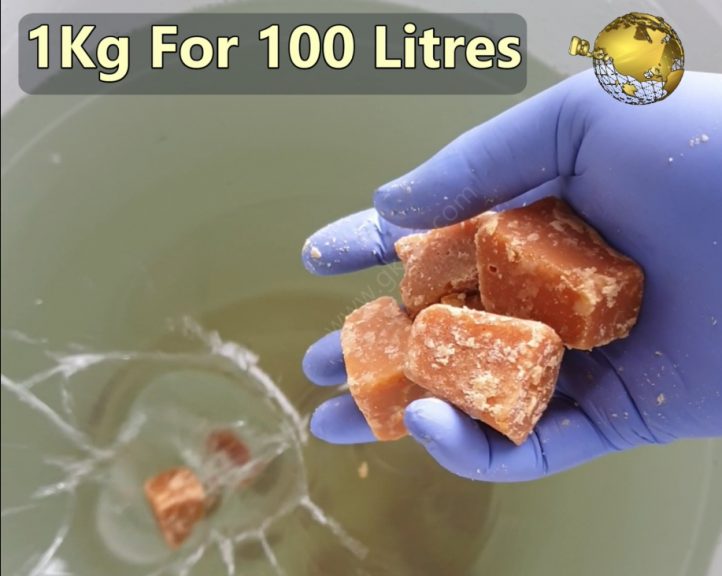
Now add 2 kilograms of Jaggery for 200 litres of water or 1 kilogram for 100 litres. This is the food for these microorganisms.
Now take 1 bottle of waste decomposer and pour all its contents. Make sure you avoid direct contact of its contents with bare hands. Mix it thoroughly using any stick or any pipe.
Then cover the container with a cloth. You need to open this daily and stir the solution once in 24 hours.
After 5 days or max 7 days depending on the climate, this solution turns creamy which means now you have 200 litres of water decomposer ready to use.
We will discuss on the uses of this solution shortly. To restart mass multiplication, now you don’t need to buy waster decomposer again. After use, Just leave around 20 litres of this solution in the barrel and add water again, then add jaggery again and repeat the procedure to maintain this for ever.
Now let’s discuss on The Various uses of this waste decomposer:
1. SEED TREATMENT: Simply spray or sprinkle waste decomposer solution uniformly over the seeds. You can even soak the seeds if you are doing this on a large scale. This works on all types of seeds. Keep the treated seeds in shade for about 30 minutes and then plant the seeds. Seed treatment with waste decomposer shows 98% early and uniform germination and provides protection against various seed borne diseases and also plays a role in strengthening the plants defence mechanisms.
2. FERTILIZER AND SOIL TREATMENT: Watering with waste decomposer solution significantly changes the biological as well as the physical properties of all type of soil within 21 days of application and it also helps to generate earthworm population in the soil which is so beneficial. You can dilute the waste decomposer in 1:2 ratio with water, that is one part waste decomposer to 2 parts water and water your plants once every 15 days or even once in a month. This is also proven to control many soil borne diseases in crops.
3. FOLIAR SPRAY: It acts as a potent bio pesticide when sprayed on plants.You need to dilute it to 1:3 ration to use it as a foliar spray. This helps control a variety of fungal, bacterial and viral diseases in crops when sprayed once in 10 days for 4 times in the growth cycle of a crop.
4. COMPOSTING: This is a compost accelerator and your compost will be ready within 30 to 40 days depending on the type of waste used for composting. For conventional pile method of composting, you need to sprinkle waste decomposer for every layer of compost and maintain the basics of aerobic composting like maintaining moisture, aeration by turning the compost pile and stuff like that. You can check my 4 episode series on composting from a link in description below. If you do composting at home in small scale, you can sprinkle waste decomposer solution once or twice and get that compost ready within 30 to 40 days.
Now, Let’s prepare the DIY micronutrient rich organic fertilizer using this waste decomposer, as recommended by the national centre for organic farming.
The basic principle of making this micro nutrient fertilizer is: Adding foods that are rich in proteins, vitamins and major and minor elements including Nitrogen, phosphorous, potassium, iron, copper, zinc, calcium, magnesium, boron and so on. Adding these into the waste decomposer results in break down of these elements into soluble forms by the microorganisms, enzymes and organic acids present in waste decomposer.
Well, Now let’s prepare this fertilizer and learn how to use this for your plants.
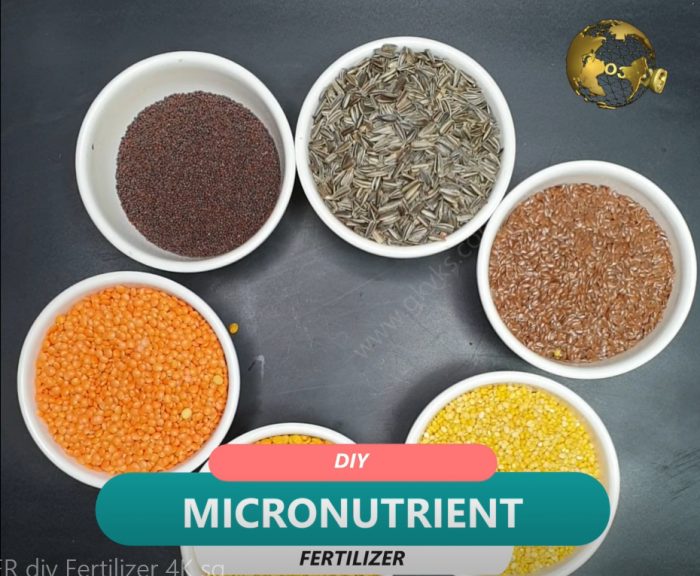
First of all – Things You Need: We will prepare this in around 25 litres of waste decomposer solution. Do not worry too much on the quantity and over dosage. This is not a problem with organic fertilizers.
1. Atleast 3 varieties of Oil seeds like 100 gms each of sunflower seeds, mustard seeds, flax seeds, or any other like soya, castor oil seeds, nigella seeds or any 3 varieties.
2. 3 varieties of Pulses or lentils of your choice like Red Lentil (Masoor dal), Yellow or Green split gram (Moong dal), Bengal gram (Chana dal), You can also take Red gram (Arhar dal), Black gram (urad dal) and so on.
3. Some 4 to 5 old iron nails or any small pieces of junk iron stuff.
4. Some copper source – like some old copper wires extracted from wires lying in your junk yard or any old copper vessel if you have one.
5. Some Zinc source – like one or two dry cells which are made up of zinc container.
Firstly, powder these seeds and pulses, this helps in faster decomposition. Add these into 25 litres of waste decomposer. Now add iron nails, then copper wires, then the zinc source. Mix it well and leave it for 10 days. Do not forget to stir this once daily.
After 10 days, your potent nutrient rich organic fertilizer is ready. So, How do we use this. You can use it in 2 ways. One, as a liquid fertilizer to water your plants and secondly as a foliar spray to instantly feed your plants through leaves stomata.
For watering your plants, you need to dilute this to 1:5. That is one part of this liquid to 5 parts of water. Where as for foliar feed, you can dilute this to 1:10 and spray thoroughly on your plants including the undersides of your leaves, because the stomata or the leaf openings are more concentrated at the bottom side of leaves.
In our previous posts we discussed on the fundamentals of composting including Types of Composting, the Carbon Nitrogen ratio and demonstrated the anaerobic or bokashi composting method step by step.
In Today’s episode, let’s learn How to perfectly make compost at home in 5 easy steps:
Step 1: CHOOSING YOUR CONTAINER
There are many ways to compost. You can either use an open pile composting method or use a compost bin. Open pile composting or using a simple chicken mesh boundary is the simplest way to start, but it has its own disadvantages. The best way to compost at home is use a compost bin. Bins have the advantage of being neat, keeping animals, rodents and insects away and preserving heat. You can build your own DIY compost bin from some plastic buckets or even drums or barrels. You can even build a tumbling compost bin. Or you can just purchase these from a garden store or online. The size and type of bin you build or purchase will depend on how much compostable material you generate on a day to day basis. A rotating Tumbler compost bin has many advantages, like you need not turn up the compost pile for oxygenation manually, instead you just give few rotations once daily and this will also speed up the composting process. The twin drum has an advantage of providing continuous supply of compost, like when one drum is full, you leave it for few weeks for final maturation and then start adding materials in the second bin. And repeat this process to get a continuous supply of compost.
PURCHASE TUMBLER BINS HERE:
Twin Tumbler Compost Bin https://amzn.to/3960iyp
Single Tumbler Compost https://amzn.to/2CL4ibs
Step 2: CHOOSING THE LOCATION
For conventional pile composting, a sunny location and a flat surface on soil is better. For drum composting or if using a tumbling composter this is not so crucial. However keep in a place which is open with good air circulation, and also keep in mind there is a liquid leak below the compost bins. This compost tea can be collected and makes a good liquid fertilizer for plants if used in adequate dilution.
Step 3: ADDING GREENS AND BROWNS
This we have discussed in detail in part 2 of our composting series. For greens and kitchen waste recycling you can add them daily to your compost bin along with browns. If your daily collection is too little, you can store in refrigerator and then add to your bin. Greens are nitrogen rich and mostly wet materials like waste kitchen scraps like vegetables scraps, fruit scraps, fresh grass cuttings, animal manure but not your cat or dog poop, then bird or poultry droppings, feathers, fleshy plants and leaves, flowers, tea and coffee waste, egg shells, nail clippings, human and animal hair, and so on.
Browns are carbon rich dry materials like dry fallen leaves, dried flowers, wood chips, twigs, straw, shredded paper, shredded card board or paper cartons, and also the toilet paper rolls, toilet paper or used napkins or facial tissues, coffee filters and tea bags, cotton, sawdust, pine needles, Pencil Shavings, dried grass clippings, peat moss, cocopeat or coconut fibers, used paper plates, nut shells, wine corks, toothpicks, paper cupcakes, used match sticks, wood ash or ashes from the fireplace, coal, and so on.
Well, We will not go into discussing the Carbon : Nitrogen Ratio in this episode. You just have to remember the Green to Brown Ratio while adding stuff into compost bin.
As a General Rule: A 1-to-1 Ratio works well with the Add as You Go Pile as well as for the Batch Pile and is safe for beginners. This will aid you in creating about a 50:1 C/N Ratio, adequate enough to get a warm pile. This means, For every bowl of greens, you add one bowl of browns and a little bit of compost activator.
Step 4: COMPOST STARTER or ACCELERATOR OR ACTIVATOR
If you are starting for the first time or first batch, you need to add those microorgansisms to start the composting process. This can be either a commercial compost maker powder; but remember not to add the Bokashi bran powder which is exclusively meant for anaerobic composting which we have discussed and demonstrated in detail in episode 3 of this composting series. You can check that link in description below. So, you can add this powder like 1 or 2 teaspoons or as recommended in your packet and, every time you add greens and browns and then rotate the tumbler or turn your compost a few times for good oxygenation. If you have a half finished compost or even a fully finished compost or decomposed cowdung can be added as a starter. You can also add the finished compost from your Bokashi bucket into this aerobic compost bin.
Step 5: MATURATION AND HARVESTING
when the bin is 70 to 80% full, stop adding further waste into it and leave it for 6 to 8 weeks for compost cooking and final maturation. But make sure you tumble the compost bin on a daily basis or if you are doing the compost pile method, you need to turn the compost pile every other day for proper aeration, otherwise it will develop foul smell and fail. If you are getting a sweeter pleasant smell, then everything is going fine. After 6 to 8 weeks or even more, you can collect your final compost and use this pure fertilizer for your plants. You can leave about 10% in the bin which acts as an accelerator for the next batch. Finished compost will be dark, crumbly and smell like earth.
In our previous two posts we discussed on the fundamentals of composting, Types of Composting and the materials that can be added and those that are prohibited in compost bin plus we also discussed on the CN ratio and the Greens vs Browns Ratio. In this post, we will demonstrate how to do Bokashi composting correctly to get that perfect organic compost at home – with no foul smell and within a short period of time plus you also get a glass or two of nutrient rich compost tea which you can dilute and water your plants.
Bokashi composting is anaerobic method of composting, meaning it happens in the absence of air or oxygen and is actually a fermentation process carried out by special anaerobic microorganisms, first developed by a Japanese professor – Dr. Teuro Higa. The term Bokashi is a Japanese word that means “fermented organic matter.” This method was mainly developed to recycle wet nitrogen rich kitchen waste quickly, unlike the conventional aerobic composting which takes atleast 4 to 6 weeks to form complete compost.
So, What are the materials that best work with this type of composting. Anything can be composted, but the carbon rich browns like dried leaves, saw dust, grass clippings, paper, card board, etc will take a long time to decompose in this method or might even halt or fail the process of composting. Anaerobic Composting works best with nitrogen-rich materials as they are mainly wet – the kitchen scrap including left over cooked or raw food, vegetable and fruit scraps, cooked or uncooked meat and fish except bones – this is actually avoided in aerobic composting and vermicomposting, but this is the beauty of Bokashi composting! You can also add egg shells, tea and coffee grounds, tea or coffee bags and other stuff which is common for greens in aerobic composting as discussed in our previous post. Avoid adding large seeds like mango seeds, bones, rubber bands, condoms, metallic objects and so on.
Well, now Let’s learn Bokashi step by step. One thing to note before we start is: You can either do batch composting or one shot composting. In batch composting you add your kitchen waste on a day to day basis, opening the compost bin lid. I recommend One shot composting, like Add it, close it and forget it. One Simple Tip for you: Collect your daily kitchen waste in bags and store the waste in your refrigerator.
Step 1: The Container: This is typically any air tight container called Digester. You can use any barrel or a bucket with a lid which can seal it perfectly. This container should have a tap at the bottom to collect our nutrient rich compost tea once or twice in a week.
Step 2: Preparing the Bottom: First of all place about 20 to 30 gms of jaggery or molasses at the bottom of the container. This accelerates the fermentation process and is a food for our hard working microbes. Then Place the plastic grate at the bottom of the bucket with the knob facing upwards. This space of about 3 inches is required for the fluids to collect at the bottom which we drain out as the Bokashi Tea. Then Make sure the tap is closed and then Place a piece of newspaper over it.
Step 3: Bokashi Bran: or Bokashi powder is a magic ingredient in this system. This is a vegan stuff and contains the essential microorganisms to perform the composting process quicker than the conventional method of composting. This powder is inexpensive and easily available.
Step 4: Layering: First layer you sprinkle the bokashi bran over the bottom – two table spoons. Then you add a 1 to 2 inch layer of kitchen waste over this. For every 1 – 2 inch waste, sprinkle atleast two tablespoons of bokashi bran. Then again add 1 – 2 inch kitchen scraps and then again sprinkle bokashi powder. Make sure you chop large chunks of waste into smaller pieces for faster composting. Crush and add egg shells.
Step 5: Compression: In this step you compress the layers as and when you are adding the waste layer by layer. This will displace out the air pockets which may be present in between the waste. This is also an important step for successful smell free composting.
Step 6: After your finish multiple layers. Add a thick layer of bokashi powder like about 3 tablespoons and take and extra step to keep it air tight. Place a piece of cardboard on top of the layers and press it. Then Finally Close the Lid properly to make sure there is no chance of air entry.
Step 7: Location: You can keep it indoors or in any location where there is no sunlight.
Step 8: Collecting Bokashi Tea: This tea must be collected every 3 or 4 days to avoid foul smell and composting failure. This tea can be used as a liquid fertilizer for your plants. It must be diluted with water at a 100:1 ratio, that’s 100 parts water to 1 part bokashi juice, that’s approximately 2 teaspoons of juice for every litre of water. Mix well and water your plants to give them an instant supply of nutrients.
Step 9: Leave it Undisturbed for at least 15 days before you harvest. But don’t forget to collect the bokashi tea twice in a week.
Step 10: Harvesting: This is the only drawback of Bokashi. Just as pickled onions or mangoes are still the same size and shape, your pickled food scraps preserve their looks, unlike aerobic composting where the stuff shrinks considerably during decomposition. But the advantage is its high nutritive value, but the harvested bokashi after 15 to 20 days needs further processing and cannot be added directly to plants. You need to dig a trench in soil and add this final product and cover it with atleast 6 inches soil. Allow another 3 to 4 weeks for final processing and then plant over it or use this finished compost on your plants. If you also have the conventional aerobic composting going on, you can just dump this into it for faster and perfect processing.
In our next post we will demonstrate conventional aerobic composting method, step by step.
Composting is a controlled and accelerated rotting down of organic matter into nutrient rich compost. Aerobic Composting uses the natural processes of rotting and decay by microorganisms in the presence of oxygen and produces heat and hence it is sometimes called hot pile composting. Whereas Anaerobic or Bokashi composting is the job done mainly by microorganisms in the absence of air which is more like fermentation process.
Aerobic Composting requires 4 things: Carbon, Nitrogen, Oxygen and Water in just the right amount for proper composting. Out of these, we need to provide Carbon and Nitrogen in the right ratio, what is known as the C:N ration or Carbon Nitrogen Ratio. Things that are rich in Carbon are called the Browns and those that are rich in Nitrogen are known as the Greens.
To be correctly composted, a material needs to have the following two important characteristics: 1. The waste material must be organic and biodegradable.
2. The waste material must contain things that are liked by micro-organisms to feed on.
So what types of waste can we can use in aerobic composting method. Firstly, let’s start with what we should NOT put onto our compost bin or compost heap. So let lists the Don’t’s First:
- Glass, metal and plastics are obviously prohibited in both types of composting.
- Oil, fat, meat, fish or dairy products are avoided because of their tendency to attract insects like flies and rodents. But these products are allowed in Bokashi composting.
- Hard woody branches, stems or roots which take a very long time to decompose.
- Rubber bands, Latex condoms, diapers and other obvious stuff like metallic objects like for example safety pins.
Having looked at the things to be avoided, now let’s look at what we can add, and there are literally thousands to choose from. The micro-organisms and even macro-organisms like earthworms need to have a balanced diet and just like animals or humans they need “energy” in the form of food to survive. This energy is supplied to them by carbohydrates which contain Carbon. But micro-organisms also need proteins in the form of Nitrogen and also Phosphorus. Aerobic composting works best if these organisms are fed a mixture of carbon rich materials known commonly as “Browns” and nitrogen rich materials known commonly as “Greens” in proper ratios.
Let’s List the Browns First: Browns are mostly dried woody materials which are high in carbon. Without the browns your greens will decompose too quickly and turn into a smelly pile – that’s called putrified pile. Here’s the List of Browns:
like dry fallen leaves, dried flowers, wood chips, twigs, straw, shredded paper, shredded card board or paper cartons, like this and also the toilet paper rolls, toilet paper or used napkins or facial tissues, coffee filters and tea bags, cotton, sawdust, pine needles, Pencil Shavings, dried grass clippings, peat moss, cocopeat or coconut fibers, used paper plates, nut shells, wine corks, toothpicks, paper cupcakes, used match sticks, wood ash or ashes from the fireplace, coal, etc.
Now Let’s List the Greens: Greens are mostly wet materials like waste kitchen scraps mostly vegetables scraps, fruit scraps, fresh grass cuttings, animal manure but not your cat or dog poop, bird or poultry droppings and feathers, fleshy plants and leaves, flowers, tea and coffee waste, egg shells, nail clippings (if no nail polish), human and animal hair, etc.
Having said that, now lets look at the Greens Vs Browns Ratio and the Carbon:Nitrogen Ratio. The right mixture of greens and browns, known commonly in the gardening world as the Carbon-to-Nitrogen ratio or C/N ratio, is important for proper composting. We want Composting and not Putrefaction or rotting.
So what is the ideal C/N ratio for an aerobic composting? Most experts suggest a CN ratio of 25 to 30:1, which means 25 to 30 parts carbon rich material to 1 part nitrogen rich material. High Carbon may result in too slow composting whereas high nitrogen may result in foul smelling putrefaction.
HOW TO USE THE C:N RATIO? Do not misinterpret this CN ration! This ratio describes the chemical composition of a material and does not mean that you need a volume of brown materials that is thirty times greater than the amount of green matter! Don’t make this mistake! Here comes the Green to Brown Ration to our rescue. You have to understand this carefully. The Ideal Green to Brown Ration is 2:1 but it can also be 1:1 for those who are starting to compost. This means for one bowl of greens, you can add one bowl of browns. Let me explain this. Every material has its own C:N ratio, like for example Food Scraps has a Carbon:Nitrogen Ratio of 17:1, meaning 17 parts Carbon to 1 part Nitrogen). Saw dust has very high C:N ration of 500:1. Hence this calculation depends on what you add to your compost bin and it gets more and more complicated. You can store this table for reference of C:N values of various materials.
For Ideal Composting – Do Remember these 2 Golden Tips:
- A 2-to-1 ratio of Greens to Browns is your best bet when creating a Batch Pile. This will aid you in creating about a 30:1 C/N Ratio. Adequate enough to get a hot pile.
- A 1-to-1 Ratio works well with the Add as You Go Pile as well as for the Batch Pile and is safe for beginners. This will aid you in creating about a 50:1 C/N Ratio, adequate enough to get a warm pile.
In our Next posts of this composting series, we will demonstrate how to do Aerobic and Anaerobic or Bokashi composting at home.
WHAT IS COMPOSTING?
Composting is a natural process of breakdown or decomposition of various organic materials otherwise regarded as waste products and finally produces a nutrient rich product which is known as the compost.
WHY SHOULD YOU COMPOST?
Most of the solid wastes in our cities comprises of our yard waste and kitchen or food waste. By composting or recycling these items, it makes it possible to reduce the overall amount of waste being sent to landfills and mass-burn incinerators. The final compost, is nutrient-rich and can be used to amend poor soils and fertilize gardens instead of using chemical fertilizers which are hazardous to all organisms on earth.
TYPES OF COMPOSTING:
There are three types: aerobic, anaerobic (like Bokashi’s composting), and vermicomposting. Each one has its own pros and cons.
- AEROBIC COMPOSTING: In aerobic composting method, air or oxygen is introduced to help break down organic materials. The composting pile needs to be turned for aeration every other day. This can accomplished by using a fork tool or using a tumble style or barrel composter. We will discuss and demonstrate how to easily do aerobic and also anaerobic or bokashi’s composting later, after we discuss some fundamental concepts of composting.
- ANAEROBIC COMPOSTING: This is exactly opposite of aerobic composting. Actually some do not include this in composting and rather call it a fermenting process. Japanese method called Bokashi composting is the best example of anaerobic composting. Anaerobic composting takes almost no effort at all. Just add scraps into the composter, and leave it air tight for many days. Many people think Anaerobic composting stinks like hell but this is not true if done properly and this can be avoided with the use of Bokashi method which we will demonstrate and discuss later.
- VERMICOMPOSTING: Vermicomposting uses earthworms, oxygen and moisture to safely break down organic material with very less odours. Basically, worms do most of the job along with the bacteria. This method is the most preferred method due to its many advantages.
FUNDAMENTALS & REQUIREMENTS FOR COMPOSTING:
These basics are really important and please do not skip these points.
Well, Composting requires the following three components: 1. human management, 2. aerobic conditions, and 3. development of internal biological heat. Composting Process by organisms require four equally important components to work effectively:
- Carbon — for energy. And the microbial oxidation of carbon produces the heat. High carbon materials to be added to compost bin are generally brown and dry stuff like dried leaves, twigs, saw dust, charcoal and so on. We will discuss on the materials that can be added and those prohibited in the later episodes of this composting series. Well, the second ingredient is
- Nitrogen — which is essential to grow and reproduce more organisms to oxidize the carbon. High nitrogen materials generally tend to be green like the wet scrap from your kitchen like fruits and vegetables. We will also discuss on the importance of Carbon:Nitrogen ratio later on.
- Oxygen — for oxidizing the carbon and for the decomposition process. This is supplied by good aeration of the bin and also by turning the compost pile every other day.
- Water — All life needs water – that’s for the microorganisms and also the earthworms if you are vermicomposting. And Water in the right amounts is very important for decomposition process and to keep the temperature regulated. Too much or too little water is bad for composting.
The Composting microorganisms are introduced into the pile to start the process of decomposition by either adding a good quality garden soil or a manure like vermicompost or even cowdung manure. You also have many commercially available compost makers for this job.
Well, In our next postswe will list out the materials that can be added and those that are prohibited along with the some basics on the C:N or the Carbon:Nitrogen Ratio. Then we will demonstrate easy methods for both aerobic and Bokashi composting methods for home gardening.