Bonsai is an increasingly popular art of growing miniature live trees. Many people would love to own and grow a bonsai tree themselves. But You will need the right tools and right techniques to accomplish this. You will find that, most bonsai tools like scissors, shears, rakes, hooks, etc are quite expensive, may be because they are made in Japan or may be the demand and supply issues.
Let’s begin!
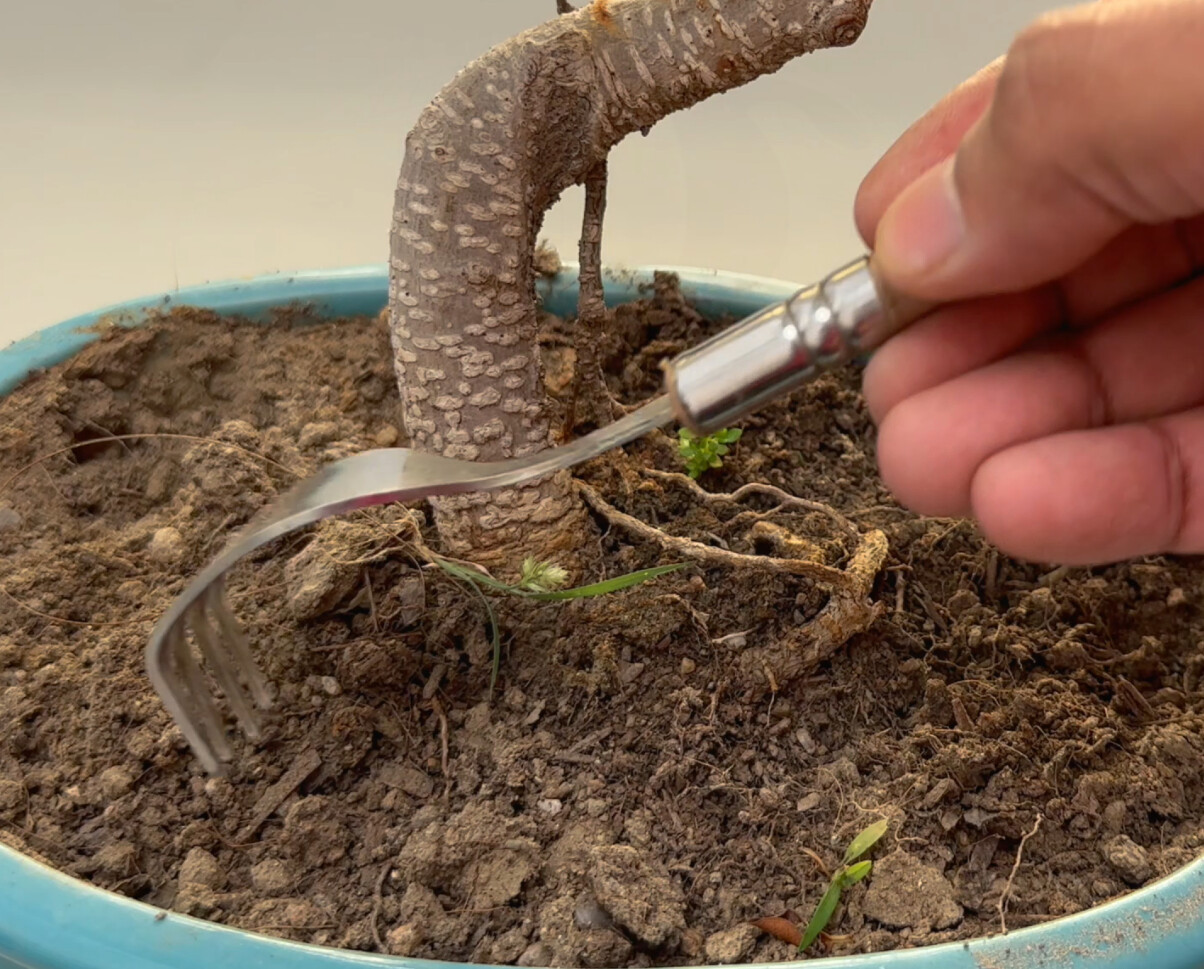
- Bonsai Rake Tool Hack: A stainless steel bonsai raking tool is an expensive tool. Simple free solution to this is to convert a stainless-steel dining fork to make a bonsai rake. Just insert the fork tines under a door or any sturdy slot and then gently bend it to your desired level to make a bonsai rake tool. Raking the top soil is a healthy gardening practice which has a lot of benefits.
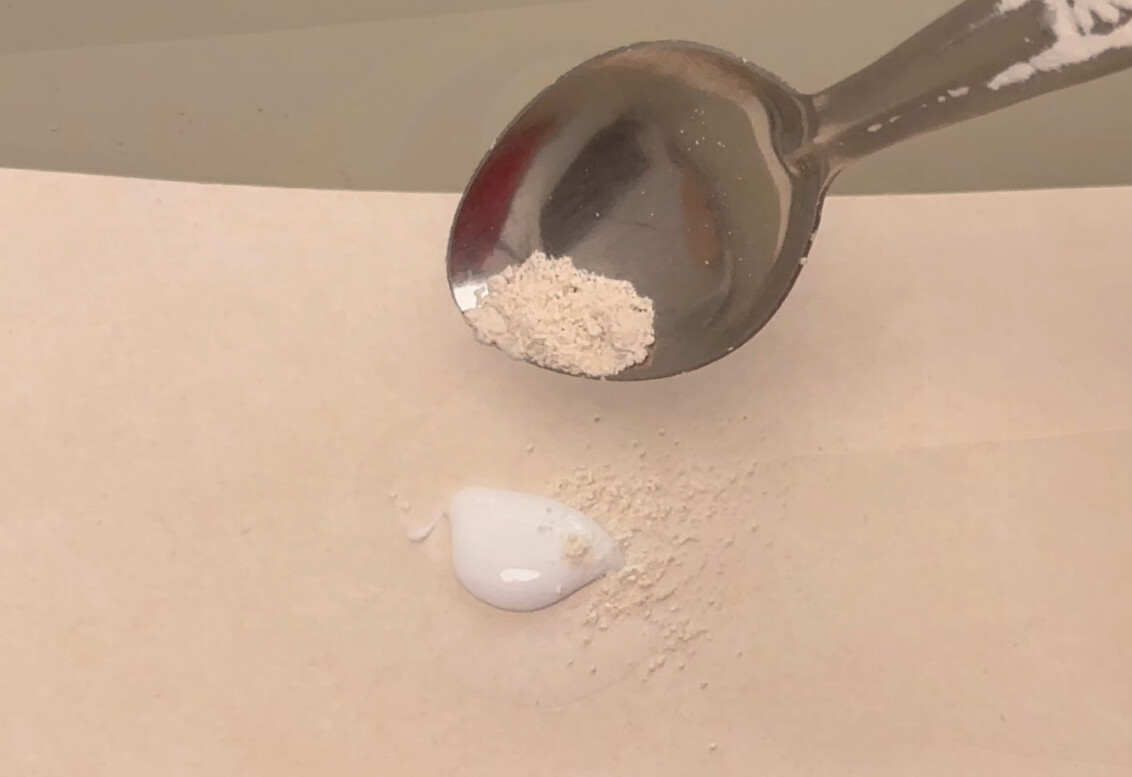
- Wound Sealant Hack: Bonsai would sealant paste is very expensive. A simple alternative to this is to use universally available Fevicol paste. If you want to make it more effective, you can add some antifungal powder to Fevicol paste and apply to larger bonsai pruning wounds.
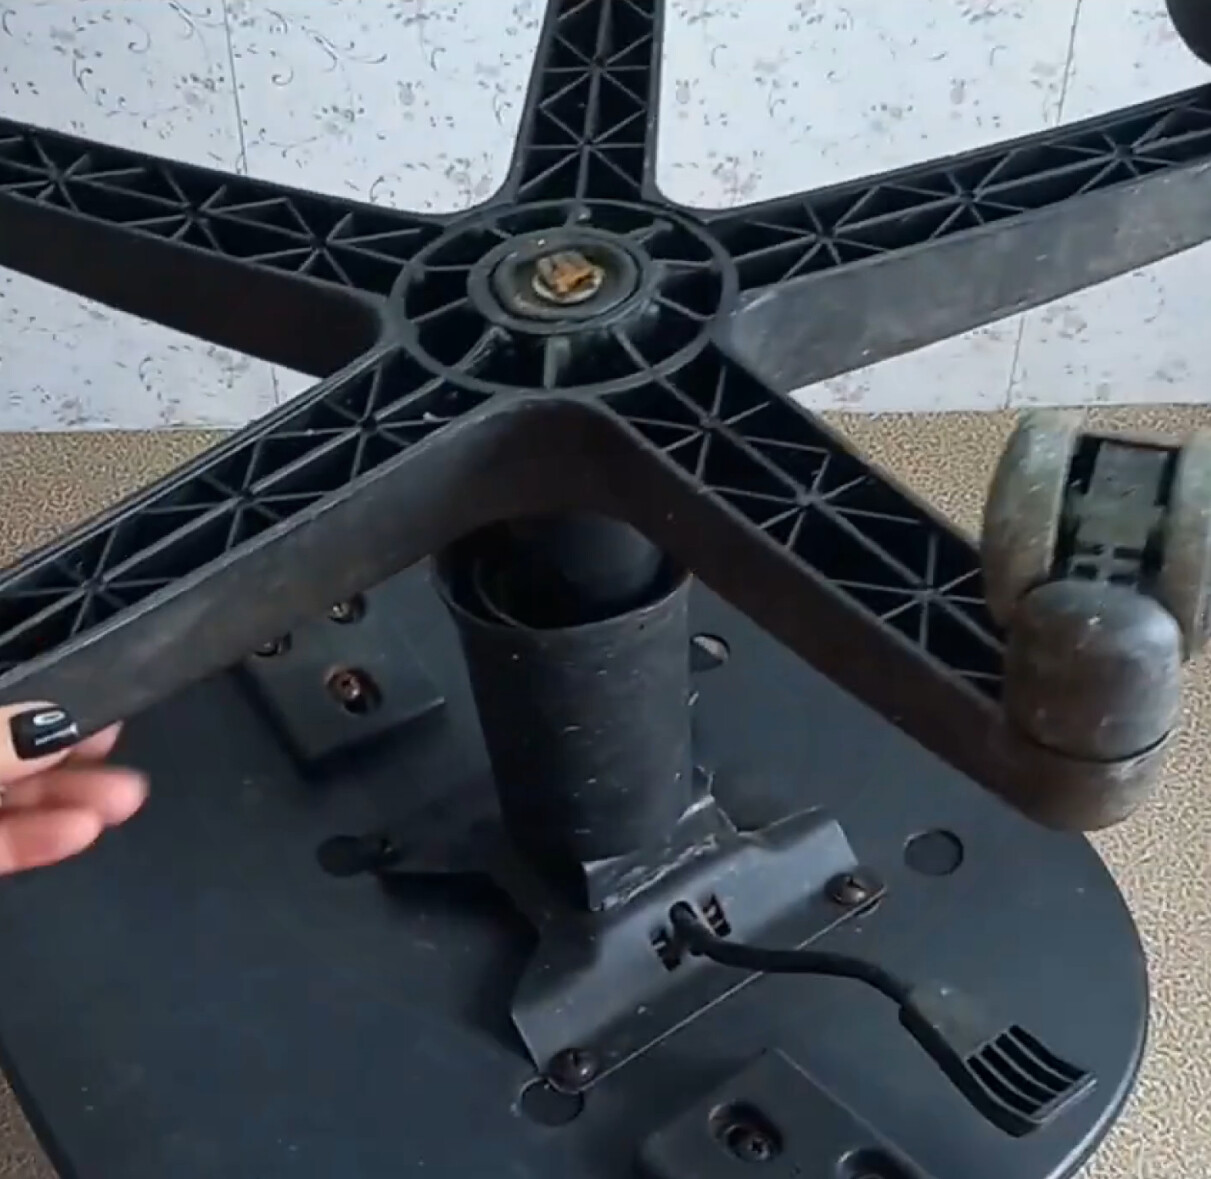
- Bonsai Turntable Hack: Bonsai Turntable is a very useful and a must have tool for anyone working with bonsais. If you do not have a professional bonsai turn-table, the cheapest alternative is a cake turntable which can efficiently work for smaller bonsais. Another hack to make a heavy-duty turntable for larger bonsais is to use the bottom steel base from an old or broken revolving office chair.
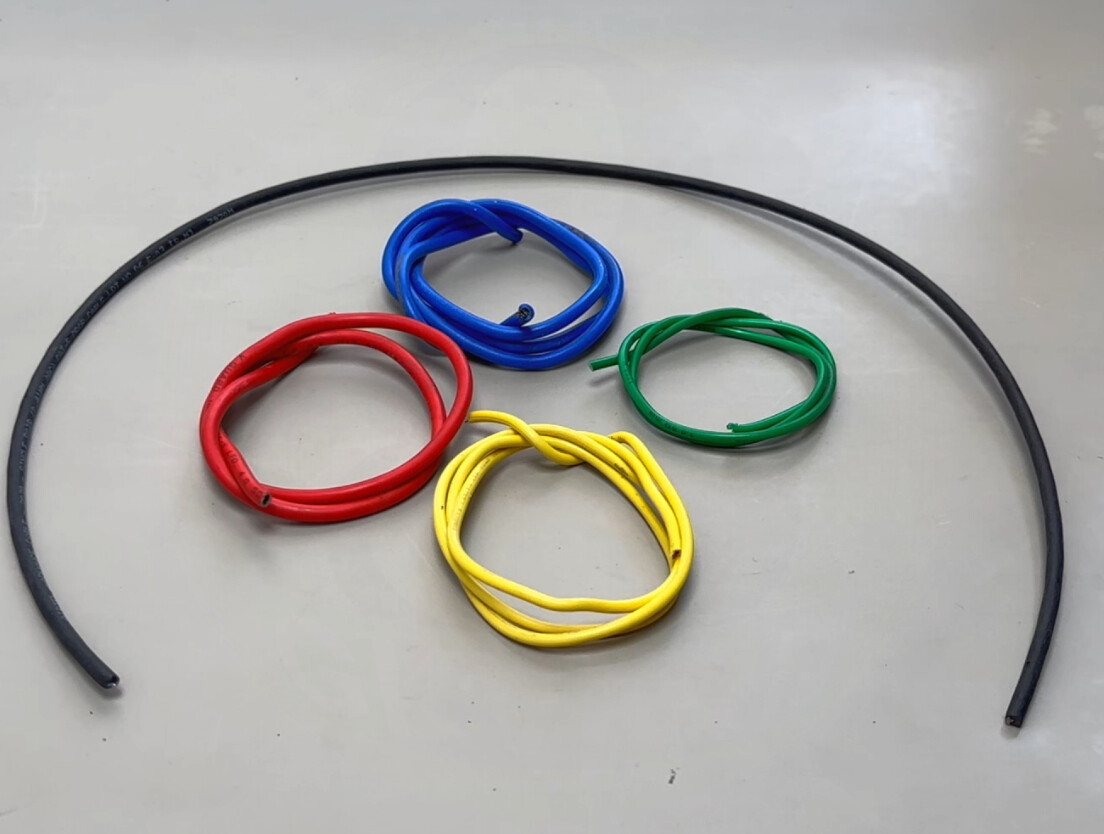
- Bonsai Wire Hack: if you do not have the professional bonsai wire to shape your bonsai branches, an easy alternative is to use thick gauge electric wires. You can use left-over pieces of old electric wire of different gauge, to wire and bend branches easily. But never use a GI wire like this one to wire bonsai, the obvious reasons are they are prone to rusting and difficulty in removing it when you want to, as they can adhere deeply into the stem or branch.
- Thick Woody Stem Bending Hack: It is next to impossible to bend a thick woody stem or a branch. You all know how important are bends or curves in bonsai tree designing. This bending technique is very important for making instant bonsais, especially from air layering technique which we shall discuss it later. If you have a thick branch or stem to bend, you can use a pruning saw or if the stem is not so thick, you can use a simple hack-saw blade to make multiple small wedge shaped cuts with a gap of about 1 inch between the cuts. You can vary the number of cuts or the distance between these cuts depending on how acute you want the bend. Make sure you don’t make too deep cuts, about 50% cut through the stem is fine. Then bend the stem or the branch to approximate or merge these cut wounds. To hold the bent stem in position, use a wire to support this stem or branch. Then wrap the wounds tightly with an aluminium foil first, to prevent moisture loss and promote proper healing of this wound, then wrap a grafting tape or a thin polythene sheet over this and then if you wish, put another layer of tape around it. Keep it undisturbed in partial shade. It should heal in about 4 to 6 weeks and your bonsai stem shape is done!

- Branch Splitter Hack: Bonsai Branch cutters or splitters are indeed expensive tools. In fact, almost all bonsai tools are expensive. You can make a bonsai branch splitter by grinding a cheap nail puller tool available at any hardware store. Carefully look at the image of the bonsai cutter blades and sharpen them in the same way. If you have good grinding skills, you can also make a parrot beak or bonsai concave cutter which is a very useful bonsai tool. Branch splitters are used to split thick branches, which helps to bend thick branches.
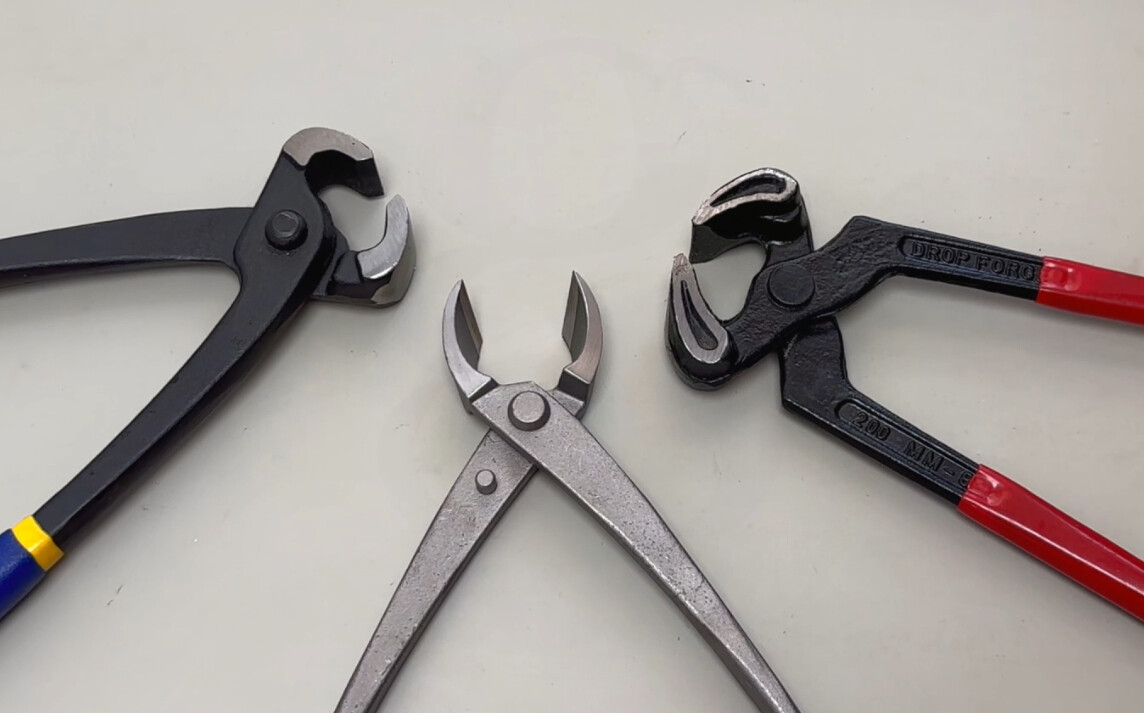
- Bonsai Scissor Hack: stainless steel bonsai shears and bonsai twig scissors are again expensive tools. A simple alternative is, to use surgical scissors with long blades as twig shears. These surgical scissors are very durable and do not rust so easily.
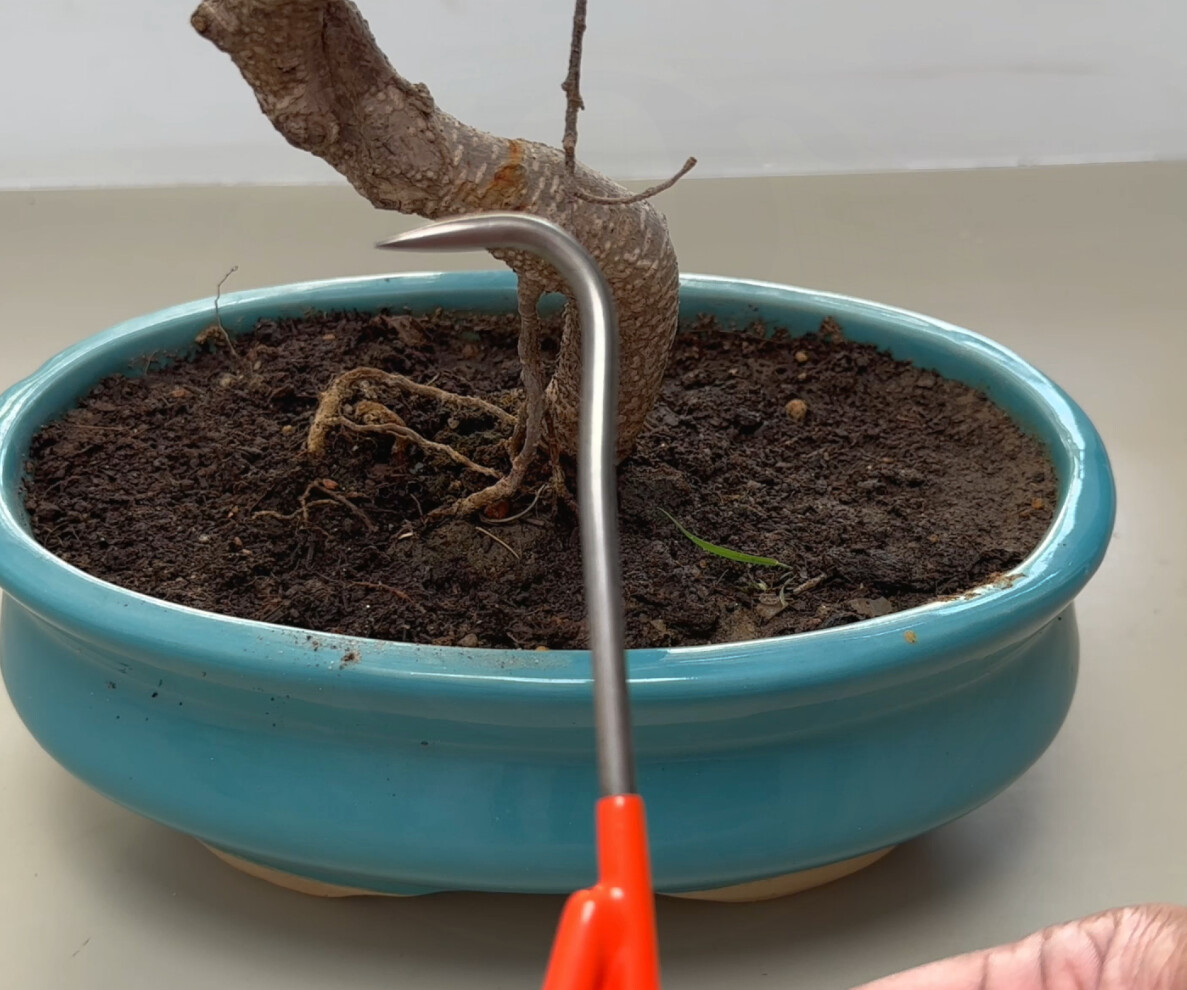
- Bonsai Root Rake Hook Tool Hack: Bonsai root hook is an indispensable tool needed while repotting bonsais. A simple way of making a bonsai root hook is to use large sized J hooks like these, which are cheap and easily available from a hardware store. You can sharpen the working point of this hook to your desired level. Now you need a handle to fix this hook. You can just use any wooden piece to make a handle, but the best solution to this is use a paint brush handle from an old paint brush. Just cut this part and make a hole into this handle and insert the hook and screw it tightly. You can then bend this hook to your desired level if needed. That’s it! Your bonsai root hook is ready to rake the roots.
- Thick Stem Hack: for faster development of a thick stem or trunk of any plant, you can place your pre-bonsai plant pot on a layer of gravel bed over the soil. The plant grows faster and thicker by sending out roots into the gravel bed through the drainage holes.
- Instant Bonsai Hack: As you all know making a true bonsai tree takes many many years if you are starting from a seed or a sapling. The quickest way of making and designing a thick bonsai tree is Air Layering technique which gives you an instant live bonsai tree to work on and save many years of work required to make a bonsai tree. You can check a detailed post and video on 5 different types of air Layering and some air layering tricks and hacks from HERE.
Happy Gardening and Happy Bonsai Making. Watch Full Bonsai Hacks Video below:
Well, Now these beautiful little adenium seedlings are about 2 months old.
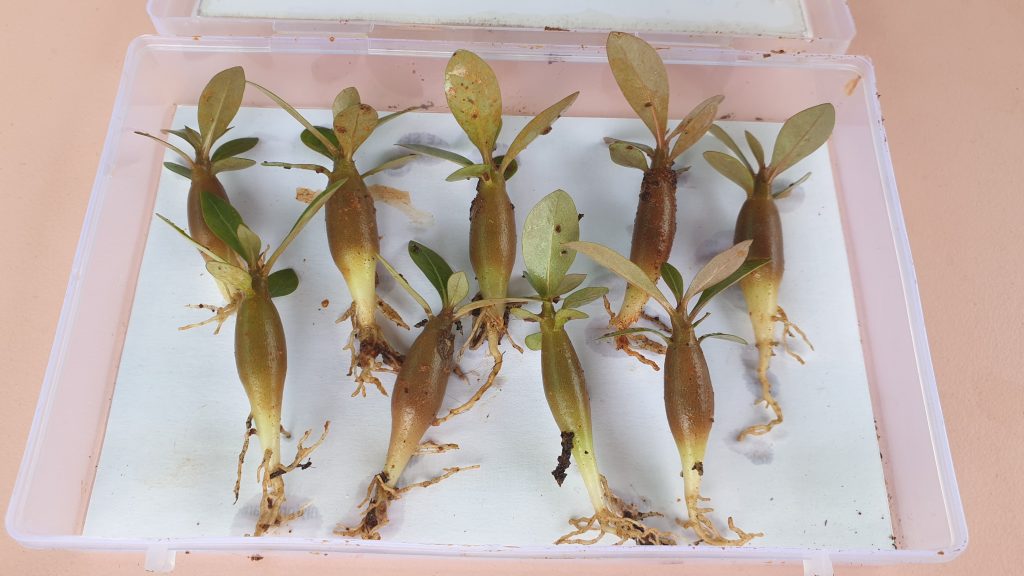
This is the best time to repot them into independent containers, because the nutrient requirement will increase as they grow and also increased chances of overcrowding and due to this the more aggressive ones will siphon supply off the nutrients from their neighbours affecting the weaker ones.
At about 2 months, they are about 2 to 3 inches in length and remember they are not so delicate or sensitive as you might think. You can transplant or repot them easily. But you need to remember few important points during the process of repotting and post transplant care.
Here are some 10 useful points to remember:
- Choosing Containers: You can use 4 to 6 inch clean new containers or clean up existing containers with baking soda or any mild disinfectant and make sure they have good number of drainage holes.
- Potting Mix: You can use any succulent potting mix with about 50 percent sand, Garden soil and perlite and other optional stuff as mentioned in one of my post on Potting mix for succulents and cacti.
- Taking out Seedlings: You can use the spoon method to carefully dig out the little ones by holding a leaf and gently digging and pulling out. This should be easy because we have germinated the seeds in sand and cocopeat.
- Inspect the seedlings and discard any rotting or rotten ones.
- Repotting: Have a look at the structure and the markings. The first mark is to demarcate the level above and below the soil. Make sure you insert the plant’s future caudex above the level of soil. If its too below the soil level, it can lead to rot and death.
- Optional Tap Root Cutting: This step can be performed after 6 months or 1 year to make the caudex more fatter. This time it may be little risky to cut the tap root at the mark shown here. I have shown all steps to make the caudex thicker in one my older episodes last year.
- After Repotting: Its always safe to either spray and antifungal solution like bavistin or water these with dilute antifungal mixed in water.
- Water Requirement: Check the soil for moisture before watering. Over watering can kill these little ones. Roughly you can water once in 3 to 5 days.
- Fertilizer: If you have added some compost into the potting mix, they don’t require any feeding for atleast 2 or 3 months. If you use NPK water soluble feed, water them with a 50 percent dilute solution of this once in 15 days for faster growth.
- Sunlight: This is very important. After repotting keep them in indirect light or even shade for 3 to 4 days and then shift to full sunlight once they are out of transplant shock.
To begin! I received these 5 bare rooted baby adenium plants about an year back, gifted by my dearest gardener friend Ram. These travelled over a 1000 miles to reach the destination in a great condition, This is because these are excellent drought tolerant plants and rightly called desert rose. So, you can safely purchase adenium plants online if it’s not available at your local nursery.
For beginners, Adenium Obesum is a succulent plant which stores lot of water in its stem and also the modified part of the stem called the Caudex. We have discussed these in detail in my other adenium videos.
Before I reveal you the three nursery secrets on growing adenium, I will quickly brief you on 5 important care tips for adenium.
- SOIL: This is the most important factor for successfully growing adenium. It’s a desert rose and hence prefers a sandy soil. Make sure you have atleast 50 percent sand or perlite mixed in your potting soil. For details on the perfect potting mix for adenium or any succulent, I have detailed episode on this topic. You can check that link at the end screen of this video.
- WATERING: If your soil is really well draining, the frequency of watering does not matter much, like for instance if you have lot of rains in your zone, its almost like daily watering. And also make sure, you have good drainage holes in your container. Otherwise, generally watering weekly twice is the general rule for adenium like any other succulent.
- SUNLIGHT: This is a very important factor for proper flowering. Adenium needs maximum sunlight and good humidity for flowering and growth. Atleast 6 hours of direct sunlight is a must!
- FERTILIZERS: Most recommend chemical fertilizers like water soluble NPK, but I always use organic ones like simple decomposed cowdung or vermicompost like a handful of it once a month. And during repotting mixing a table spoon of steamed bone meal will do the job and induce enormous flowering in all seasons except in it dormant season – that’s winter.
- PEST CONTROL: Its commonly affected by sucking pests like aphids, mealy bugs and mites. Weekly spray of 10 ml neem oil in 1 litre of water will easily control this problem.
Now, lets look into the three Nursery secrets on how to grow adenium from seeds.
To start this story, I purchased adenium seeds from amazon and followed all tips perfectly to germinate adenium seeds. I have shown this in a detailed video some time ago. You can check a link to that episode in the description below. But the result of these amazon seeds was really bad, not even a single seed germinated.
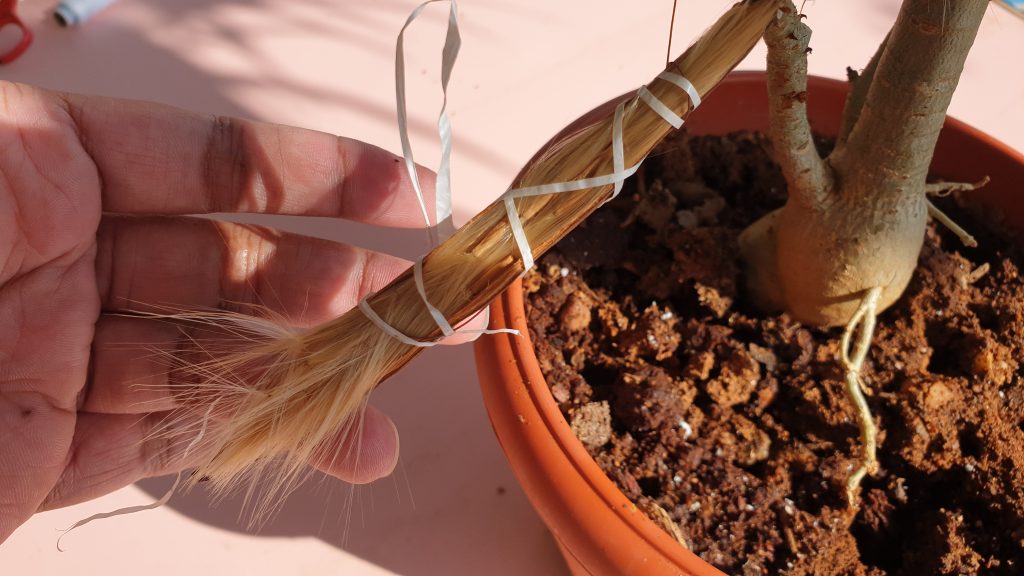
Then recently, one of my adeniums started developing a seed pod. First thing you need to do when you notice adenium seed pod is tie some thread around the pod to prevent spillage of seeds before the seed pod matures and releases seeds. It has a special seed dispersal mechanism by wind, where each seed had this fluffy stuff which is easily carried away by wind. Here you can see, I have protected the seed pod from its natural dispersal mechanism. When the seed pod starts drying and cracks open, it’s the time to harvest the seeds. Separate the seeds by gently pulling this fluffy stuff as shown in this pic.
So these are fresh adenium seeds we just harvested!
Now the first secret to get a great success rate in germination? These seeds
are very delicate and are more prone to fungus. So what you need to do
immediately is pour in some antifungal powder like bavistin or any antifungal
powder like Carbendazin + mancozeb combination like the SAAF brand powder. Coat
the seeds with this antifungal powder whether you keep them aside for storage
or plan to sow them immediately.
Now the second nursery secret: The growing medium. You can use pure sand or some cocopeat mixed in it. What they actually do is, take fine sand and sterilize it by keeping in full sunlight for atleast 2 or 3 days or if you are growing in small scale, you can even microwave this sand. I think if you are using anti fungal powder, this step is perhaps optional.
Now the third secret and then finally the results of this process on day 6, day 10, day 12 and day 15 in the video at the bottom of this post.
And one more thing: You also mix some antifungal powder into this sand or cocopeat. And while sowing the seeds try to maintain a space of atleast an inch to avoid overcrowding. You can do this better, here I have not done this perfectly.
Then finally, you also mix some antifungal into the water or spray can and use the same solution to spray or gently sprinkle some water once every two days. Do not flood the seeds with water, this can damage the seeds.
Please Watch the RESULTS on Day 5 till Day 15 in the Video below.