Well, Now these beautiful little adenium seedlings are about 2 months old.
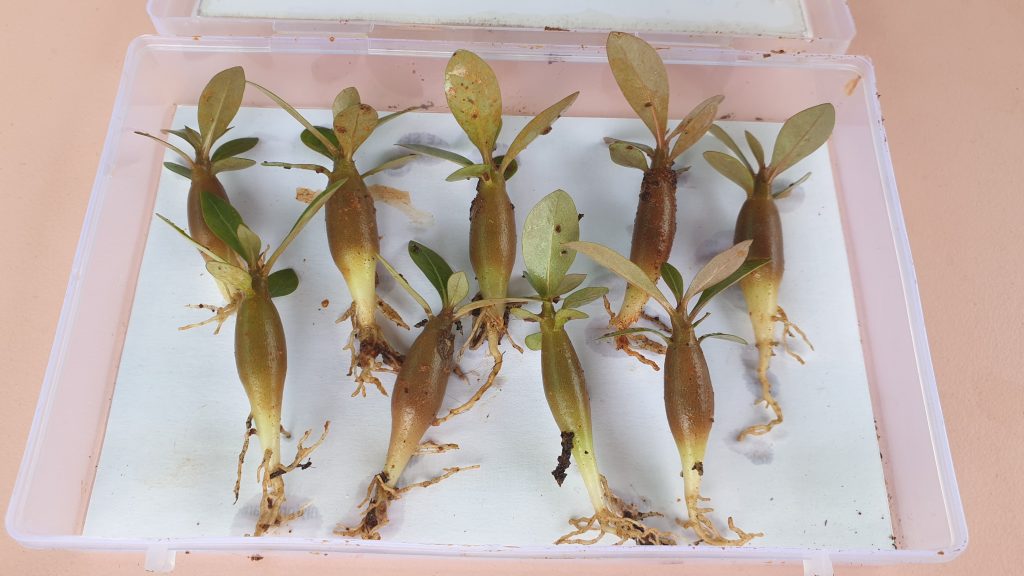
This is the best time to repot them into independent containers, because the nutrient requirement will increase as they grow and also increased chances of overcrowding and due to this the more aggressive ones will siphon supply off the nutrients from their neighbours affecting the weaker ones.
At about 2 months, they are about 2 to 3 inches in length and remember they are not so delicate or sensitive as you might think. You can transplant or repot them easily. But you need to remember few important points during the process of repotting and post transplant care.
Here are some 10 useful points to remember:
- Choosing Containers: You can use 4 to 6 inch clean new containers or clean up existing containers with baking soda or any mild disinfectant and make sure they have good number of drainage holes.
- Potting Mix: You can use any succulent potting mix with about 50 percent sand, Garden soil and perlite and other optional stuff as mentioned in one of my post on Potting mix for succulents and cacti.
- Taking out Seedlings: You can use the spoon method to carefully dig out the little ones by holding a leaf and gently digging and pulling out. This should be easy because we have germinated the seeds in sand and cocopeat.
- Inspect the seedlings and discard any rotting or rotten ones.
- Repotting: Have a look at the structure and the markings. The first mark is to demarcate the level above and below the soil. Make sure you insert the plant’s future caudex above the level of soil. If its too below the soil level, it can lead to rot and death.
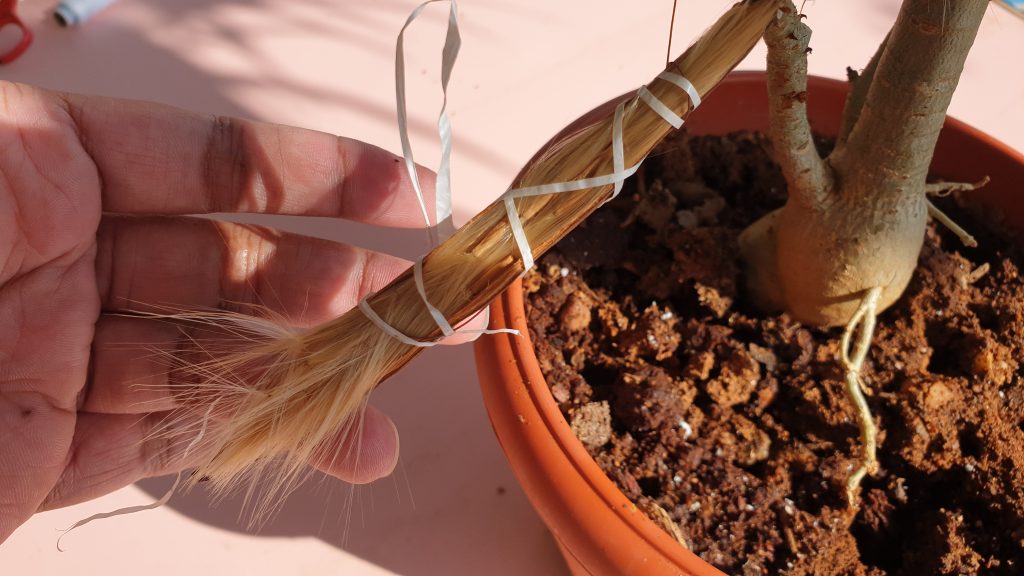
- Optional Tap Root Cutting: This step can be performed after 6 months or 1 year to make the caudex more fatter. This time it may be little risky to cut the tap root at the mark shown here. I have shown all steps to make the caudex thicker in one my older episodes last year.
- After Repotting: Its always safe to either spray and antifungal solution like bavistin or water these with dilute antifungal mixed in water.
- Water Requirement: Check the soil for moisture before watering. Over watering can kill these little ones. Roughly you can water once in 3 to 5 days.
- Fertilizer: If you have added some compost into the potting mix, they don’t require any feeding for atleast 2 or 3 months. If you use NPK water soluble feed, water them with a 50 percent dilute solution of this once in 15 days for faster growth.
- Sunlight: This is very important. After repotting keep them in indirect light or even shade for 3 to 4 days and then shift to full sunlight once they are out of transplant shock.
To begin! I received these 5 bare rooted baby adenium plants about an year back, gifted by my dearest gardener friend Ram. These travelled over a 1000 miles to reach the destination in a great condition, This is because these are excellent drought tolerant plants and rightly called desert rose. So, you can safely purchase adenium plants online if it’s not available at your local nursery.
For beginners, Adenium Obesum is a succulent plant which stores lot of water in its stem and also the modified part of the stem called the Caudex. We have discussed these in detail in my other adenium videos.
Before I reveal you the three nursery secrets on growing adenium, I will quickly brief you on 5 important care tips for adenium.
- SOIL: This is the most important factor for successfully growing adenium. It’s a desert rose and hence prefers a sandy soil. Make sure you have atleast 50 percent sand or perlite mixed in your potting soil. For details on the perfect potting mix for adenium or any succulent, I have detailed episode on this topic. You can check that link at the end screen of this video.
- WATERING: If your soil is really well draining, the frequency of watering does not matter much, like for instance if you have lot of rains in your zone, its almost like daily watering. And also make sure, you have good drainage holes in your container. Otherwise, generally watering weekly twice is the general rule for adenium like any other succulent.
- SUNLIGHT: This is a very important factor for proper flowering. Adenium needs maximum sunlight and good humidity for flowering and growth. Atleast 6 hours of direct sunlight is a must!
- FERTILIZERS: Most recommend chemical fertilizers like water soluble NPK, but I always use organic ones like simple decomposed cowdung or vermicompost like a handful of it once a month. And during repotting mixing a table spoon of steamed bone meal will do the job and induce enormous flowering in all seasons except in it dormant season – that’s winter.
- PEST CONTROL: Its commonly affected by sucking pests like aphids, mealy bugs and mites. Weekly spray of 10 ml neem oil in 1 litre of water will easily control this problem.
Now, lets look into the three Nursery secrets on how to grow adenium from seeds.
To start this story, I purchased adenium seeds from amazon and followed all tips perfectly to germinate adenium seeds. I have shown this in a detailed video some time ago. You can check a link to that episode in the description below. But the result of these amazon seeds was really bad, not even a single seed germinated.
Then recently, one of my adeniums started developing a seed pod. First thing you need to do when you notice adenium seed pod is tie some thread around the pod to prevent spillage of seeds before the seed pod matures and releases seeds. It has a special seed dispersal mechanism by wind, where each seed had this fluffy stuff which is easily carried away by wind. Here you can see, I have protected the seed pod from its natural dispersal mechanism. When the seed pod starts drying and cracks open, it’s the time to harvest the seeds. Separate the seeds by gently pulling this fluffy stuff as shown in this pic.
So these are fresh adenium seeds we just harvested!
Now the first secret to get a great success rate in germination? These seeds
are very delicate and are more prone to fungus. So what you need to do
immediately is pour in some antifungal powder like bavistin or any antifungal
powder like Carbendazin + mancozeb combination like the SAAF brand powder. Coat
the seeds with this antifungal powder whether you keep them aside for storage
or plan to sow them immediately.
Now the second nursery secret: The growing medium. You can use pure sand or some cocopeat mixed in it. What they actually do is, take fine sand and sterilize it by keeping in full sunlight for atleast 2 or 3 days or if you are growing in small scale, you can even microwave this sand. I think if you are using anti fungal powder, this step is perhaps optional.
Now the third secret and then finally the results of this process on day 6, day 10, day 12 and day 15 in the video at the bottom of this post.
And one more thing: You also mix some antifungal powder into this sand or cocopeat. And while sowing the seeds try to maintain a space of atleast an inch to avoid overcrowding. You can do this better, here I have not done this perfectly.
Then finally, you also mix some antifungal into the water or spray can and use the same solution to spray or gently sprinkle some water once every two days. Do not flood the seeds with water, this can damage the seeds.
Please Watch the RESULTS on Day 5 till Day 15 in the Video below.
Generally, for most plants, rain water has lot of benefits that ordinary bore or tap water. And growth of plants is accelerated in rains and they appear lusher, greener and cleaner in rainy season.
Please do not skip these few important scientific reasons, am gonna discuss before listing out the top 5 hacks and tips. It will hardly take a minute.
Well, There are many reasons why rainwater is more suitable for plants than tap water or bore water, but the most important is simple chemistry – The rain water is free of chlorine and fluoride which is a cause for leaf burning specially at edges. And more over it has extra oxygen in form of h2o2 – that is hydrogen peroxide in small amounts, which is so beneficial for plants. I have separate videos on H2O2 in gardening and also leaf browning and leaf yellowing topics – you can check that later from my channel.
Another important concept to remember is: Since air is 78 percent nitrogen and nitrogen during rain, is available for immediate uptake for leaves and roots, and this makes the plant more green and lushy.
THE BAD NEWS IS ADENIUMS AND SUCCULENT PLANTS MUST BE PROTECTED IN RAINY SEASON TO PREVENT THEM FROM ROTTING. The problem of death in adenium during the rainy season is NOT from rain. Just like how other plants benefit from rain, Adenium too can derive these benefits of rain, but we need to protect it from rot in rainy season by following some simple practical tips to help Adenium.
Now we will look into top 5 important tips and hacks to protect adenium in rainy season.
- SHIFTING Adeniums to Shelter from Rains: This is the First thing you think about to protect adeniums from rotting in rains, specially if its raining heavily and almost daily. But this is not always practical for many of us. One reason because it also requires sunlight for proper growth and flowering and also for practical reasons like lack of space and stuff like that. You can also consider building a temporary shelter by tying a waterproof plastic sheet or any other similar solution specially if the rain drops are too big and can hit the soft flowers and buds and damage them. But if you have strong winds blowing, this might fail.
- SOIL check: Recheck the soil drainage system. Firstly check the drainage holes and secondly, the soil quality for draining out water immediately. You can consider changing the potting mix and choose a much more well draining type of soil. You can mix something like orchid mix or cactus mix into the soil or lots of perlite, piece of pine bark, more sand and pebbles and things like that. Also do not add any fertilizer into this mix – Because as I already said, during the rainy season Nitrogen in the air is already high.
- USE OF A FUNGICIDE: You have to use fungicide in many situations in rainy season. Firstly spray a fungicide at the beginning of rains and if it raining more frequently, spray every 3-5 days, then atleast weekly once. Then also if you are repotting adenium, you can water your adenium plant with a very dilute solution of fungicide. What I use is a fungicide powder called SAAF – tahts its brand name. Its actually Carbendazim 12% + Mancozeb 63% WP. SO it’s a Double action fungicide – systemic as well as contact fungicide. For beginners, Contact fungicide effect is from spraying on the plant and systemic effect by getting absorbed from the roots into the water conducting tissues of the plant – like how we use systemic antibiotic injections intravenously and topical or contact creams or ointments on our skin – that’s similar to contact fungicide.
The Dosage of this fungicide: You can use a quarter teaspoon per liter of water to spray this fungicide and little more diluted if you are watering your plant.
- PROTECTING YOUR BABY ADENIUMS OR SMALL ADENIUMS, Better shift them to shelter and do not expose them to Rains, because the roots are young and not strong and can rot easily.
- Then Coming to a Simple Adenium Hack in rainy season: Take a polythene sheet. You can also cut this sheet from your shopping bag. Then cover it around the plant and container like this and tie a twist tie or any wire tightly around the stem. This hack can be used if you are not following any of the tips I mentioned in the video, but still want to protect it from rain.
What you can do is – use this hack plus spray a fungicide once a week over the plant. I think this should be the minimum effort to save adenium from rains.
RELATED VIDEOS:
1. ADENIUM HACKS TO MAKE FAT CAUDEX