Having a beautiful, lush green lawn is every gardener’s dream. It really makes your home and garden landscape look beautiful.
We would all like to have that best-looking perfect lawn, but it is not always easy to achieve. Here in today’s episode, we will show you step by step, how to grow lawn grass successfully from seeds without the need of hiring a landscape designer and stuff like that.
Whether you want to fill a bare spot in your lawn or grow a brand-new lawn grass from the scratch, please read till the end, as it might surprise you with lots of useful tips and tricks. Let’s begin.
- Type of Lawn Grass Seeds?
This is the first important step where most inexperienced gardeners and home owners get deceived while purchasing grass seeds.
PURCHASE LINKS:
BERMUDA GRASS SEEDS: https://amzn.to/3P5npAr
There are many different grass species which thrive in different climates. Like, there are cool-season grasses which grow best when temperatures are 60-75 degrees Fahrenheit and warm-season grasses which thrive from late spring through summer. You can check the packet instructions and labels for this info.
Well, some of the common grass types to mention are Bermuda grass or doob grass, buffalo grass, bentgrass, ryegrass and so on. In this context I would like to highlight you on this important lawn grass seed scam mostly going on online even at big websites like amazon. Some sellers list out as Bermuda grass and the seeds you receive are some millet seeds like foxtail millet seeds or cattle fodder grass seeds which are actually very cheap. These types of seeds are usually fed as budgie food grains but they are selling as Bermuda grass seeds. You must know how to identify the proper seeds before planting and avoid these types of scams. These are mostly non-returnable items and also amazon does not publish negative reviews when we try reporting these fake items. We will grow these fake seeds in one container and genuine Bermuda grass seeds in another container as well as over the lawn area and show you the results in the end.
PURCHASE LINKS:
BERMUDA GRASS SEEDS: https://amzn.to/3P5npAr
- Preparing the Ground and Soil:
This is a very important step and you should know that the tender roots of young grass plants will not grow well in compacted soils.
Choose the location you want to grow lawn grass whether its your front patio or your back-yard. Optionally, You may also have to level the ground surface by adding some loose soil over your lawn area, days before planning your lawn grass.
Well, Firstly, loosen the top 2-3 inches of the soil. If it’s a small area, you can use a hand cultivator or if it’s a larger area you can dig with a shovel or hoe. After digging, you need to rake it smooth to break up any soil clods and rake the soil out into fine particles. Then you need to water the area thoroughly before planting seeds, because damp soil encourages speedy germination and provides immediate moisture to emerging roots.
- Planting the grass seeds:
For home gardens, you can just use your hand to distribute the seeds, flinging it out over the area. Spread them out evenly over the soil surface, neither too crowded nor too sparse.
- Covering the seeds:
After the seeds are sown, covering them is very much important to protect them from birds and also preventing them from washing away in a heavy rain.
You can just use plain soil to cover the grass seeds after planting. But best thing to do is to use a mixture of soil and a water retaining stuff like cocopeat or peat moss to cover them. Like 50% soil and 50% cocopeat and optionally compost like decomposed cow dung or vermicompost. You can mix all three in equal proportions or at least add some 20% compost. Cover the seeds evenly with this soil-peat mix to about one quarter of an inch but never more than half an inch.
- Watering:
This is most important step for germination.
Keep the top layer of soil moist (but not soggy). Too much water is as bad as too little, and avoid vigorous watering with a hose and stuff like that and this could wash the seeds away. A misting or shower attachment on your watering hose can cut down on the amount of force you use.
Till germination, Water at least once a day early in the morning and depending on the climate again in the afternoon if the sun and wind have dried out the soil.
But, once the grass seed germinates and begins to grow, reduce the frequency of irrigation but water more deeply. Once your new grass is about two inches tall, reduce your watering schedule to twice or thrice a week depending on the climate, but water until the ground is wet down to a depth of about three inches.
- Germination:
We will show you the results of seeds grown in containers as well, including the fake bermuda grass or fodder grass seeds.
PURCHASE LINKS:
BERMUDA GRASS SEEDS: https://amzn.to/3P5npAr
Germination should begin within a week depending on the type of grass seeds. In my case, you can see germination has happened within 3 days. On the third day, you can see these cute tiny grass seedlings popping out.
You can check the results in these containers. On Day 5: This one is the result for genuine Bermuda grass and this one is the fake Bermuda grass seeds. Just look at the grass blades and spot the difference. The fake fodder grass has wider leaves.
Then you can see the results after 1 week in containers and the ground. The whole area should appear green in about 2 weeks’ time.
We will make another detailed episode on how to take care of lawn grass like fertilizing lawn grass, trimming lawn grass and stuff like that.
These zero or low maintenance plants do not require any special fertilizers for growth and flowering. But you can add a handful of compost like cowdung or vermicompost or any compost once 3 to 6 months.
Here’s my list of top 10 low maintenance houseplants for lazy gardeners:
12: Norfolk Island pine: Also known by many as the Christmas Tree. This is a hard to kill plant in tropical climates and needs very little care to survive. It grows well in bright indirect sunlight and also direct sun. It needs watering every other day or even less depending on the climate you live in.
11: Succulents & Cacti: Most people think succulents are hard to maintain and they die even after proper and intensive care. This is the mistake they do. They actually thrive well on neglect. They need very less frequent watering like once or max twice a week. They do well in full sunlight as well as indirect bright light depending on the type of succulent.
10: Spider Plant (or Chlorphytums): This is one of the best starter plant. Spider plants are mostly grown in hanging baskets. But they thrive in any container or any type of soil or potting mix. They grow very well in shady places with indirect bright light. They do not need daily watering. you can water on alternate days or even once or twice a week depending on the climatic conditions.
9: Peace Lily: Peace Lily is one of the most beautiful low-maintenance flowering plants you can add to your home garden. Additionally, the Peace Lily is also a good air purifier plant. This can be grown indoor or outdoors and requires bright indirect sunlight. It has beautiful shiny green leaves with creamy-white hooded flowers. You can water it on alternate days or even lesser depending on the climate.
8: Jade Plant: This is actually a succulent plant which requires very less frequent watering, like once or maximum twice a week even in summer season. This plant requires at least 2 to 3 hours of direct sunlight for proper growth, preferably morning sunlight.
7: ZZ Plant: This is another attractive ornamental plant that requires very little care. It’s a beautiful plant with glossy green leaves and also an air purifier plant. It is a drought tolerant plant and requires very less frequent watering like once or twice a week. It can be grown indoors or outdoors in shady or bright locations. It doesn’t need direct sunlight.
6: Syngonium: This is another beautiful ornamental flowering plant with an attractive foliage. This needs alternate day watering or at least weekly twice watering. It grows in indirect bright locations as well as in direct sun. If kept in direct sun, avoid hot noon sun and water it daily.
5: Snake Plant (sansevieria): These are actually true zero maintenance plants and can survive the worst of the conditions. They require very less watering and even sunlight. They adapt to any conditions and grown in dark locations as well as bright locations and also in direct harsh sunlight. They come in many beautiful varieties and colors.
4: Lucky Bamboo: This is a dracaena species and grown mostly in water. But it grows equally well in soil too. If grown in water, this is a very low maintenance plant and requires changing water once in 10 to 15 days. Its grown indoors and needs very little light.
3: Philodendrons: These are again zero maintenance plants that need very little light to grow. They can be grown indoors or outdoors in shady places. They need less frequent watering like once or twice a week.
2: Aloevera: If you can’t remember the last time you watered your plants, aloe is perfect for you. This is a succulent plant which store water in its thick fleshy leaves and can survive many days without watering. It grows indoors as well as outdoors, but can get leggy if it does not get sufficient direct sunlight.
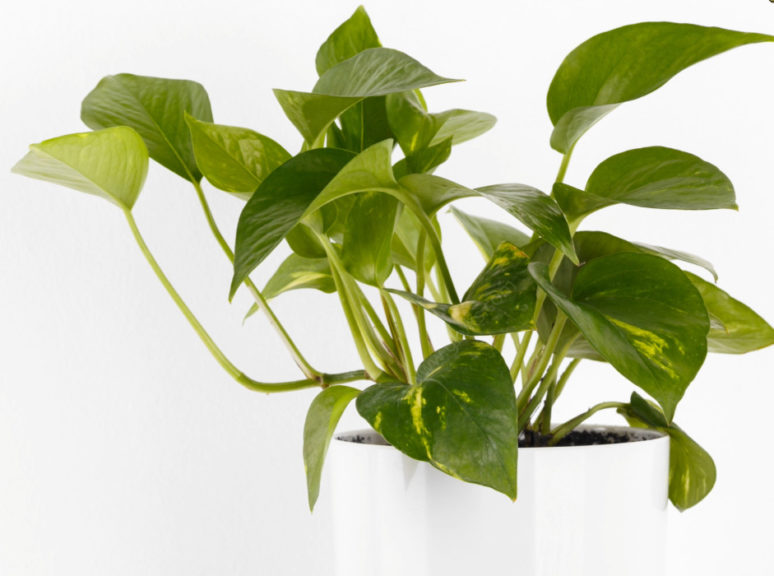
1: Money Plant or Pothos: This is also called Devil’s ivy, because it’s a hard to kill plant and survives even the worst conditions. Pothos come in a wide variety of beautiful colors and varieties like golden pothos, marble queen, marble prince, neon and so on. They are grow indoors mostly in water as well as outdoors in bright shady locations. You can check a detailed episode on Money plant and secrets to get very large size leaves in pothos, from a link in description below.
The other low maintenance plants that need a mention are: Dieffenbachias, Umbrella tree or schefflera, Plumeria or Champa tree, Dragon tree, Rubber tree, and Pepperomias – but not variegated ones – any variegated plant needs more sunlight exposure because the pigment chlorophyll essential for photosynthesis is lesser in variegated plants.
Now I will tell you two fruit trees I have grown that need no special care except watering, sunlight and occasional handful of compost. The first one and my most favourite tree is Mulberry tree, which can also be grown in containers to bear fruits. The second one is a fig tree. Choose grafted trees if you are growing in large containers.
- Rooting Hack: For faster and guaranteed rooting of stem or branch cuttings, take a small piece of fresh aloe vera leaf and insert the cutting into it and then plant into the soil. Roots grow as early as 10 days depending on the plant you choose.
- Candle Hack: Seal the upper cut end of your plant stem or branch cutting using few drops of candle wax. This helps prevent moisture evaporation and result in faster rooting.
- No Browns for Composting? Use a paper shredder and use the shredded paper and card board to add into your compost bin for faster and smell free composting.
- Easy Tomato Stakes: Tomato plants require support to avoid awkward bends and also to get the best yield. String Support your Tomato plants using a small piece of GI metal wire. Make it into a U-shaped loop and insert it near the roots. Tie one end of a string to this and the other end to some support at the top.
- Banana Peel Fertilizer for Flowering: To make banana peel tea, soak pieces of banana peels in water for 2 to 3 days. Dilute this liquid with water in 1:5 ratio and water your plants to provide potassium to your plants which increases flowering in plants and also makes the flower size bigger.
- Anti-Gravity Plant Support: While growing climber veggies, do not take them to a height above 6 feet, but instead support in a slope like fashion, like take it to a height and then slope the growing ends downwards to assist in long-distance transport of water and nutrients for healthy growth. The arch like trellis is the ideal support fence for growing climber or creeper veggies.
- Hairs to Roots: Insert tomato seedlings as deep as possible to increase the density of roots formed from tiny hairy projections from tomato stems and this makes the plant stronger to produce the best yield.
- Big Leaves: To get large sized leaves in your money plant, use a moss stick or coir stick to anchor the aerial roots to it. Wet the moss stick whenever you water the money plant.
- Onion + Aloe Vera Rooting Agent: Making a paste using onion and aloe vera gel and dipping the cuttings into it for few minutes before planting in soil will help in faster and guaranteed rooting.
- Spoon Transplant: To transplant your seedlings, use a spoon, dig out as much soil with it including the roots of the plant and hold the leaves of the plant and not the STEM to pull out, because this can squeeze and damage the water and food conducting tubes – xylem and phloem and the little plant may die.
- Grow From Junk: Never throw away a pine apple crown, just remove the bottom leaves and keep the bottom inserted into a glass of water for a week and then transfer to a container. It will bear fruits within a year.
- Eggshell Water: One eggshell contains about 2gms of calcium. When you boil eggs, a small percentage of this calcium and phosphorous is released into the water. Do not throw away this water, but use it to water your plants that require a lot of calcium – like tomatoes and peppers as well as flowering plants.
- Cello Tape Pest Trap: Wrap the cello tape in reverse on your fingers and use the sticky part to touch on leaves infested with pests like aphids, whiteflies and mealybugs.
- Clay Soil Hack: Remove Clayey or sticky soil from roots using this simple Hack: When you bring your plant from a nursery and start repotting, most often you find they have stuffed the plant in a clay-rich sticky soil. You can remove this soil without damaging the roots by soaking the root ball in water for few minutes till this soil dissolves. Then you can repot this plant in a well-draining potting mix.
- Root Teasing: Always Loosen up or tease your roots before repotting into a new container.
- Toilet Paper Cloning Hack: Use Aloe vera and Toilet paper to produce roots faster during air layering your favourite plant.
- Aspirin Hack: During conventional air layering to produce faster and better roots, use one tablet of aspirin 350mg per litre of water and add this water you’re the potting mix and then wrap it around the injured stem for faster and dense root formation.
- Hydroponic Cloner: For faster rooting, make your own hydroponic plant cloner using a plastic bucket and an aquarium pump. Healthy Roots develop within 8 days.
- Free Calcium: Egg shells easily dissolve in vinegar and release free calcium to your plants. Make egg shell powder and the add about a cup of vinegar to a cup of egg shell powder and stir nicely and leave it for any hour. Then dilute this to 1:100 or more to water your plants and treat acute calcium deficiencies which can produce blossom end rot disease in your fruits and veggies.
- Simplest Plant Cloner: Use any container and place a couple of aquarium air stones to pump oxygen into the water. This helps in faster and guaranteed rooting of any plant cuttings in water.
- Wheel-Barrow: No Wheelbarrow to move garden stuff? Do not worry, the cheapest alternative is a large cloth or an old bed sheet. Just load on the heavy objects and drag it along.
- Aspirin for Rooting: When you propagate cuttings in water, do not forget to add a small piece of Aspirin tablet into it for faster and stronger root development.
- Seed Split Trick: Split the Cilatro or Corinader seeds before planting them the sand paper paper method and apply gentle scraping pressure to split the seeds and do not crush or damage them using a heavy objects like these. This helps to grow enormous cilantro harvest.
- Scrape and Sow: Use sand paper to scrape the hard seed cover of certain seeds like apple, chickoo and those with hard seed over for faster seed germination.
- Treat Leaf Curl Virus using Asafoetida: Take 500ml of sour butter milk. Add one teaspoon or about 5 gms of Asafoetida powder to it and mix well. Let it stay for 1 or 2 hours. Sieve this solution and Spray thoroughly over the affected plant including the underside of the leaves. Repeat this, every 3 days for 3 – 4 times to completely cure the leaf curl disease.
- Egg Shell Planter: You can use egg shells to sow seeds. To make drainage holes, scrape with a sand paper and use a thin drill bit to make a hole without breaking the shell.
- Egg Trays: Card board Egg trays can be used as seed germination trays. You can directly transplant the seedling along with the card board into the soil, as this is bio-degradable.
- Chalk Sticks: Chalk is chemically Calcium Carbonate. You can bury a chalk stick into the soil while planting your veggies. This really works wonders for plants like Tomatoes, Peppers, squashes, egg plants and almost any vegetable plant.
- Strong Roots: Strong Roots means a healthier plant with a better yield. In its early growth phase, adding a source of phosphorous like bone meal powder or organic rock phosphate powder will produce stronger roots and produce a better harvest.
- Seed Viability Check: An Easy method to check viability of your larger seeds is to pour them into a bowl of water. If the seeds are floating, this means they are dry and not viable. Discard them and use only those seeds that sink to the bottom.
- No Garden Gloves? Scrape your nails into a soap before working with your garden soil or potting mix. This helps in cleaning your hands easily later on and also the dirt won’t enter into your nail beds.
- Repel Animals: A simplest way to repel Some animals like cats, dogs and rabbits – is to soak a some pieces of cloth with vinegar and stuff them in some areas of your garden. These animals cannot withstand the smell of vinegar and may not return if you repeat this process for few days. Similarly using Asafoetida wrapped in a piece of cloth will deter these animals and certain insects.
- Magnifying Lens: Use a Magnifying Glass to closely examine and diagnose your plant pests and insects to identify them and follow the treatment accordingly.
- Tea Fertilizer: You can also use tea waste or coffee grounds on flowering plants as an organic fertilizer to boost blooms.
- Tea waste compost: Add used tea waste or coffee grounds into your compost bin for faster composting because earth worms digest them very fast.
- Seed Spacing: You can do perfect seeds spacing for Tiny seeds like spreading them apart in a row on toilet paper – for better visibility and even spacing and sowing. You can make a seed tapes either in a row or a square or round seed board specially for carrot seeds for even spacing and better growth and ease of harvesting.
- Over-Ripe: Garden vegetables and fruits that become over-ripe are an easy target for pests. Remove them as soon as possible to avoid pest growth.
- Faster Germination: A simple hack for faster germination and healthy seedlings is to soak seeds in Epsom salt solution for a couple of hours before planting – like half a teaspoon of Epsom salt in 100 ml of water. You can also spray Epsom salt solution on your seeds and seedlings for healthy outcome.
- Pick Small: You can Pick small seeds for sowing with a stick or tooth pick dipped in water.
- Acidify Soil: For Acid loving plants like Rose, Hibiscus or Hydrangeas, use 5gms of Alum powder in 1 litre of water once every 15 days and this will boost flowering.
- Soil PH Test Using Litmus Paper: Mix Water and Soil in 1:1 ratio. Dip the litmus paper and match the color with your color coding chart that came along with your litmus paper kit.
- A Rough Soil PH Test Method: Take a soil sample and pour some vinegar. If it fizzes and bubbles you have an alkaline soil. What if the soil is acidic? Add baking soda one or two teaspoons and mix it with soil. Then wet the soil baking soda mix with distilled water. If it fizzes and bubbles your soil is acidic, because the acidic content in soil reacts with a base or alkaline stuff like baking soda.
- Free Bio Seed Pots: Never throw away the toilet paper card board roll. But use it to make seedling cups which are bio degradable and can be directly planted into soil without disturbing roots.
- Paper pots: You can also make seed pots by rolling newspaper and even this is bio degradable and similarly you can directly transplant with the pot into the soil or into a larger container.
- Mosquito Repelling Plants: Growing plants like Lemon grass, Citronella, catnip, basil, marigolds, eucalyptus and many other plants helps deter mosquitoes.
- Turmeric Treatment: You can use turmeric powder from your kitchen treat and prevent rose-dieback disease after pruning your rose bush.
- Silica Gel Packets: Never throw away these tiny sachets, use them in your seed storage container as desiccants which increases your seed life and protects them from fungus.You can also use these to preserve and protect powdered gardening stuff like bone meal, fungicide powder, rooting hormone, etc. Just tape the sachet to the underside of the container lid and that’s it.
- DIY Watering Can: Take the base of a soda bottle and place it around one end of a pvc pipe. Heat it up with a lighter. It should shrink and clamp around the open edge. No glue needed. Use a pin and poke some holes in the bottle base. Next, cut the edge of the pipe at an angle using a saw blade. Next insert the pipe into the inlet and use some hot glue to hold it in place. Optionally, colour it to get that beautiful look.
- Mini Green House: Use plastic bins or containers as mini green houses or poly houses for faster seed germinations.
- Do Not Kill: Avoid spraying a pesticide on the flowers. This is to avoid any harm to beneficial Pollinator insects like butterflies and honey bees which are essential for pollination and fruit formation.
Before we start, I always start with the word “Organic Gardening” which uses natural and organic sources of fertilizers and pesticides. Please avoid the use of chemical fertilizers and pesticides to protect our mother earth from the hazards of chemicals. Now, Let’s list out the 10 organic secrets and tips to boost flowering in Hibiscus bush.
10. REPOTTING: Most of us think repotting is the first and foremost task as soon as you bring your plant home from a nursery or a garden store. No! This is not true. Do not repot immediately. Allow your plant to settle down for at least one week to its new place and then consider repotting. During repotting, you need to mix some important ingredients into the potting mix like for a 12-inch pot, roughly about 1 tablespoon of steamed bone meal powder which is a great source of phosphorous. Phosphorous strengthens the root system and a strong root system is indispensable for flowering and plant growth. The vegan alternative to bone meal is Organic rock phosphate. Optionally you can also mix the Mycorrhizae fungi – the beneficial fungi or even pseudomonas and Trichoderma powder. You can check my detailed posts on these topics from HERE.
9. CONTAINER SIZE: A simple concept to remember while choosing your pot size is: if you choose a deeper container, the plant will start focussing more on root development due to increased soil space and less on flower production. Though this may be useful in the long run. But to get faster results and boost flowering, the best one is a container that is wider than the usual nursery pot, but still not too deep. Like for instance, if your plant came in a 6-inch container, go for a 8 inch container. If you choose this method, you might need to repot it every year in a graded manner like increasing 2 inches every time you repot.
8. LOCATION: Keep your plants away from the traffic and pollution. Dust accumulating on the leaves can impair photosynthesis – that’s plant food production, which in turn reduces plant growth and flowering. It can also reduce the flower size. So, you might want to remember this tip to get big sized flowers. The solution to this problem if you have no option to shift the plant to a better location is – misting the plant with water and cleaning the leaves with a soft cloth. Or if you have lots of plants, then using your watering hose in shower mode and gently pressure wash your plants while watering.
7. SUNLIGHT: Place your plant in a location where you get adequate direct sunlight. Hibisucs needs at least 6 hours to 8 hours DIRECT SUNLIGHT for proper flowering. Without direct sun, you cannot expect hibiscus to flower. If it’s too hot like in summer season or to protect it from noon sunlight which can sometimes cause leaf burning and drying, you can install a 50% green shade net in summer season.
6. WATERING: If you are growing in containers, daily watering is must specially in summer season. Here you don’t need to check using moisture meter or finger dip method. Just daily watering and deep watering. If it’s winter season, it may need less frequent watering depending on the zone you live in. One most important thing to check is the drainage hole of your container. Check for its patency. Make sure water flows out of it after you thoroughly water your plant. Water stagnation can result in root rot and death of your plant. Do not worry about over watering if you have a patent drainage hole and also if you are using a well-draining soil mix. We will discuss about the potting mix shortly.
5. PEST CONTROL: Controlling pests is very important step to keep the plant healthy and blooming. Examine the plant closely for pests and insects including underside of the leaves. Common pests like whiteflies, aphids, mealybugs can be easily eliminated using organic neem oil + liquid soap spray weekly once. Depending on the ppm concentration of your neem oil brand, you add 5 to 10 ml of neem oil per litre of water and few drops of liquid soap. Shake well and spray this once every week to treat pests and once every 15 days as a preventive measure.
4. RAKING OR TILLING THE SOIL: This is just loosening your top soil using a raking or tilling tool. This is an important step everyone must follow before applying any fertilizer or manure to your plant. Raking or tilling the soil is recommended once every 15 days, which improves soil aeration and has many benefits. Make it a habit to rake the soil and then apply your fertilizer every 15 days.
3. POTTING SOIL: Here you should remember few important factors like:
a) Soil PH b) Thing to mix in Potting soil to get more flowers c) Keeping the soil well-draining. The First factor is PH. Hibiscus prefers a slightly acidic soil like around 6.0 +/-0.5. If you have a PH testing meter, you can alter the soil ph to acidic by using Alum powder hack. Even if you do not have this meter and your plant is not performing well, you can roughly add about 5 gms of alum powder in one litre of water once every 15 days to maintain this acidic level, which is very important for absorption of nutrients in the soil. The other alternative to Alum is to use 1 – 2 teaspoon of white vinegar per litre of water weekly once to make your soil acidic.
Now the potting mix recipe. To get adequate flowering, you can follow a simple formula: 30% Garden Soil, 30% Compost like cow dung or vermicompost and 30% Cocopeat or Peat moss. 10 percent additional stuff like bone meal powder, neem cake powder, mycorrhizae, Trichoderma, etc as discussed earlier.
2. FERTILIZER: In this video, I will be talking only about organic fertilizers and not chemicals like NPK or DAP.
You add a handful of decomposed cowdung or horsedung or even goat dung or vermicompost on the top layer of the soil once every 15 days after nicely raking or tilling the top soil. This should be the minimum fertilizer use and frequency to get big sized flowers as well as increase flowering. If you want to get still better results, You can also use compost tea sprays or even mustard cake tea sprays or watering and other foliar feeds once in a while like once in month. You can also prepare a Cocktail Fertilizer Powder containing most of the useful organic fertilizers available. You can check a detailed post on how to prepare this mixed fertilizer powder.
1. PRUNING: Yes this is another important step which many of us neglect. Some newbie gardeners actually hesitate to trim the plants. But this should not be the case. Pruning or trimming the plant branches encourages the formation of more branches and hence more flowering. You can soft prune or trim the plant all round the year. And you can do hard pruning once in a year. You can check detailed post Pruning Tutorial – on when to prune and how to prune and what pruning tools you need. You also need to perform deadheading of the flowers from time to time. Dead heading means removing the dead and dried flower along with its twig or branch and this is another important step for maintaining blooms as this will divert the energy to plant growth and more flowering rather than seed formation.
Aloe vera plant needs no introduction. I am sure most of us have an aloe vera plant in their homes, either indoors or outdoors in the garden. Aloe vera is one of the NASA recommended air purifying plant, which has been proven to remove the harmful benzene and formaldehyde from indoor spaces.
Now, let us look into 3 simple and useful tips on how to grow thick and fleshy Aloe Vera leaves.
- SUNLIGHT: This is one of the most important factors that decides the thickness of your aloe vera leaves. The common reason for thin, long or leggy aloe vera leaves is keeping them indoors in spaces with not enough light. No doubt, it’s a hardy plant that survives low light conditions, but it won’t grow to its full potential if you do not keep in in direct sunlight. Remember to get a thick and fleshy aloe vera plant, you must provide direct sunlight of at least 6 to 8 hours. Like starting from early morning sun till noon sun. Try to avoid the harsh noon sun, which can sometimes burn the leaf tips and edges, especially in summer season. If you prefer to keep it all day in direct sunlight, you can install a 50% green shade net to protect it from harsh sun and let it enjoy the pleasant sun for the entire day. If you are growing indoors, you need to keep it in full direct sun light at least 2 to 3 times in a week or you can grow it under a good quality LED grow light.
- ROTATION TECHNIQUE: This is another useful trick to keep your plant healthy and get those thick and fleshy aloe vera leaves. To keep your plant growing evenly, rotate the container at least a couple of times every week so that all of its leaves get an equal amount of sun light for photosynthesis.
- WATERING: This watering trick for aloe vera is the most important tip to get thicker and fleshy aloe vera plant. You know, aloe vera is a drought-resistant succulent plant which stores most of its moisture in its leaves in the form of gel. We all know the medicinal and various other uses of this aloe vera gel. We will not discuss about that in this video. To understand this trick, you need to know what happens to aloe vera when you deprive it of water. If you let the soil go very much dry for too long, your plant will begin to use the water reserves in its leaves, causing them to shrivel and shrink. Of course, we do not want this to happen. So, the right technique to water aloe vera plant is, Yes! Deprive it of water, but not too long. Make it a lot thirsty first and then provide it will lots of water to drink. Practically, this is done by allowing the top 2 inches of soil to dry out completely. You can check this using the finger dip method or a moisture meter if you have. Water it only if the top soil is completely dry. And Watering should be thorough and deep till the water flows out of the drainage holes. This simple hack helps to grow aloe vera leaves thicker and fleshy.
If you want to know the complete care tips for aloe vera plant like fertilizer, pot selection and other useful points, you can check my detailed post on aloe vera care tips.
Lemon grass also known as citronella grass is a wonderful herb that adds a pleasant and appetizing citrus flavour to in your soups, stir-fries, and teas. It grows into a lovely arching grass clump that looks really beautiful in your garden.
Lemongrass has anti-inflammatory and anti-septic properties and has loads of health benefits including protection from heart attacks by lowering your bad cholesterol and fats. We will not be discussing the health benefits of lemon grass in this post. One more point to mention is, it’s a mosquito repellent plant that drives away mosquitoes and other harmful insects but luckily it attracts beneficial insects and pollinators like honey bees and butterflies.
Now, let’s quickly look into some useful tips and tricks to grow and propagate or multiply lemon grass starting from a small piece or a small plant and grow it quickly into a large plant.
- SUNLIGHT AND LOCATION: Many people try to grow lemon grass in shade, this will not work. Plants growing in shade will be sparse and may attract pests. Lemon grass plant likes a lot of heat and light and grows well in warm and humid conditions. So, grow it in a location that receives maximum amount of direct sunlight, at least 6 hours a day. However, in hot summer season or to protect it from noon sun, you can optionally install a green shade net that filters light upto 50%.
- CONTAINER SELECTION: This is very important. Do not try to grow lemon grass in small containers. Choose a wide and a deep container. The wider container allows it to self-propagate and it spreads like a grass clump. Also, it gets root bound quickly and this is another reason to choose a large and wide container.
- POTTING SOIL: Lemon grass grows quickly and spread rapidly if you use a well-draining soil rich in compost like cowdung or horsedung or any compost like vermicompost or leaf compost. To make a well-draining soil mix you can mix stuff like cocopeat or peat moss like about 30-40%, garden soil 30-40% and 30-40% compost like cowdung.
- WATERING: This is another important factor in successfully growing lemon grass. Lemongrass loves a moist soil for best growth, but not soggy soil with water stagnation as this can result in root rot and death. So, make sure you have proper drainage holes in your container. Daily watering is the general rule, otherwise you may get leaf drying and browning or burning from tips and edges. In very hot summers, misting the plant with water also helps. Also mulching it with some leaves or twigs will help conserve soil moisture, especially in hot summers.
- FERTILIZER: Lemongrass is a grassy plant with green leaves, and hence needs a nitrogen-rich fertilizer for best growth of its foliage. A one or two handful of compost like decomposed cow dung or vermicompost once in a week or two is sufficient for its optimal growth. Please Do not use any chemical fertilizers for edible gardening.
- PRUNING: Regular removal of dead and dried up leaves will help in not only keeping it neat and tidy, but also promotes better growth and air circulation. Apart from daily snipping some leaves for your tea or soup, you can snip the leaves once in a while like giving it an annual haircut. You can do hard pruning in winter like about 6 inches above the level of soil.
- PEST CONTROL: Lemon grass is itself a pest repelling plant which repels many pests and insects like mosquitoes but fortunately attracts beneficial insects and pollinators like honey bees and butterflies. Also, as I said earlier, Plants growing in shade will be sparse and may attract pests. In that case, you can spray neem oil to control pests and then keep it in full sun.
- PROPAGATION: There are many ways to propagate lemon grass plant. One is from seeds and the other method is from bulbs. Lemongrass grows in clumps that make it very easy to propagate by dividing. Each leaf fan will be attached to a narrow bulb-like base with roots attached, and each one of these has the potential to become a new clump. It’s up to you how large you want each division to be. Replanting a division with at least five or six bulbs will look more substantial than a single bulb.
Money plant or pothos botanically called Epipremnum aureum is basically a vine and the most common plant found in home gardens and grown indoors in a water container. It is called money plant because it is believed to bring prosperity and good fortune to you. Well, superstitions apart!, But this is one of the NASA recommended air purifying plant. It has many common names like golden pothos, Ceylon creeper, hunter’s robe, ivy arum, silver vine, marble queen, taro vine, devil’s vine or devil’s ivy and so on.
TYPES OR SPECIES OF MONEY PLANTS OR SIMILAR PLANTS:
Golden Money Plant or the golden pothos – it has bright green leaves with golden or yellow splashes.
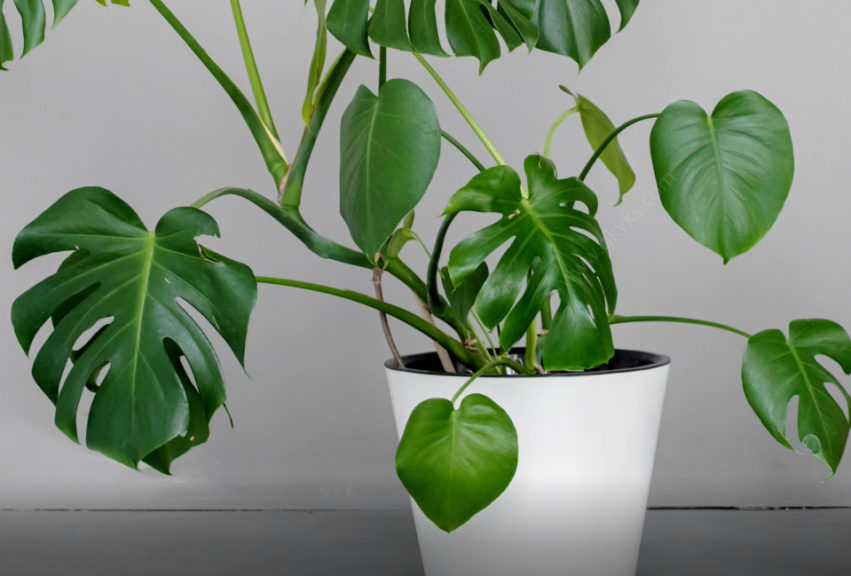
Split Leaf Money Plant or Monstera Deliciosa – This is a low light indoor plant. This is similar to Philidendeon Broken heart plant with beautiful design of notches within the leaf.
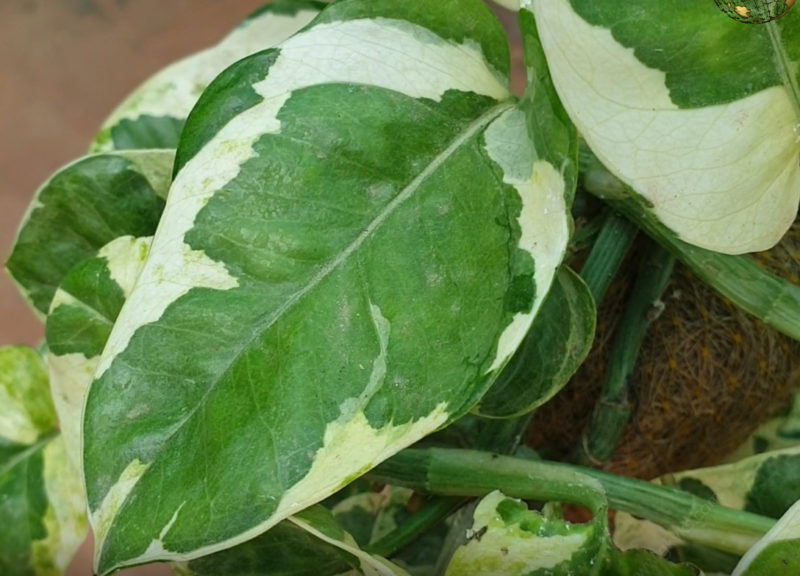
Marble Queen Money Plant – The leaves are creamy-white in color, so less green and less chlorophyll and hence this need more exposure to sunlight for proper photosynthesis.

Marble Prince Money Plant – This has distinct white and green colors on the leaves.
Silver Money Plant or Satin Pothos, Swiss Cheese Money Plant or Monstera obliqua, Chinese Money plant, Jade Money plant (Dark green heart shaped leaves), Neon money plant, Other similar plants but from different families include English ivy – plain and variegated, then various types of philodendrons.
Let’s first start with:
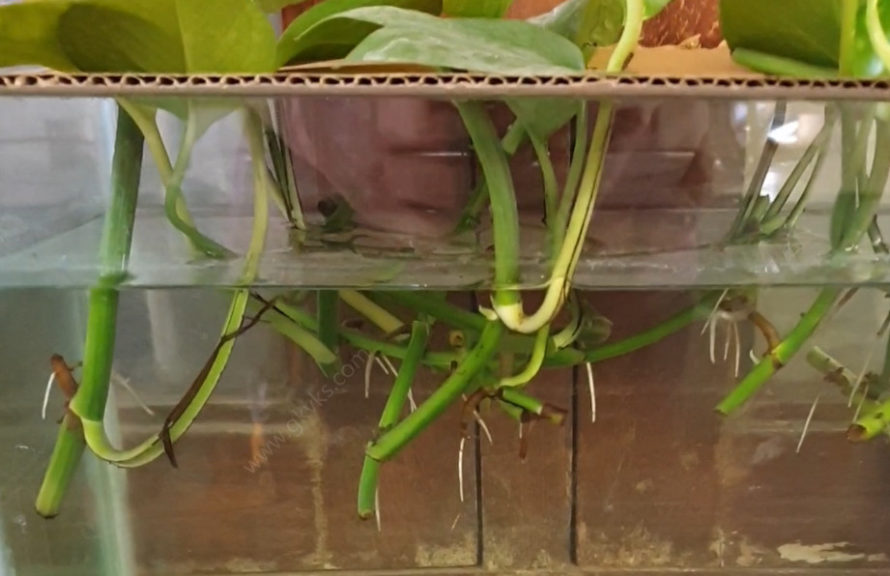
- PROPAGATION OF MONEY PLANTS: This we are discussing first because most of us do not purchase these from nursery or garden center, but instead, you get a small cutting of a money plant and try to grow at home either in water or in soil in containers. Now let’s learn some simple tricks to multiply your pothos plant easily. There are many methods of rooting money plant cuttings. One guaranteed method is soil layering – you just insert one or two nodes of a branch into the soil – mostly into a small pot. Within 2 weeks, you should start seeing roots and you can then cut of this from the mother plant and grow as an independent plant, either in water or soil. You can also successfully grow its cuttings but the most important point to remember is – planting the node into the soil and not just the stem without a node. Many gardeners show money plant can be grown from a single leaf, but this will be successful only if a node is included along with the leaf.
- Another Simple hack to use for faster rooting, especially if you are rooting in water is to use a quarter or half tablet of Aspirin 350 mg dispersible tablet every time you change water. You can check my detailed post on Aspirin and its benefits in gardening.
Now Let’s look into some important care tips and tricks to grow money plant. These are slightly different if you are growing them in Soil vs growing in water indoors. Let’s first quickly discuss on care of money plant in soil, like tricks on how to make the leaves bigger and how to get a bushier money plant. Also remember that they grow faster and better in soil than in water.
- Season: Money Plant can be grown in any season or any time of the year.
- Sunlight Requirement: Money plant can grow in direct sunlight as well as indirect sunlight and even indoors in your home lighting. Though, too much direct sunlight can burn the leaf edges, you need to remember this simple concept for any plant. The green color is imparted to the leaf by a pigment called chlorophyll which is essential for photosynthesis or plant food preparation in simple terms, for proper growth of the plant. If there is lesser green pigment on the leaves like in marble queen varieties or any variegated varieties, then more amount of exposure to sunlight is needed and vice versa. The best place to keep them is under a 50% shade net. They grow faster and healthier under these sun conditions. If you grow them indoors in containers, make sure you keep at the brightest spots like near entrances or near windows to get the bright light.
- Water Requirement: Money plant likes a lot of water, but at the same time it’s a drought tolerant plant and can live without water for many days. Watering Daily or Alternate days is sufficient. Make sure you water deeply and thoroughly and also check patency of drainage holes in containers to avoid water stagnation and root rot. Less frequent watering can result in burning or browning of tips and edges. Over watering can result in leaf yellowing and stunted growth.
- Soil Mix: If you provide a loose well-draining soil to money plant, the roots grow faster and hence the plant grows faster and healthy. You can mix some stuff like cocopeat or peat moss, sand, perlite, vermiculite or whatever you can, along with some 20% compost like cowdung or vermicompost to about 50% garden soil. This forms the best potting mix for money plant.
- Repotting Money Plant: This is only required when you have chosen a small container to grow money plant and the plant roots have bound to the container. If there is stunted growth and leaf yellowing, its time to repot in a larger container.
- Fertilizers: Money plants require very less amount of fertilizers and most of the nutrients are already found in the potting mix and they should be sufficient for 3 to 6 months. Because we grow money plant for its leaves, a handful of nitrogen rich fertilizer like decomposed cow dung or vermicompost, once every 3 months is more than sufficient for one standard container of money plant. Avoid using chemical fertilizers like urea or NPK as they can cause fertilizer burns. To get lush and large sized leaves, You can additionally foliar spray it with Epsom salt solution – like 1 teaspoon of Epsom salt in 1 litre of water and spray over the leaves once in about 10 days.
- Pests and Disease: Money plant is one of the top 5 pest resistance plants. So spraying a pesticide is optional. You can spray neem oil monthly once in a low dose of about 5ml per litre of water. But some diseases like fungal root rot can rarely kill the money plant. This happens mainly due to over watering.
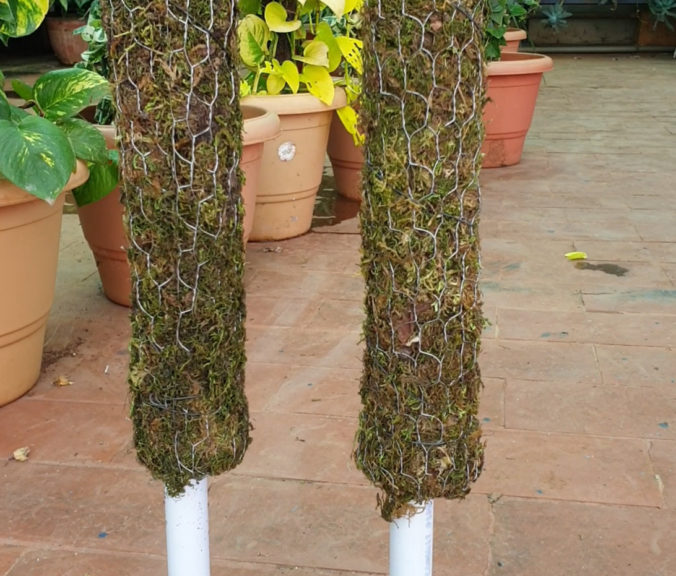
- Now, the most important part of this episode. How to get big sized leaves in money plant? Money plants have aerial roots which are adventitious roots which are many designed for clinging and climbing on to a surface like trees, rocks and other structure we artificially provide like the moss sticks, coir sticks, trellis and so on. The concept is, these aerial roots also absorb some moisture and nutrients as well. So, taking this advantage, we have to follow these two simple tricks and hacks to get big sized leaves and lush bushy fast growing money plant. No doubt the size of the leaves also depends on the type of money plants and its genetic make up.
First Trick to Apply is: Use a Climber stick like coco coir stick, a moss stick or your own DIY gunny bag pole to anchor the aerial roots. The best one is a moss stick which is made of sphagnum moss. You can easily anchor the aerial roots into the moss and tie it up to hold in place. Make sure whenever you water your money plant, you water the moss stick as well. Liquid fertilizer like compost tea poured on to the moss stick also gives great results.
The Second Trick is: When it grows one round to the top of the pole, you take it downwards and then when it reaches the soil, you do soil layering or take a dip of one or two nodes into the same container and then take it upwards. This helps development of multiple root system that supports a short segment or a certain length of the money plants and helps in a very steady and faster growth.
Now Lastly some quick points to remember while growing money plant in water indoors.

If you start from a cutting, choose a healthy cutting of about 1 foot long and must have at least 3 to 4 nodes in it. Insert at least two nodes into a clean container, preferably a glass bottle. Avoid using plastic bottles. The narrow-necked bottles are better as it provides more humidity around the main stem. Use clean water to grow money plants and change water once every 10 days for best results. Keep it in a bright location in your home like near a window. And It does not require fertilizers when grown in water.
Whether you are growing succulents & cacti indoors or outdoors, it’s really important to learn how to care for succulents and some very important Do’s and Don’ts. Let us find out how not to kill your succulents and how to keep them healthy and happy.
- MEANING OF SUCCULENT: Succulent means full of juice : juicy. So these are plants with fleshy tissues adapted to water storage. Some random examples of succulents are: Echeverias, Haworthias, Aeoniums, Gasteria, Sedums, donkey’s tail, All varieties of Kalanchoes, Jades and Crassulas, Aloe vera, All types of cactus like fairy castle cactus, Bunny ears cactus, Pincushion cactus, christmas cactus, and, the most beautiful Adeniums or Desert roses.
- SUNLIGHT: Most people think succulents are indoor plants. No doubt they can be grown indoors with proper care or that extra or special care. But succulents love full sunlight and do well with at least five or six hours of direct sun per day. This again depends on the type of succulent. And also, immature succulents or seedlings need lesser sun and have to be gradually introduced to sunlight like the Hardening Off procedure we follow for vegetable seedlings like 1-hour sun exposure for day 1, 2 hours for day, 3 hours for day 3 and so on. We will discuss more useful tips and tricks like how to avoid elongating and ugly growing succulents in the later part of this episode.
- WATERING: This is another very important factor for successful and healthy growth of succulents and cacti. The watering frequency depends on the season of the year. In spring to summer, the succulents grow to their full potential, like any other plant. And in winter season the growth is slowed down and many succulents go into a state of dormancy or inactivity, just like other plants. So, the watering requirement is drastically reduced in winter season. Now, lets talk about how to water, how much to water and how frequently to water. This is very important because overwatering can result in mold and rot and can kill the plant. Succulent and cacti are different from other plants with thick fleshy tissues like leaves or stems are adapted to water storage. So, a lot of water is already stored in these tissues and hence, the water requirement of these plants is very less compared to other plants.
While watering a succulent or a cactus, you need to stick to two rules to prevent over watering and rot. The first rule to follow is the Finger Dip method: Insert your finger to at least one inch into the soil to check the moisture. Water them only if soil is completely dry. You can also dip a moisture meter if you have. And second rule is to avoid water spillage over the fleshy leaves to prevent rot. For this you can use a watering can with a long nozzle to water over the soil and avoid water spillage over the leaves. Then thirdly water it thoroughly and deeply till the water flows out of the drain holes. Generally, in most tropical climates, watering weekly once or max twice a week is sufficient if kept in direct sun. - POTTING SOIL: This is another important factor for healthy succulent growth. Succulents and cacti need a soil mix that drains very quickly, so regular potting soil is not recommended to grow succulents. So, you need to add stuff that helps drain out water very quickly. One such succulent potting mix formula is:
30 to 40% of Garden Soil, 30 to 40% Sand, 10% to 20% pebbles or some small coarse rocks or pumice or perlite if available, 10 to 20% Compost like cowdung or vermicompost, Optionally you can add some 10% Charcoal – small pieces. Do not use cocopeat for succulents especially if you grow them indoors or keep them under indirect sunlight, because it can retain water and might result in mold and rot due to water retention.
- POT SIZE: Choosing the right sized container is also important for healthy growth of succuelnts and again this depends on the type of succulents you are growing. Most succulents have a shallow and delicate root system which do not need too deep containers and it can increase the risk of rot. For most succulents we recommend a wider shallow container for best results, because a wider container with enough space will help in propagation of succulents which produce offsets or babies from sides, which can be separated and grown as independent plants. Also make sure there are multiple drainage holes in the container you choose. You can also grow multiple succulents in a wide container. Make sure you give some spacing between each plant.
- FERTILIZERS: Succulents do not need much fertilizers, but you can give them light feedings like a teaspoon of vermicompost or decomposed cowdung once in 3 months and increase this during the active season – that’s the spring and summer season.
- PEST CONTROL: Mostly affected by mealybugs and the soil by the fungus gnats. You can spray neem oil once in about 15 days as preventive measure or weekly once to get rid of these if already infested. You can even water the succulent once with the same neem oil solution to get rid of fungus gnats. The dose os 5 to 10 ml neem oil per litre of water. The best alternative to kill fungus gnats is 250 ml hydrogen peroxide 3% per litre of water and water the soil.
- CLEANING SUCCULENTS: Wipe off the leaves and spines gently with a damp cloth to get rid of dust and this helps in better photosynthesis.
- REPOTTING: You have to take special care while repotting a succulent, because they are more prone to mold and rot after repotting. To avoid problems, always mix some antifungal powder or some neem cake powder into the potting mix during repotting.
- PROPAGATION: There are several, simple ways to propagate succulents. First method is: Growing from Cuttings: This is best applied in case the succulents have grown too leggy with elongated stems. This elongation of stem happens when there is little sunlight or if kept in indirect light. They elongate their stems for seeking sunlight. As a result they look ugly and take bad bends and turns. So, as discussed – keep them in full direct sun and make it a habit to rotate the containers once in a while to avoid bends and provide uniform sunlight. Well, coming back to propagation, Take the cuttings and leave it in air to dry for 2 days for callous formation – that’s something like wound healing and sealing to prevent rot. Then insert the cutting into a loose draining soil. Just keep the soil moist, do not water it too much. It should start rooting in 2 weeks.
The Second method is Propagating from Leaves: Yes, you can grow succulents from a single leaf. Just remove an actively growing healthy leaf from a mature succulent plant. Make sure you strip from the base, taking out the entire leaf. Leave this to air dry for 2 days and then just place it superficially over the soil. You should see a tiny plant popping out of this leaf with formation of tiny roots.
The Third Method is from Offsets or Babies, which are produced from the mother plant like aloe versa, haworthias and echeverias. Most of the succulents produce these babies which can be separated from the mother plant and planted independently.
The Fourth Method is growing from seeds: This is the slowest method to grow succulents. But if you have the time and patience, give it a try! Seeds of mature plants are located in the seed pod produced after flowering. The seeds can be collected from the pods and planted in a clean seed sowing mix or sand.
Chili Peppers is a warm weather vegetable and can be easily grown in containers.
- CHOOSING THE VARIETY: There are literally dozens of chili pepper varieties. Each type varies in taste, size and shape. Mildest type is Bell Pepper or capsicum. So, these tips are common for all varieties of chilly peppers.
- SEED SOWING: Chilli Peppers grows best in warm conditions. Right time to plant seeds is when the soil temperature is 70 – 85 degrees Fahrenheit (20 to 30 Celsius). You need to choose a mature seed pod to grow chilli peppers like the red one. Green pods are still immature and may show poor germination results.
You can sow the seeds first in a small container or seedling trays and then go for transplant after 4 to 6 weeks. In any case, the depth of sowing should not be more than 5 mm. The seed starting mix should have at least 50% compost like vermicompost or decomposed cow dung in it. They usually germinate in 1 to 2 weeks.
You can transplant these after 4 – 6 weeks.
- CHOOSING THE CONTAINER: You can easily grow Chilli Peppers in small containers. Its ideally grown in a 12 inch container. You can use good quality plastic pot or a cement pot or a grow bag.
- POTTING SOIL MIX: A well-draining soil is very important for healthy root growth. A simple well draining potting mix should include: 30 – 40 percent garden soil, 30 – 40 percent Coco-peat or peat moss and 20 – 30 percent compost like decomposed cow dung or vermicompost.
- SUPPORT / STAKING: Installing stakes or supports is helpful especially if they load up with fruits. You can use sticks or pipes tp support them. You can also tie strings to support the main stem.
- SUNLIGHT / LOCATION: Chilli Peppers need full direct sunlight of at least 6 hours for flowering and fruiting. Also keep them in a spot where pollinator insects like butterflies and honeybees visit frequently. Otherwise they will fail to produce fruit and result in flower drop off.
- WATERING: Give Chili Peppers a steady supply of moisture, but do not let the soil get soggy. Daily watering is the general rule and whenever you are watering, water it deeply and thoroughly so that entire root system is drenched with water. Improper watering can result in flower or fruit drop off.
- FERTILIZERS: Firstly during transplant adding a some amount of phosphorous source like bone meal powder or organic rock phosphate will really help the plant to induce lot of flowering and fruiting and also confers resistance to pests and diseases like the leaf curl virus. These two organic fertilizers are very important slow release sources of phosphorous which makes the roots stronger which in turn makes the plant grow healthier and yield better by boosting the plant immune system or resistance against pests and disease.
Secondly, A handful of compost like decomposed cowdung or vermicompost or both once every 15 days is the minimum requirement for Chilli Peppers. You can double this frequency or amount in flowering stage.
Then, adding some source of calcium like gypsum or lime or even finely powdered egg shells is also beneficial especially during fruiting stage.
- PEST CONTROL: Chilli Peppers is occasionally affected by pests like mealybugs, aphids and white flies. Leaf curl Virus needs a special mention. If the plant is affected by leaf curl virus, better to discuss the plant so that other plants are not infected.
Best is prevention by spraying neem oil once in 15 days. 5 to 10 ml neem oil plus some liquid soap in one litre of water is the recommended dosage. If it’s already infested, you can spray weekly once or even twice until all pests are eradicated. Make sure you do a patch test on a leaf before spraying on the entire plant.
- PRUNING or TRIMMING: Trimming promotes branching and this in turn produces more flowers and more fruits.
One important tip here: When the plant is about six to 8 inches tall, pinching the growing tip will result in a bushier plant and also remove any flowers that appear early, as the early flowers diminish the plants overall energy.
HARVESTING CHILLI PEPPERS: You can harvest chilly peppers anywhere between 60 to 100 days after planting.
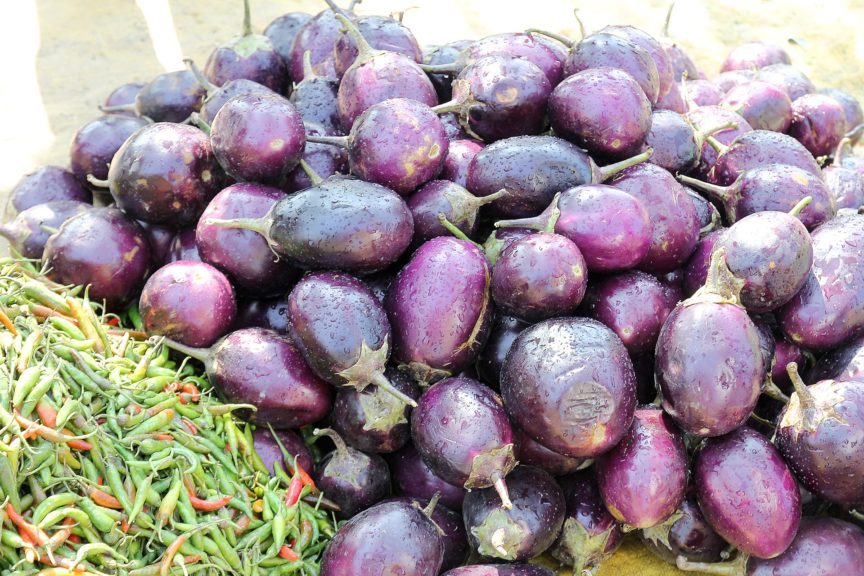
Eggplant or Brinjal or Aubergine is a warm weather vegetable that are harvested in mid- to late summer. Whether you are growing in containers, raised beds or in ground, these tips are common for growing eggplants. You will also learn how to get the best tasting eggplants, increase yield and size of the fruit.
- CHOOSING THE VARIETY: There are many varieties of eggplant, like the Fairy tale, White eggplant, Indian eggplant, Green eggplant, Japanese, Italian and many more. The Care tips are common for all varieties of egg plants. If you want the best tasting variety – you can choose Fairy tale or the Indian Eggplant.
- SEED SOWING: Eggplant grows best in warm conditions. Right time to plant seeds is when the soil temperature is70- and 85-degrees Fahrenheit (20 to 30 Celsius). If you want to know more details on Soil temperature, please check my detailed episode on Soil temperature and vegetable planting calendar from a link in description below. Well, you can either sow the seeds directly into the main container or in a single container or seedling trays and then go for transplant. In any case, the depth of sowing should not be more than 5 to 10 mm. The seed starting mix should have at least 40 to 50% compost like vermicompost or decomposed cow dung in it. They usually germinate in 1 to 2 weeks. You can transplant these after 4 – 6 weeks.
- CHOOSING THE CONTAINER: You can easily grow eggplant in 12 to 15 inches containers. Atleast 12 inches – both in diameter and height. You can use good quality plastic pot or a cement pot or even a clay pot if available. You can also grow in fabric grow bags especially if you grow them on your terrace. These fabric bags follow the principles of air pruning which is so much beneficial to root system. Make sure there are a lot of drainage holes at the bottom of these pots. Another tip here: Choose a black coloured container if possible, because black bodies are good absorbers of heat and they do well in warm temperatures. And if you are growing in ground, better plant in raised beds for best results.
- POTTING SOIL MIX: A well-draining soil is very important for proper root growth. A stronger root system will produce a stronger and healthier shoots and yield a better harvest in the end. A simple potting mix formula should include: 40 percent garden soil, 40 percent Coco-peat or peat moss and 20 percent compost like decomposed cow dung or vermicompost. You can optionally add other stuff like perlite, neem cake powder etc if you have. You can watch a detailed episode on various potting mix recipes from links in description below. Well, In addition to this and to make the root system stronger and induce lots of flowering and fruiting, you can add one handful of steamed bone meal powder which is very inexpensive and easily available. If you are a vegan, you can add organic rock phosphate powder to the potting mix. These two organic fertilizers are very important slow release sources of phosphorous which makes the roots stronger which in turn makes the plant grow healthier and yield better by boosting the plant immune system or resistance against pests and disease. Regarding the soil PH, eggplant needs a slightly acidic soil of around 6 to 6.5 which is the ideal soil PH required for most plants.
- SUPPORT / STAKING: Once the plants begin to start growing, this is a good time to install stakes or supports to keep the plants from falling over as they load up with fruits. We will shortly discuss, how to get big sized fruit and a tastier fruit. Please Keep watching. Well, for staking, you can use simple sticks or dedicated trellis like how we use for tomato plants or you can build your own trellis using pipes or sticks. You can also tie strings to support the main stem using these type of clips.
- SUNLIGHT: Whether you are growing eggplant at your balcony or on the terrace, or back yard, location is very important because they need full direct sunlight of at least 6 hours for best results and also keep them in a spot where pollinator insects like butterflies and honeybees visit frequently. Otherwise they will fail to produce fruit and result in flower drop off. Do not spray chemical pesticides which can drive away or even kill these beneficial insects.
- WATERING: This is a very important factor. Give eggplant a steady supply of moisture, but do not let the soil get soggy. If you are not watering properly, this can result in fruit drop off or low quality or small size fruits or bad tasting bitter fruits. Daily watering is the general rule and you should not worry about over watering of the soil is well draining and you have adequate drainage holes.
And whenever you are watering, make it a habit to water it deeply and thoroughly so that entire root system is drenched with water and water then comes out of the drainage holes. You can also consider mulching over the top soil to prevent water evaporation quickly and also control weed growth. - FERTILIZERS: This is another important step, if you want to have lot of flowering and healthy fruiting in eggplant. During flowering and fruit formation, if you do not feed them with all nutrients and trace elements like iron, manganese, magnesium and others, they can show signs of deficiency, fruit drop off, small sized fruit and so on.
First of all, a handful of compost like decomposed cowdung or vermicompost or both once every 15 days is the minimum requirement for eggplant. You can double this frequency or amount in flowering stage. A good quality compost supplies most of the essential macro and micronutrients. If you wish you can add some micronutrient fertilizer containing all trace elements or you can make a cocktail organic fertilizer mixing all available organic fertilizers and calculate its total NPK value, like how I have shown in one of my episode on the Universal fertilizer mix, you can check that link in description below.
- PEST CONTROL: Eggplant is occasionally affected by pests like flea beetles, powdery mildew, mealybugs, aphids and white flies. Best is prevention by spraying neem oil once in 15 days. 5 to 10 ml neem oil in one litre of water is the recommended dosage. If it’s already infested, you can spray weekly once or even twice until all pests are eradicated. Make sure you do a patch test on a leaf before spraying on the entire plant.
- PRUNING or TRIMMING: First task is pinching the tops.Thiswill encourage more branching and makes the plant bushy and produce a better yield.You can regularly trim or prune the unhealthy or dry branches to keep it looking good which also encourage good air circulation and prevents fungal disease.
Now, If you want to have a big sized fruit, apart from following all 10 tips discussed, you need to restrict the fruit numbers per container. Like if you are growing in a 12 to 15 inch pot, you can restrict to 6 to 8 fruits max per container, by pinching the extra fruit growth.
To Get the best tasting fruit, harvest it when it’s young. This also encourages new fruit formation. Eggplant fully matures at around 100 days, but its best to harvest at around 80 days or lesser. One easy sign to look for is the skin shininess. The skin of the fruit should look glossy and unwrinkled and have a uniform colour.