In Today’s post, let us look into 15 household items and their miraculous uses for plants and garden.
15. Soap: Bar soap apart from cleaning purpose, there are some really powerful uses in gardening. You can scrape your nails into a bar soap before handling a potting mix and stuff like that. The dirt won’t enter your nail beds and this hack allows you to clean your hands easily after the job.
Liquid soap or even shampoo is used as a simple pesticide if you do not have any pesticide. Just add 10 to 20 drops or 1 or 2 teaspoons of liquid soap to 1 litre of water and spray on the affected plant. This will clear pests like mealybugs, whiteflies and aphids which are the most common pests in garden. Dish washing liquid soap is actually more potent than handwash liquid soap.
14. Chalk Sticks: Chalk is chemically Calcium Carbonate. You can take white chalk sticks and bury them into the soil while planting your veggies. That’s in initial stages. This really works wonders for plants like Tomatoes, Peppers, squashes, egg plants and almost any vegetable plant. You can bury two chalk sticks per container for these vegetable plants safely if you soil PH is around 6.0. For other plants to provide slow release calcium source, you can bury one chalk stick per container.
13. Turmeric: Turmeric powder has many effective uses in garden like: It repels ants when sprinkled around the plants. You can get rid of soil pests particularly fungal root rot and fungus gnats in the soil by mixing turmeric in soil. You can mix about 1 tablespoon per gallon of soil while making potting mix or 1 tablespoon of turmeric in 1 gallon of water or 1 teaspoon per liter of water and thoroughly water your affected plant with this solution. Its also helpful in healing tree wounds and in grafting as it prevents fungal rot. Another common use of turmeric is in rose die-back disease.
12. Vinegar: You can use vinegar to clean your rusty garden tools and pots. To make your soil more acidic for acid loving plants like hydrangeas, rose, hibiscus and so on and increase flowering in these plants. To do this, Mix one table spoon of white vinegar to one litre of water and water you acid loving plants with this solution once every 15 days to reduce the soil PH. Vinegar is also a strong pesticide. Its almost 100% effective in clearing powdery mildew fungus. To make this spray add One cup of White Vinegar to 1 litre of water and shake well and spray it on the affected leaves. It is also effective against white files and mealy bugs. It is also an animal repellent. Just soak some pieces of cloth and stuff them at entrances or behind pots to deter animals that can spoil your garden.
11. Baking Soda: Apart from cleaning your dirty garden tools and stuff with baking soda, you can also use it for other purpose like sprinkle to drive away Foul Smell from your Compost Pile or compost bin. To kill cabbage worms – Sprinkle Baking soda + flour like wheat flour in 1:1 ratio on the cabbage or broccoli leaves. The worms munch on this and die within 1 or 2 days. Baking soda also encourages flower blooming. Make a solution of 1 teaspoon baking soda in 1 litre of water and spray on your plants with flower buds or unopened flowers.
10. Asafoetida or Hing: The most effective use of asafetida is to treat leaf curl disease in plants. Add 5 gms of asafetida powder to one liter of sour butter milk. Mix well, leave for an hour, then sieve the solution and load your spray bottle. Spray over your affected plant. Repeat this every 3 days for 3 – 4 times. Leaf curl disease which is common in pepper and tomato plants will be completely cured by this treatment. Asafoetida can also be used to repel animals in your garden. Just hang some pieces of it in your garden entrances. Animals hate the pungent odor of asafetida. It also repels other insects and termites.
9. Charcoal: Hard wood charcoal has lots of amazing uses in garden like filling your pot bottom with charcoal pieces reduces pot weight. It can be used for mulching and garden décor. Mixing charcoal in soil can act as a good fungicide and prevent root rot, especially for expensive succulent plants. It also increases soil PH, when your soil is too acidic. It also works as a soil conditioner making the soil well draining. It also hold the fertilizers added for a longer duration and make them act like slow release fertilizers. Sprinkled charcoal powder helps deter many insects like the voracious beetles which can create havoc in your garden or on your crops.
8. Alum: Alum or Potash Alum can help to boost flowering. It makes the soil acidic for acid loving plants like hydrangeas, rose, hibiscus and so on. Just 5 gms alum powder per litre of water and water your plants once in a month. Alum is also a good pesticide in higher concentrations, like 100 grams per litre of water and spray on the plants to kill many pests including cabbage worms, cutworms, slugs and snails, etc. It is well known for mostquito control as a larvicide when sprinkled over the stagnant waters.
7. Banana Peels: Banana peel is one of the highest organic sources of potassium. It helps strengthen the plant and increases flowering and fruiting. You can make banana peel tea or banana peel fertilizer powder if you intend to store it. To make banana peel tea, soak pieces of banana peels in water for about 3 to 5 days. Use this banana tea in 1:5 dilution to water your plants once in a month. To make banana peel fertilizer powder, sun dry pieces of banana peels for 2 to 3 days till they are crispy enough to make a powder. Add one tablespoon of this powder once in a month and see the effect.
6. Aloevera: Aloevera has numerous benefits not only to the human body, but also to plants, like: It helps in faster rooting. Just insert a cutting into a piece of aloe vera and plant into soil. Rooting is faster and success rate is higher. Diluted aloe vera gel sprayed or watered to your seeds helps in faster and healthier germination. High levels of certain compounds found in aloe vera confer immunity or resistance against many plant diseases. Aloevera can also be used as a potent pesticide if mixed with other agents like neem oil, especially for pests resistant against certain pesticides.
5. Onions Peels: contain many useful substances like sulphur, quercetin, potassium, phosphorus, zinc, and so on. So, do not throw away the onion peels. The simplest use of these peels is to use them for mulching. If you have time you can make a fertilizer out of these onion peels. Just soak the peels in water for 1 to 2 days and water the solution to your plants once in a month to notice the benefits.
4. Tea and Coffee Waste: Do not throw this away. It can certainly boost flowering in your plants. It contains tannic acid which helps plants like Rose and hibiscus to increase flowering. You can wash the waste for any sugars and directly add to your plants or collect this and sun dry this powder and use it for your plants. You can also add this waste directly into your compost bin for making a rich compost.
3. Cinnamon: Cinnamon powder from your kitchen is well known for its wonderful uses in gardening. It can be used as a rooting agent to increase the chances for rooting cuttings. Just dip the cutting into cinnamon powder and plant it. It also deters ants when sprinkled around your plants. Its antifungal properties also fight fungal attacks to your seedlings. Just sprinkle fine cinnamon powder over your seedling and prevent dampening off.
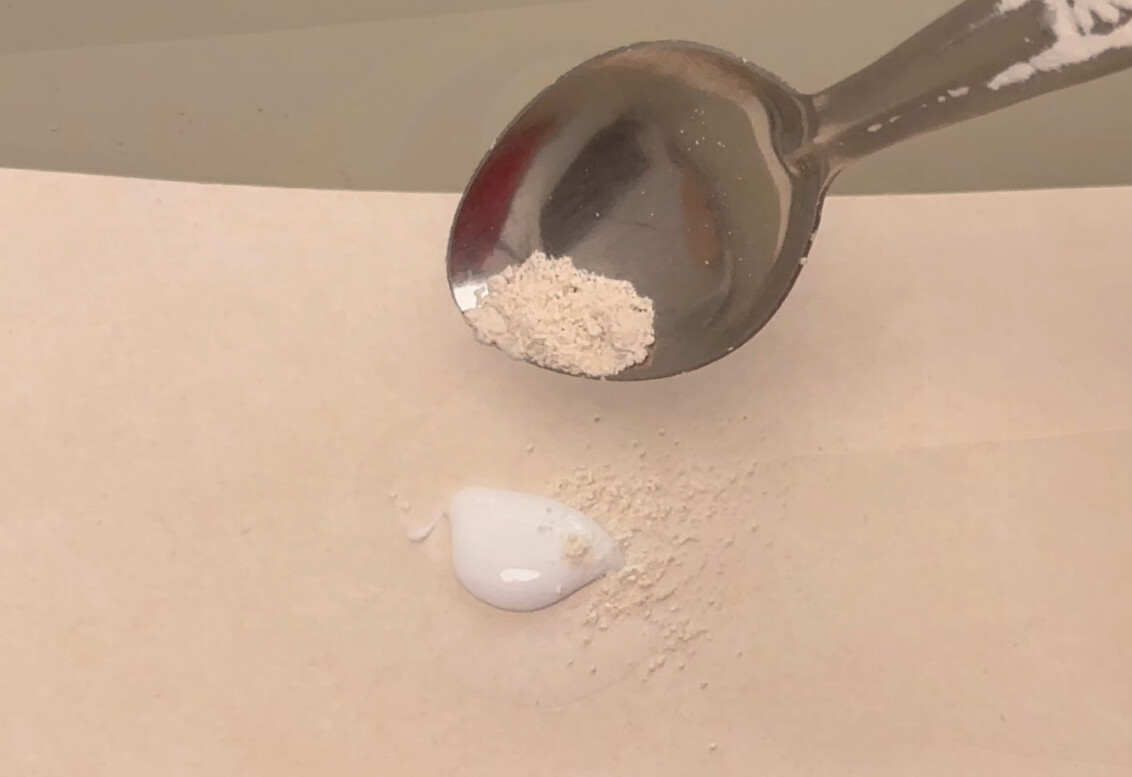
2. Eggshells: Though eggshells are a great source of calcium, do not add crushed egg shells directly to your plants. It takes many years to decompose and release that calcium into the soil. You need to instantly release this calcium from eggshells by using Vinegar. Make eggshell powder first and then add a cup of vinegar to it. Stir it well and leave for an hour. The acetic acid breaks the eggshell compound and release free calcium into this solution. You can then dilute this solution to 1: 10 or 1:20 and then water your plants to treat or prevent acute calcium deficiency problems like tomato blossom end rot disease and other problems like bud or flower or fruit drop off and increase your flowering and fruiting. You can also add egg shells to compost bin for a calcium rich compost.
1. Aspirin: Aspirin is acetyl salicylic acid. Salicylic acid is a plant auxin and a rooting hormone which is proven to accelerate rooting and also it confers immunity against many plant diseases. You can use a dispersible 350 mg Aspirin tablet. Just a little of it will do the trick. A quarter or half a tablet is sufficient. You can read all detailed articles on these individual stuff by searching our website for that particular stuff.
Having a beautiful, lush green lawn is every gardener’s dream. It really makes your home and garden landscape look beautiful.
We would all like to have that best-looking perfect lawn, but it is not always easy to achieve. Here in today’s episode, we will show you step by step, how to grow lawn grass successfully from seeds without the need of hiring a landscape designer and stuff like that.
Whether you want to fill a bare spot in your lawn or grow a brand-new lawn grass from the scratch, please read till the end, as it might surprise you with lots of useful tips and tricks. Let’s begin.
- Type of Lawn Grass Seeds?
This is the first important step where most inexperienced gardeners and home owners get deceived while purchasing grass seeds.
PURCHASE LINKS:
BERMUDA GRASS SEEDS: https://amzn.to/3P5npAr
There are many different grass species which thrive in different climates. Like, there are cool-season grasses which grow best when temperatures are 60-75 degrees Fahrenheit and warm-season grasses which thrive from late spring through summer. You can check the packet instructions and labels for this info.
Well, some of the common grass types to mention are Bermuda grass or doob grass, buffalo grass, bentgrass, ryegrass and so on. In this context I would like to highlight you on this important lawn grass seed scam mostly going on online even at big websites like amazon. Some sellers list out as Bermuda grass and the seeds you receive are some millet seeds like foxtail millet seeds or cattle fodder grass seeds which are actually very cheap. These types of seeds are usually fed as budgie food grains but they are selling as Bermuda grass seeds. You must know how to identify the proper seeds before planting and avoid these types of scams. These are mostly non-returnable items and also amazon does not publish negative reviews when we try reporting these fake items. We will grow these fake seeds in one container and genuine Bermuda grass seeds in another container as well as over the lawn area and show you the results in the end.
PURCHASE LINKS:
BERMUDA GRASS SEEDS: https://amzn.to/3P5npAr
- Preparing the Ground and Soil:
This is a very important step and you should know that the tender roots of young grass plants will not grow well in compacted soils.
Choose the location you want to grow lawn grass whether its your front patio or your back-yard. Optionally, You may also have to level the ground surface by adding some loose soil over your lawn area, days before planning your lawn grass.
Well, Firstly, loosen the top 2-3 inches of the soil. If it’s a small area, you can use a hand cultivator or if it’s a larger area you can dig with a shovel or hoe. After digging, you need to rake it smooth to break up any soil clods and rake the soil out into fine particles. Then you need to water the area thoroughly before planting seeds, because damp soil encourages speedy germination and provides immediate moisture to emerging roots.
- Planting the grass seeds:
For home gardens, you can just use your hand to distribute the seeds, flinging it out over the area. Spread them out evenly over the soil surface, neither too crowded nor too sparse.
- Covering the seeds:
After the seeds are sown, covering them is very much important to protect them from birds and also preventing them from washing away in a heavy rain.
You can just use plain soil to cover the grass seeds after planting. But best thing to do is to use a mixture of soil and a water retaining stuff like cocopeat or peat moss to cover them. Like 50% soil and 50% cocopeat and optionally compost like decomposed cow dung or vermicompost. You can mix all three in equal proportions or at least add some 20% compost. Cover the seeds evenly with this soil-peat mix to about one quarter of an inch but never more than half an inch.
- Watering:
This is most important step for germination.
Keep the top layer of soil moist (but not soggy). Too much water is as bad as too little, and avoid vigorous watering with a hose and stuff like that and this could wash the seeds away. A misting or shower attachment on your watering hose can cut down on the amount of force you use.
Till germination, Water at least once a day early in the morning and depending on the climate again in the afternoon if the sun and wind have dried out the soil.
But, once the grass seed germinates and begins to grow, reduce the frequency of irrigation but water more deeply. Once your new grass is about two inches tall, reduce your watering schedule to twice or thrice a week depending on the climate, but water until the ground is wet down to a depth of about three inches.
- Germination:
We will show you the results of seeds grown in containers as well, including the fake bermuda grass or fodder grass seeds.
PURCHASE LINKS:
BERMUDA GRASS SEEDS: https://amzn.to/3P5npAr
Germination should begin within a week depending on the type of grass seeds. In my case, you can see germination has happened within 3 days. On the third day, you can see these cute tiny grass seedlings popping out.
You can check the results in these containers. On Day 5: This one is the result for genuine Bermuda grass and this one is the fake Bermuda grass seeds. Just look at the grass blades and spot the difference. The fake fodder grass has wider leaves.
Then you can see the results after 1 week in containers and the ground. The whole area should appear green in about 2 weeks’ time.
We will make another detailed episode on how to take care of lawn grass like fertilizing lawn grass, trimming lawn grass and stuff like that.
Bonsai is an increasingly popular art of growing miniature live trees. Many people would love to own and grow a bonsai tree themselves. But You will need the right tools and right techniques to accomplish this. You will find that, most bonsai tools like scissors, shears, rakes, hooks, etc are quite expensive, may be because they are made in Japan or may be the demand and supply issues.
Let’s begin!
- Bonsai Rake Tool Hack: A stainless steel bonsai raking tool is an expensive tool. Simple free solution to this is to convert a stainless-steel dining fork to make a bonsai rake. Just insert the fork tines under a door or any sturdy slot and then gently bend it to your desired level to make a bonsai rake tool. Raking the top soil is a healthy gardening practice which has a lot of benefits.
- Wound Sealant Hack: Bonsai would sealant paste is very expensive. A simple alternative to this is to use universally available Fevicol paste. If you want to make it more effective, you can add some antifungal powder to Fevicol paste and apply to larger bonsai pruning wounds.
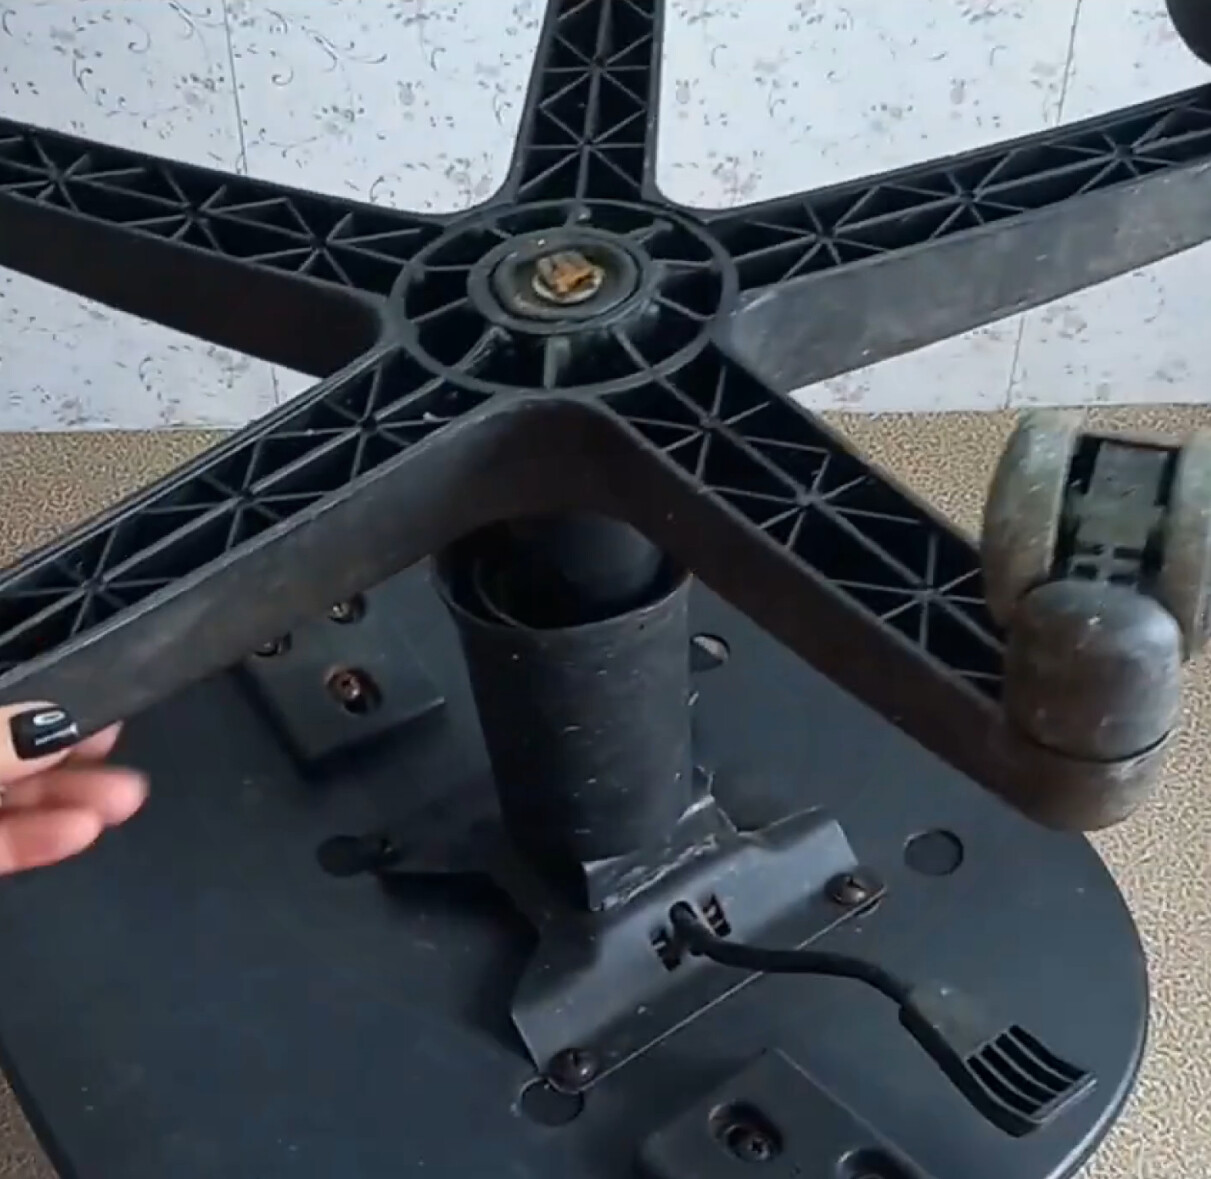
- Bonsai Turntable Hack: Bonsai Turntable is a very useful and a must have tool for anyone working with bonsais. If you do not have a professional bonsai turn-table, the cheapest alternative is a cake turntable which can efficiently work for smaller bonsais. Another hack to make a heavy-duty turntable for larger bonsais is to use the bottom steel base from an old or broken revolving office chair.
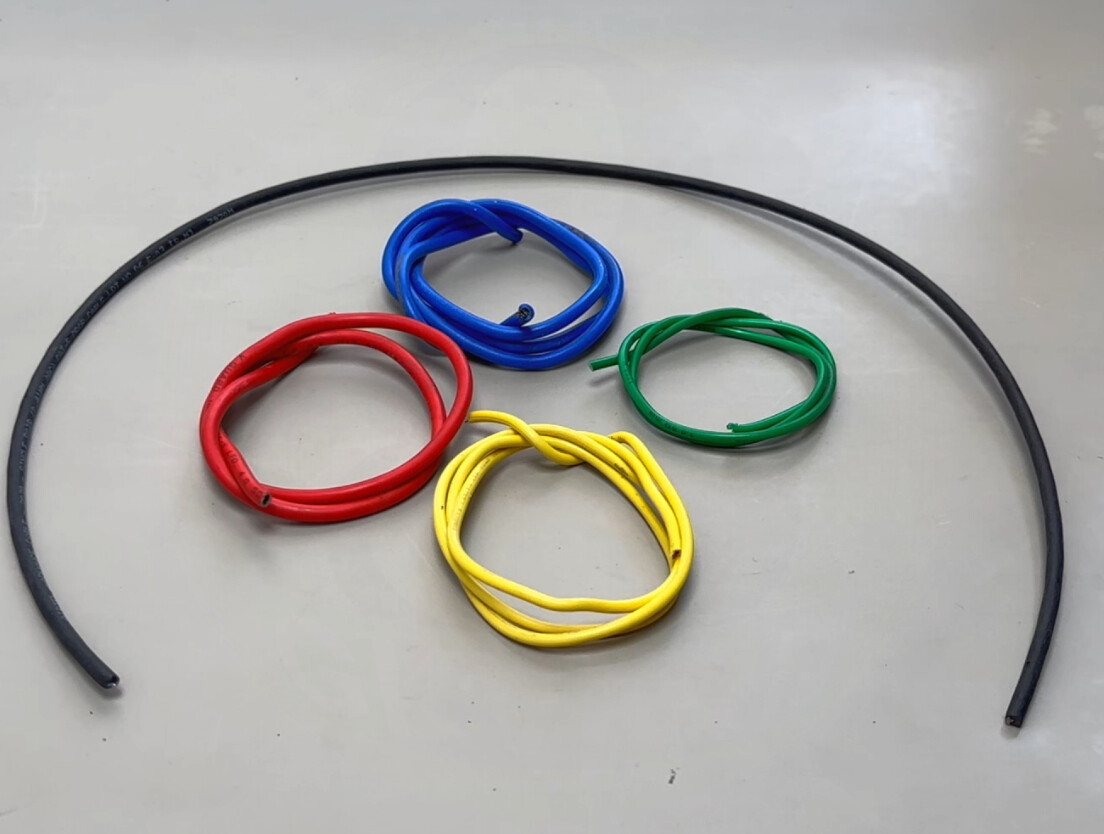
- Bonsai Wire Hack: if you do not have the professional bonsai wire to shape your bonsai branches, an easy alternative is to use thick gauge electric wires. You can use left-over pieces of old electric wire of different gauge, to wire and bend branches easily. But never use a GI wire like this one to wire bonsai, the obvious reasons are they are prone to rusting and difficulty in removing it when you want to, as they can adhere deeply into the stem or branch.
- Thick Woody Stem Bending Hack: It is next to impossible to bend a thick woody stem or a branch. You all know how important are bends or curves in bonsai tree designing. This bending technique is very important for making instant bonsais, especially from air layering technique which we shall discuss it later. If you have a thick branch or stem to bend, you can use a pruning saw or if the stem is not so thick, you can use a simple hack-saw blade to make multiple small wedge shaped cuts with a gap of about 1 inch between the cuts. You can vary the number of cuts or the distance between these cuts depending on how acute you want the bend. Make sure you don’t make too deep cuts, about 50% cut through the stem is fine. Then bend the stem or the branch to approximate or merge these cut wounds. To hold the bent stem in position, use a wire to support this stem or branch. Then wrap the wounds tightly with an aluminium foil first, to prevent moisture loss and promote proper healing of this wound, then wrap a grafting tape or a thin polythene sheet over this and then if you wish, put another layer of tape around it. Keep it undisturbed in partial shade. It should heal in about 4 to 6 weeks and your bonsai stem shape is done!

- Branch Splitter Hack: Bonsai Branch cutters or splitters are indeed expensive tools. In fact, almost all bonsai tools are expensive. You can make a bonsai branch splitter by grinding a cheap nail puller tool available at any hardware store. Carefully look at the image of the bonsai cutter blades and sharpen them in the same way. If you have good grinding skills, you can also make a parrot beak or bonsai concave cutter which is a very useful bonsai tool. Branch splitters are used to split thick branches, which helps to bend thick branches.
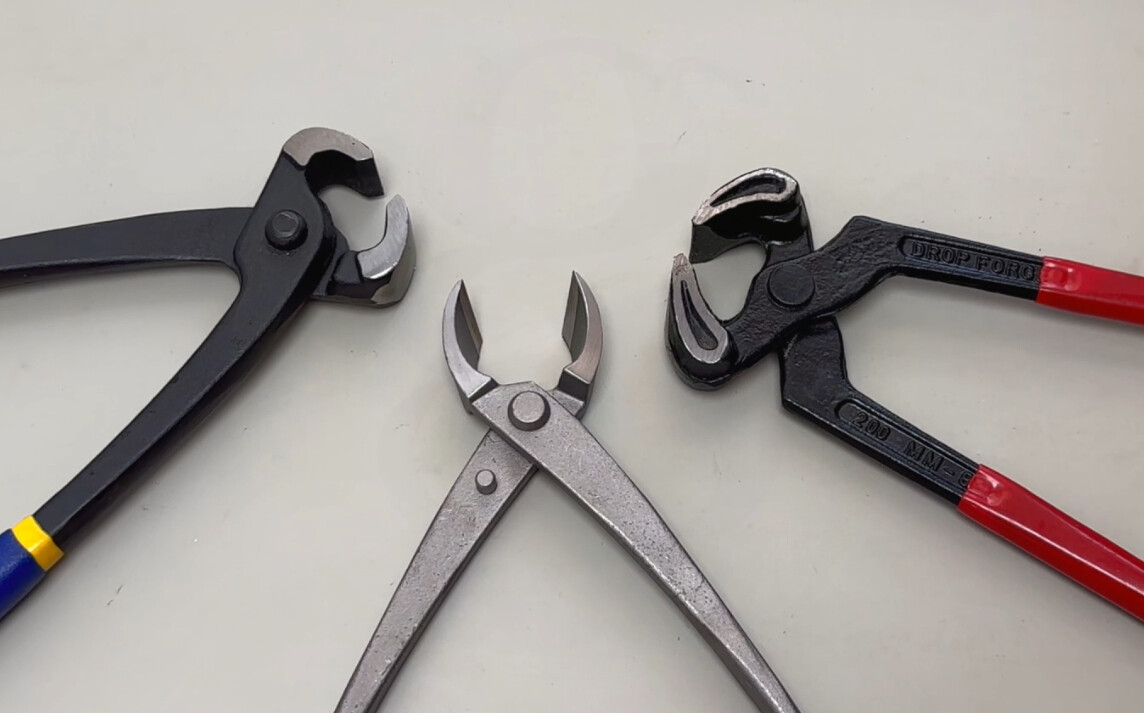
- Bonsai Scissor Hack: stainless steel bonsai shears and bonsai twig scissors are again expensive tools. A simple alternative is, to use surgical scissors with long blades as twig shears. These surgical scissors are very durable and do not rust so easily.
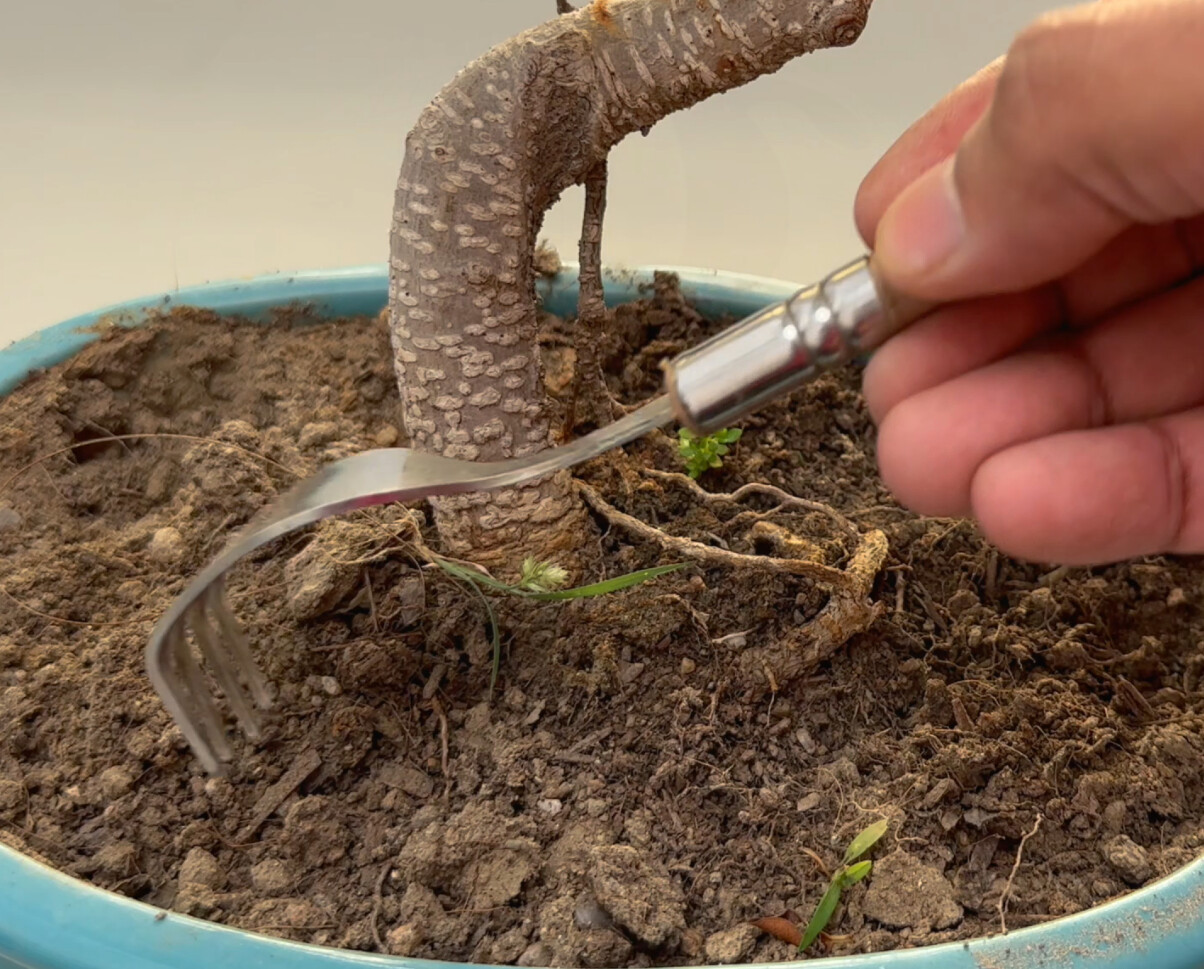
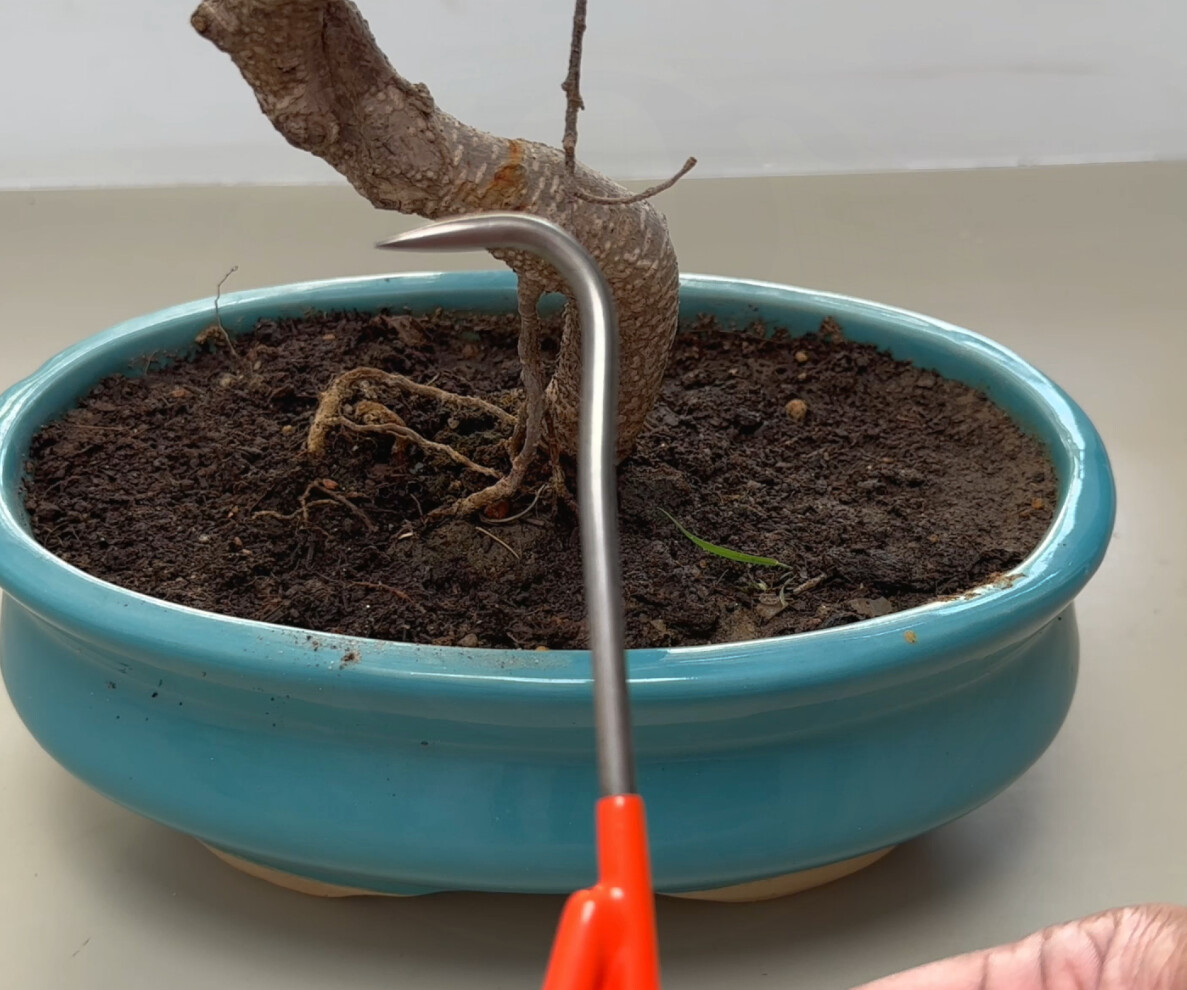
- Bonsai Root Rake Hook Tool Hack: Bonsai root hook is an indispensable tool needed while repotting bonsais. A simple way of making a bonsai root hook is to use large sized J hooks like these, which are cheap and easily available from a hardware store. You can sharpen the working point of this hook to your desired level. Now you need a handle to fix this hook. You can just use any wooden piece to make a handle, but the best solution to this is use a paint brush handle from an old paint brush. Just cut this part and make a hole into this handle and insert the hook and screw it tightly. You can then bend this hook to your desired level if needed. That’s it! Your bonsai root hook is ready to rake the roots.
- Thick Stem Hack: for faster development of a thick stem or trunk of any plant, you can place your pre-bonsai plant pot on a layer of gravel bed over the soil. The plant grows faster and thicker by sending out roots into the gravel bed through the drainage holes.
- Instant Bonsai Hack: As you all know making a true bonsai tree takes many many years if you are starting from a seed or a sapling. The quickest way of making and designing a thick bonsai tree is Air Layering technique which gives you an instant live bonsai tree to work on and save many years of work required to make a bonsai tree. You can check a detailed post and video on 5 different types of air Layering and some air layering tricks and hacks from HERE.
Happy Gardening and Happy Bonsai Making. Watch Full Bonsai Hacks Video below:
Now let us now install a grow light for our indoor plants. Grow lights are not expensive now a days. You get simple grow light bulbs for smaller plants, full spectrum grow light panels which even support flowering and fruiting. I have shown them all in my earlier episodes on indoor gardening.
Now, coming to this led grow light strip. This is a good option for certain areas in your home and add to the beauty of your home interiors. These led strips come in various lengths like in meters. Depending on the requirement you can order these grow light strips from amazon or any other reliable shopping website. These are waterproof strips and come with a sticker at the back surface. You can see this partition panel and I have created these two compartments for indoor plants. I have done wiring from inside for power supply. The most elegant way to install these led strips is to use these aluminum profile light channels which again come in various sizes. Here I am using 17mm channels. You need to cut a groove for this 17 mm channel.

Now let us first assemble these led light strips. You can measure the length of the strip needed and how many strips you require and make a cut at this point marked on the strip. This not rocket science. Its simple DIY thing. If you want to join two strips together, you can use these connectors of proper sizes to hook in the ends of the strips. Or you can just solder wires to the ends. Make sure you have a color coding for positive and negative terminal and not to reverse the polarity. It’s clearly marked on the strip.
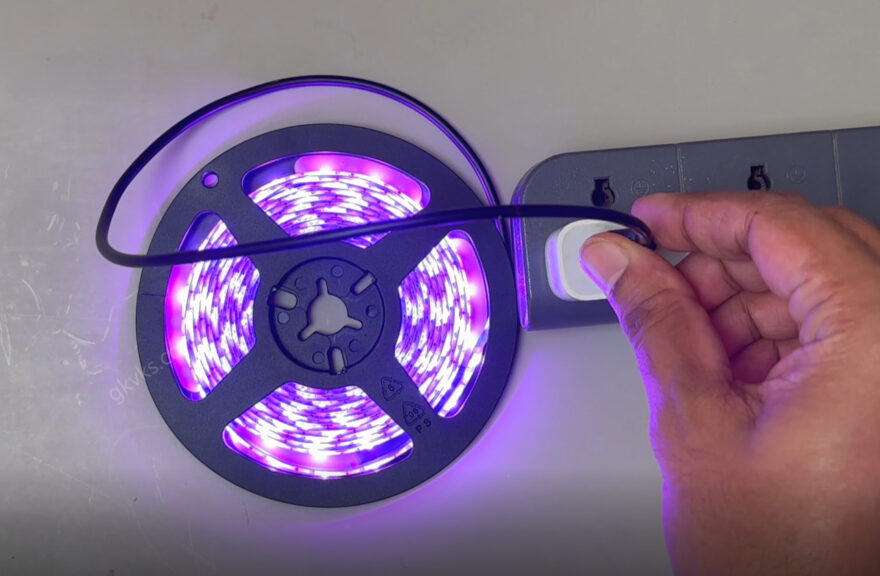
Depending on the specifications of your strip, you need to provide proper power supply, like in this case its 5 volts power needed for this strip for which you can connect it to any mobile charger or a socket with USB charging facility which has 5 volts supply. You can solder or join the wires from any USB cable to this led strip. Then you can stick the strip to the aluminum channel and fix the channel to your plant compartment area. That’s it. You can power these on for 10 to 12 hours a day depending on the plant you are growing under it. Make sure the distance of plant is not too much from light source.
- Simplest method is to use a taut wire on a wall preferably a pvc coated GI metal wire which is easily available at hardware stores. Just fix the ends tightly on a wall and make multiple rows and hang your vertical plastic pots on them.
- Use a mesh – metallic GI mesh like this one and fix it at a convenient place and hang the pots. I prefer pvc coated GI wire mesh like this one for obvious reasons like no rusting and no hassles of painting it frequently. If you have any trees or poles in your garden, just wrap them around and tie some plastic or metallic ties. Then hang your pots in the desired fashion.
- The third option is if you can afford a professional vertical garden setup like this. This is easily available online from amazon and other websites. Depending on the dimensions of your wall you can choose multiple wall panel sets. Each panel is 6 inches wide by 18 inches in length. So first fix these panels by drilling on the wall and then fix it with screws. Then just hang all your vertical pots. These are available in various attractive Colors and these pots are not expensive. Then plant your favourite plants and setup your beautiful vertical garden wall.
Please watch video above.
These zero or low maintenance plants do not require any special fertilizers for growth and flowering. But you can add a handful of compost like cowdung or vermicompost or any compost once 3 to 6 months.
Here’s my list of top 10 low maintenance houseplants for lazy gardeners:
12: Norfolk Island pine: Also known by many as the Christmas Tree. This is a hard to kill plant in tropical climates and needs very little care to survive. It grows well in bright indirect sunlight and also direct sun. It needs watering every other day or even less depending on the climate you live in.
11: Succulents & Cacti: Most people think succulents are hard to maintain and they die even after proper and intensive care. This is the mistake they do. They actually thrive well on neglect. They need very less frequent watering like once or max twice a week. They do well in full sunlight as well as indirect bright light depending on the type of succulent.
10: Spider Plant (or Chlorphytums): This is one of the best starter plant. Spider plants are mostly grown in hanging baskets. But they thrive in any container or any type of soil or potting mix. They grow very well in shady places with indirect bright light. They do not need daily watering. you can water on alternate days or even once or twice a week depending on the climatic conditions.
9: Peace Lily: Peace Lily is one of the most beautiful low-maintenance flowering plants you can add to your home garden. Additionally, the Peace Lily is also a good air purifier plant. This can be grown indoor or outdoors and requires bright indirect sunlight. It has beautiful shiny green leaves with creamy-white hooded flowers. You can water it on alternate days or even lesser depending on the climate.
8: Jade Plant: This is actually a succulent plant which requires very less frequent watering, like once or maximum twice a week even in summer season. This plant requires at least 2 to 3 hours of direct sunlight for proper growth, preferably morning sunlight.
7: ZZ Plant: This is another attractive ornamental plant that requires very little care. It’s a beautiful plant with glossy green leaves and also an air purifier plant. It is a drought tolerant plant and requires very less frequent watering like once or twice a week. It can be grown indoors or outdoors in shady or bright locations. It doesn’t need direct sunlight.
6: Syngonium: This is another beautiful ornamental flowering plant with an attractive foliage. This needs alternate day watering or at least weekly twice watering. It grows in indirect bright locations as well as in direct sun. If kept in direct sun, avoid hot noon sun and water it daily.
5: Snake Plant (sansevieria): These are actually true zero maintenance plants and can survive the worst of the conditions. They require very less watering and even sunlight. They adapt to any conditions and grown in dark locations as well as bright locations and also in direct harsh sunlight. They come in many beautiful varieties and colors.
4: Lucky Bamboo: This is a dracaena species and grown mostly in water. But it grows equally well in soil too. If grown in water, this is a very low maintenance plant and requires changing water once in 10 to 15 days. Its grown indoors and needs very little light.
3: Philodendrons: These are again zero maintenance plants that need very little light to grow. They can be grown indoors or outdoors in shady places. They need less frequent watering like once or twice a week.
2: Aloevera: If you can’t remember the last time you watered your plants, aloe is perfect for you. This is a succulent plant which store water in its thick fleshy leaves and can survive many days without watering. It grows indoors as well as outdoors, but can get leggy if it does not get sufficient direct sunlight.
1: Money Plant or Pothos: This is also called Devil’s ivy, because it’s a hard to kill plant and survives even the worst conditions. Pothos come in a wide variety of beautiful colors and varieties like golden pothos, marble queen, marble prince, neon and so on. They are grow indoors mostly in water as well as outdoors in bright shady locations. You can check a detailed episode on Money plant and secrets to get very large size leaves in pothos, from a link in description below.
The other low maintenance plants that need a mention are: Dieffenbachias, Umbrella tree or schefflera, Plumeria or Champa tree, Dragon tree, Rubber tree, and Pepperomias – but not variegated ones – any variegated plant needs more sunlight exposure because the pigment chlorophyll essential for photosynthesis is lesser in variegated plants.
Now I will tell you two fruit trees I have grown that need no special care except watering, sunlight and occasional handful of compost. The first one and my most favourite tree is Mulberry tree, which can also be grown in containers to bear fruits. The second one is a fig tree. Choose grafted trees if you are growing in large containers.
- Rooting Hack: For faster and guaranteed rooting of stem or branch cuttings, take a small piece of fresh aloe vera leaf and insert the cutting into it and then plant into the soil. Roots grow as early as 10 days depending on the plant you choose.
- Candle Hack: Seal the upper cut end of your plant stem or branch cutting using few drops of candle wax. This helps prevent moisture evaporation and result in faster rooting.
- No Browns for Composting? Use a paper shredder and use the shredded paper and card board to add into your compost bin for faster and smell free composting.
- Easy Tomato Stakes: Tomato plants require support to avoid awkward bends and also to get the best yield. String Support your Tomato plants using a small piece of GI metal wire. Make it into a U-shaped loop and insert it near the roots. Tie one end of a string to this and the other end to some support at the top.
- Banana Peel Fertilizer for Flowering: To make banana peel tea, soak pieces of banana peels in water for 2 to 3 days. Dilute this liquid with water in 1:5 ratio and water your plants to provide potassium to your plants which increases flowering in plants and also makes the flower size bigger.
- Anti-Gravity Plant Support: While growing climber veggies, do not take them to a height above 6 feet, but instead support in a slope like fashion, like take it to a height and then slope the growing ends downwards to assist in long-distance transport of water and nutrients for healthy growth. The arch like trellis is the ideal support fence for growing climber or creeper veggies.
- Hairs to Roots: Insert tomato seedlings as deep as possible to increase the density of roots formed from tiny hairy projections from tomato stems and this makes the plant stronger to produce the best yield.
- Big Leaves: To get large sized leaves in your money plant, use a moss stick or coir stick to anchor the aerial roots to it. Wet the moss stick whenever you water the money plant.
- Onion + Aloe Vera Rooting Agent: Making a paste using onion and aloe vera gel and dipping the cuttings into it for few minutes before planting in soil will help in faster and guaranteed rooting.
- Spoon Transplant: To transplant your seedlings, use a spoon, dig out as much soil with it including the roots of the plant and hold the leaves of the plant and not the STEM to pull out, because this can squeeze and damage the water and food conducting tubes – xylem and phloem and the little plant may die.
- Grow From Junk: Never throw away a pine apple crown, just remove the bottom leaves and keep the bottom inserted into a glass of water for a week and then transfer to a container. It will bear fruits within a year.
- Eggshell Water: One eggshell contains about 2gms of calcium. When you boil eggs, a small percentage of this calcium and phosphorous is released into the water. Do not throw away this water, but use it to water your plants that require a lot of calcium – like tomatoes and peppers as well as flowering plants.
- Cello Tape Pest Trap: Wrap the cello tape in reverse on your fingers and use the sticky part to touch on leaves infested with pests like aphids, whiteflies and mealybugs.
- Clay Soil Hack: Remove Clayey or sticky soil from roots using this simple Hack: When you bring your plant from a nursery and start repotting, most often you find they have stuffed the plant in a clay-rich sticky soil. You can remove this soil without damaging the roots by soaking the root ball in water for few minutes till this soil dissolves. Then you can repot this plant in a well-draining potting mix.
- Root Teasing: Always Loosen up or tease your roots before repotting into a new container.
- Toilet Paper Cloning Hack: Use Aloe vera and Toilet paper to produce roots faster during air layering your favourite plant.
- Aspirin Hack: During conventional air layering to produce faster and better roots, use one tablet of aspirin 350mg per litre of water and add this water you’re the potting mix and then wrap it around the injured stem for faster and dense root formation.
- Hydroponic Cloner: For faster rooting, make your own hydroponic plant cloner using a plastic bucket and an aquarium pump. Healthy Roots develop within 8 days.
- Free Calcium: Egg shells easily dissolve in vinegar and release free calcium to your plants. Make egg shell powder and the add about a cup of vinegar to a cup of egg shell powder and stir nicely and leave it for any hour. Then dilute this to 1:100 or more to water your plants and treat acute calcium deficiencies which can produce blossom end rot disease in your fruits and veggies.
- Simplest Plant Cloner: Use any container and place a couple of aquarium air stones to pump oxygen into the water. This helps in faster and guaranteed rooting of any plant cuttings in water.
- Wheel-Barrow: No Wheelbarrow to move garden stuff? Do not worry, the cheapest alternative is a large cloth or an old bed sheet. Just load on the heavy objects and drag it along.
- Aspirin for Rooting: When you propagate cuttings in water, do not forget to add a small piece of Aspirin tablet into it for faster and stronger root development.
- Seed Split Trick: Split the Cilatro or Corinader seeds before planting them the sand paper paper method and apply gentle scraping pressure to split the seeds and do not crush or damage them using a heavy objects like these. This helps to grow enormous cilantro harvest.
- Scrape and Sow: Use sand paper to scrape the hard seed cover of certain seeds like apple, chickoo and those with hard seed over for faster seed germination.
- Treat Leaf Curl Virus using Asafoetida: Take 500ml of sour butter milk. Add one teaspoon or about 5 gms of Asafoetida powder to it and mix well. Let it stay for 1 or 2 hours. Sieve this solution and Spray thoroughly over the affected plant including the underside of the leaves. Repeat this, every 3 days for 3 – 4 times to completely cure the leaf curl disease.
- Egg Shell Planter: You can use egg shells to sow seeds. To make drainage holes, scrape with a sand paper and use a thin drill bit to make a hole without breaking the shell.
- Egg Trays: Card board Egg trays can be used as seed germination trays. You can directly transplant the seedling along with the card board into the soil, as this is bio-degradable.
- Chalk Sticks: Chalk is chemically Calcium Carbonate. You can bury a chalk stick into the soil while planting your veggies. This really works wonders for plants like Tomatoes, Peppers, squashes, egg plants and almost any vegetable plant.
- Strong Roots: Strong Roots means a healthier plant with a better yield. In its early growth phase, adding a source of phosphorous like bone meal powder or organic rock phosphate powder will produce stronger roots and produce a better harvest.
- Seed Viability Check: An Easy method to check viability of your larger seeds is to pour them into a bowl of water. If the seeds are floating, this means they are dry and not viable. Discard them and use only those seeds that sink to the bottom.
- No Garden Gloves? Scrape your nails into a soap before working with your garden soil or potting mix. This helps in cleaning your hands easily later on and also the dirt won’t enter into your nail beds.
- Repel Animals: A simplest way to repel Some animals like cats, dogs and rabbits – is to soak a some pieces of cloth with vinegar and stuff them in some areas of your garden. These animals cannot withstand the smell of vinegar and may not return if you repeat this process for few days. Similarly using Asafoetida wrapped in a piece of cloth will deter these animals and certain insects.
- Magnifying Lens: Use a Magnifying Glass to closely examine and diagnose your plant pests and insects to identify them and follow the treatment accordingly.
- Tea Fertilizer: You can also use tea waste or coffee grounds on flowering plants as an organic fertilizer to boost blooms.
- Tea waste compost: Add used tea waste or coffee grounds into your compost bin for faster composting because earth worms digest them very fast.
- Seed Spacing: You can do perfect seeds spacing for Tiny seeds like spreading them apart in a row on toilet paper – for better visibility and even spacing and sowing. You can make a seed tapes either in a row or a square or round seed board specially for carrot seeds for even spacing and better growth and ease of harvesting.
- Over-Ripe: Garden vegetables and fruits that become over-ripe are an easy target for pests. Remove them as soon as possible to avoid pest growth.
- Faster Germination: A simple hack for faster germination and healthy seedlings is to soak seeds in Epsom salt solution for a couple of hours before planting – like half a teaspoon of Epsom salt in 100 ml of water. You can also spray Epsom salt solution on your seeds and seedlings for healthy outcome.
- Pick Small: You can Pick small seeds for sowing with a stick or tooth pick dipped in water.
- Acidify Soil: For Acid loving plants like Rose, Hibiscus or Hydrangeas, use 5gms of Alum powder in 1 litre of water once every 15 days and this will boost flowering.
- Soil PH Test Using Litmus Paper: Mix Water and Soil in 1:1 ratio. Dip the litmus paper and match the color with your color coding chart that came along with your litmus paper kit.
- A Rough Soil PH Test Method: Take a soil sample and pour some vinegar. If it fizzes and bubbles you have an alkaline soil. What if the soil is acidic? Add baking soda one or two teaspoons and mix it with soil. Then wet the soil baking soda mix with distilled water. If it fizzes and bubbles your soil is acidic, because the acidic content in soil reacts with a base or alkaline stuff like baking soda.
- Free Bio Seed Pots: Never throw away the toilet paper card board roll. But use it to make seedling cups which are bio degradable and can be directly planted into soil without disturbing roots.
- Paper pots: You can also make seed pots by rolling newspaper and even this is bio degradable and similarly you can directly transplant with the pot into the soil or into a larger container.
- Mosquito Repelling Plants: Growing plants like Lemon grass, Citronella, catnip, basil, marigolds, eucalyptus and many other plants helps deter mosquitoes.
- Turmeric Treatment: You can use turmeric powder from your kitchen treat and prevent rose-dieback disease after pruning your rose bush.
- Silica Gel Packets: Never throw away these tiny sachets, use them in your seed storage container as desiccants which increases your seed life and protects them from fungus.You can also use these to preserve and protect powdered gardening stuff like bone meal, fungicide powder, rooting hormone, etc. Just tape the sachet to the underside of the container lid and that’s it.
- DIY Watering Can: Take the base of a soda bottle and place it around one end of a pvc pipe. Heat it up with a lighter. It should shrink and clamp around the open edge. No glue needed. Use a pin and poke some holes in the bottle base. Next, cut the edge of the pipe at an angle using a saw blade. Next insert the pipe into the inlet and use some hot glue to hold it in place. Optionally, colour it to get that beautiful look.
- Mini Green House: Use plastic bins or containers as mini green houses or poly houses for faster seed germinations.
- Do Not Kill: Avoid spraying a pesticide on the flowers. This is to avoid any harm to beneficial Pollinator insects like butterflies and honey bees which are essential for pollination and fruit formation.
Before we start, I always start with the word “Organic Gardening” which uses natural and organic sources of fertilizers and pesticides. Please avoid the use of chemical fertilizers and pesticides to protect our mother earth from the hazards of chemicals. Now, Let’s list out the 10 organic secrets and tips to boost flowering in Hibiscus bush.
10. REPOTTING: Most of us think repotting is the first and foremost task as soon as you bring your plant home from a nursery or a garden store. No! This is not true. Do not repot immediately. Allow your plant to settle down for at least one week to its new place and then consider repotting. During repotting, you need to mix some important ingredients into the potting mix like for a 12-inch pot, roughly about 1 tablespoon of steamed bone meal powder which is a great source of phosphorous. Phosphorous strengthens the root system and a strong root system is indispensable for flowering and plant growth. The vegan alternative to bone meal is Organic rock phosphate. Optionally you can also mix the Mycorrhizae fungi – the beneficial fungi or even pseudomonas and Trichoderma powder. You can check my detailed posts on these topics from HERE.
9. CONTAINER SIZE: A simple concept to remember while choosing your pot size is: if you choose a deeper container, the plant will start focussing more on root development due to increased soil space and less on flower production. Though this may be useful in the long run. But to get faster results and boost flowering, the best one is a container that is wider than the usual nursery pot, but still not too deep. Like for instance, if your plant came in a 6-inch container, go for a 8 inch container. If you choose this method, you might need to repot it every year in a graded manner like increasing 2 inches every time you repot.
8. LOCATION: Keep your plants away from the traffic and pollution. Dust accumulating on the leaves can impair photosynthesis – that’s plant food production, which in turn reduces plant growth and flowering. It can also reduce the flower size. So, you might want to remember this tip to get big sized flowers. The solution to this problem if you have no option to shift the plant to a better location is – misting the plant with water and cleaning the leaves with a soft cloth. Or if you have lots of plants, then using your watering hose in shower mode and gently pressure wash your plants while watering.
7. SUNLIGHT: Place your plant in a location where you get adequate direct sunlight. Hibisucs needs at least 6 hours to 8 hours DIRECT SUNLIGHT for proper flowering. Without direct sun, you cannot expect hibiscus to flower. If it’s too hot like in summer season or to protect it from noon sunlight which can sometimes cause leaf burning and drying, you can install a 50% green shade net in summer season.
6. WATERING: If you are growing in containers, daily watering is must specially in summer season. Here you don’t need to check using moisture meter or finger dip method. Just daily watering and deep watering. If it’s winter season, it may need less frequent watering depending on the zone you live in. One most important thing to check is the drainage hole of your container. Check for its patency. Make sure water flows out of it after you thoroughly water your plant. Water stagnation can result in root rot and death of your plant. Do not worry about over watering if you have a patent drainage hole and also if you are using a well-draining soil mix. We will discuss about the potting mix shortly.
5. PEST CONTROL: Controlling pests is very important step to keep the plant healthy and blooming. Examine the plant closely for pests and insects including underside of the leaves. Common pests like whiteflies, aphids, mealybugs can be easily eliminated using organic neem oil + liquid soap spray weekly once. Depending on the ppm concentration of your neem oil brand, you add 5 to 10 ml of neem oil per litre of water and few drops of liquid soap. Shake well and spray this once every week to treat pests and once every 15 days as a preventive measure.
4. RAKING OR TILLING THE SOIL: This is just loosening your top soil using a raking or tilling tool. This is an important step everyone must follow before applying any fertilizer or manure to your plant. Raking or tilling the soil is recommended once every 15 days, which improves soil aeration and has many benefits. Make it a habit to rake the soil and then apply your fertilizer every 15 days.
3. POTTING SOIL: Here you should remember few important factors like:
a) Soil PH b) Thing to mix in Potting soil to get more flowers c) Keeping the soil well-draining. The First factor is PH. Hibiscus prefers a slightly acidic soil like around 6.0 +/-0.5. If you have a PH testing meter, you can alter the soil ph to acidic by using Alum powder hack. Even if you do not have this meter and your plant is not performing well, you can roughly add about 5 gms of alum powder in one litre of water once every 15 days to maintain this acidic level, which is very important for absorption of nutrients in the soil. The other alternative to Alum is to use 1 – 2 teaspoon of white vinegar per litre of water weekly once to make your soil acidic.
Now the potting mix recipe. To get adequate flowering, you can follow a simple formula: 30% Garden Soil, 30% Compost like cow dung or vermicompost and 30% Cocopeat or Peat moss. 10 percent additional stuff like bone meal powder, neem cake powder, mycorrhizae, Trichoderma, etc as discussed earlier.
2. FERTILIZER: In this video, I will be talking only about organic fertilizers and not chemicals like NPK or DAP.
You add a handful of decomposed cowdung or horsedung or even goat dung or vermicompost on the top layer of the soil once every 15 days after nicely raking or tilling the top soil. This should be the minimum fertilizer use and frequency to get big sized flowers as well as increase flowering. If you want to get still better results, You can also use compost tea sprays or even mustard cake tea sprays or watering and other foliar feeds once in a while like once in month. You can also prepare a Cocktail Fertilizer Powder containing most of the useful organic fertilizers available. You can check a detailed post on how to prepare this mixed fertilizer powder.
1. PRUNING: Yes this is another important step which many of us neglect. Some newbie gardeners actually hesitate to trim the plants. But this should not be the case. Pruning or trimming the plant branches encourages the formation of more branches and hence more flowering. You can soft prune or trim the plant all round the year. And you can do hard pruning once in a year. You can check detailed post Pruning Tutorial – on when to prune and how to prune and what pruning tools you need. You also need to perform deadheading of the flowers from time to time. Dead heading means removing the dead and dried flower along with its twig or branch and this is another important step for maintaining blooms as this will divert the energy to plant growth and more flowering rather than seed formation.
Aloe vera plant needs no introduction. I am sure most of us have an aloe vera plant in their homes, either indoors or outdoors in the garden. Aloe vera is one of the NASA recommended air purifying plant, which has been proven to remove the harmful benzene and formaldehyde from indoor spaces.
Now, let us look into 3 simple and useful tips on how to grow thick and fleshy Aloe Vera leaves.
- SUNLIGHT: This is one of the most important factors that decides the thickness of your aloe vera leaves. The common reason for thin, long or leggy aloe vera leaves is keeping them indoors in spaces with not enough light. No doubt, it’s a hardy plant that survives low light conditions, but it won’t grow to its full potential if you do not keep in in direct sunlight. Remember to get a thick and fleshy aloe vera plant, you must provide direct sunlight of at least 6 to 8 hours. Like starting from early morning sun till noon sun. Try to avoid the harsh noon sun, which can sometimes burn the leaf tips and edges, especially in summer season. If you prefer to keep it all day in direct sunlight, you can install a 50% green shade net to protect it from harsh sun and let it enjoy the pleasant sun for the entire day. If you are growing indoors, you need to keep it in full direct sun light at least 2 to 3 times in a week or you can grow it under a good quality LED grow light.
- ROTATION TECHNIQUE: This is another useful trick to keep your plant healthy and get those thick and fleshy aloe vera leaves. To keep your plant growing evenly, rotate the container at least a couple of times every week so that all of its leaves get an equal amount of sun light for photosynthesis.
- WATERING: This watering trick for aloe vera is the most important tip to get thicker and fleshy aloe vera plant. You know, aloe vera is a drought-resistant succulent plant which stores most of its moisture in its leaves in the form of gel. We all know the medicinal and various other uses of this aloe vera gel. We will not discuss about that in this video. To understand this trick, you need to know what happens to aloe vera when you deprive it of water. If you let the soil go very much dry for too long, your plant will begin to use the water reserves in its leaves, causing them to shrivel and shrink. Of course, we do not want this to happen. So, the right technique to water aloe vera plant is, Yes! Deprive it of water, but not too long. Make it a lot thirsty first and then provide it will lots of water to drink. Practically, this is done by allowing the top 2 inches of soil to dry out completely. You can check this using the finger dip method or a moisture meter if you have. Water it only if the top soil is completely dry. And Watering should be thorough and deep till the water flows out of the drainage holes. This simple hack helps to grow aloe vera leaves thicker and fleshy.
If you want to know the complete care tips for aloe vera plant like fertilizer, pot selection and other useful points, you can check my detailed post on aloe vera care tips.
Want to grow edibles indoors even in winter season? Yes! You can grow many plants indoors, including your ornamental houseplants, succulents and even fruits and vegetables in containers. You need an appropriate full spectrum grow light and the main advantage of using grow lights is you can grow any veggie in any time of the year including the winter season. And also, grow lights are ideal for seed starting because they help in faster germination due to the warm temperature.
We will discuss some important tips and tricks on how to successfully grow veggies indoors using grow lights – like adjusting the appropriate amount light of light required for a particular plant by altering the distance or by using the Dimmer switch and many other useful tips.
Let us practically do this by first planting some seeds:
This seed starting mix contains about 30 to 40% compost, some 30% Garden soil and 30% coco peat or peat moss.
Let’s plant tomato seeds first. Just space them well and cover with some mix. Do not sow them too deep.
Now Let’s plant some greens like cilantro or coriander. You need to use the sand paper trick to split the seeds into two before sowing each seed is technically a fruit containing two seeds in it. So, you get two plants from one single seed. You can check a detailed episode on this topic HERE.
Now Let’s plant other green leafy’s like Spinach and Fenugreek. Do not sow them too deep. Cover with a thin layer of potting mix. Generally, the sowing depth = 2 times the seed thickness.
We will also plant some French beans and see how to do under a grow light indoors.
Before we show you the results, let’s review BESTVA Pro 4000-Watt LED grow light and keep all these containers under this grow light and we will simultaneously discuss some tips and tricks on growing plants under artificial lights. We will not bore you with physics or those difficult to understand technical details while discussing the specifications of this light. You can also check links provided below in the description box to see more details and specifications and also purchase links given in description below.
Let us quickly unbox this grow light. The package comes with some useful accessories including these grow room glasses, light hanging strings, rachet hangers and the double power cord and also the user manual. The overall look and design of this light looks awesome.
Bestva Pro 4000 Watt is a large full spectrum grow light with high quality Samsung LM301B LEDs and double Mean Well Drivers which means a long life. This light comes with 3 years warranty. It comes with 3mm thickness aluminum plate radiator for better heat dissipation. Holes on the aluminum plate and the glass make heat convection, run 50~60℉ lower than any other LEDs.
The dimensions of this light are: 543 x 512.6 x 77mm and it weighs 9.4 kgs – that’s huge.
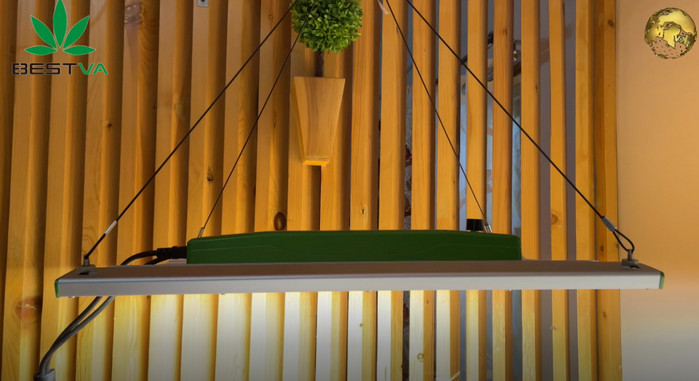
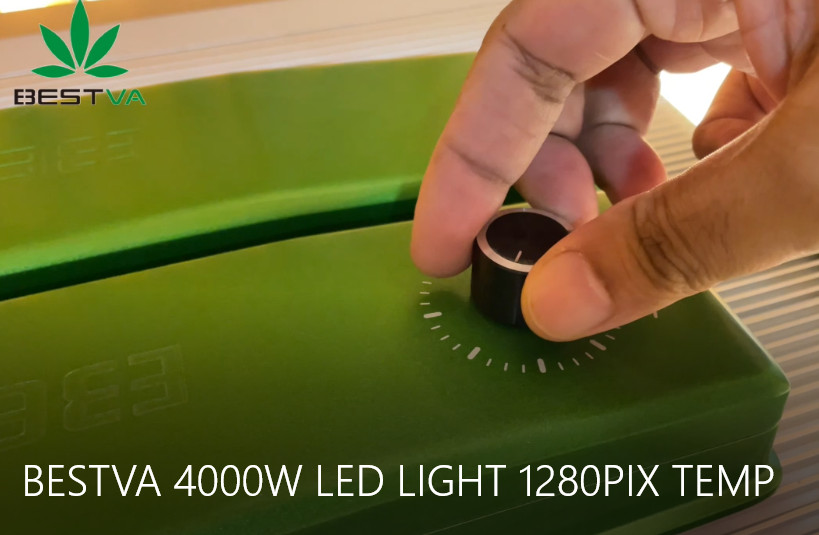
The best part of this light is it comes with a Dimmer Switch which goes from 100% all way down to zero and even with a power off function. This is really helpful for many reasons, which we will discuss later.
Another useful feature is its Auto sensing power supply and works on both 120VAC and 240VAC and 277VAC. It comes with dual power cord. You need to connect it like this into the sockets. This power cord has another on off switch available in the cord itself.
Well, Let us now look into the area covered or the number of plants that can be grown using a single light. Well, according to the company specifications, its actually a large area covered by this grow light. Like Vegetative coverage at 18 inch 7.5 x 7.5 feet and Flowering coverage at 14inch is 6 x 6 feet which is actually a lot of space. You can grow a lot number of plants.
Other technical specifications are: Power Consumption 415W and PPFD 2.9 umol/J.
This light is a full spectrum light covering the entire growth cycles of a plant starting from the seedling stage.
Lets quickly hang this light. This comes with a different hanging design. These knobs are fitted into these grooves or anchor points at four corners and tightened. Then you just hang it to the rachet hanger which allows you to adjust the distance of this light from the plants. This distance is important and varies with the different growth stage of a plant. Like in Seedling stage: 60cm (24″) Growing stage: 40-60 cm (16″- 24″) and Flowering stage: 30-40 cm (12″-16″). If you increase this distance and want to cover a larger area, you need to keep it on for longer than 12 hours. This also depends on whether or not you use a grow tent.
So overall a great quality grow light if you want to grow anything indoors, anytime, any season!
Happy Gardening!
PRODUCT LINKS:
BESTVA PRO 4000W LED GROW LIGHT: https://dada.link/lGxeoy
Official Website: https://www.bestvaled.com
Amazon.com Link: https://www.amazon.com/BESTVA-Dimmable-MeanWell-Greenhouse-Hydroponic/dp/B08PD5TL6Z/