In today’s article, we will quickly debunk 20 interesting and unbelievable gardening myths and reveal some extremely useful scientific facts and tips related to Gardening.
- Fresh Cow Dung or Horse Dung is very Good for Plants?
This is absolutely false! Fresh Cow poop should never be applied for your plants, because it not only stinks but contains high levels of ammonia and salts which can burn your plants. It also contains harmful microorganisms like e-coli which are harmful to plants as well as humans. Plus, it also contains weed seeds which can produce a lot of weeds or unwanted plants in your garden. So always use decomposed cow-dung or horse dung for your plants. You can watch a detailed video on 5 hacks to quickly decompose cow dung from a link in description below or from end-screen link at the end of this video. Let’s move on..
- Is it Dangerous to Expose Roots to Light?
Well, This can be a very nice high school project for kids, to grow two similar plants, one in a transparent container and one in an opaque container and then compare these two. As you can see nothing happens to the plant grown in transparent containers. The actual concern is, root exposure to AIR and even the heat from sunlight that can cause drying and can damage your plant. But still you are advised to keep the roots in the dark. This is because of algae growth due to light and your roots are not getting enough oxygen because the algae is stealing the oxygen and nutrients for itself. So light as such does not hurt the roots, but air, heat and algae hurt the roots and kill the plant.
- Do Plants feel Pain?
There are many studies and researches conducted on this topic. Basically, Plants lack a nervous system – that is a brain and other neurological structures like nerves and pain receptors, so they should not feel pain, unlike in humans and animals where we have specialised pain receptors.
But according to some researches, “Plant can know of themselves being eaten” because studies have shown that plants release defence chemicals in response to caterpillars munching on them.
Other points include: Plants fight for territory, seek out food, evade predators and interestingly trap prey like what your see in carnivorous plants like the venus fly trap. They are as alive like any animal, and – like animals – they exhibit behaviour.
- Talking to You Plants will help them Grow?
People who really love plants and gardening will often tell you that talking to plants or even music has a beneficial impact on their overall health and growth. Despite many different scientific studies on this theory, there’s still no conclusive evidence that talking to plants helps them grow. One theory says that since plants take up carbon dioxide, and hence talking to plants releases carbon dioxide when we exhale. So, that explains it all.
- Plants can Die of Old age or aging. The oldest known tree in the world is the Great Basin bristlecone pine in the White Mountains of California which is over 5000 years old. Actually Trees grow indeterminately, meaning that with the right conditions, they can grow and grow and grow. But the only problem that limits them from reaching up to the sky is the food and water transport through xylem and phloem to the growing end from the roots. The taller the tree the more difficult it is to transport water from roots to the foliage near the top. But here what happens is instead of growing taller they increase in width and also branch out more, as you might have noticed some old trees with huge girth of their stems.
- Animal or Human Urine can be used as a Fertilizer. Yes, this is a Fact!For example, cow urine contains loads of NPK – that’s nitrogen, phosphorus and potassium which are the most essential plant nutrients for agricultural use. But it has to be applied in dilution of at least 1:20 in water.
- Is it Dangerous to go near Trees during Night Time? Well, In day time under the presence of sunlight – that’s photosynthesis, plants take up Carbon dioxide and release Oxygen. But during night they take in Oxygen and release CO2 and hence the air near trees will have lesser concentration of Oxygen and higher concentration of CO2. But, this impact will be negligible for small plants and at home gardens and only be noticeable near very large trees or in thick vegetation.
- Naphthalene balls or Moth Balls contain Naphthalene Acetic Acid and can be used as a rooting agent. It’s a Myth. NAA – Naphthalene Acetic Acid and IBA – Indole Butyric Acid are plant auxins or hormones which are entirely different compounds and used for rooting your plant cuttings. These two are entirely different from moth balls which are used to keep insects at bay.
- Watering plants on a hot sunny day will magnify the sunlight through the droplets acting as convex lenses and burn the leaves badly! No doubt, watering plants early in the morning or late in the evening is great! Because less water will evaporate during this time. But This theory that water droplets on leaves can act like mini magnifying lenses, focusing the sun’s rays and causing leaf burn has been completely disproved by physicists.
- Planting by the Moon affects plant growth and yield?
The idea that the Moon affects plant growth is an old one that is believed by many people. This is a myth! No study has proven the effect of moon on plant growth. And the only plants that use moon light for photosynthesis are certain types of phytoplanktons which are not normally found in gardens. - Crushed egg shells are a good source of Calcium to treat calcium deficiency? This is False! Even Powdered Egg shells take a long time to decompose and release that calcium into the soil and make them available for uptake by plants. You can make a water soluble calcium using egg shells by mixing it with distilled Vinegar to make this happen. You can find this detailed video from a link in description or from a link at top right corner of this screen.
- Saplings or seedlings need to be supported to protect them? True or False?
This is False! Many people recommend you to provide support to these young slender plants due to the risk of wind blowing them and things like that. Unless it’s a strong wind, tying a sapling or young plant to a support stick or any kind of support will actually do more harm than good. Research has shown that trees without support, over a period of time will develop thicker trunks, more supportive roots and more resistance to breakages.
- Do Magnets affect Plant growth?
This is a fact. Magnetism affects plant growth and seed germination positively. Studies have shown that when plants are exposed to a magnetic field with south pole facing towards the roots, Seeds germinate faster and plant grow faster and stronger in the presence of magnetic field in the soil. You can check a detailed video on this experiment from a link in description or from a link at top right corner of this video. - Can Harvested or Collected seeds be stored in a Refrigerator or Freezer?
This is not correct! Most seeds that are stored in a seed banks are first dried up so that the moisture content is reduced to about 10 percent and then these can be stored for several years. But if you freeze freshly collected seeds, the moisture content in these seeds will form ice crystals within and can destroy the seed viability. - Growing Fruit Trees in Containers is not possible due to limited space?
This is not true. You can grow them but you need little larger containers or fabric bags like more than 18 or 24 inch. You can watch a detailed episode on the top ten terrace gardening myths and facts from a link in description.
- Does Potting Mix Cause Legionnaires’ Pneumonia in Gardeners? True or False?
Do not worry! This is not True. Legionnaires’ Pneumonia is a severe form of pneumonia or lung infection mostly cause by inhaling the bacteria. Though these legionella bacteria survive in outdoor soil, it rarely causes infections. But still, prevention is better than cure. Better wear a mask while handling potting mix, specially people with weaker immune systems.
.
- How do I know my plant is still alive and how to save a dying plant?
There are many signs to know whether your plant can still survive. If your plant is looking dry and has shed its leaves, most of us think its dead. But actually, it may be alive or can be revived. Please watch my detailed episode on this topic demonstrating how to save a dying plant. I have linked that video in description below.
- Can we grow plants from leaves?
Yes! Some, but not all plants can be propagated from just a leaf or a section of a leaf. Leaf cuttings of most plants will not generate a new plant; they usually produce only a few roots or just decay. There are many ways you can grow leaves into a new plant, like 1. from a leaf petiole, 2. by dividing a leaf into multiple pieces for example fleshy succulent plants like sanseviera or the snake plant and other succulents. Other methods of propagation like cane or stub cuttings, root cuttings, leaf bud cuttings and so on.
- Gardening on Terrace is Bad for the Building. This is not completely true unless your building is too old with a poor construction. Otherwise if wisely planned, a garden on terrace will not be a problem, like placing the heavy containers along the walls on your terrace which are weight bearing or main walls of the building and things like that.
Water proofing the terrace is not always necessarily, unless you plan to build raised bed terrace garden. If you grow in container, you only need to check whether the water draining out of the pots is easily flowing out of the terrace and not stagnant.
- Does Electric Current affect Plant Growth? Well, there is a separate science called electro-culture farming which utilizes this effect. I have conducted a simple experiment on this topic to study the effect of electric current on plant growth. You can watch that episode from an end-screen link or from garden tips channel.
Root Crops or Root Vegetables are underground plant parts that are harvested and eaten by humans as food. These can be roots, bulbs, rhizomes or tubers. We will not go into the botanical details of these terms for now.
The Commonly grown root vegetables include Carrots, Raddish, Beets, Onions, Potatoes and many many more. It’s a big list and a big classification. Now, we will quickly look into certain signs and tips which are really useful for everyone whether you grow veggies in containers or in ground.
- The first tip actually is, a reason why this Harvest timing is so important. Do not let them grow too larger because they can become tough and woody to taste and may not be chewable. You know what I mean by this. Yes the size is very important.
- Beets and Turnips should be pulled out as soon as they grow to the size of a golf ball, but never allow them to grow to the size above a tennis ball. Tender roots are actually the best to taste. Now you may ask a question, All these are lying underground and how would I know the size of these veggies. You will get answers to these questions in the coming tips. So please watch it till the end. Next:
- We will start with some tips or signs that indicate, your veggies are ready to harvest. We will start with Carrots, Beets and Radish or Turnips: First of all you must know that their Green leaves are edible and really tasty. If its too early, you can just snip off some leaves if you want to have them. As long as you leave some greens on the plant, it will continue to grow more of them.
- When it comes to roots, that’s the main veggie! Remember: the smaller the root, the better it tastes! So when to pull it out? Pull the largest roots every time you harvest. If you become greedy and leave them under for a long time they get woody and bitter to taste.
- So which is the biggest one or how to know if its ready to be pulled out? Just Look at the green leaves, and Remember this General rule: the bigger the root under the soil, the darker the green leaves and thicker the stem. So, If some of the greens in the row look darker than the others, you can be sure the largest root veggies are underneath.
- Another Tip here: – Beets. carrots and radish, grow partly above the soil, especially when they mature. But sometimes you can remove some of the top soil and check the thickness or the size of the crown – that’s the top portion, before pulling them out.
- Then, The Dates on the seed packets will also give you a rough idea about when you should expect them to be fully ripe, Generally its about 40 to 60 or more days, but you can apply some of these tips shown in this episode and decide combining all the knowledge you gain in this episode.
- Well, the Next tip is: If you planted seeds too close and you see there is congestion, specially in container gardening – you can pull out some baby roots like carrots or radish because these are really soft and delicious to eat. This will also relieve the congestion and allows remaining crops to grow to their proper size.
- When it comes to Onions and Garlic: Onions can be left for storage or harvested when the leaves turn yellow or the necks at the base bend. You should stop watering them and then harvest or store them. If you wish to consume the onion leaves or spring onions, they are really delicious. You can snip off and prepare your favourite dish.
- Potatoes: Generally take a longer time like about 10 to 12 weeks after planting and the first indication is when the plant starts flowering. This is the time they generally attain their proper size. Snip off the flowers to divert the plant energy to get bigger sized potatoes. The final indication of harvesting is when the plant starts to become yellow and eventually dries off. You can check my detailed post on some useful hacks and tricks to grow lots of potatoes in containers.
To get started all you need is an empty plastic bottle. Preferably, Not too large, as we plan to hang it. A small piece of PVC pipe and a good quality string/rope.
Let us get started in building our mint planter.
Step 1: Using a heated nail or a soldering gun, make some holes in the plastic bottle. Make sure to not make the holes too close or too many holes. Make two holes opposite to each other close to the base of the bottle.
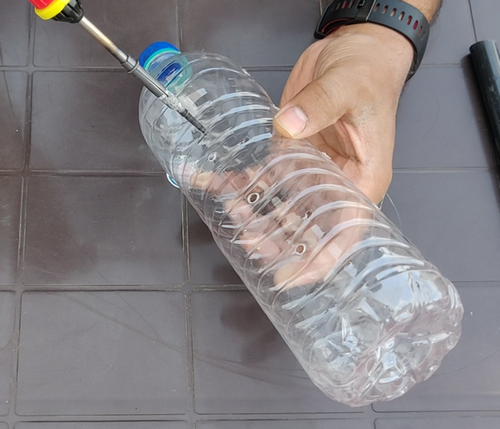
Step 2: Using a blade remove the base of the bottle.
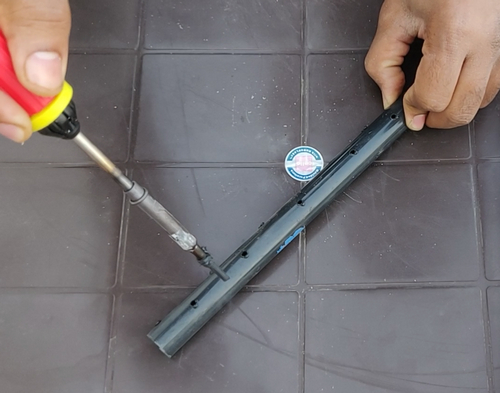
Step 3: Using the same nail or soldering gun, make some holes in the pvc pipe too. Using a flat blade you can shave the excess to avoid blockages. This pipe is going to be the plants lifeline as it will take care of getting water and air distributed equally throughout the length of the bottle. It somewhat works on the principles of air pruning which is so beneficial to grow larger trees in smaller containers. You can check out my detailed post on Air Pruning.
Step 4: Pass the edges of the rope/string through the holes at the base and tie a knot. That is it, they are now ready to hang.
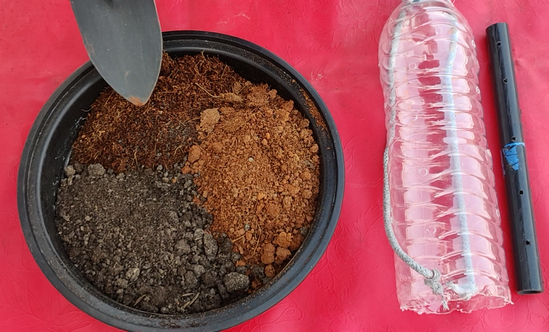
Step 5: To prepare the potting mix, you need to use a mix of plain garden soil, coco peat and dried compost in equal thirds. Place the pipe in the centre of the bottle and start filling the potting mix in around the pipe. Leave some room at the top to prevent soil and water overflow during watering.
Step 6: You need some freshly cut mint stems. You can take out the leaves and use them. All we need is the stems. You can simply start inserting the stems into the inserts in the bottle. Insert them gently and carefully. Do not force the stem as it might damage it. You can avoid it by selectively choosing the stems of appropriate size.
That is it, we are done. Hang the arrangement in a nice shady area and give it plenty of water to start the root generation process.
After about two weeks, you can see the results. Several tiny branches and leaves emerging from the stems we planted. This is good progress.
And here we have the progress after three weeks. The mint cuttings are thriving and so is the root structure. So, there you have it. No space, No fuss, super easy mint supply for your next kitchen adventure by recycling waste plastic bottles.
We all know the importance of planting right seeds in the right season for best results. Planting in the wrong season can result in poor seed germination, stunted plant growth, diseased plants and a very bad harvest.
Some Vegetables and fruits grow only in certain Temperatures, Humidity, and Soil PH levels, so it is critical to know which season is compatible to grow a particular plant. But, this growing calendar or the seasons are not constant and this varies throughout the world and varies from zone to zone. Hence, in this episode, we will learn how to make your own vegetable planting calendar and start vegetable planting or seed sowing based on the Soil Temperature. Do not worry, it’s not at all complicated. But this is actually very important. You may also have some questions in mind, like why only soil temperature and why not air temperature? We will answer everything in this episode in an interesting Q & A Format.
- What is Soil temperature?
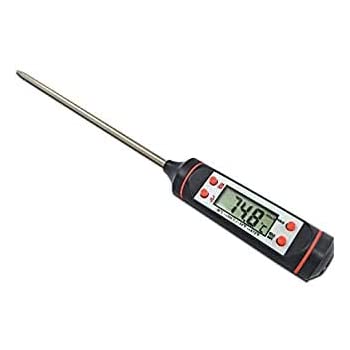
Soil temperature is simply the measurement of the warmth in the soil. Night time and daytime soil temperatures are both equally important. It’s measured in Degrees Fahrenheit or Degrees Centigrade or Celsius depending on where you live. - What Gadgets you need to measure Soil Temperature?
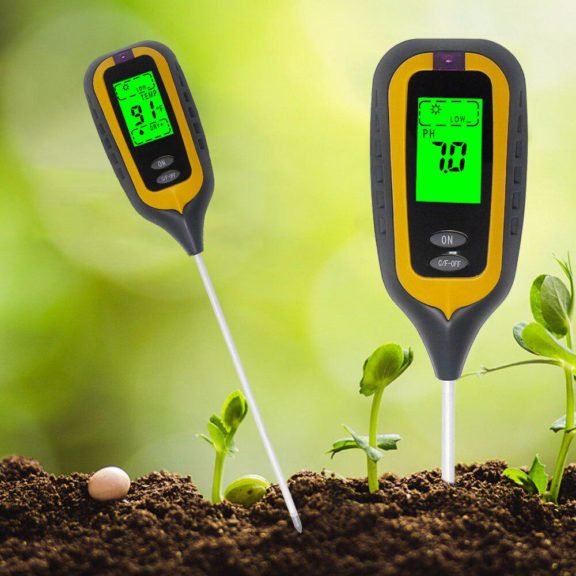
Obviously you need a thermometer to measure temperature. Soil thermometers are not expensive. There are many types of soil thermometers available. You can use any thermometer with a long probe to measure the soil temperature, including this type of food or milk thermometer. This is really cheap and available online – you can check a link to buy it online from description below. You can also use this type of all in one gadget which measures PH, moisture and temperature.
How to Measure Soil Temperature?
For seed starting, you insert the probe 1 to 2 inches deep to check the readings. Whereas for transplants or for other plants, You need to insert the probe 2 to 4 inches deep or even more and then keep it in soil for about 2-3 minutes to get the right reading. You can also repeat multiple times and take average of all readings. One simple tip here: Do not press your thermometer harder to make it into the soil, especially if soil is harder. You can use a screw driver to make a hole into the soil and then insert the thermometer.
What time of the Day should I measure?
Soil temperature is best taken in the early morning when the soil is coolest and not yet warmed under the day’s sun.
- Why Not Air Temperature?
This is because, the relationship between soil temperature and air temperature is not fixed and varies in different seasons. Like in early spring, the soil temperature is lower than the air temperature and then in summer, its higher than the air temperature. If you know this concept, then you can use your zone air temperature and roughly use the weather readings from your smart phone and use it as a baseline for planting your crops. - What Factors affect soil temperature?
The moisture content in the soil is the most important factor that affects soil temperature. Moist soils heat up slowly. Hence when you measure soil temperature, its better to insert the thermometer at least after 12 hours of watering the soil. Another factor which is actually used in many zones with unfavourable temperatures is the use of Green houses or poly houses to maintain temperatures ideal for seed germination and plant growth. - What is Workable Soil test?
Before soil thermometers were used in farming, the common method of determining when to plant was soil workability. This is the in fact an old fashioned method to roughly know when to plant.
The soil is workable and ready for seed sowing or planting if it passes the Workable Soil Test. Here’s the test: squeeze a handful of soil in the palm of your hand; when you open your hand if the soil remains a wet or very moist clump, it is not workable. Let the soil dry. If the soil crumbles from your hand with a touch, it is workable. - What is the ideal soil Temperature for most plants?
Each vegetable has a specific ideal temperature that’s favourable for seed germination and best results. Ideal soil temperature for planting should be 10 degree above the ideal minimum and 10 degree below maximum for that vegetable. We will show you the temperature chart for various vegetables at the end of this episode.
- Why Soil Temperature is important?
The right Soil temperature triggers not only seed germination but is an important factor in soil chemistry as well. Soil chemistry includes the release and absorption of mineral and nutrients in soil by the roots and this is so vital for plant resistance against pests and proper plant growth and maturation till the harvest. Now! - Let’s build our own Seed sowing or Vegetable Planting Calendar depending on the temperatures. You can classify this calendar in two ways:
A much broader way is to put them into two categories – like WARM CROPS or COOL CROPS or COLD CROPS.
One more method is to divide into seasons or even months from Jan to December, or like:
- Spring Vegetable planting
- Summer Vegetables
- Rainy season vegetables
- Winter season vegetables
If you want your very own perfect calendar for all these seasons, you might have to measure the soil temperatures at your local zone, yourself and then prepare this chart. This hard work is perhaps very important and saves your time and might yield best results in future.
So based on the Soil temperature charts for different vegetables, My season-wise or month wise planting calendar is like this: I will show you how to use the temperature chart for different vegetables to build this calendar in a short while from now.
Spring Season Vegetables: All Gourds – like Bittergourd, Bottle gourd, Sponge Gourd, Cucumbers, Beans, Okra, Watermelon, Lettuce, Spinach, and even Onions and carrots.
Summer Season Vegetables: Capsicum and Chilly – that’s all varieties of peppers, Coriander or cilantro, Tomatoes, Okra, Amaranthus, All Gourds, Cucumber, cauliflower, Brinjal and so on.
Rainy Season Vegetables: All gourds, All Beans, Cucumber, Okra, Tomato, Carrot, Cauliflower, Radish, Cucumber, Onion, Peas, Spinach, Peas, Lettuce and so on.
Winter season crops: Beet, Eggplant, Cabbage, Carrot, Beans, Lettuce, Okra, Turnip, pumpkins, Watermelon, Muskmelon, Ash gourd, Ridge gourd, Bitter gourd, Bottle gourd, Cucumber, Cabbage and so on.
You can DOWNLOAD this PDF temperature chart for various vegetables from a link in description below and build your own Zonal Garden Calendar for perfect Vegetable gardening.
About 7 Months back, we planted some pieces of grocery bought ginger and turmeric rhizomes. Let’s take a quick recap of that step by step process which is common for both ginger and turmeric.
- Choose your rhizomes – they must be free of wrinkles and with visible eyes.
- Cut into multiple pieces – each piece must have atleast 2 eyes.
- Soak in water for about 12 hours.
- Plant them in a well draining soil containing at least 50% compost like decomposed cowdung or vermicompost. You can use garden soil or coco coir or a mix of both.
- You can first plant in smaller containers or directly plant in larger containers of atleast 12 inch size.
- Plant them 1 to 2 inches deep with eyes facing upwards or sidewards. Best time to plant is spring or summer so that you can harvest in fall months.
- Water thoroughly and then keep in bright indirect sunlight until you get first set of leaves.
- Rooting and shooting should start within a week, you can keep in direct sunlight of atleast 4 to 6 hours.
- After a month, if you have grown in smaller containers, transplant each plant into a larger container of atleast 12 inches.
- Fertilize once a month With one or Two Handfuls Of Compost and water thoroughly twice a week or more depending on your climatic conditions.
Now Let’s look into harvesting:
Ginger and Turmeric can be harvested any time after 6 to 8 months or when you see the plant starts to dieback and leaves turning yellow and dry.
You need to stop watering a week before harvesting. Then just loosen the soil in the container by tapping it or if you have grown in a poly bag, you can loosen the soil by tapping and patting. That’s it. Remove the dirt and air dry the rhizomes before storing.
Before we discuss on the Pros and Cons, Let’s first learn how to grow tomatoes upside down starting from the seedling stage.
You can grow tomato plants very easily from seeds in smaller containers or seedling trays first and then transplant them to larger containers. If you do not have seeds, you can grow them from fresh tomatoes. If you want to grow tomatoes upside down, choose a light weight variety like the cherry tomatoes.
Take any clean Potting soil containing peat moss or cocopeat and garden soil in 1:1 ratio with some 30% compost like vermicompost or decomposed cow dung.
Make multiple slices of about 3-4mm thickness and just place them in a container like this. Then cover with a thin layer of potting mix and make sure it’s not planted too deep. Finally water this thoroughly and place in a shady place like your window sil.
You should see the results within a week.
When they reach a size of about 3 to 4 inches, transplant them in little larger containers independently. Adding a pinch of phosphorous supply like the organic rock phosphate or bone meal powder in this early growth stage will help in stronger roots and a healthy disease resistant future plant. When these grow to about 8 to 10 inches, it’s time for the final transplant to a larger container.
To make them grow upside down, take any container like this hanging basket type container. Make a hole of about 1 inch diameter like this. Then take a piece of foam and cut through it like this. Remove the root ball of your tomato sapling and gently remove the dirt from the roots. Insert the roots through the hole and place the foam like this from the inner side of the container. Finally pour the potting mix into the container. Make sure you have good amount of compost and also mix a table spoon of phosphorous supply like bone meal or rock phosphate into this mix. Water the plant thoroughly and hang it at a favourite place in your garden. You might have to water it daily or you can even mulch the top with some mulching stuff to avoid water evaporation too quickly. You can also connect the drip feeder if you have a drip irrigation system.
Well, Now Let’s check out the Pros or the Reasons to Grow Tomatoes Upside Down:
- Small Space Gardening: You can grow tomatoes with little to no garden space. If you have a small balcony, you can grow them easily.
- Flexibility: Tomatoes need full sun and if you do not have sufficient sunlight in one area like in a balcony, you can easily shift to another area with full sunlight. Like for example, east facing balcony for morning sun and west facing balcony for evening sun. And moreover, they can be easily moved away from bad weather conditions.
- No Staking or Cages required: Staking is usually required to help the plant support the weight of the growing fruit. Smaller varieties like Cherry tomatoes do well when grown upside down.
- Pests and Diseases are limited: One reason is they are hung at a height and there is good air circulation around and the soil borne diseases are limited.
Now, let’s look at the Cons or Drawbacks of this system: - Requires More Frequent Watering – like atleast daily watering and hence difficult to grow in summer season. So, you can mulch the top with some mulching stuff to avoid water evaporation too quickly. You can also connect the drip feeder if you have a drip irrigation system in your garden.
- Weight Bearing Problem: When the plant is loaded with fruits, this system will have problems, especially with beefsteak tomatoes. Smaller cherry tomatoes are the best to grow in this inverted planters.
- Fruit Ripening Issue. Tomatoes need sunlight to ripen the fruits. Fruits may not ripen well due to sunlight issues at the bottom part.
- U shaped Bends and Turns: This happens due to photo-tropism, where the tips of the branches turn upward towards the light and cause these U-shaped bends and turns.
But, Nonetheless, every hobby gardener must give this a try!
The three primary nutrients essential for plants are the NPK – Nitrogen, Phosphorous and Potassium. Nitrogen (N) is largely responsible for the growth of leaves on the plant. Phosphorus (P) is largely responsible for root growth and flower and fruit development. Potassium (K) is a nutrient that helps regulate important physiological processes or the functional processes in a plant.
Having said that, now let’s look into what is Rock Phosphate and the difference between Rock Phosphate fertilizer and Bone meal fertilizer.
Rock phosphate, also called phosphorite, is a natural mineral fertilizer obtained by mining from sedimentary clay deposits and rocks that contain phosphorus. Rock phosphate is a long-standing or slow release best organic fertilizer for adding phosphorus to your vegetable garden.
Both Rock Phosphate and Bone Meal are good sources of organic phosphorous for home gardeners. Bone meal is mainly used as a short term phosphorous supply and rock phosphate as a long term phosphorous supply, as it’s slower to break down plus it’s a non leachable source of phosphorous and calcium.
Now let’s look into 5 important benefits of using organic rock phosphate in gardening and How much and how to use it:
- STRONG ROOT SYSTEM: Rock phosphate promotes the development of strong roots throughout the growing stage of a plant and makes your plant healthy and high yielding by accelerating plant maturity.
- RESISTANCE TO PEST ATTACKS: a strong root system and a healthier plant means a plant highly resistant to pest attacks. Applying phosphorous at early growth stage of a plant will confer a great immune system and help resist pests.
- FLOWERING PLANTS: Any flowering perennial plant like rose and hibiscus love rock phosphate as it helps them develop more buds and larger sized flowers.
- VEGETABLES AND FRUITS: Strong roots, healthy immune plant and more buds means more vegetables and fruits. One or two applications of rock phosphate early in the growth stage is important to achieve this.
- Improves Soil Structure and water holding capacity. Rock phosphate is in Powdered form and hence can be mixed with soil and proves very beneficial while you prepare the potting soil before planting.
- EARTHWORMS and Beneficial microbes in soil are not harmed and infact they love it.
- DOSAGE and How to Apply: Best way is to mix the rock phosphate powder in your potting mix along with other stuff like compost, cocopeat or peat moss and others. This is because for proper phosphorous uptake by plants, the soil PH has to be slightly acidic and and adding compost like decomposed cowdung or vermicompost will help achieve this task. You can watch a detailed video on making the best potting soil here.
Well, Now, How to use Rock phosphate in potted plants and plants grown in ground or raised beds.
First of all loosen the soil around the plant by raking or tilling the top layer. For Potted Plants start with 1 teaspoon per container and then add 1 tablespoon after 15 days. For ground plants or raised beds start with 1 tablespoon per plant, preferably in its growing stage and then two tables spoons after 15 days. And this one time application will help your plant throughout its stages of growth till flowering and fruiting.
Seeds are magic to gardens. Tuck them in soil, add a little water and you’re on the way to a beautiful bloom or a tasty harvest. Whether you are a beginner or an expert gardener, you will certainly improve your success by avoiding these common errors that will be discussed shortly.
Germinating seeds is infact a simple process. But when seeds do not sprout, you feel disheartened and infact some loose their interest in gardening. But you should always take time to evaluate or diagnose the problem. Why didn’t my seeds germinate?
Here are the 7 FATAL MISTAKES or Answers to Seed Germination Problems.
- YOU ARE USING NON-VIABLE OR OLD SEEDS: If your
seeds have not sprouted within the appropriate number days, then most likely or
the most common reason could be the seeds are not viable.
Always check the expiry date or best before date on the seed packet and also purchase seeds from reliable sources.
This Seed viability issue can even be due to improper storage of seeds like in moisture which can cause them to rot or mold.
Here are two simple hacks to test whether your seed is viable. First method is: - Simply Pour the Seeds in a container of water and if the seeds are floating, they are not viable. Just discard them and choose only those sunk to the bottom.
- Checking seed viability using a wet toilet paper method. Pour some seeds on a wet toilet paper and keep it in a zip lock bag for 24 to 48 hours and see for sprouting to check viability.
- Another important point to remember is the Seed Pod Maturity, specially if you are growing from seeds from a fruit or vegetable. A fruit or vegetable develops from a flower after pollination and fertilization process and is nothing but a seed pod. In my previous episode, the seeds from green bell pepper did not germinate but those from the yellow and red pepper germinated to nearly 100%. The capsicum or bell pepper gradually matures from green color to yellow, orange and then finally Red. Hope this answers the question!
- WRONG PLANTING TECHNIQUE: Planting your seeds too deep can cause problems with sprouting. So, What is the ideal depth for sowing seeds? The rule of thumb is to plant seeds at a depth equal to two times or max three times their width. It’s better to plant seeds too shallow than too deep. You should also avoid pressing down on top of your seeds after you plant them.
- BAD SEED STARTING POTTING MIX OR SOIL: This is a very important factor for success rate. Starting seeds in garden soil alone is not recommended because this soil is too compacted and the seeds cannot sprout. Also if it contains large pieces of stones, wood and stuff like that, can prevent the seeds from sprouting freely. And moreover this soil is full of harmful pathogens that can affect seed germination and also the health of the seedling. Many gardeners suggest baking this soil in oven at 180 degrees for 30 minutes to kill most weeds and pathogens. But this will also kill the beneficial microorganisms like mychorrhizae and pseudomonas from the soil. So, it’s always better to prepare your own seed starting mix without using garden soil. One such recipe, you can follow is:
- Cocopeat or peat moss – 70% + Compost like decomposed cowdung or Vermicompost 30%. This is more that sufficient and the best seed starting mix. You can optionally add stuff like perlite and fine grade vermiculite into this mixture.
- Alternately you can also use seed starting coco peat pellets which can be directly transplanted into soil when the seedling are ready for transplant.
- WRONG TEMPERATURE AND WRONG SEASON: This is another common mistake most of us commit. Planting by the season depending on the zone you live in is really important, because the temperature is a very important factor for seed germination. Temperatures that are too high or too low can cause problems germinating seeds. So, try to follow the planting calendar of the zone you live in.
- IMPROPER WATERING: Seed germination is highly dependent on watering. If it’s too dry, they fail to sprout! And too wet they will rot in the dirt. Seeds need to be moderately moist to sprout and this is infact difficult to assess. Also very young seedlings are even more tender and can die due to improper watering. The best trick to water these is using a bottom tray method. Just keep the bottom tray filled with water and do not water from top. If the potting medium is dry, it starts to absorb water through the drainage holes and this process goes on and is completely safe method of watering seeds and tender seedlings.
- DIRTY OR UNSTERILE CONTAINERS OR SEED TRAYS: For a better success rate in seed germination, its always wise to use a fresh new container or thoroughly clean the old containers before adding the potting mix. Fungal and mold infections are the most common infection from dirty containers. If infection occurs you will notice a fuzzy growth on the top of the planting medium. You may also see that a seed sprouts, but then rots at its base and falls over. This is called damping off and is caused by a fungal infection in your soil.
To clean your old containers, You can use hydrogen peroxide or even use your kitchen baking soda – like 1 tablespoon per litre of water and clean the containers with this solution. Or simply clean it with soap and water or even a diluted bleaching powder.
- ROLE OF SUNLIGHT: Do Seeds require sunlight to germinate? For most of the seeds, sunlight is not required for sprouting of the seeds. Dark, damp and warm conditions are best for the sprouting stage of germination. But once the seeds germinate and two new tiny leaves are out, they need sunlight. You must follow the “Hardening Off” Method which means a gradual exposure to sunlight, like 1 hour for the first day, 2 hours for the second, 3 hrs for the third and so on to provide full sun exposure.
Do Plants Feel Pain?
Can Artificial LED grow lights help the plant in flowering and growth?
Can I use Coffee as an effective pesticide on plants and how?
Plus a nice funny question at the end.
So Lets begin!
- Do plants feel Pain?
There are many studies and researches conducted on this topic. Plants lack a nervous system – that is a brain and other neurological structures like nerves and pain receptors, so they should not feel pain, unlike in humans and animals where we have specialised pain receptors.
But according to some researches, “Plant can know of themselves being eaten” because studies have shown plants release defence chemicals in response to caterpillars munching on them.
Other points include: Plants fight for territory, seek out food, evade predators and trap prey like what your see in carnivorous plants like the venus fly trap. They are as alive like any animal, and – like animals – they exhibit behaviour.
- Can we grow plants from leaves
Yes! Some, but not all plants can be propagated from just a leaf or a section of a leaf. Leaf cuttings of most plants will not generate a new plant; they usually produce only a few roots or just decay. There are many ways you can grow leaves into a new plant, like 1. from a leaf petiole, 2. by dividing a leaf into multiple pieces for example fleshy succulent plants like sanseviera or the snake plant and other succulents. Other methods of propagation like cane or stub cuttings, root cuttings, leaf bud cuttings and so on. I will try to prepare a detailed episode on this topic when I get a chance.
- Can Artificial light be used for photosynthesesis and do plants flower in it.
Yes you can.
In fact, good quality LED grow lights are highly efficient, because they provide the exact spectrum of light your plants need. But, Remember one thing: sunlight is free, while good quality LED lights are quite expensive.
- Can I use coffee as pesticide on plants?
The Answer is YES: Coffee contains a chemical called caffeine which is considered neurotoxic to many pests like aphids.
You can make a Caffeine Spray. Many research studies have shown
that caffeine combined with other insecticides increases their killing
power. In one test, a small dose of caffine increased a known pesticide’s
potency by ten times.
So how do I make a Caffiene Spray. Its simple. You just have to make a cocktail
solution. I always prefer organic mixes. You can use any recipe of your organic
pesticide like neem oil, clove oil or whatever, and add one or two tablesspoons
of used coffee grounds or 1 or 2 teaspoons of fresh coffee if you like to use
it for your plants. Mix well and let it
marinate for about 24 hours and then strain it and spray it once a while with
your regular pesticide. That’s it. You can watch a detailed video on a Cocktail
mixed organic pesticide recipe.
Now lastly a Funny Question!
- How do I prevent my neighbours from stealing my plants and fruits from my garden?
Some might think of installing a burglar alarm or fencing it well or locking their gardens. But I suggest one simple remedy to this problem. First of all, interact with them and make friends with them even if you do not like them. Talk about exchanging your plants, seeds or cuttings. You take the first step and present them some of your good plants or cuttings. That is all!
RELATED VIDEOS AND LINKS:
Full Q and A Playlist: https://www.youtube.com/watch?v=5Uyvjf8gv4k&list=PLvE-WOB38X7bcd6kFShVvq0zyxLPD5ymQ
GARDEN SECRETS All VIDEOS Playlist: https://www.youtube.com/watch?v=FDIYZci5w2k&list=PLvE-WOB38X7YSKfmaBQc3cDNkvrnDGTyJ
Increase Flowering: https://youtu.be/FDIYZci5w2k
Air Pruning for Fast Growth: https://youtu.be/hkUOB1bHi2M
EASY PLANT CLONING IN WATER: https://youtu.be/lLvgE6ouNBA
Please LIKE, SHARE AND COMMENT on the video. Consider subscribing if you are new to this gardening channel.
Happy Gardening!
Purchase Gardening Stuff: http://www.gkvk.net/links
Well, before I show you the actual recipe or the Formula for the making of our so called magic solution, you must know some Basic concepts. Please do not skip these 5 points am gonna discuss now. Will try to make it as short and as simple as possible, specially for beginners.
1. What do you mean by foliar Spray? Foliage means leaves! So the term foliar spray says it all, that is Spraying a liquid fertilizer on your plants foliage which aids in absorption of certain essential elements like calcium, magnesium through their stomata. Stomata are pores found in the epidermis of leaves which help in nutrient absorption and also gas exchange.
2. Calcium and Its importance: Calcium is the most important component of a plants cell wall. Hence for cell division and growth its indispensable, especially in rapid growers like tomatoes. So we will keep this point in mind and add calcium into our mix.
3. Magnesium and Its importance: Did you know Magnesium is the central atom in between four nitrogen atoms in the chlorophyll molecule. For beginners, Chlorophyll is the pigment present in leaves which is essential for photosynthesis – that’s plant food production. So we will keep this point in mind and add magnesium into our mix using our famous organic Epsom salt.
4. Soil PH concept: We have discussed in detail about the importance of soil ph in nutrient absorption in my video titled Ideal Soil PH for plants. You can check that HERE. Well! when it comes to foliar spray of fertilizer solution, its completely independent of the soil PH, because nutrients are absorbed through leaves.
- And last concept: Many Experts recommend applying egg shells andcalcium tablets to soil and some evenmake a smoothie juice or paste using all kitchen waste like banana peels, fruit peels and what not. This in perhaps unscientific according to me to directly apply to your plants. I don’t know! If you have any scientific explanation to this, please do write in the comment box. What I feel is why not utilize this idea of making this smoothie and keeping a dedicated heavy duty blender or mixer for this purpose for faster composting. Yes! if you are adding this paste to your compost bin and feeding your earth worms, this can accelerate composting process.
So you can utilize this concept of foliar feeding if your plants are not performing well despite all your efforts, care, fertilizing, watering promptly and what not! Many viewers keep asking the same question. So why not make it a habit of alternating your feeds – that’s fertilizing your plants once in 15 days with foliar spray to feed your plants. Because this idea is independent of soil PH value.
Now The Formula or the recipe of this Magic Fertilizer liquid.
I will quickly list out the ingredients one by one and quickly explain the benefit of each of these components.
1. Water: Nothing to explain about this universal solvent. We will formulate this recipe for 1 liter of water.
2. Milk: You can use skimmed milk or if available Raw milk is best. You can even use spoilt milk, butter milk or stuff like that. Use it with lower than 20 percent dilution in water that is 1:5 dilution. So you can add about 100 ml or 200 ml milk to our universal solvent. Milk is not only a source of calcium, but also an antifungal for treatment of powdery mildew and blossom end rot disease on tomato and other vegetable plants. It also kills many plant viruses like tobacco mosaic virus. In place if milk you can add 1 liter of a special water. Yes that’s special calcium rich water for plants. It s nothing but the left over water after you hard boil few eggs. The egg shells release a lot of calcium into this water during boiling.
3. Epsom Salt that’s magnesium sulfate which is a greatest source of magnesium and sulfur. This is easily available at a gardening store or at your local pharmacist and even online. So the dosage is max 5 gms or little lesser than a teaspoon per 1 liter of water.
4. Then the Most important ingredient for adding the major NPK elements into the foliar spray is COMPOST TEA. So, how do you make compost tea? Its really simple. Just Add a handful of decomposed manure or compost like cowdung powder or vermicompost per liter of water. You can make your own quantity of 2 liters or 5 liters depending on your garden size. Allow this to brew for atleast 1 week. Make sure you stir this atleast once every 24 hours to oxygenate this mix till 1 week. Then strain out the liquid using a cloth and use this liquid. I shall make a detailed video some other time on how to use some simple gadgets like an aquarium air pump to quickly make your compost tea.
Well, For now, Once the compost tea is ready, you should dilute this like 1:5 in water and then add about 1 liter to the above solution. Normally if you are using only the compost tea as a foliar spray, you need to use 1:10 dilution. But here we are making a 2.1 liter solution in total. I Hope you got my point!
That’s it, mix it thoroughly and load the spray bottle or use your electric sprayer or whatever and foliar feed your plants. Spray very early in the morning or late in the evening because leaf stomatas are well opened at this period so that absorption happens at its best.