ErrorException Message: WP_Translation_Controller::load_file(): Argument #2 ($textdomain) must be of type string, null given, called in /home4/rvanjsu1/public_html/wp-includes/l10n.php on line 838 https://www.gkvks.com/wp-content/plugins/dmca-badge/libraries/sidecar/classes/seed germination – GKVKs – Gardening Tips and Store
https://www.gkvks.com
Gardening Tips and StoreSun, 19 Jan 2020 17:41:02 +0000en-US
hourly
1 https://wordpress.org/?v=6.5.2https://www.gkvks.com/wp-content/uploads/2018/06/cropped-icon-512-32x32.pngseed germination – GKVKs – Gardening Tips and Store
https://www.gkvks.com
3232Why are Seeds Not Germinating or Sprouting? | 7 Biggest Mistakes I made!
https://www.gkvks.com/why-are-seeds-not-germinating-or-sprouting-7-biggest-mistakes-i-made/
https://www.gkvks.com/why-are-seeds-not-germinating-or-sprouting-7-biggest-mistakes-i-made/#respondSun, 19 Jan 2020 17:40:59 +0000http://www.gkvks.com/?p=7973 In Today’s post we will look into 7 Fatal
Mistakes or reasons, why your seeds are not germinating or sprouting? This
knowledge and certain tricks shown in this video might take your vegetable
gardening to the next level and you can achieve nearly 100% success in seed
germination.
Seeds are magic to gardens. Tuck them in soil, add a little
water and you’re on the way to a beautiful bloom or a tasty harvest. Whether
you are a beginner or an expert gardener, you will certainly improve your
success by avoiding these common errors that will be discussed shortly.
Germinating seeds is infact a simple process. But when seeds
do not sprout, you feel disheartened and infact some loose their interest in
gardening. But you should always take
time to evaluate or diagnose the problem. Why didn’t my seeds germinate?
Here are the 7 FATAL MISTAKES or Answers to Seed Germination
Problems.
YOU ARE USING NON-VIABLE OR OLD SEEDS: If your
seeds have not sprouted within the appropriate number days, then most likely or
the most common reason could be the seeds are not viable.
Always check the expiry date or best before date on the seed packet and also
purchase seeds from reliable sources.
This Seed viability issue can even be due to improper storage of seeds like in
moisture which can cause them to rot or mold.
Here are two simple hacks to test whether your seed is viable. First method is:
Simply Pour
the Seeds in a container of water and if the seeds are floating, they are not
viable. Just discard them and choose only those sunk to the bottom.
Checking
seed viability using a wet toilet paper method. Pour some seeds on a wet toilet
paper and keep it in a zip lock bag for 24 to 48 hours and see for sprouting to
check viability.
Another
important point to remember is the Seed Pod Maturity, specially if you are
growing from seeds from a fruit or vegetable. A fruit or vegetable develops
from a flower after pollination and fertilization process and is nothing but a
seed pod. In my previous episode, the seeds from green bell pepper did not
germinate but those from the yellow and red pepper germinated to nearly 100%.
The capsicum or bell pepper gradually matures from green color to yellow,
orange and then finally Red. Hope this answers the question!
WRONG PLANTING TECHNIQUE: Planting
your seeds too deep can cause problems with sprouting. So, What is the ideal
depth for sowing seeds? The rule of thumb is to plant seeds at a depth equal to
two times or max three times their width. It’s better to plant seeds too
shallow than too deep. You should also avoid pressing down on top of your seeds
after you plant them.
BAD SEED STARTING POTTING MIX OR SOIL: This is a
very important factor for success rate. Starting seeds in garden soil alone is
not recommended because this soil is too compacted and the seeds cannot sprout.
Also if it contains large pieces of stones, wood and stuff like that, can
prevent the seeds from sprouting freely. And moreover this soil is full of
harmful pathogens that can affect seed germination and also the health of the
seedling. Many gardeners suggest baking this soil in oven at 180 degrees for 30
minutes to kill most weeds and pathogens. But this will also kill the
beneficial microorganisms like mychorrhizae and pseudomonas from the soil. So,
it’s always better to prepare your own seed starting mix without using garden
soil. One such recipe, you can follow is:
Cocopeat or
peat moss – 70% + Compost like decomposed cowdung or Vermicompost 30%. This is
more that sufficient and the best seed starting mix. You can optionally add
stuff like perlite and fine grade vermiculite into this mixture.
Alternately
you can also use seed starting coco peat pellets which can be directly
transplanted into soil when the seedling are ready for transplant.
WRONG TEMPERATURE AND WRONG SEASON: This is
another common mistake most of us commit. Planting by the season depending on
the zone you live in is really important, because the temperature is a very
important factor for seed germination. Temperatures that are too high or too
low can cause problems germinating seeds. So, try to follow the planting
calendar of the zone you live in.
IMPROPER WATERING: Seed germination is highly
dependent on watering. If it’s too dry, they fail to sprout! And too wet they
will rot in the dirt. Seeds need to be moderately moist to sprout and this is
infact difficult to assess. Also very young seedlings are even more tender and
can die due to improper watering. The best trick to water these is using a
bottom tray method. Just keep the bottom tray filled with water and do not
water from top. If the potting medium is dry, it starts to absorb water through
the drainage holes and this process goes on and is completely safe method of
watering seeds and tender seedlings.
DIRTY OR UNSTERILE CONTAINERS OR SEED TRAYS: For a
better success rate in seed germination, its always wise to use a fresh new
container or thoroughly clean the old containers before adding the potting mix.
Fungal and mold infections are the most common infection from dirty
containers. If infection occurs you will
notice a fuzzy growth on the top of the planting medium. You may also see that a seed sprouts, but
then rots at its base and falls over.
This is called damping off
and is caused by a fungal infection in your soil.
To clean your old containers, You can use hydrogen
peroxide or even use your kitchen baking soda – like 1 tablespoon per litre of
water and clean the containers with this solution. Or simply clean it with soap
and water or even a diluted bleaching powder.
ROLE OF SUNLIGHT: Do Seeds require sunlight to
germinate? For most of the seeds, sunlight is
not required for sprouting of the seeds. Dark, damp and warm
conditions are best for the sprouting stage of germination. But once the seeds germinate and two new
tiny leaves are out, they need sunlight. You must follow the “Hardening Off” Method
which means a gradual exposure to sunlight, like 1 hour for the first day, 2
hours for the second, 3 hrs for the third and so on to provide full sun
exposure.
]]>https://www.gkvks.com/why-are-seeds-not-germinating-or-sprouting-7-biggest-mistakes-i-made/feed/0FASTEST METHOD TO GROW PLANTS & GERMINATE SEEDS USING MAGNETS
https://www.gkvks.com/fastest-method-to-grow-plants-germinate-seeds-using-magnets/
https://www.gkvks.com/fastest-method-to-grow-plants-germinate-seeds-using-magnets/#respondFri, 06 Dec 2019 16:17:32 +0000http://www.gkvks.com/?p=5054In
Today’s post, we will investigate the effect of Magnetism on Seed germination
and plant growth. Surprising Results of this gardening experiment will be shown
at the end of the video.
Any gardener or farmer desires for faster, better and bigger plants with higher yields. The information gained from this experiment, may be used to help gardeners achieve a great success in gardening and farming. In our previous episode we investigated the effect of electricity on plant growth and seed germination.
In this experiment we will investigate the effect
of magnetism on seed germination and plant growth and evaluate the results on
Day 4, Day 6, Day 8 and so on. Even this
experiment can be a very good school project for kids.
Now, Lets start with hypothesis which states:
“Seeds germinate faster and plant grow faster
and stronger in the presence of magnetic field in the soil.”
MATERIALS
& METHODS
– 3 plastic Containers
– Strong Magnets
– Identical Potting Mix for all 3 containers
– 3 Identical Seeds
– A Ruler or a Measuring Tape.
The constants
in this study are:
The Potting Mix
The Water plant
receives
The Location /
Light the Plant receives
The Seeds.
PROCEDURE
Label the 3 Containers as A, B, and C. Pot C will be the Control for the
experiment.
Fill the 3 containers with the identical potting mix.
In pot A place a permanent magnet in the center with the magnetic field
is narrow and stronger.
In Pot B, insert multiple bar magnets around the container preferably
with the same polarity facing the plant, so as to create uniform magnetic field.
You can determine the Polarity of the Magnets using a Compass needle if you
have one.
Plant 3 identical seeds into all three containers. Pot A will receive
the strongest magnetic field.
Water all the 3 containers with the same amount of water.
Place the 3 containers at the same location – like on a window sil.
RESULTS
On Day 4. You can
clearly see the Seed in Container A which received the highest magnetic field
has germinated and there are no signs of sprouting in B and C.
On Day 5. The Seed
in Pot B with a weaker magnetic field also has germinated. No result yet in pot
C. Pot A there is further growth and a nice little shoot has begun.
On Day 6.
Germination has begun in the Control Pot too without any magnetic field. The
Pots A and B show more growth.
On Day 8. This hypothesis is getting proved. Plant in
Pot A is the tallest, Next come Pot B and lastly Pot C.
Conclusion: The results of the experiment clearly prove that magnetic field has a strong effect on the rate of seed germination and plant growth. You can see the roots are stronger and much widespread in A and B.
Now, The question here is how do magnets affect plant growth?
]]>https://www.gkvks.com/fastest-method-to-grow-plants-germinate-seeds-using-magnets/feed/0F1 F2 F3 HYBRID SEEDS and POLLINATION | SEED SAVING BASICS
https://www.gkvks.com/f1-f2-f3-hybrid-seeds-and-pollination-seed-saving-basics/
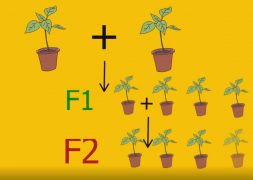
https://www.gkvks.com/f1-f2-f3-hybrid-seeds-and-pollination-seed-saving-basics/#respondWed, 14 Nov 2018 13:12:43 +0000http://www.gkvks.com/?p=2784I am sure, You might have noticed something like F1, F2 or F3 Hybrid seeds or sometimes Heirloom seeds written on seed packets. In todays episode we will look into What these letters and terms actually mean and whats their importance in gardening.
Today we will learn:
Types of Seeds: Hybrid seeds (F1 F2 F3), Heirloom seeds and Open-Pollinated seeds. And importance of knowing these types in gardening, specially for those who think of saving their plant seeds for sowing in next season.
Lets begin with Hybrid Seeds. Let us first know What this letter F stands for. The letter F represents filia – its a latin word means daughter. So the Hybrids seeds are of 3 types F1 F2 and F3. These are produced by cross-breeding of two stable plants with different genetics and the pollen from the male are used to fertilize the female. If you want to learn some basics of pollination, I have an animated video explaining pollination and seed formation HERE.
So Now lets understand F1 F2 F3 by drawing a family tree.
Imagine plants as people! So the first generation daughers or seeds are simply F1. And F2 are grandchildren and F3 are great grand children.
That means F2 are produced from F1 and F3 are produced from F2. This is so simple. But why these numbers are important in choosing the seeds when you visit a garden store or even purchase seeds online.
Well, You must know what you are Purchasing, whether children, grand children or great grandchildren! So what actually happens at some point of time with these generations and what to expect in such plants. We will look into this now.
Now Regarding F1 Hybrid seeds or or first generation seeds: Just remember, if you purchase a packet of F1 seeds, you should get the exact qualities of the parents like flowering, growth potency and disease resistance and it should produce those picture perfect flowers or fruits that’s printed on the seed packet. So If you can get F1 seeds, they are the best. But True F1 seeds are generally expensive. So always purchase them from a trusted seed company.
F2 Hybrid seeds or second generation seeds.: When F1 plants produce flowers and when they self-pollinate or hand pollinated, then F2 seeds are produced. They are sometimes known as S2 – S stands for Self. So hows this important to us. F2 generation plants have a lot of genetic variations and are often less vigorous and may not always produce the original flowers as displayed in seed packets. But many F2 seeds from good companies can also produce identical flowers, fruits or vegetables similar to the parents. F2 seeds are popular now a days because they are very inexpensive and have some decent disease resistance as well.
Some gardeners might think of Saving seeds from plants grown with F2 seeds. F3 seeds do not have that potency and qualities of F2. So the best seeds are F2 and F1.
Now lets learn two more terms used in gardening – open-pollinated and heirloom seeds:
Open-pollinated plant cultivars are pollinated by natural pollinators like the insects, birds, wind, or any natural mechanisms or even if pollinated by hand.
Heirloom seeds actually have a history of being passed down within a family for many generations like something similar to generational sharing of heirloom jewelry or furniture. Some seed companies even sell very old heirloom seeds (like cultivars that are more than 50 or even 100 years old).
The Seed Savers Exchange defines heirlooms as cultivars that have been saved and shared by generations of home gardeners.
One more point to remember is some people think Hybrid seeds are the some synthetic modern seeds produced by genetic modification. These Genetically modified (GM) seeds or crops are actually different and these are created by using the advanced GM technology in agriculture.
SO, there you have it folks.
]]>https://www.gkvks.com/f1-f2-f3-hybrid-seeds-and-pollination-seed-saving-basics/feed/0Pistachio Seed Germination Technique – Grow Pistachio Trees
https://www.gkvks.com/pistachio-seed-germination-technique-grow-pistachio-trees/
https://www.gkvks.com/pistachio-seed-germination-technique-grow-pistachio-trees/#commentsWed, 05 Sep 2018 14:26:52 +0000http://www.gkvks.com/?p=2696Yes we can germinate pistachios available in your kitchen and grow plants out of these.
We are just doing this for gardening fun and experimenting and to have the feeling of possessing a pistachio tree in your collection. Because, similar to other fruit trees like for example citrus and apple, a pistachio tree grown from seed may not bear fruits for the whole of its lifetime. The main reason is you need at least one male and one female pistachio trees for pollination and fruit production.
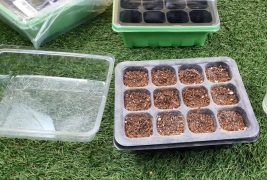
Having said that, now we will look into the step by step process you can follow for successful pistachio seed germination :
Step 1: The first and most important step is Seed Selection. Most of the pistachios with shell or without shell what we consume are roasted and salted and these will never germinate. Please do not waste your time on these pistachios. You need Raw and unprocessed pistachios which should be easily available in your local grocery store or you can even purchase online. I have given the link to purchase this in description of the video.
Step 2: Selecting some healthy looking pista seeds out of the lot. Do not select damaged ones or split ones. You can choose atleast 10 healthy seeds because all of them may not germinate. Only about 50% of the seeds or less might germinate, and only a fraction of those germinated will make it to a small seedling and then may grow into a small tree. Also if the shell is intact, you need to carefully break the hard shell without damaging the inner seed.
Step 3: Soaking these seeds in water for 24 hours. Many receommend 48 hours. I have tried 48 hours too but they split open with too much soaking. So, We need them to just swell up a bit before keeping for the sprouting process.
Step 4: You can take the soaked seeds and use two methods. Toilet paper method or coco peat method. In coco peat or dirt method. You place the soaked seeds on a layer of cocopeat and cover the seeds with cocopeat and place it inside a polythene zip lock bag for germination.
I found better results with the toilet paper method. We will look into this in step 6.
Step 5: Cold Stratification: This is optional if your climate is too hot. Stratification is a process of treating seeds to simulate natural conditions that the seeds must experience before germination can occur. Many seed species have an embryonic dormancy phase, and generally will not sprout until this dormancy is broken. So, to increase the chances of germination, you can keep the seeds in refrigerator for about 4 weeks and then sow them at room temperature. I have tried with and without stratification and the results were almost same for me. But this process is compulsory for Almond seed germination, I have even experimented this on almond seeds and the almond seeds succeed only after this stratification process in refrigerator for about 50 to 60 days and then bringing them to room temperature for successful germination. You can watch the entire process of how to grow an almond tree from home almonds in my previous video.
So coming to Step 6: Take a container with a lid or you can even use a polythene bag or a zip lock bag. Place the seeds on a layer of toilet paper and sprinkle some water to make it moist and then place another layer of tissue paper and cover the lid. This is to keep it warm and also moist and this speeds up the germination process. Check every 2 or 3 days for root development and also to see if its moist.
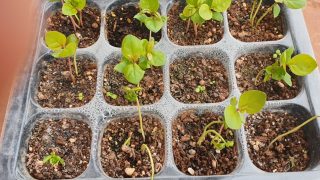
Results: First result at 4th day and then after 8 days and then 15 days.
You should see results like this after 3 to 5 days or max one week. If there is no fungus and roots look healthy, you can transplant these sprouted pistachios in small containers with a clean potting mix with cocopeat and some vermicompost and keep in indirect light or under shade like on a window sill, till you get a seedling with two leaves. Then when it grows further, you can transplant in larger container. Here you can see I am successful getting almost atleast 3 to 4 plants. May be the other seeds might also give out shoots.
WATCH VIDEO FOR THE COMPLETE STEP BY STEP PROCESS:
]]>https://www.gkvks.com/pistachio-seed-germination-technique-grow-pistachio-trees/feed/1EASY METHOD TO GERMINATE ALMOND SEEDS TO TREE
https://www.gkvks.com/easy-method-to-germinate-almond-seeds-to-tree/
https://www.gkvks.com/easy-method-to-germinate-almond-seeds-to-tree/#respondMon, 03 Sep 2018 12:06:36 +0000http://www.gkvks.com/?p=2693You can easily grow an Almond tree at home from Raw almonds available in your kitchen. You must use unsalted and unroasted almonds.
Almond seeds or badam are not so easily to germinate specially in tropic climate.
Almond seed germination is not an easy job if you are note aware of stratification of seed process.
In horticulture, stratification is a process of treating seeds to simulate natural conditions that the seeds must experience before germination can occur.
Many seed species have an embryonic dormancy phase, and generally will not sprout until this dormancy is broken.
It need low temperatures to germinate and maintain growth. Even if you get one plant from 10 almonds, you should feel lucky.
The commonest problem is fungus attack on the seed after sprouting and after transplanting.
Watch Step by Step Video Tutorial below:
]]>https://www.gkvks.com/easy-method-to-germinate-almond-seeds-to-tree/feed/0Gardening Basics : Useful Gardening Terms You Must know
https://www.gkvks.com/gardening-basics-useful-gardening-terms-you-must-know/
https://www.gkvks.com/gardening-basics-useful-gardening-terms-you-must-know/#respondFri, 10 Aug 2018 15:43:00 +0000http://www.gkvks.com/?p=2665Useful Gardening Terms You Must know | Gardening Basics Part 1
Guirella Gardening: This means Gardening on a land that the gardeners do not have the legal rights or permission to cultivate, such as abandoned sites or public properties – the commonest example is gardening outside our homes like alongside the footpaths or similar areas.
Leaf Galls / Leaf Bumps: are Odd little bumps or Funny looking protuberances on leaves. This can be an Indication of pest attack – usually the result of mites and other sucking insects that make their homes under the plant tissue.
Deadheading– similar to pruning or pinching branches to promote more branching. Dead heading means Removing faded or dry and dead flowers from your plant. Just cut of the twig holding the flower or the entire branch if there are no more flowers or buds left. This diverts the plants energy in more blooming and more branching rather than setting seeds for reproduction.
Humus– A black or brown organic substance made up of decomposed vegetable waste or even animal matter. This includes decaying leaves, insects, twigs and many other materials. Composted food and garden scraps are human-made humus. This is very useful and provides many essential nutrients for plants.
Hardening off– To Gradually acclimatize your seedlings to outdoor sunlight , temperature, wind and humidity and before transplanting them into the garden or containers. General Rule of thumb is introduce them gradually to sunlight, like 1 hours for day 1, 2 hours for day 2, 3 hours for day 3 and so on.
Biological Pest Control: Using living organisms such as beneficial insects or parasites like lady bugs to destroy garden pests. Watch a detailed video on these useful insects from a card linked at top right corner of this video.
Chlorosis: A yellowing or blanching of the leaves due to lack of chlorophyll, nutrient deficiencies or disease. Watch a detailed video on diagnosing and treatement this leaf yellowing problem from a card linked at top right corner of this video.
Foliar Feeding or Fertilizing: A technique of feeding plants by applying liquid fertilizer directly to plant leaves. This is generally done using a sprayer or mister with liquid fertilizers like the seed weed extract or even various teas like the compost tea, bone tea and even water soluble NPK feed.
Worm Casting or Vermicompost: This is nothing but the digested organic waste of earth worms – that is the excreta of earthworms. Gardeners consider them the most nutrient organic compost available which also includes various essential micronutrients for your plants.
Damping off– A disease or condition that causes seedlings to weaken and die. The Decay or rotting of young seedlings at ground level following fungal attack. This is often due to soil borne diseases and over watering. Damping off can also result in failure of seed germination, or may result in poor germination and weaker seedlings.
One way to prevent damping off, use a sterile potting mix instead of ordinary garden soil. Also Use clean, new pots, or sterilize used pots with one part bleach to 10 parts water. When you sow seeds, leave room for good air circulation. Water seeds and seedlings from the bottom using the tray method.
]]>https://www.gkvks.com/gardening-basics-useful-gardening-terms-you-must-know/feed/0BIN LADEN’s FRUIT: Is it Hybrid Apple Guava Strawberry Mix?
https://www.gkvks.com/bin-ladens-fruit-is-it-hybrid-apple-guava-strawberry-mix/
https://www.gkvks.com/bin-ladens-fruit-is-it-hybrid-apple-guava-strawberry-mix/#respondWed, 08 Aug 2018 04:35:19 +0000http://www.gkvks.com/?p=2656Today, am gonna tell you a story about this Pink Guava which I have termed as the bin ladens fruit. This story is really interesting with a moral to learn at the end of the story. I also tried growing these special fruit plants from its seeds and got great results. Please read the entire article.
Well, will start the story from a visit to one of my rich friends flat few months ago. He offered me this special looking fruit, which I had never seen before in my entire life. This was really looking special to me. Externally it looked like an apple. But when he sliced it into pieces and offered it me. The first piece I took into my mouth, wow! It was so yummy and so sweet to taste. It tasted something like special kind of guava to me but it looked like an apple. When I asked him the name of the fruit, he guessed it must be a strawberry guava, a special kind of fruit imported from Thailand. He also said, its available only to special people and through special connections and sold at Russels Market, one of the oldest and famous market of Bangalore. The cost of it is 500 Rs per piece (for international viewers, its about 75 USD roughly).
I happily ate the fruit and felt like a heavenly taste and then requested him to give me one fruit for my family.
Now it was the Time for me to experiment on this fruit. I will reveal the truth at the end. But before that, I will show u how I germinated its seeds and grew many plants out of this special fruit seeds.
Its Simple! take out as many seeds you want from the fruit and just put them in your seedling trays or any container with some compost in the seed starting mix. I just use a mix of cocopeat (70 percent) plus Perlite 10 percent and Compost like vermicompost 10 percent.
Just place the seeds into the cells and cover with some of this mix or cocopeat. Then pour water into the tray and that’s it. The watering will happen through the bottom holes if the soil mix is dry.
So heres the result after 8 days. The seeds have germinated.
Then the next result at 30 days.
Then I picked out these and transplanted them on separate containers.
Now Let me reveal the Climax of this story. I will continue and end the story. So, I brought one fruit for my family. This was packed in a tightly wrapped polythene with a tight clip on it. My friend had instructed me to always keep this in refrigerator and take out and eat immediately as per instructions of the seller. So I as a gardener, the main purpose to bring home the fruit was to grow many plants out of seeds of this special fruit. So, I opened the package and sliced it and found something suspicious about it. It was to me looking like guava inside with lot of guava seeds in it. I was pretty sure it was guava, a big sized fruit. Then when I closely looked at the outer peel, it was a magical coating with some sweet dye or some colored sugar syrup on a neatly pealed, perhaps machine peeled guava fruit. This sugar syrup was adding to the sweetness of this fruit.
So, to conclude, this a a Bin Ladens Fruit, that’s a fake fruit, a virtual fruit created by fraudsters to cheat people. So, the moral of the story: Friends Beware of such special fruits in your local market that are high priced. Always remember my video and investigate whenever you come across such a fruit.
So, there you have it folks. If you found this video helpful, please give a thumbs up or like to the video. Also share this video below with your friends.
]]>https://www.gkvks.com/bin-ladens-fruit-is-it-hybrid-apple-guava-strawberry-mix/feed/0DIY Bio degradable Plant Pots at Home | Seed Germination Pots
https://www.gkvks.com/diy-bio-degradable-plant-pots-at-home-seed-germination-pots/
https://www.gkvks.com/diy-bio-degradable-plant-pots-at-home-seed-germination-pots/#respondSat, 12 Aug 2017 15:02:20 +0000http://www.gkvks.com/?p=2487DIY Planters from Tissue Roll Waste – Eco Friendly and Biodegradable Seed Germination Pots – DIY Hack
You normally throw away the Toilet paper (tissue paper) roll card board hollow.
But those having interest in gardening, can make use of this excellent bio-degradable recyclable waste thing in making our seed starting small pots.
This video show how to cut and make use of these paper pots in seed germination. How to Easily Make your own Bio degradable Planter Pots at home for Seed Germination – DIY (Do It YourSelf).
]]>https://www.gkvks.com/diy-bio-degradable-plant-pots-at-home-seed-germination-pots/feed/0Roseapple from Seed Germination – How to Grow Gulabi Jaam Plant
https://www.gkvks.com/roseapple-from-seed-germination-how-to-grow-gulabi-jaam-plant/
https://www.gkvks.com/roseapple-from-seed-germination-how-to-grow-gulabi-jaam-plant/#respondWed, 12 Jul 2017 14:58:22 +0000http://www.gkvks.com/?p=2484Today we are going to show you an experiment with different methods on how to germinate rose apple fruit seeds also known as the Gulabi Jaam fruit seeds.
Roseapples are rich in Vitamin C, Dietary Fiber, Vitamin A, Calcium, Iron and other minerals.
There are many health benefits of roseapple like disease control, digestion, cancer prevention, etc.
COming back to the experiment, Here we have three gulabi jaam or the rose apple fruit seeds.
A zip-lock bag, a paper towel and a spray can.
Here we have cut open one seed to show you the internal structure.
Okay, coming back to the experiment. Here we are peeling one seed without damaging the inner parts and then keeping it in a paper towel for germination.
THen coming to the next seed, It has been kept soaked for 6 hours before putting in the paper towel.
Now we are going to take the paper towel, and put all the seeds in it.
Close it nicely so that all the seeds get covered.
Now wet the paper towel with the spray can.
Then place it in the zip lock bag.
Don’t forget to label it. You can write the name and date and then store it in a dry, dark and warm place.
I prefer to keep it under my covered counter wash basin.
and thats it.
Now lets wait for four to five days and then check the results.
]]>https://www.gkvks.com/roseapple-from-seed-germination-how-to-grow-gulabi-jaam-plant/feed/0How to grow morning glory ipomea plant from seeds
https://www.gkvks.com/how-to-grow-morning-glory-ipomea-plant-from-seeds/
https://www.gkvks.com/how-to-grow-morning-glory-ipomea-plant-from-seeds/#respondSat, 26 Sep 2015 14:57:36 +0000http://dev.aa-team.com/wp-themes/kingdom-woozone/?p=1158
This Topic shows you in brief and simple method on how to Grow Ipomea also known as morning glory vine from seeds.
This video tutorial shows you in brief and simple method on how to Grow Ipomea also known as morning glory vine from seeds.
1. Soak the seeds in water for 6 to 12 hours
2. Spread them in a Toilet tissue paper and gently wet it. Do not over water.
3. Fold and put this in a Plastic bag or ziplock bag and seal with a tape and label it.
4. Open after 48 to 72 hours and check for sprouting.
5. Plant them in small paper pots made of toilet paper card board roller which you throw it to bin.
6. After few days place these bio-degradable paper pots into larger pots and see the growth
7. Water once a day with good drainage.