I am sure most of us have failed many times trying to propagate roses from cuttings. Rooting Rose stem or branch cuttings needs some special care and application of certain hacks and tricks unlike other plant cuttings which are easy to grow. And you get a genetically identical copy of your Parent tree which is not the case with seed grown plant, which differs significantly from its Parent plant.
Whether you are growing rose cuttings in water or in soil, use these common tips and tricks that will give you the best results.
- The Best Cuttings: – The first and foremost criteria to choose cuttings is selecting a disease-free branch. Make sure you choose a healthy branch free of any disease like rose die-back disease or any fungal black spots or white spots. If you choose a diseased branch, the rooting will certainly fail. Secondly always choose semi woody cuttings from the branch which is healthy with young shoots and leaves at its tip. Semi woody means – neither too hard nor too soft and young.
- Length of the cutting: This is very important and should neither be too long nor too short. An ideal length for best results would be 6 to 8 inches or max 10 inches. This length also depends on the internode distance of a branch which varies with the plant species. Remember one rule of thumb: the success rate of rooting is inversely proportional to the inter-node distance. That means the lesser the internode distance, the greater the chances of success.
- Cutting Tricks: – Firstly the Cutting Tool: A clean and sharp cutting blade or pruner is important. So, disinfect it using hydrogen peroxide swab or any household disinfectant you have. A germ-free cutting is shown to produce great results.
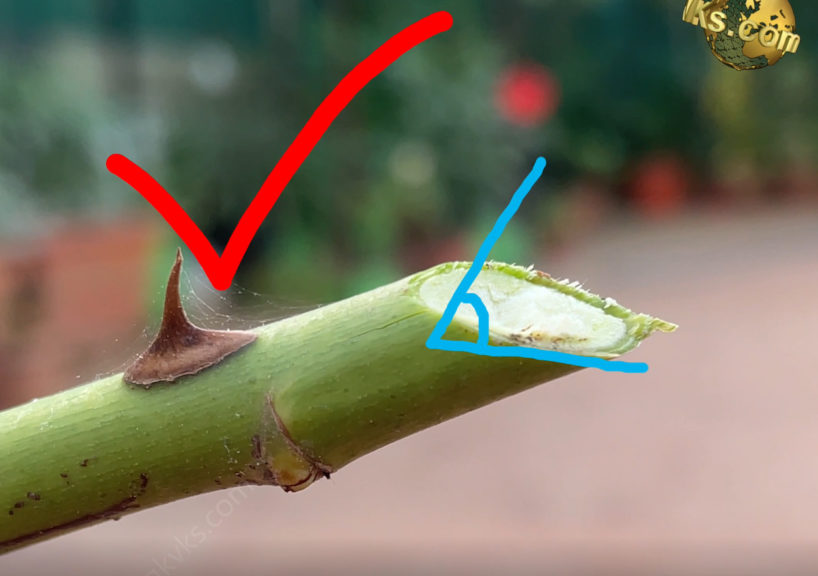
- Secondly the Cutting Point: Make a sharp cut about half to one inch below a node. This is where the rooting starts. Do not make a crushing cut which can damage the plant tissue and the outcome may be poor.
- Thirdly the Cutting Angle: A 45 degree cutting angle using a sharp and a clean cutting tool is shown to provide the best results and faster rooting because this gives the maximum surface area to produce roots and also it helps the cutting to absorb water quickly.
- Removing Leaves & Flowers: Remove the lower leaves and leave only a pair of top leaves. Cuttings do not have the root system to take up water yet, so fewer leaves means less stress on the cutting. Also Remove any flowers on the branch by snipping of dead or any flowers along with its twig. This is to divert energy to root development.
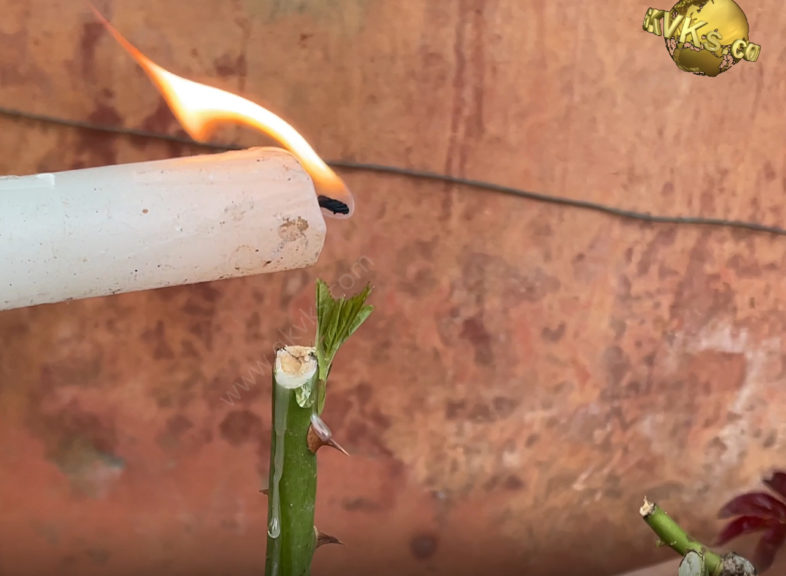
- Sealing the Top: This simple hack gives best results by retaining the moisture within the cutting and thus increasing the success rate. Simply light a Candle and pour on few drops of wax on the upper end of the cutting to seal it to prevent moisture loss from this top end. Check out my 100 Gardening Hacks Post.
- Orientation: Make sure you insert the cuttings in proper orientation and not reverse, especially if the cutting does not have any leaves on it. You can identify this by looking at the orientation of thorns and nodes.
- The Growing Medium: This is very important. If you are rooting in water, the container water should be changed every 4-5 days or at least weekly to prevent contamination and infection. If you are using Potting soil, use a loose or well-draining soil for faster root development. You can choose a sandy soil, cocopeat or peat moss, perlite and stuff like that. Or you can make your own potting mix using all these stuffs or whatever available.
- Insertion depth: How deep should I insert the cuttings. This is another important factor to consider. An insertion depth of 2 inches is considered better, one reason perhaps is better anchorage into the soil and keeps the cutting less disturbed.
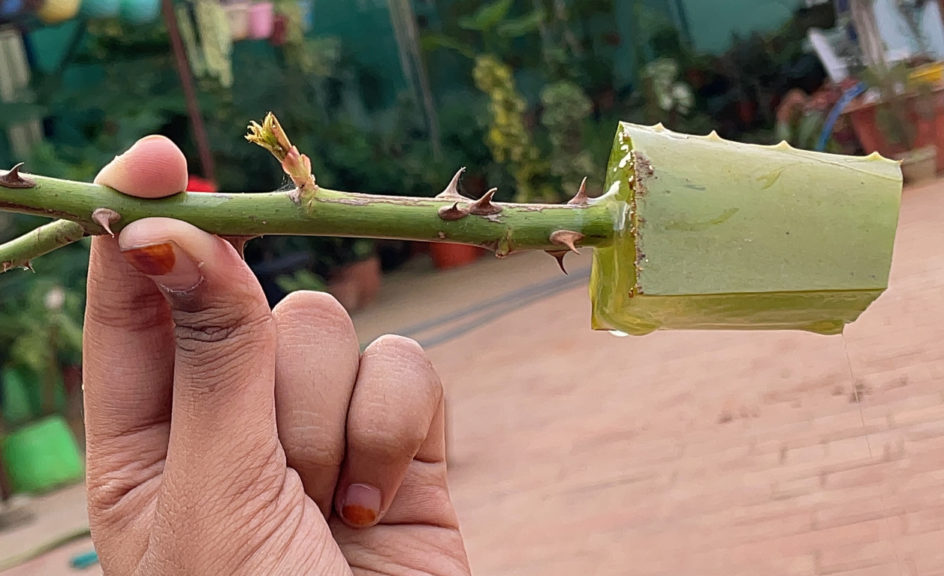
- Rooting Hack: This simple rooting hack will help not only get faster results but guaranteed results. If you have rooting hormone powder like Indole Butyric Acid (IBA) or Naphthalene Acetic Acid (NAA), that’s great, you can apply this to the cuttings. But, If you do not have it, you can use a lot of natural rooting agents. One such stuff is Aloe vera. Yes Aloe vera has anti-microbial and rooting properties. You just cut a fleshy piece of aloe vera leaf, split it and place the cutting or just insert the lower end of the cutting into this piece and then insert into soil. The success rate using this method is great. You can also use this trick for air layering.
- Growing Conditions: Where to keep these cuttings? When to take out and repot them independently? And how frequently and how much to water these cuttings? These factors are very important and matter a lot for achieving best results. One common mistake people do is – taking out the cutting too early to check for roots. This happens because, when they see fresh shoots and leaves coming, they think adequate roots would have formed and they tend to remove it for transplanting. This is not right. Minimum period of at least 4 to 6 weeks or even more, is must, before sufficient roots have formed. Other factors like, A warm and humid environment is very important for rooting. Do not keep the cuttings in direct sunlight to avoid moisture loss before rooting. Keep them in indirect bright light. To maintain humidity and prevent moisture evaporation you can cover with a polythene bag and make some small holes for air circulation. You can water them only if the top soil is dry on touch or finger dip, or roughly you can water once every 2-3 days for best results depending on the climate. You can check my post on How to care for your Rose bush and get maximum flowering in Rose plant from this LINK.
Happy Gardening!
In this article let’s list out the 10 useful rose plant care tips one by one.
10. Bare Root Roses or Container Roses?
You can purchase roses already potted in soil thats container roses or as
dormant bare-root plants. If you are a beginner, container roses is the best
option, because they are easy to plant and they establish quickly. If you are
planting bare root roses, which are commonly sold online, they need to have
their roots soaked overnight in water before planting them in the soil, and the
roots must be kept always moist for the first few weeks after planting.
9. Repotting a Newly
bought Rose plant
The commonest mistake most of us do immediately repot a newly purchased plant.
Never do this. Keep this newly bought container in partial shade or indirect
sunlight for at least 3 to 4 days for it to settle down and then shift to full
sunlight or consider repotting in a new container and new potting mix of you
choice. Do not remove the entire mother soil from the plant, specially beginners.
Just tease the roots around and then
place in a new potting mix. Then after repotting, water it thoroughly and keep
it in shade for few days to prevent repotting or transplant shock which causes
the plant to wilt.
8. Drainage and Pot
Selection
No doubt, You need a well draining soil for all plants. This applies even to
rose plant. Make sure you have good drainage holes at the bottom that do not
get clogged easily. As you keep the
containers in full sunlight, plastic containers are not recommended. Clay pots
are the best and next comes the cement containers.
7. Potting Mix
Rose is a special plant and we expect a lot of flowers from it. So the nutrient
requirement for this plant is high. As you all know, Any plant requires
Phosphorous and Potassium for healthy flowering and fruiting. Keeping this in
mind while you prepare your potting. Steamed bone meal is the most important
source of phosphorous and a slow release fertilizer. One handful of it will be sufficient to
produce flowering for the entire year. You should also make a proper potting mix with
all ingredients like decomposed cowdung, vermicompost, coco peat or peat moss
and garden soil in proper proportions to make a well draining soil
6. Sunlight and
Location
Rose plant needs atleast 6 to 8 hours of full direct sunlight to produce
flowers and to keep it healthy. You cannot expect flowering without sunlight.
One more important point to remember here is its location. If possible protect
it from hot noon sunlight, like 12 pm to 2 pm sun or if this is not possible,
you can install a 50 percent green shade net to protect from noon sun,
specially in hot summer.
5. Watering
Requirement
Roses need daily watering and a well draining soil is very important and at the
same time moisture around roots has to be maintained by adding stuff like
compost and coco peat. You can add a little more compost like decomposed
cowdung or some extra leaf compost in your potting mix. One important watering
tip for roses to avoid fungus is Water early in the morning before sun starts.
Watering in evening can keep it damp and encourage fungus.
4. Fertilizer
Rose plant requires regular feeding to increase flowering both number of
flowers and also to achieve big sized roses. If you use chemical fertilizers, NPK
20 20 20 and DAP crystals that’s Di ammonium phosphate alternating every week
is sufficient to produce good flowering. But if you are completely organic like
me, Consider adding a hand full of vermicompost or decomposed cow dung in each
container every 15 days after raking or tilling the top soil. Raking or tilling the soil is itself an
important task to improve soil aeration and improve your plants health.
Then, You can also perform a foliar spray by mixing 1 teaspoon of Epsom salt in
1 litre of water once every 15 days for best results.
3. Pest Control
This is most important step. The only regular pesticide I recommend is Neem oil weekly once spray. This prevents and cures a lot of diseases and pests on rose plants. 5 to 10 ml neem oil mixed in 1 litre of water with few drops of liquid soap or shampoo. There are two most common disease attacks on rose. One is the Rose die back disease and the black spot rose disease, both are caused by fungus.
2. Dead Heading
This is another important task most of us are lazy to perform. Just pluck those
dead and fading flowers from the plant. This will conserve the plants energy to
product more new buds rather than diverting the energy in seed formation. Performing dead heading as soon as the flowers
starts to fade is beneficial instead of waiting for the flower to dry
completely.
1. Pruning or Trimming Rose Plants
This is important task most of us neglect. Do not hesitate or be afraid to prune you rose plant. You are not gonna kill it. Pruning is an important gardening secret to healthy rose bush because this encourages branching and makes your plant more bushy as a result more number of flowers. Perform at least a basic pruning what is called soft pruning in early spring season once in a year.
I have a detailed article on Pruning concepts and types of pruning.
Now! Two Bonus Tips:
Firstly About Soil PH: Rose loves slightly acidic soil. If you have a PH testing meter you can check it by dipping into your soil. Rose loves a ph of 6.0 to 6.5. To acidify your soil you can water it by mixing 10 gms of alum in 1 litre of water, once every 15 days or a month. This will certainly improve your plants health and increase flowering because acidic soil is important for nutrient absorption.
Secondly, You can add Mustard Cake Tea or Even used tea dust as discussed in my previous article on Used tea for Plants.
Happy Gardening!
This method of cloning plant cuttings in water is an age-old practice.
If you want to increase the success rate of growing plants in water or rooting your cuttings in water, you need to follow certain simple tips. The most important advantage of this, whether cuttings are grown in soil or water or even air layering, you get an identical copy of your Parent plant (also called the Stock Plant). But This is not the case with seed grown plant, which differs significantly from its Parent plant.
Please Watch all these Steps and Tips till the end to achieve a great result and have fun with your gardening hobby. Also some scientific concepts specially Tip #4 and Tip #8 like the nitrogen draining concept and the oxygenation concept may be completely new and really interesting to most of us. Also Some of these tips are common when you are propagating cuttings in soil. With these simple tips and scientific concepts, you can achieve a success rate of nearly 100 percent.
- 1. Taking Healthy Cuttings:Yes this is the first and foremost job which is most important to achieve a good successs rate. Take a cutting from a healthy mother plant, which is free of pest and disease and has good active growing branches. Choose Semi-woody cuttings, not hard woody or too soft ones which can easily rot.Making a Sharp Cut at 45 degree angle. A sharp cut with a sharp cutting tool or blade is also an important factor for success. Preferably sterilize the cutter with some disinfectant like hydrogen peroxide or any household antiseptic like Dettol.
Cut about half an inch below a node – this is the area where rooting starts and which is to be inserted into water or your rooting solution.3. Length of Cuttings: This is generally 6 to 10 inches or atleast 2 or 3 nodes above the rooting node. The length depends on the internode distance of a branch. Remember one rule of thumb: , the success rate of cloning is inversely proportional to the internode distance. That means the lesser the internode distance, the greater the chances of success.
4. Drain Out Nitrogen for the Branch: As you all know, nitrogen slows down rooting process. Pouring lot of water on the plant or the branch which is to be cut, is believed to drain out nitrogen. Do this and then take your cuttings from the plant. I don’t know how this happens. but if u know about the concept please let us know in the comments box below this video.
5. Do Not Fertilize your Parent Plant: Applying the same concept of nitrogen drain out, better not to feed the plant atleast 15 days prior to taking cuttings.
6. Prepare Rooting Solution: You can use just plain clean soft water. Better avoid salty water or chlorinated water to increase the chances of success. The second option is to add some ingredients into this water which serves two functions. First, prevents contamination and rot and secondly, it helps accelerate the actual rooting process. You have many options for this:
a. Rooting Hormone Powder with indole butyric acid or NAA (naphthalene acetic acid) – just add half a teaspoon of this to your glass or the container holding the cutting and mix it well. Add this everytime you change the water till the rooting starts.
b. Aspirin or willow water: Aspirin which is chemically Acetyl Salicylic Acid serves both functions, including rooting. You can watch a detailed video on this from a link at top right corner of this video.
c. Fresh aloe vera gel extracted from aloe leaf also contains salicylic acid and other ingredients which help in preventing rot and accelerate rooting.
7. Use Clean Containers and Change Water or your Rooting Solution every 2 to 3 days: Take clean containers preferably transparent ones, so that you can actually see through for the root development.
- Oxygenate the tissues: Yes this is another important tip for succuessful rooting. Lift the cutting out of the water once daily and stir the water atleast once to oxygenate it. Scientists have proved that plants need dissolved oxygen to survive and that the cutting will consume all the dissolved oxygen in the immediate vicinity of its rooting zone, so water needs to be stirred in order to maintain healthy root formation. This is infact the basics of Aeroponics and Hydroponics which will try to discuss in detail in some other episode.9. Submerge the cutting into water or your rooting solution, atleast 2 inches above the lowermost node, that is the rooting area. Keep it Undisturbed preferably on a window sill to receive indirect light and also optionally Suspend the Cutting into the Container through a plug like a piece of foam or a cloth. Also it’s a good idea to cover it with a polythene bag intermittently, specially in night time if its too cool. This is to provide the optimum temperature and humidity levels for rooting.
Now the Question is: what do I feed them: giving nutrients would be pointless until roots develop as the cuttings cannot absorb any mineral content. Once the rooting starts, you can feed with very dilute solutions of water soluble NPK or even very dilute compost tea. But one hack to counter the stress or the shock to these little cuttings. Vitamin B1 that is Thiamine in the rooting solution is thought to help alleviate any stress, like how we use Epsom salt solution to water the plants to counter transplant shock. This effect of vitamin B-1 is actually derived from researches based on tissue culture media. But I am not sure of this and the mechanism of action and the molecular concepts behind this.
10. Transplant into Soil: Once you see multiple roots atleast 4 to 5 roots of atleast about an inch in length, you can carefully transplant into your potting mix.