The pesticides approved in organic farming are largely the natural ones, though a limited amount of synthetic substances are permitted.
Let’s list these synthetic and natural pesticides used in organic farming and learn how to use them one by one.
1. BORIC ACID AND BORAX: This powder is commonly used to play carom has many uses in gardening. It’s mainly used to treat soil pests and insects like millipedes and also for ant control. Just sprinkle the boric acid over the areas of infestation and do not water for at least 24 hours. It acts as a contact poison and also as a stomach poison when the pests ingest this powder.
2. COPPER SULPHATE: This is used both as a fertilizer as well as a fungicide. As an anti-fungal, it can be used in the prevention and treatment of fungal diseases like the Powdery mildew, Leaf rust, black spot rose disease and any other serious fungal disease. This is the most effective anti-fungal in organic gardening.
How to Use it? Mix 20 grams of copper sulfate into 1 litre of water in a spray bottle and spray it on the affected plant. You can repeat this process after 1 week. Prepare only the required solution for the day and do not store it for next use.
3. TRICHODERMA VIRIDE: This is a certified bio-fungicide and is normally present in soil which controls other pathogenic fungi and prevents root rot and other harmful soil fungi. So, this can be used in the treatment of soil fungi, root rot, damping off in seedlings and also to treat fungus affected seeds or to prevent fungal infestation of seeds.
How to use it? For Preventing Canker and stem rot after pruning, make a solution by adding 10 gms in 100 ml water and apply this on the injured stem after pruning to prevent fungal disease.
To Prevent Seed Fungus, add 10 gms powder to 1 kilogram of seeds and mix well.
For plants that are wilting and you suspect a fungal disease in soil and root rot, mix 10 gms per litre of water and drench the plant and soil. Repeat after a week if necessary.
To Mix it in your potting mix, add about 10 gms to a potting mix volume of a 12 inch container and then repot your plant. This is particularly beneficial when you transplant your seedlings into fresh potting mix.
4. BAKING SODA: This is pure sodium bicarbonate which is mainly for cooking purpose and readily available in your kitchen. To use it as a fungicide, you can mix 2 to 3 teaspoons of baking soda in 1 litre of water and mix well and spray on the affected parts. If you want to make it more effective and a universal pesticide, you can add 1 teaspoon of oil like neem oil to this solution plus some 10 drops of liquid soap and spray on the plant. You can also use any vegetable oil, but best is neem oil and also clove oil or eucalyptus oil. Repeat this spray every week till your problem is solved. Apart from this there are about 10 uses of baking soda in gardening. You can check a detailed post on baking soda in garden.
5. DIATOMACEOUS EARTH: This magical organic powder has many uses in gardening like ant control, slug and snail control, preventing animals and rodents in your garden and mainly as an organic pesticide effective against all types of pests like aphids, mites, thrips, mealy bugs, caterpillars and even soil pests and insects. The mechanism of action is it’s a contact poison which kills pests by extreme dehydration. You can check a detailed post on DE powder.
How to use Diatomaceous earth on plants?
First of all Water your plants for the day. Then dust the plants with an applicator or just sprinkle the powder on your plants. To avoid killing beneficial pollinators like bees and butterflies, do not sprinkle on flowers.
6. HYDROGEN PEROXIDE: Though it a chemical with formula H2O2, which is similar to that of water, but with an extra oxygen atom. This concept is the key for using hydrogen peroxide in gardening. Well, to use it as an effective pesticide and antifungal, add 1 cup that’s about 250 ml of 6% hydrogen peroxide per litre of water or 2 cups of 3% h2o2 per litre of water. Load it in a spray bottle and spray on the plants. To control Fungus gnats and soil pests, you can water the plant with the same solution. Apart from this, hydrogen peroxide has many other miraculous uses like to save a dying plant, as a fertilizer and many other beneficial uses. You can check a detailed post on hydrogen peroxide in gardening.
7. VINEGAR: this is chemically called Acetic Acid. It’s an inexpensive product and found in most kitchens. In gardening we use 5% white vinegar or the distilled white vinegar. For the treatment of powdery mildew or spot fungus, add One cup of White Vinegar to 1 litre of water and shake well and spray it on the affected leaves. To use it as a pesticide, Add one cup white vinegar to 1 litre of water and then add some 10 drops of liquid soap and spray on the affected plants. You can check a detailed post on uses of vinegar in garden.
8. NEEM OIL: Neem oil is by far the best Organic Pesticide available worldwide. Azadirachtin and Nimbin found in neem oil are the two major compounds responsible for its antibacterial and antifungal actions. It is in fact a broad spectrum pesticide and the safest and most effective of all organic or natural pesticides. To learn about how to use it, the dosage and the patch test, You can check a detailed post on neem oil for plants.
Mealybugs are like a coronavirus. They spread quickly from plant to plant and sometimes it can be difficult to get rid of them.
Mealybugs are infact insects and considered sap sucking pests in gardening. They are soft-bodied insects covered with a white, waxy, cottony material. Dissolving this protective waxy layer will kill these mealy bugs. There are different entomological types of mealy bugs but in home gardening we are mainly concerned with root mealy bugs or ground mealybugs and the sap sucking leaf mealybugs. This is a complete step by step guide.
If you see mealybugs and ants together, then this is a serious issue and difficult to eradicate them. Because they have a mutual symbiotic relationship and these ants protect the bugs from predators and parasites. This also applies to aphids. The ants, especially the fire ants help mealybugs by carrying them to the tips of growing plants and in return they get to eat the honeydew excreted out of their anus.
Having said that, let’s look into the treatments: Please follow the same order for treatment and resort to the last option only if you fail.
10. MOVE YOUR INFECTED PLANT AWAY from the other plants because it can spread quickly from one plant to another.
9. PRUNING: This is the simplest treatment especially if a group of mealy bugs are concentrated at the tips of the branches. Remove those branches and dispose them carefully or burn those branches if possible.
8. BUG BLASTER METHOD: This means spraying water, preferably warm water with high pressure to dislodge the mealy bugs from the plants. This can be used to treat if the infestation is not so high and if there are no ants seen around them, else they tend to return back to the plant in no time.
7. SOAP WATER: This is another simple method if the mealybug load is not so high. Add 1 teaspoon of dish wash liquid soap or even some shampoo to 1 litre of water and mix well before spraying on the plant. This again works by dislodging the mealybugs from the plant. But do not use it when they exist together with ants.
6. NEEM OIL: This is a universal most commonly used broad spectrum pesticide in organic gardening. 1 teaspoon of Neem oil per litre of water + some 10 drops of liquid dish wash soap actually works for mealybugs. But remember to completely drench the plant with this spray and also spray on the top soil surrounding the plant. This solution may take time to completely eradicate the bugs and you may have to repeat this every week until eradication. Please perform a patch test on a leaf before spraying on the entire plant. Patch test means spraying on a single leaf or branch to see the potency of your pesticide. If its wilts or damaged in 1 to 2 hours, then you need to dilute it further, so that your plant is not harmed.
5. ALCOHOL: Do not use any alcohol specially ethanol and methanol because they can damage your plant. Safest is the rubbing alcohol which is 70% Isopropyl Alcohol. This works 100% on mealybugs. Do not worry if you do not have this rubbing alcohol. I will show you some easy alternatives shortly. So, How to use this on mealy bugs. If infestation is very little, just take a cotton swab and soak it with rubbing alcohol and wipe the mealy bugs. If infestation is high, then some recommend spraying directly on the plant using a sprayer. But it can damage some plants. To be safe, its better to dilute this with water in 1:1 ratio and spray on the plants. Alcohol dissolves the waxy coating of mealybugs almost instantly and they die in no time. Repeat this if required after one week. But remember to perform a patch test before spraying.
4. THE COCKTAIL METHOD: In this method, we mix up many ingredients to make a cocktail solution. Take 500 ml water in a spray can. Add half to 1 teaspoon of Neem Oil. Then You add one cup or 250 ml of rubbing alcohol. If you do not have this, you can use a hand sanitizer or even after shave lotion. Then add about 10 drops of liquid soap to this. This is the most powerful mixture to destroy all the mealy bugs in one shot. But please perform the patch test on a leaf before spraying on the entire plant.
3. Diatomaceous Earth or DE powder: Reserve this as the next organic option, because if it’s a flowering or fruiting plant, pollinators may be harmed specially if you sprinkle this powder on flowers. This powder is particularly useful if you also have ants in symbiosis with the mealybugs. Sprinkling or dusting this powder will take care of both these insects.
2. INSECTICIDES like Malathion, carbaryl and other organo-phosphorous compounds kill these bugs. But the use of chemicals is not recommended. If only one or few plants are infested, destroying your plant is another option recommended by some gardeners so that it doesn’t spread to the other healthy plants.
1. HYDROGEN PEROXIDE: This is great especially for root or ground mealy bugs. Use 2 cups of 3% hydrogen peroxide or 1 cup of 6% peroxide per litre of water and water your plant with this solution and repeat after a week if necessary.
Have you noticed, how plants suddenly look greener during rainy season? One of the reasons is hydrogen peroxide found in small amounts naturally in rain water.
Although Hydrogen Peroxide is a chemical, but it easily decomposes to water and oxygen, and hence safe to be used even in organic gardening in varying dilutions. It is a colourless and odourless liquid and a commonly used medical and household disinfectant.
Now, the Concept for using Hydrogen peroxide in garden: It has a chemical formula H2O2 similar to that of water, but with an extra oxygen atom. This concept of additional oxygen release when hydrogen peroxide breaks down is the key to its beneficial effects in gardening.
Well, before we list out the top 10 benefits of hydro gen peroxide in garden, you must be aware of what concentration to purchase from the medical stores. It’s very inexpensive and commonly available in 3%, 6% and sometimes 35%. We will be using 3% or 6% hydrogen peroxide in our garden. Please watch this video till the end!
10. Save a Dying Plant: Applying the concept of extra oxygen atom release, we can revive a dying plant with hydrogen peroxide. First Check by scratching the stem, if its green and juicy, then it can be revived. Cut off all the dead branches and stem till the viability zone or the green zone. Take out the plant by its roots. Inspect the roots for any rot. Prepare a diluted hydrogen peroxide solution using 3% or 6%. Use 2-3 teaspoons of 3% peroxide per litre or 2 tablespoons per gallon of water. If you are using 6%, the dosage is half of this. Now soak the roots into this solution for about 6 hours. Then repot this in a clean fresh potting mix and new container. Water this with the same solution and leave it alone in shade for few days. Water the plant only when 1 or 2 inches of top soil dries out completely. You can repeat watering with this solution till it begins to show signs of life.
9. Accelerate Seed Germination: Seeds soaked in diluted hydrogen peroxide germinate faster and display healthy growth in future. Since the oxygen requirement of sprouting seeds is very high, this extra oxygen supply is obviously beneficial. You can soak seeds in a solution with 1-2 teaspoons of 3% peroxide per litre of water or water the seedling tray of seeds are already planted. This also takes care of any seed borne pathogens and helps in better root development of the seedlings.
8. Disinfecting Garden tools: especially the cutting and pruning tools should be disinfected while taking plant cuttings for rooting or cloning your plants. You can use 6% h2o2 solution to wipe off the cutting tool with a cotton or dip the tool into the solution for few minutes. This increases the chances of a high success rate in growing plants from cuttings.
7. Disinfect Seed Germination Trays: for a high success rate in germination your seed trays have to be free from pathogenic microorganisms. You can wipe them with 6% solution without any dilution.
6. Treat Fungal or Bacterial Root Rot: Overwatering can cause a shortage of oxygen at the roots. By filling the air pockets found in the soil around your plants, suffocating the roots of the plant. This lack of air causes the plants to start dying due to root rot. To treat this problem, you can water them with a mixture of two to three teaspoons of 3 percent hydrogen peroxide per litre of water or 2 tablespoons per gallon of water. The extra oxygen found in the hydrogen peroxide delivers the much-needed oxygen to the plant’s roots. After applying this solution to your plants avoid watering again until the top two inches of the soil is completely dried.
5. To Sterilize the Seed Starting Mix for better success in seed germinations. Add a 1:3 dilution of 3% h2o2 in water to the seed starting mix and leave it over night before using the soil or mix for seed sowing. You can also sprinkle this on your potting mix to disinfect your potting soil.
4. Weed Killer: At 10% or higher concentration of hydrogen peroxide, it completely destroys all types of vegetation it comes in contact with. But use it with caution around your plants. This is best applicable for cracks and crevices.
3. As a Fertilizer: Water your plants with a very dilute solution of hydrogen peroxide once in a month for the rain effect. You can add 1 teaspoon per litre of 3% hydrogen peroxide or 1 table spoon per gallon of water and water your plants to supply oxygen to the roots.
2. In hydroponic or aquaponics system: the addition of hydrogen peroxide to the water will keep the plants healthy. The roots of plants, as well as the aquatic life, appreciate the extra supply of oxygen.
1. EFFECTIVE PESTICIDE AND ANTI FUNGAL: It can control many common pests and insects in garden, mainly the sap sucking pests like aphids, mites and mealybugs. It can kill the eggs and larvae of moths and other harmful pests with its strong oxidizing effect. To make this pesticide, use 1 cup that’s about 250 ml of 6% hydrogen peroxide per litre of water or 2 cups of 3% h2o2 per litre of water. Load it in a spray bottle and spray on the plants. To control Fungus gnats and soil pests, you can water the plant with the same solution. It can also used in the treatment of mold and powdery mildew fungus.
Technically, Aspirin is not an organic solution, however, it is a safe and very inexpensive option that contains far fewer chemicals than the store-bought chemical products for gardening. I think most of us might have exhausted their regular pesticide stocks during this lockdown period, especially the great neem oil. Do not worry and watch this video till the end.
Aspirin is chemically Acetyl Salicylic Acid and medically a non-steroidal analgesic and anti-inflammatory medicine, inexpensive and easily available in almost all medical stores.
So, what is the actual concept behind using Aspirin in gardening and farming. Salicylic acid is naturally found in willow bark and many other trees. Studies have found that the plant hormone salicylic acid is released in tiny amounts when plants are in stress. So this concept has been utilized and many benefits of Aspirin have already been proven. Here we are using Aspirin 350 mg dispersible tablet – brand names like Disprin, Ecospirin, Bayer Aspirin and so on. If you are not getting a dispersible tablet, you can crush the non-dispersible tablet and powder it and use it.
- Aspirin for Plant growth: Many university research studies have been conducted on this. They sprayed plants with an aspirin water once every three weeks for the course of an entire growing season and found that, the plants sprayed with the aspirin solution were found much bigger and had more fruits and flowers than their counterparts.
So, How to use Aspirin in your garden? You can dissolve one tablet of aspirin in one gallon of water and drench your plants with this solution once in a month. You can spray this solution on the leaves and also water your plants with this water. This enhances the immune system of plants and helps them in combating with pests and microbial attacks and prevents the formation of fungus leading to increased growth of plants and improves the overall health if your plants. - Aspirin Improves Seed Germination: A low dose of aspirin water significantly improves seed germination and in one study the plants treated with the aspirin water had a 100 percent germination rate, while the plants that weren’t treated had more inconsistent results. To make this solution or spray, drop half a tablet of a 350 mg Aspirin per gallon of water or a quarter tablet per litre of water and stir well. One method is to Spray on the seeds already planted and another method is to soak the seeds in this solution for 1 to 2 hours before planting them.
- Aspirin as a Rooting Hormone: As already discussed, Salicylic acid is naturally found in willow bark and many other trees. Willow bark extract is being used since ages as a Rooting agent to clone plant cuttings successfully. If you do not have rooting hormone powders like naphthalene acetic acid and indole butyric acid, you can use aspirin for this job.
Take one teaspoon of cinnamon powder from your kitchen and add it to 1 litre of lukewarm water and then drop in half a tablet of 350mg aspirin and stir it well. Then dip the cuttings into this solutions for about 30 to 60 minutes and then plant those cuttings into soil. If you are trying to root cuttings in water, drop half a tablet of aspirin per litre of water. If you are changing this water, you need to again add half a tablet of aspirin into the container till rooting starts.
- Aspirin as an anti fungal to treat Blight in plants: Blight means a specific symptom affecting some plants like tomatoes and peppers due to infections by pathogenic microrganisms, leading to rapid and complete chlorosis, browning, then death of plant tissues started from leaves, branches, flowers and fruits. The dosage is same, that is one tablet per gallon of water as a spray or drench your plant with this water.
- To keep Cut flowers stay fresh for a longer time: Put a 1/4th tablet of aspirin in a vase with fresh cut flowers from your garden to help them stay fresh longer. If the vase is larger add half a tablet.
Now! The PESTICIDE RECIPE:
– Take a Large Onion and drop it into a kitchen blender
– Add 4 fresh cloves of garlic into this.
– Add 2 teaspoons of Red Chilli Powder.
– Add 1 teaspoon of Cinnamon Powder.
– Blend this into a fine paste by adding some water.
– Now Add about 2 Cups of Water to this and mix well and allow it to steep overnight.
– Then in the morning, strain out the liquid using a nylon cloth or a fine sieve to get your pesticide concentrate. You can even store this concentrate in refrigerator.
– To Apply as pesticide, Use it in 1:5 dilution in water. That is to one cup of this pesticide add 5 cups of water and most importantly do not forget to add some 10 drops of liquid detergent soap for the surfactant effect and to coat the leaves and retain the pesticide effect for longer time. Use this twice weekly until all pests are eradicated. This will successfully kill common pests like aphids, mealybugs, whiteflies and many others.
Onion skin and peels are usually thrown into the bin. But starting today and after watching this episode till the end, you will never throw them again!
Onion skin and peels have antioxidant and antimicrobial properties and contain many useful substances like sulphur, quercetin, Potassium, phosphorus, zinc, iron, iodine, vitamins, pectins, saponins, flavonoids and so on.
Have you even wondered why tears start flowing out of your eyes as soon as we start chopping onions? This is Onion-Chemistry. Before we start with the 5 uses of onions in gardening, let’s quickly know the scientific reason behind this interesting scene:
While chopping onions, cells inside the onion are broken down and the gas that comes out forms sulfenic acid. This acid gets mixed with enzymes and forms a gas called propanethiol S-oxide. When this gas reaches our eyes, it gets mixed with our tears and forms sulphuric acid which causes irritation of the tear glands and that’s it.
Well, Now let’s list out the benefits of onions for plants and gardening:
5. COMPOSTING: If you are not using earthworms for making your compost, You can drop onion skins and peels a little deeper into the compost bin and get a nutrient-rich compost in the final result. But You should avoid adding them in your worm composting bin, this is because earthworms hate onions and similar odorous substances.
4. MULCHING: For Beginners, A mulch is a layer of material applied to the surface of soil for benefits like preserving soil moisture, reducing weed growth and so on. You can use onion skins for mulching and the dry onion peels will decompose soon and enrich your soil with potassium and calcium, which is so good for your plant growth.
3. ONION PESTICIDE RECIPE: If you do organic vegetable gardening without using any chemical pesticides and fertilizer, you will certainly realise the importance of these organic recipes, especially if you do not have the universal organic pesticide like the great neem oil. Do not worry!, you can make a potent organic pesticide using onion and other stuff.
– Take a Large Onion and drop it into a kitchen blender
– Add 4 fresh cloves of garlic into this.
– Add 2 teaspoons of Red Chilli Powder.
– Add 1 teaspoon of Cinnamon Powder.
– Blend this into a fine paste by adding some water.
– Now Add about 2 Cups of Water to this and mix well and allow it to steep
overnight.
– Then in the morning, strain out the liquid using a nylon cloth or a fine
sieve to get your pesticide concentrate. You can store this concentrate in
refrigerator.
– To Apply as pesticide, Use it in 1:5
dilution in water. That is to one cup of this pesticide add 5 cups of water and
most importantly do not forget to add some 10 drops of liquid detergent soap
for the surfactant effect and to coat the leaves and retain the pesticide
effect for longer time. Use this twice weekly until all pests are eradicated. This
will successfully kill common pests like aphids, mealybugs, whiteflies and many
others.
2. ONION
PEEL FERTILZIER: There are two
methods to make onion peel fertilizer, one is to boil the onion peels for few
hours in water and the other method is to soak the onion peels in water for 24
hours. Some do not recommend boiling.
So, take 2 to 3 handfuls of onion peels
and drop in 1 litre of water and allow it to soak for 24 hours.
After 24 hours, strain out the liquid and use it as a liquid fertilizer. You
can use it without dilution or with further dilution of 1:1 in water if you
regularly fertilize your plants. Use it once in 15 days to see the effect in
about 3 months.
1. ROOTING HORMONE RECIPE: Not really a rooting hormone, but you can call it a rooting agent. Onion due to its antimicrobial properties and when mixed along with other stuff will certainly improve the results of rooting your plant cuttings. To prepare this:
– Take ¼ Onion
– Add ½ a Cup of Fresh Aloe vera Juice extracted from a leaf.
– Add some cinnamon or willow bark into this – Its better to have it Presoaked in a cup of water for 24 hours.
– Now Add this cup to the blender and make a paste or solution. Then Strain out this liquid to use as as rooting agent. Just dip the cuttings into this solution or apply this with your finger and plant the cuttings. You can watch a detailed post on the 10 natural rooting agents you can use to add into this recipe or experiment this recipe with more stuff.
Slugs and snails are actually cute looking creatures, but they eat away a lot of your garden, leaving only plant or leaf skeletons. They are active during the night and really difficult to get rid-off. In our previous posts, we discussed so many natural methods to control slugs and snails like using a Beer Trap, Food grade Diatomaceous earth boundaries, sprinkling Epsom salt, encouraging natural predators like birds, frogs, toads, chicken and stuff like that. But none of these are 100% effective and in fact some of these are difficult to implement.
In this post, we will discuss on the barrier or the fence method using copper wire or copper tape and show you the 100% effective electric fence method. Some of you might be worried hearing the word “Electric”! Do not worry, its 100% safe for humans and pets because we are using just a 9V DC battery which does not cause any electric shock and, it is infact quite inexpensive, permanent and 100% working method. Inexpensive! Yes indeed, because the battery will not be consumed unless the slugs and snails complete the circuit by trying to cross this barrier.
Many companies sell some slugs and snail copper tapes and claim they repel these creatures. No doubt copper is a repellent for slugs and snails, but there has to be a good concentration of copper in the tapes and also the tape has to be more than 2 inches wide to create the copper repelling effect on the snails.
Now Lets quickly build this DIY slugs and Snail electric fence in three simple steps:
But Before
that, lets List out Few basic Things You need:
a. 9V Battery with its connecting wires.
You can also try using a 3 volt battery
for smaller pots. But the best effect is seen with a 9V battery.
b. Bare or non-insulated copper wire or
any bare metallic wire, preferably a galvanized wire because its resists
corrosion. You can also strip some copper wires from old electric wires if you
have some.
c. A small plastic container as a
battery holder. You can even use a small glass bottle to build a water
proof housing for the battery.
d. Optionally you may need a soldering gun, glue gun, wire cutters, staplers particularly
if you are installing on wooden containers or raised beds, then you may also
need some insulation tape and other stuff as required.
Step 1: Water Proofing the Battery Housing: For better durability and water proofing, place the battery into a plastic container and seal any openings to make it water proof using a glue gun or any other method. Try to make a downward loop of the wire, so that water does not get into the unit.
Step 2: Wrap the copper wire around the containers in two parallel lines. Make sure the distance between these two lines is not more than 2 cm and also make sure they do no touch each other. This can even be installed on raised beds or wooden pots using staplers. You can also stick copper tapes in a similar fashion specially if you use plastic containers. These tapes come in one sided stickers and easy to fix on plastic containers. After fixing these two lines, you can solder the wires from the battery, one to each track and fix the battery housing to the container properly to avoid water exposure and any extreme weather.
Step 3: The Connections: It’s simple! Take both ends of the top wire, and “twist” them together, do the same with the bottom wire. Connect one line to the positive terminal of the battery and the other to the negative terminal. That’s it. Its now an open circuit and not consuming any battery power. You can optionally check the continuity of the wires or copper tape if you have a multimeter and also the voltage running through the line.
Let’s see what happens when slugs and snails try to cross this fence. You know these are slimy wet creatures and when they try to cross the track they complete the circuit and get a nice shock and get repelled. Watch Video Below:
Do Plants Feel Pain?
Can Artificial LED grow lights help the plant in flowering and growth?
Can I use Coffee as an effective pesticide on plants and how?
Plus a nice funny question at the end.
So Lets begin!
- Do plants feel Pain?
There are many studies and researches conducted on this topic. Plants lack a nervous system – that is a brain and other neurological structures like nerves and pain receptors, so they should not feel pain, unlike in humans and animals where we have specialised pain receptors.
But according to some researches, “Plant can know of themselves being eaten” because studies have shown plants release defence chemicals in response to caterpillars munching on them.
Other points include: Plants fight for territory, seek out food, evade predators and trap prey like what your see in carnivorous plants like the venus fly trap. They are as alive like any animal, and – like animals – they exhibit behaviour.
- Can we grow plants from leaves
Yes! Some, but not all plants can be propagated from just a leaf or a section of a leaf. Leaf cuttings of most plants will not generate a new plant; they usually produce only a few roots or just decay. There are many ways you can grow leaves into a new plant, like 1. from a leaf petiole, 2. by dividing a leaf into multiple pieces for example fleshy succulent plants like sanseviera or the snake plant and other succulents. Other methods of propagation like cane or stub cuttings, root cuttings, leaf bud cuttings and so on. I will try to prepare a detailed episode on this topic when I get a chance.
- Can Artificial light be used for photosynthesesis and do plants flower in it.
Yes you can.
In fact, good quality LED grow lights are highly efficient, because they provide the exact spectrum of light your plants need. But, Remember one thing: sunlight is free, while good quality LED lights are quite expensive.
- Can I use coffee as pesticide on plants?
The Answer is YES: Coffee contains a chemical called caffeine which is considered neurotoxic to many pests like aphids.
You can make a Caffeine Spray. Many research studies have shown
that caffeine combined with other insecticides increases their killing
power. In one test, a small dose of caffine increased a known pesticide’s
potency by ten times.
So how do I make a Caffiene Spray. Its simple. You just have to make a cocktail
solution. I always prefer organic mixes. You can use any recipe of your organic
pesticide like neem oil, clove oil or whatever, and add one or two tablesspoons
of used coffee grounds or 1 or 2 teaspoons of fresh coffee if you like to use
it for your plants. Mix well and let it
marinate for about 24 hours and then strain it and spray it once a while with
your regular pesticide. That’s it. You can watch a detailed video on a Cocktail
mixed organic pesticide recipe.
Now lastly a Funny Question!
- How do I prevent my neighbours from stealing my plants and fruits from my garden?
Some might think of installing a burglar alarm or fencing it well or locking their gardens. But I suggest one simple remedy to this problem. First of all, interact with them and make friends with them even if you do not like them. Talk about exchanging your plants, seeds or cuttings. You take the first step and present them some of your good plants or cuttings. That is all!
RELATED VIDEOS AND LINKS:
Full Q and A Playlist: https://www.youtube.com/watch?v=5Uyvjf8gv4k&list=PLvE-WOB38X7bcd6kFShVvq0zyxLPD5ymQ
GARDEN SECRETS All VIDEOS Playlist: https://www.youtube.com/watch?v=FDIYZci5w2k&list=PLvE-WOB38X7YSKfmaBQc3cDNkvrnDGTyJ
Increase Flowering: https://youtu.be/FDIYZci5w2k
Air Pruning for Fast Growth: https://youtu.be/hkUOB1bHi2M
EASY PLANT CLONING IN WATER: https://youtu.be/lLvgE6ouNBA
Please LIKE, SHARE AND COMMENT on the video. Consider subscribing if you are new to this gardening channel.
Happy Gardening!
Purchase Gardening Stuff: http://www.gkvk.net/links
How would you feel, when oneday on your early morning garden inspection you find part of your garden disappeared while you slept, or realize your flower buds are torn apart and very badly damaged?
I am sure after seeing this damage, Your first instinct is likely to spray some powerful chemical pesticide all over your plants to kill those culprits without even investigating further. This is not a right decision. Please Spend a little time to find out what’s eating your plants and then take necessary action particularly prescribed for that pest or insect.
Yes, Today we will look into Identifying those common pests by scanning their leaf signatures – that’s the leaf damage pattern they leave after feeding on your plants. So lets begin.
Chewed Leaves or Slime Trails
- Chewed Leaves or Slime Trails: If you seeirregular-shaped holes in the leaf (but not along the edges) and if you seeslime trails or lines, then most likely the Culprits are Slugs and Snails. So Whats the Solution? There are lot ofremedies for slugs and snails but Beer Trap is the most effective oneconsidered by many. Pour some beer in a saucer and leave it overnight. Thisattracts and kills these creatures. Chewed Leaves along the edges: Leafcutting bees are the culprits. So whats the solution? Generally unless its tooextensive damage, you need not take any step to kill or drive away these bees,because they are beneficial insects and required for pollination in yourgarden.
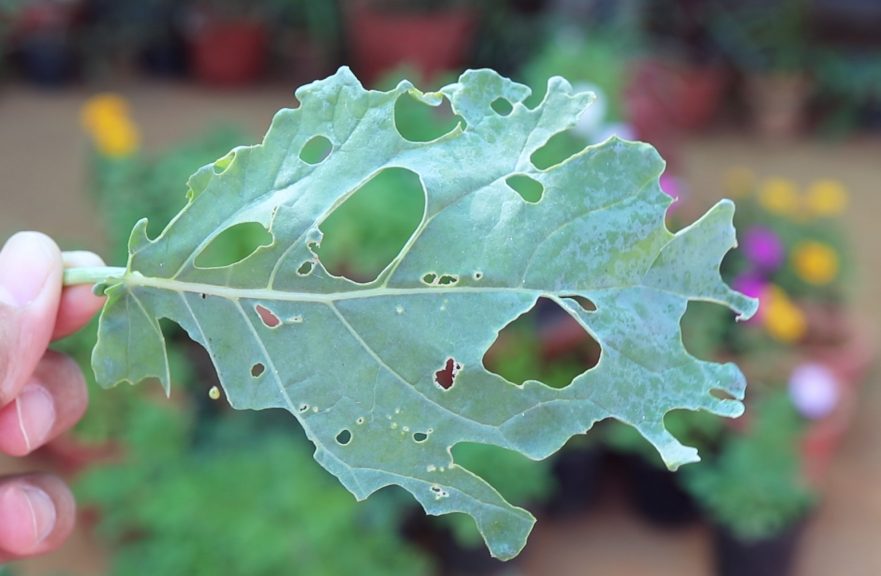
- Chewed Leaves with central holes in betweenveins – like Skeletonised leaves. The culprit here is Caterpillars if largerholes, then the other insects which can cause this pattern are Beetles, Earwigsand Saw flies. So whats the remedy. For caterpillars, hand pick and eliminatethem including their eggs from the leaves. After doing this apply a neem oil +soap solution weekly twice. 10 ml neem oil + 10 drops or 10 ml of liquid soapor shampoo and spray it thoroughly including the undersides of the leaves.
Skeletonised leaves
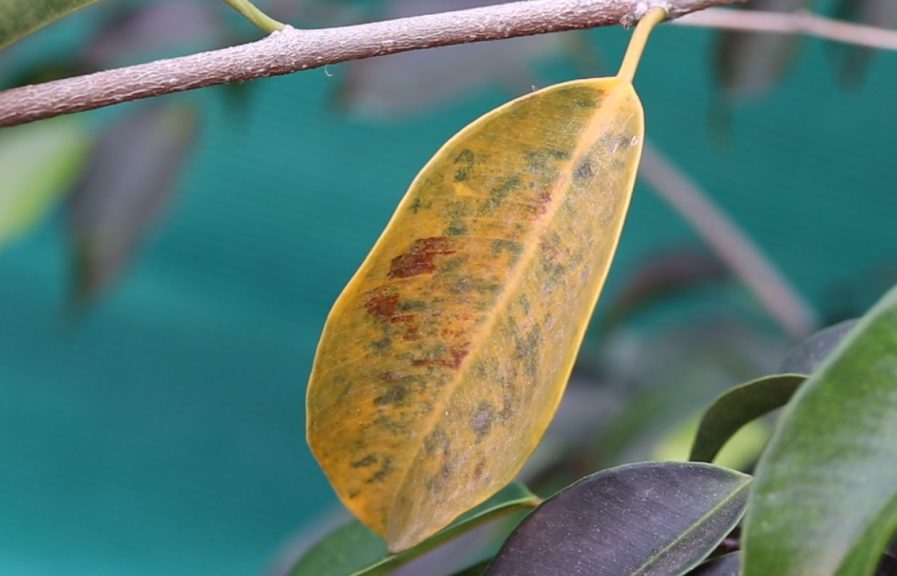
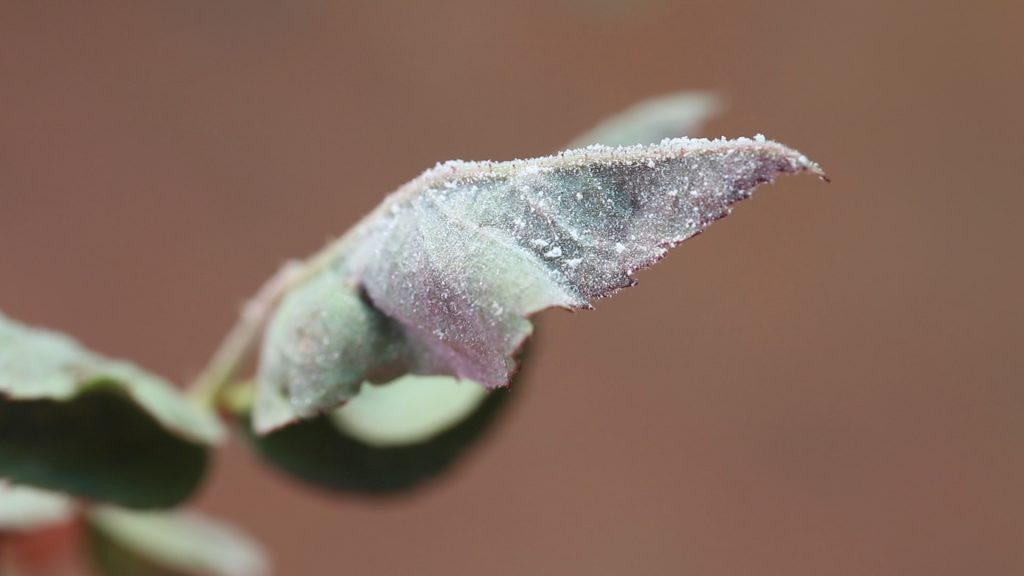
Discolored Leaves + Sucking Damage: Thisis commonly caused by Thrips and Spider Mites, common thrips are the CubanLaurel Thrips. As you can see here, the leaf is discoloured and then foldedonto itself to form a pouch or cover these creatures and its eggs. If leftuntreated, these thrips will multiply drastically and can cause a considerabledamage to your plant. So Whats thesolution? You can use the same Neem oil + soap spray weekly twice or can addanother oil like clove oil or eucalyptus oil if they are too extensive. If theystill persist, then go for a chemical sprays like those containing Imidaclopridas the last resort. If you still want organic solution like me, consideranother option called diatomaceous earth (DE).
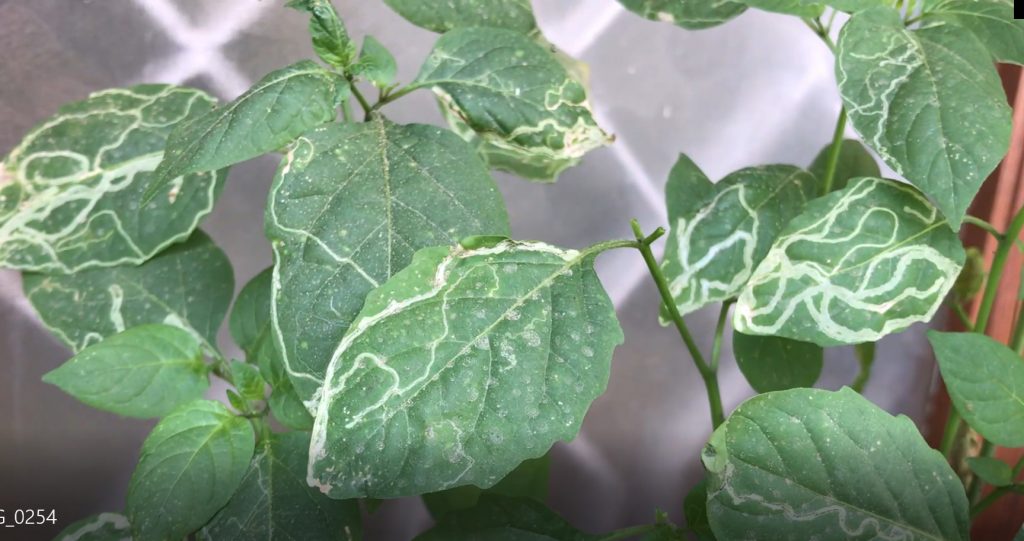
Zig zag leaf mining Pattern: Obviouslythese are called Leaf miners. Leafminers are very tiny larvae of a variety ofinsects like flies, moths and beetles. Leafminers do not actually cause majorinjury to the infested plant, but rather give an unattractive look to theplant. This mining pattern of zig zag lines on the leaves are produced as thesetiny larvae burry and eat along the infested leaves. If you want to control these, Neem oil is thebest solution. You can watch my detailed video on leaf miners and its remediesfrom HERE.
Sucking Damage and Deformed Leaves and Leaf Curls: Common Sucking pests are Aphids,Whiteflies and Mealy Bugs. The mealy bugs are very common and are found suckingthe new growth and tips. Infact, Mealybugs as well as Aphids have a symbioticrelationship with Ants which protect these pests from predators and also carrythem to the plants. The Ants in turn get the honeydew sugars excreted out oftheir anus as their gift. So, Whats the Solution? I have been using theMagic organic mix containing multiple ingredients along with neem oil tocontrol these. But they need a weekly spray with this solution depending on theseverity. There are lot of solutions to these pests including alcohol basedsprays, neem oil and many others. Please check a video on this topic HERE.
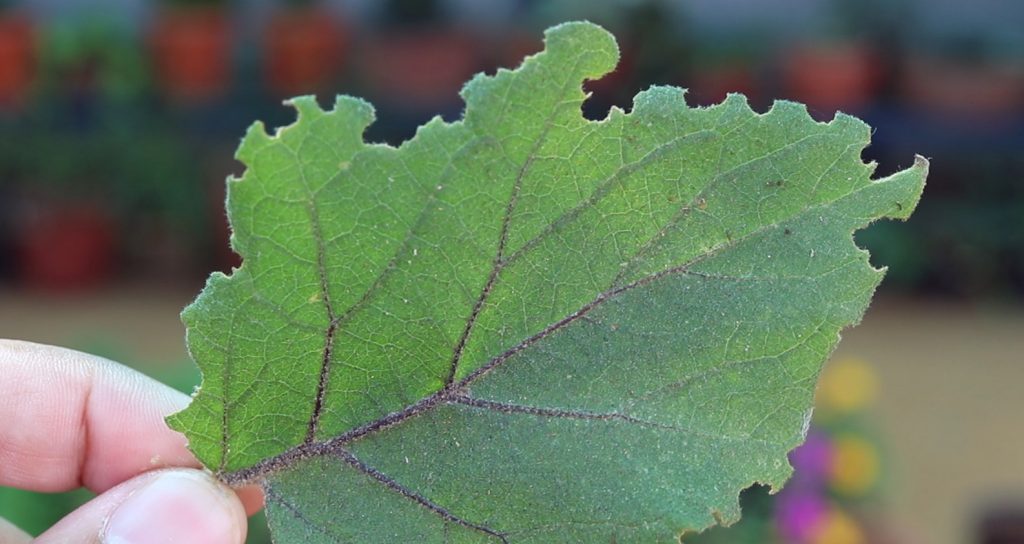
Leaf Galls or Leaf Bumps: This is astrange and rare pattern which presents as tumour like boils on the leafsurface. This is considered to be due to irritation or stimulation of plantcells due to feeding or egg-laying by insects such as aphids, wasps and mites.

The main idea behind these methods is, this saves me a lot of time and Time is really precious!
Here s a list of few easy methods I use. These include natural pesticides and other simple methods.
1. Grow Plants Full of Health and Vigour: Yes, Regularly Adding organic composts like vermicompost, decomposed cowdung or horsedung on your top layer of soil is the best way to develop strong and vigorous plants which can resist or withstand these pest attacks. I also mix organic neem seed meal powder into the soil which combats many pathogens in the soil and also neem cake is a natural fertilizer with many micronutrients.
2. Keep Pest Repelling Plants in your garden. This is infact an easy way of keep many pests away including mosquitoes. You have to do this strategically – like placing these insect-repelling plants near entrances and also interspersed between your other plants which are more prone to pest attacks. There is a long list of such plants – I have listed out these names in these slides on the screen. This is taken from Wikipedia website. CHECK HERE.
3. Trimming or Pruning the Affected Leaves or branches. This step is really important because this has two benefits. This will reduce the load of pests to be eliminated by a pesticide and also offers the benefits of pruning a plant, that is giving out more branching.
4. Hand Pick and Eliminate. This is actually the best method to eliminate some worms and insects like caterpillars, slugs and snails and other leaf eating worms.
5. Neem Oil Spray: This is by far the most widely accepted natural pesticide spray worldwide. When you have lot of pests, spray your plants thoroughly once weekly or atleast once in 15 days. Then a maintenance or prophylactic dose of once a month if you have no pests in your garden. The Formula is Add 5 ml Pure Neem oil in 1 litre of water + some 10 drops of any liquid soap for the surfactant effect and to coat the leaves. Do a patch test on a leaf and then spray the whole garden. WATCH a Detailed Video HERE.
6. My Cocktail Organic Pest Spray: If your plant pest load is too high, consider using a mixture of multiple natural oils and other stuff to make a cocktail pesticide spray. I have discussed this recipe in detail in my video titled Universal Pesticide recipe. You can check this VIDEO HERE. What I used is a mixture of Clove Oil, Neem Oil and Optionally Eucalyptus Oil and then liquid soap. This is a really powerful organic pesticide solution. And again, Always do a patch test on a leaf to check the result before applying on entire plant.
7. And FINALLY, the Best method of pest control which can eliminate more than 80 percent of pests in 1 single shot. When we see these pests damaging our beloved plants, am sure we all feel like burning them to death. But we are helpless, we cannot burn our plants. You can only burn the cut out branches and leaves loaded with pests, which is infact the best way to prevent contamination to other plants. Incineration or burning is one of the best sterilization methods.
So, The only best way is to either kill them on the plants without damaging our plants or somehow dissociate them from our plants. Yes, This method is to separate these pests from our plants. I will demonstrate how powerful this is, so keep watching. Yes, Am talking about the high pressure water spray in misting mode using your garden spray gun with the correct pressure. I will reveal you everything now. How I experimented many methods to finally settle on this method and also the other benefits of this method. First of all there is absolutely no water pressure on your teres garden, because overhead tanks are sitting on the teres or slightly above it. I am sure all of you agree with me on this point. Most of us must be using the bottle spray to pump or spray pesticides which is a manual method to spray with very little pressure and with lot of effort and time and energy consuming specially if you have too many plants. To overcome this, First I started with the rechargeable battery operated 16 litre sprayer can. This was actually a good option with good pressure and other benefits like portability and things like that. But I wanted to connect my multi-mode spray gun with something like a multipurpose gadget where I can use my coiled hose with this multimode spray gun to do all tasks like water the plants and also spray pesticides and do all in one activity. And So, I connected my hose to this Double barrelled Self priming 12 v DC pump which is available online actually as a car wash pump. YOU CAN CHECK THIS POST to get all these products used here. I am not promoting this product. You can buy any similar pump and connect according to your plan and requirement and also please suggest more ideas in the comment box so that everyone is benefited.
As you can see, I am spraying this in pressure mist mode on this plant loaded with mealy bugs. See the pressure and with this pressure of fine misting, any pest will definitely dissociate from the plant, even including the underside of the leaves. After washing, you can then spray your regular pesticide.
For me, This is looking perfect so far, with the desired pressure and options to use it as a watering equipment , pest spraying, misting my plants and also misting or watering my seedlings and do a lot of stuff. It really saves me a lot of time.
So, there we have it folks, that was in brief on the best ways to control pests in your garden. Please give me a thumbs up If you liked this post. Also tweet or share the video with your gardener friends. Comment below with any query or any feedback regarding this.
Happy Gardening.
Recommended Products:
- Battery Operated Pesticide Sprayer ( 16 L): https://goo.gl/wxqyYM
- Boston Double Pump – Car Washer Set (BEST): https://goo.gl/4jb3PB
- Multi-mode Spray Gun with Re-Coiling Garden Hose Pipe: https://goo.gl/GNS4b1
Recommended Related Videos:
- Cocktail Organic Pesticide: https://www.youtube.com/watch?v=PKJOEMtz9jQ
- Neem Oil in Gardening: https://www.youtube.com/watch?v=D6TtdKGIE-0
- Blog Article – http://www.gkvks.com/top-7-best-natural-pest-control-methods-organic-pesticides/
- Products Links: http://www.gkvks.com/electric-pesticide-sprayer-with-pressure-washer-car-wash-pump/