First and foremost, I always repeat these lines: Please avoid the use of chemical pesticides and fertilizers which have a lot of hazardous effects on humans and animals. That’s the main reason, why we promote the use of natural agents or organic pesticides and fertilizers in this gardening website.
What is Asafoetida?
Asafoetida, also known as hing, is a common flavoring agent found in most kitchens. It’s actually dried latex or gum exuded from the rhizome or tap root of Ferula Asafoetida plants.

What is the Scientific Basis of its use in gardening and Farming?
First of all, let’s look into its composition. Typical asafoetida contains about 40–64% resin, 25% endogenous gum, 10–17% volatile oil, and 1.5–10% ash. The resin portion and the volatile oil portion contains a lot of strong compounds that are responsible for its pungent odor and its beneficial properties. Apart from it’s medicinal properties, Asafoetida has some amazing uses in gardening and farming as a pesticide to control many pests and insects including termites, also to repel rodents and animals from your garden or farm, and also to treat some plant diseases like leaf curl virus or leaf curl disease which otherwise has absolutely no treatment. We will look into how to use Asafoetida for each of these problems.
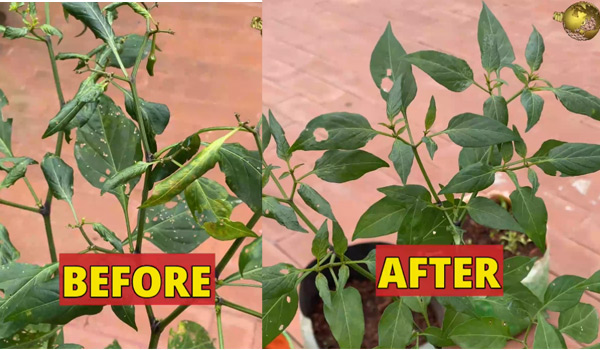
How to use Asafoetida to treat Leaf Curl Disease?
Take one liter of sour butter milk. You can also take 500 ml, if you have fewer plants.
Add one teaspoon or about 5 gms of Asafoetida powder to it and mix well.
Let it stay for 1 or 2 hours.
Sieve this solution using a fine cloth to avoid spray bottle clogging.
Spray this thoroughly over the affected plant including the underside of the leaves.
Repeat this every 3 days for 3 – 4 times. Leaf curl disease which is common in pepper and tomato plants will be completely cured by this treatment most of the times.
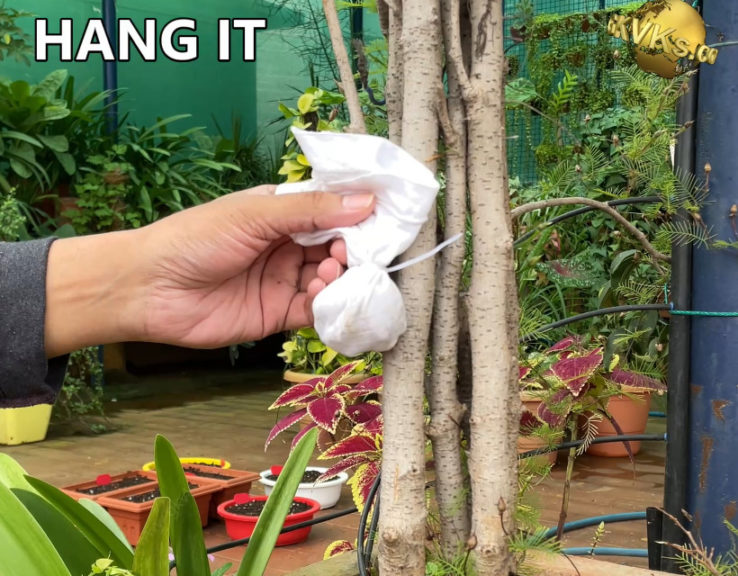
How to use Asafoetida to Repel Insects and Termites?
Take 50 gms of Asafoetida – raw cake form is better.
Put this in a piece of cotton cloth and make a small sac like this.
Hang this over the tree or plant where you want to repel unwanted insects including termites. The disagreeable odour repels termites and other insects.
How to use Asafoetida to Repel Unwanted Animals and Rodents?
Sometimes these rodents and other animals including our pets like cats and dogs create havoc in our gardens. Most of these animals hate the strong pungent smell of asafoetida. To make it effective you need to use a lot of Asafoetida wrapped up in cotton cloth to repel these animals. Perhaps about 100 gms of Asafoetida may help protect and area of about 1 to 2 square meters. It may not be so much cost effective, but it depends on the intensity of your problem.
How to Use Asafoetida as an Organic Fertilizer and Why?
Using Asafoetida as a liquid fertilizer is said to boost plant immune system and protect it from various diseases in the long run.
- Add 2 grams of raw Asafoetida or pure powder form to 1 litre of water.
- Mix it well by stirring continuously.
- Then water your plants with this solution once in a while, preferably in early growth stages of the plant.
- You can also mix more of it per liter of water and then dilute the solution accordingly and water your plants once in a while.
- You can also foliar spray this solution over your plants.
How to use Asafoetida as an Organic Pesticide?
Asafoetida alone may not be effective to control common pests in our gardens like Aphids, mealybugs, whiteflies, thrips, mites and so on. But mixing this with other ingredients can make it a powerful natural pesticide to control these pests.
- Take 1 litre of water and add 5 gms of Asafoetida powder or cake form.
- Add Neem oil of about 5 ml.
- Mix it well and spray it on the affected plants once weekly.
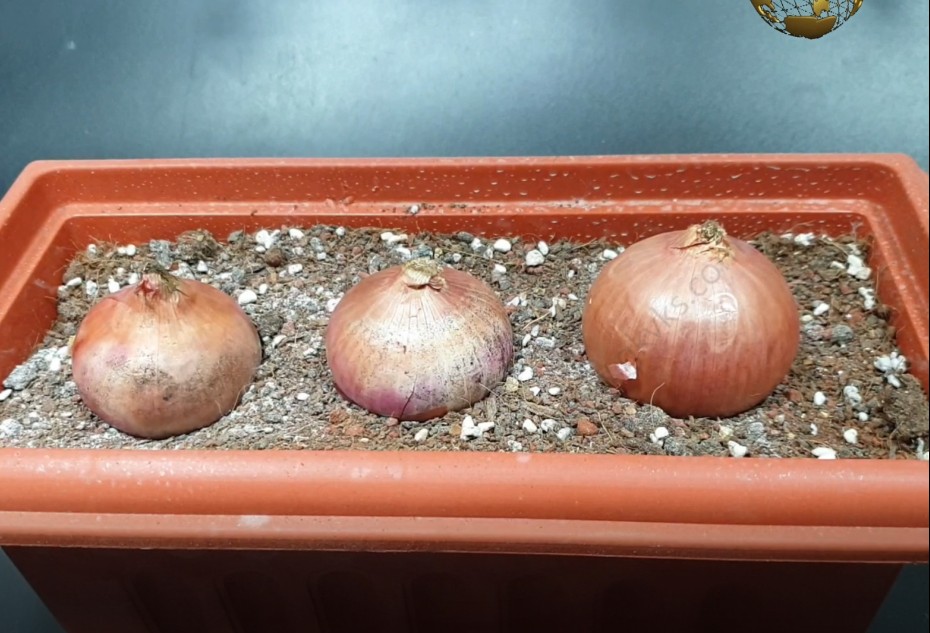
- ONIONS: Onions are actually grown from seeds to get bulbs. One seed generally gives one bulb. However if you want to harvest fresh organic spring onions, you can take some onions from your kitchen and plant them either directly into soil or even in water. If you grow in soil, make sure you have at least 30 to 40% compost in soil and also you need to water only if the top soil is fully dry. If you grow in water, you need to change water every week. You can harvest fresh spring onions after 20 to 30 days. The number of plants a single onion bulb can produce will vary from 1-6. In our case, you can see one bulb has produced 7 or 8 plants and their independent bulbs. For larger sized bulbs, you can separate these and plant them independently. Onions need full direct sunlight of at least 4 to 6 hours.
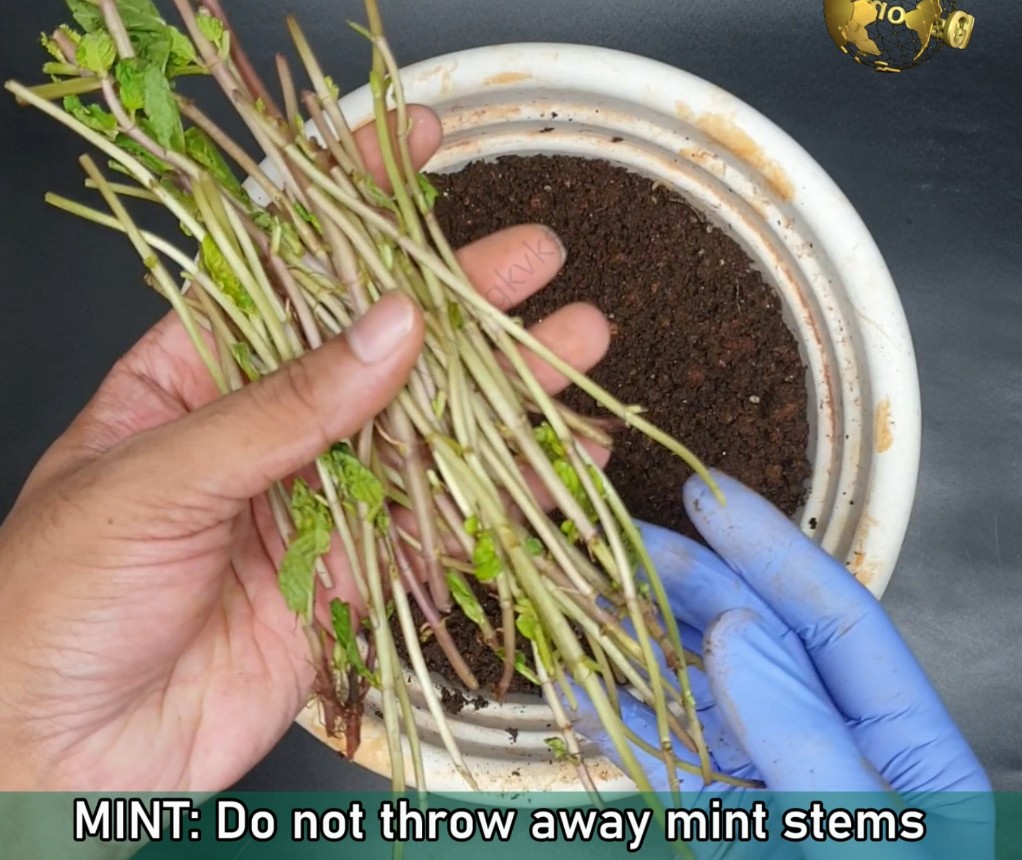
- MINT: Do not throw away mint stems into the bin. Just plant them back in soil or in a container to get an unlimited supply of mint leaves. You only require a container with well draining soil and some compost to grow mint. Every time you plant the stems, add a handful of compost like decomposed cowdung or vermicompost once and that’s sufficient till the harvest. Water them only if the soil is dry. Mint can be grown in bright indirect sunlight or filtered light under a green shade net.
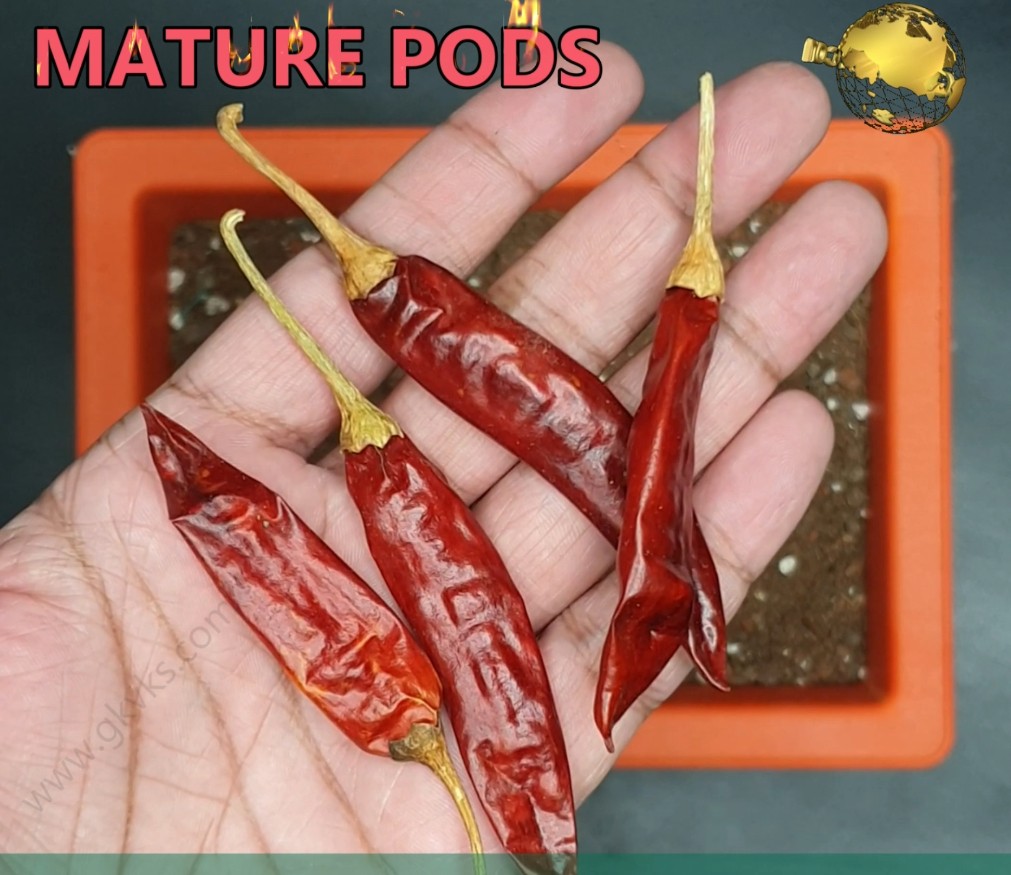
- CHILLI PEPPERS: It’s not really difficult to grow chillies from chillies. Take a mature chilli pod from your kitchen. Do not try this on immature green pods, because the germination rate is lower. Extract the seeds by splitting the pod. Take a shallow container or even seed trays if you have. The soil should be full of compost like at least 30 to 40% vermicompost or decomposed cow dung or both. Just sprinkle the seeds with some spacing and add a thin layer of soil or compost on top of this. Water them every other day. They start sprouting within a week. Once they reach about 4 inches you can choose the best ones and plant them in larger containers like 8 to 12 inch containers, which are sufficient for chilli peppers. You need full direct sunlight of around 4 to 6 hours to grow chilli peppers.
- GARLIC: Garlic can be easily rooted from a single clove. Each clove will produce a new plant. Take some good quality garlic from you kitchen or store room and separate its cloves gently. Plant them in any container of your choice with a good amount of compost in soil. They should start germinating within a week. If you planted them in smaller containers, you can transplant them in larger containers with a loose well draining soil. Garlic needs full direct sunlight of atleast 4 to 6 hours or can even be grown in filtered light under a green shade net.
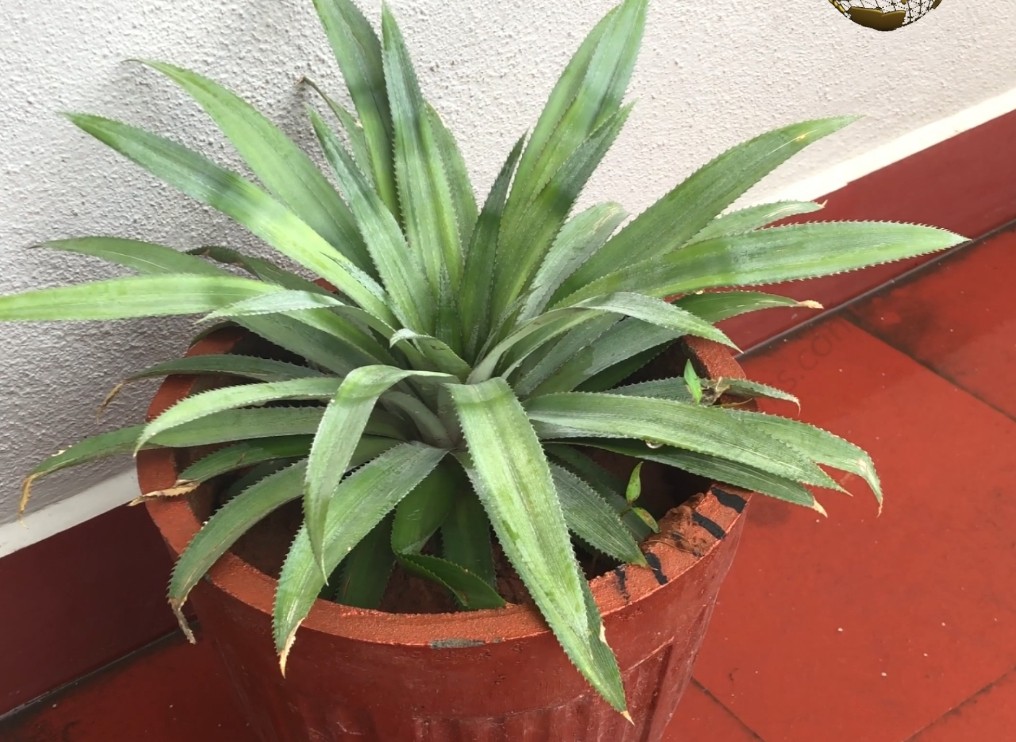
- PINE APPLE: Never throw away the pine apple tops especially if they look fresh and healthy. You can easily grow a pine apple tree from it. Make sure you strip few leaves at bottom to expose the white portion. You can leave it for a day or two to form the callous and then you can either plant it directly in a loose well draining soil or first root it in a glass of water. If you grow in water, you need to change water every week. You can drop a quarter tablet of aspirin 350 mg into water everytime you change it. This helps is faster and healthy rooting by boosting the plants immunity. You can check a detailed post on Benefits of Aspirin in gardening . Once the rooting starts you can transfer into a larger container of at least 12 inch with good amount of compost in it.
- CAPSICUM or BELL PEPPER: You have to use a mature pod like red or yellow and not the immature green capsicum for better germination results. Just extract the seeds by cutting this pod and plant them in a soil with good amount of compost. They start germinating within a week. Once they grow to about 4 inches, you can perform thinning of seedlings and choose the best ones to grow and transplant them in independent containers.
- CORIANDER (CILANTRO): This can be easily grown from seeds. To get the best harvest, you need to first split the seeds by scraping them in sand paper or stuff like that. Remember each Coriander seed is technically a fruit containing two seeds in it. Hence splitting them will produce more plants. Do not use any heavy object or too much pressure to split them, they can get damaged and may not germinate. Plant them in any container preferably in shallow containers and once they germinate and product first set of leaves, keep them in full sunlight, else they become too thin and leggy. Water them daily or alternate days depending on the climate. You can harvest cilantro multiple times by leaving an inch of the stem while harvesting, and this method regrows cilantro again and again.

- POTATOES: Yes you can grow potatoes from grocery bought potatoes or seed potatoes purchased from a garden store. You can keep the potato for pre-sprouting that’s called Chitting a potato. You keep them for 15 days in a carton box in a dark place. Once it sprouts, plant it deeply in a loose soil in a large container of at least 15 inches depth and diameter. Once it starts growing shoots, keep on adding soil on top to make room for more tubers growing inside. Once the potato flowering starts, you can pinch or snip it off to divert energy to potato tuber formation rather than seed formation. You can harvest new or baby potatoes after 70 days and mature storage potatoes after 90 to 120 days.

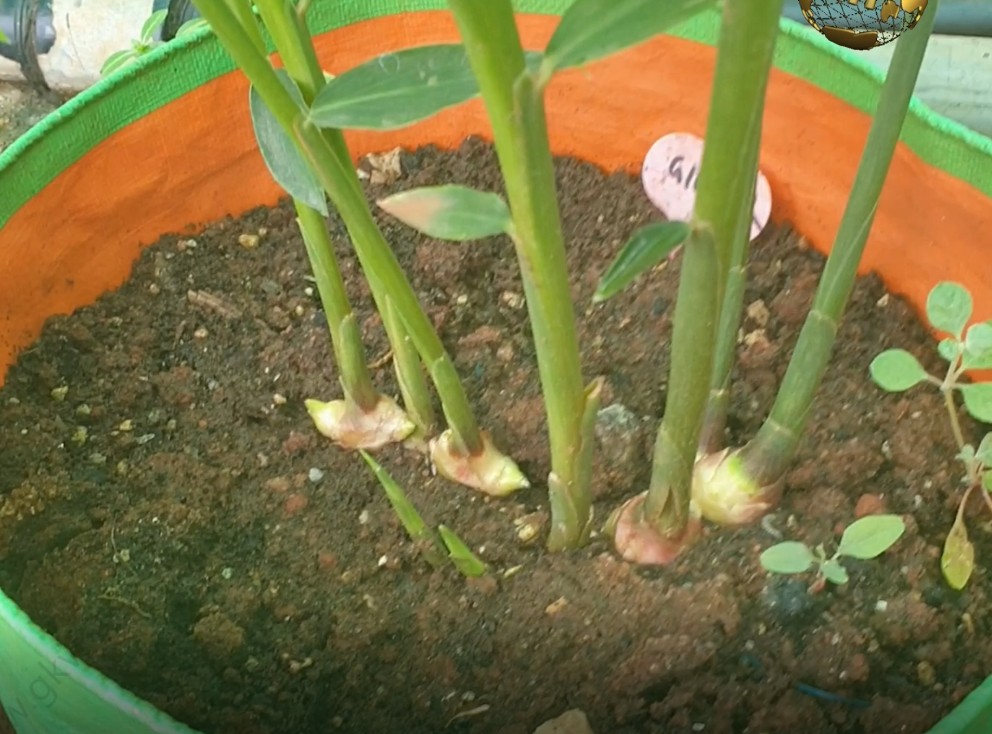
- GINGER AND TURMERIC: The process is same for both these rhizomes. You can soak them for 12 hours in water for faster germination. Plant them in smaller containers first for pre-sprouting or directly plant them in larger containers. Make sure potting soil has more than 50% compost in it and it should be a loose well draining soil. You can watch a detailed post on some of the best potting mix recipes.
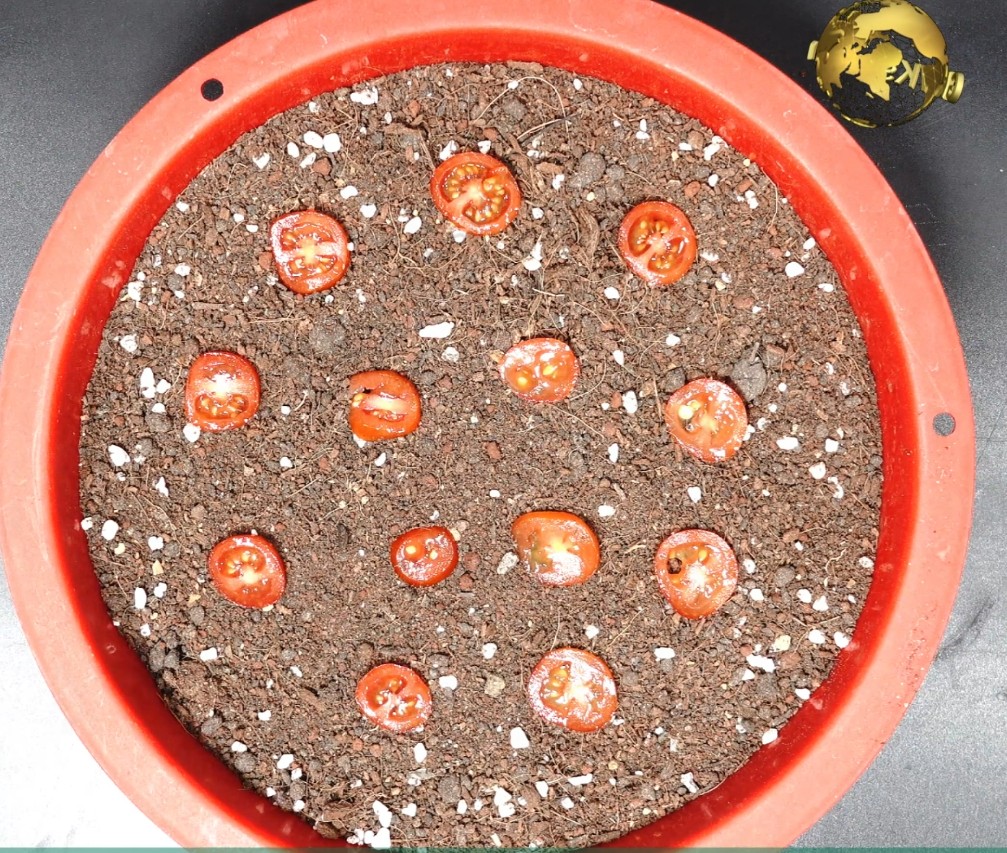
Well, Ginger and Turmeric start germinating within a week. Make sure you keep them in full sunlight or filtered sun light under a green shade net. Water them once the soil is dry. You can add a handful of compost once in 15 days. You can harvest them once the plant starts to wilt and become yellow. - TOMATOES: Yes you can easily grow tomatoes from tomatoes. Just slice them into multiple pieces of about half a centimetre thickness and plant them into a compost rich potting soil. You should see little ones germinating within a week. Now you can perform thinning of seedlings where you choose only the best ones and discard the weaker ones. Transplant into little larger containers at this stage. Though growing tomatoes looks really easy, you need to apply some tricks and procedures to get the best harvest, starting from its early growth phase, like what fertilizer to use, supports to use, removing tomato suckers and many tricks that make tomatoes healthier with a better yield. Please check my post on 10 Tricks to grow lots of tomatoes here.
Potatoes can be grown in ground or in containers. It’s better to grow in containers, mainly because harvesting is a lot easier and it can be grown throughout the year, especially in the tropical zones.
You can grow potatoes from store bought potatoes, but try to choose organically grown potatoes if possible. Potatoes are actually grown from Certified Seed Potatoes which are usually disease free.
But you can easily grow a healthy potato plant with a good harvest from store bought potatoes. Let’s start this step by step.
Step 1: Chitting Potatoes: Chitting simply means pre-sprouting potatoes, before planting them. Chitting potatoes is not a compulsory step to growing potatoes, but it can give the crop a head start so that it matures quicker.
So, How to Chit potatoes? First of all make sure you have good “eyes” in your potatoes. This is where your potatoes will grow sprouts. Place the potatoes in a paper carton box, of course with some holes in the box for ventilation. Leave it undisturbed for at least 2 to 3 weeks to get your seed potatoes.
Step 2: Cutting: This is optional. If you want more plants and have less seed potatoes, you can cut them into pieces, but each piece should have a sprout in it. But you have to leave the cut ends to heal for about 2 days so that they form a callous at the wound. Otherwise, there is a risk of rot.
Step 3: Soil Preparation: Potatoes need a loose well draining potting mix to grow. You can use 30% garden soil + 30% cocopeat or peatmoss + 30% compost like decomposed cowdung or vermicompost + some 10% other stuff like neem powder, perlite and so on. I also add one or two spoons of trichoderma viride powder which is a biofungicide, but this is optional.
Step 4: Choosing Containers: You need a large deep container, like at least 15 inch container for best results. You can use fabric grow bags, some plastic tubs or pots or whisky barrel container or any large container. Make sure you have lot of drainage holes at the bottom. Generally you can harvest upto 10 potatoes per container per plant.
Step 5: Planting: Potatoes have to be planted deeper into the soil. If you are using cut pieces, you plant with the sprout facing upwards. Otherwise it doesn’t matter. Just plant them deep and cover with the soil.
Best time to plant potatoes is about 2 weeks before the onset of spring for most zones, but in few zones in the tropics, you can grow anytime.
Step 6: HILLING: Once the shoots start to grow, you can keep adding potting soil on top to get more space for the potatoes. This is called Hilling of Potatoes. Then at this early stage, that is, once the shoots start to appear, you can add one tablespoon of Organic rock phosphate powder to supply phosphorous to make the root system stronger which in turn can yield a better harvest. Alternately, you can also use fine steamed bone meal powder.
Also try to spray neem oil to keep away potato pests like once in a week or 10 days. 5 to 10 ml neem oil + few drops of liquid soap + half a teaspoon of baking soda to combat any fungal spots on the leaves which is quite common in moist conditions.
Step 7: Watering: Once you plant the potatoes, you can water the container once and leave it alone for atleast 3 to 4 days without watering to prevent the risk of rot. Once the shooting starts, you can water them once every other day depending on the climate or by using the finger dip method to check the soil moisture.
Step 8: Sunlight: Potatoes need at least 6 to 8 hours of direct sunlight. So, depending on this you choose the growing location.
Step 9: Potato Flowering: The potato plant start to flower anytime after 40 to 50 days. But one trick you have to perform at this stage is just snip off the flowering stalk. You can just pinch it or snip them off with shears. We want all the energy diverted towards the roots and potato formation and not on seed formation. Potato flowering indicates the plant is just matured and small tubers have started to form.
Step 10: Harvesting: For most certified seed potatoes, you can harvest after 70 to 80 days. But for some varieties it can be as long as 120 days. This is difficult to determine for store bought potatoes. This is the one of the drawbacks of growing store bought potatoes. To harvest your potatoes, stop watering at least a week before harvest date. One important sign that can indicate your potatoes are ready to harvest is the potato plant begins to wilt and starts to become yellow and is about to die. This sign indicates your potatoes are ready to harvest. One important point relating to harvest is whether you want New Potatoes or Storage Potatoes. New potatoes are small and thin skinned potatoes usually harvested before 70 days. You can carefully harvest a few new potatoes and then cover the plant with soil and leave it for another 2 to 3 weeks to harvest the Storage potatoes which are the main-crop potatoes. The one sign that indicates this maturity is the potato plant completely becomes yellow, starts wilting and begins to dry.
The pesticides approved in organic farming are largely the natural ones, though a limited amount of synthetic substances are permitted.
Let’s list these synthetic and natural pesticides used in organic farming and learn how to use them one by one.
1. BORIC ACID AND BORAX: This powder is commonly used to play carom has many uses in gardening. It’s mainly used to treat soil pests and insects like millipedes and also for ant control. Just sprinkle the boric acid over the areas of infestation and do not water for at least 24 hours. It acts as a contact poison and also as a stomach poison when the pests ingest this powder.
2. COPPER SULPHATE: This is used both as a fertilizer as well as a fungicide. As an anti-fungal, it can be used in the prevention and treatment of fungal diseases like the Powdery mildew, Leaf rust, black spot rose disease and any other serious fungal disease. This is the most effective anti-fungal in organic gardening.
How to Use it? Mix 20 grams of copper sulfate into 1 litre of water in a spray bottle and spray it on the affected plant. You can repeat this process after 1 week. Prepare only the required solution for the day and do not store it for next use.
3. TRICHODERMA VIRIDE: This is a certified bio-fungicide and is normally present in soil which controls other pathogenic fungi and prevents root rot and other harmful soil fungi. So, this can be used in the treatment of soil fungi, root rot, damping off in seedlings and also to treat fungus affected seeds or to prevent fungal infestation of seeds.
How to use it? For Preventing Canker and stem rot after pruning, make a solution by adding 10 gms in 100 ml water and apply this on the injured stem after pruning to prevent fungal disease.
To Prevent Seed Fungus, add 10 gms powder to 1 kilogram of seeds and mix well.
For plants that are wilting and you suspect a fungal disease in soil and root rot, mix 10 gms per litre of water and drench the plant and soil. Repeat after a week if necessary.
To Mix it in your potting mix, add about 10 gms to a potting mix volume of a 12 inch container and then repot your plant. This is particularly beneficial when you transplant your seedlings into fresh potting mix.
4. BAKING SODA: This is pure sodium bicarbonate which is mainly for cooking purpose and readily available in your kitchen. To use it as a fungicide, you can mix 2 to 3 teaspoons of baking soda in 1 litre of water and mix well and spray on the affected parts. If you want to make it more effective and a universal pesticide, you can add 1 teaspoon of oil like neem oil to this solution plus some 10 drops of liquid soap and spray on the plant. You can also use any vegetable oil, but best is neem oil and also clove oil or eucalyptus oil. Repeat this spray every week till your problem is solved. Apart from this there are about 10 uses of baking soda in gardening. You can check a detailed post on baking soda in garden.
5. DIATOMACEOUS EARTH: This magical organic powder has many uses in gardening like ant control, slug and snail control, preventing animals and rodents in your garden and mainly as an organic pesticide effective against all types of pests like aphids, mites, thrips, mealy bugs, caterpillars and even soil pests and insects. The mechanism of action is it’s a contact poison which kills pests by extreme dehydration. You can check a detailed post on DE powder.
How to use Diatomaceous earth on plants?
First of all Water your plants for the day. Then dust the plants with an applicator or just sprinkle the powder on your plants. To avoid killing beneficial pollinators like bees and butterflies, do not sprinkle on flowers.
6. HYDROGEN PEROXIDE: Though it a chemical with formula H2O2, which is similar to that of water, but with an extra oxygen atom. This concept is the key for using hydrogen peroxide in gardening. Well, to use it as an effective pesticide and antifungal, add 1 cup that’s about 250 ml of 6% hydrogen peroxide per litre of water or 2 cups of 3% h2o2 per litre of water. Load it in a spray bottle and spray on the plants. To control Fungus gnats and soil pests, you can water the plant with the same solution. Apart from this, hydrogen peroxide has many other miraculous uses like to save a dying plant, as a fertilizer and many other beneficial uses. You can check a detailed post on hydrogen peroxide in gardening.
7. VINEGAR: this is chemically called Acetic Acid. It’s an inexpensive product and found in most kitchens. In gardening we use 5% white vinegar or the distilled white vinegar. For the treatment of powdery mildew or spot fungus, add One cup of White Vinegar to 1 litre of water and shake well and spray it on the affected leaves. To use it as a pesticide, Add one cup white vinegar to 1 litre of water and then add some 10 drops of liquid soap and spray on the affected plants. You can check a detailed post on uses of vinegar in garden.
8. NEEM OIL: Neem oil is by far the best Organic Pesticide available worldwide. Azadirachtin and Nimbin found in neem oil are the two major compounds responsible for its antibacterial and antifungal actions. It is in fact a broad spectrum pesticide and the safest and most effective of all organic or natural pesticides. To learn about how to use it, the dosage and the patch test, You can check a detailed post on neem oil for plants.
When plants and animals die, their molecules become available in soil for use by other organisms like bacteria and fungi. This product is the final break-down constituents of the natural decay or decomposition of plant and animal materials through the biological activities of micro-organisms. This product is commercially available in powdered form as well as liquid form for horticultural use.
How does this work on plants? It chelates the complex nutrient compounds in the soil to convert them to simple forms suitable for plant absorption. This reduces the fertilizer usage by upto 30% and increases flowering and fruiting by up to 70%. So, this is not a fertilizer, but a bio-catalyst and bio-stimulant for the plant. This is an excellent natural and organic way to provide plants and soil with a concentrated dose of essential nutrients, amino acids, vitamins and trace elements.
Before I reveal you the name of this product, let’s quickly know some of the functions or benefits of this powder.
- Improves Soil Structure by providing more space for root growth and beneficial microbial activity. They bind to soil molecules and improve soil structure, and this is especially noticeable in high-clay and compacted soils.
- Reduces Soil Toxins: They don’t just make nutrients easily available for absorption, but also chelate harmful toxins in the soil, preventing them from entering the plant.
- Increases Water Retention in soil by reducing water evaporation by upto 30%.
- Improved Microbial Activity in the soil and chelation of complex nutrient forms to simple forms for better uptake by the roots makes the plant grow healthier with little fertilizer application and increases flowering and fruiting.
Having said that, let’s know what this is called and how to use it properly for best results.
This is called Humus which consists of three components–humic acids, fulvic acids, and humin.
This is available as powdered form and also liquid form. The Liquid is a concentrated humic acid and needs to be diluted with water before applying on plants. Humic acid is easily available at your local garden store or you can even order online.
PURCHASE LINKS:
Now, Let’s learn how to use it. This is particularly beneficial if your plant has nutritional deficiencies due to poor absorption of nutrients from the soil, which manifests as various leaf yellowing patterns.
So, How to use this? Three Methods to use this:
- Soil Application: The Dosage is 1 teaspoon per litre of water. Mix it well and water 1 cup, that’s about 250 ml of it per plant. If you are using liquid humic acid, add 3 ml of it per litre of water. You should see results within 1 – 2 weeks.
- Foliar Spray: You can add one teaspoon of this per gallon of water and spray on the plants. 1 gallon = 3.78 litres. Please check the usage instructions on the product label and use accordingly. If you are using liquid humic acid, add 1 ml per litre of water for foliar spray.
- Compost Tea: You can add 1 teaspoon per gallon to your compost tea while brewing. This will certainly help in better absorption of nutrients. For beginners, Compost tea is made by adding compost like decomposed cowdung or vermicompost into water and allowing it to brew for 5 to 7 days and then you dilute this further like in 1:10 ratio and water your plants.
We all know that plants need Major Primary Nutrients – that’s NPK – nitrogen phosphrous and potassium and also the Secondary or trace or micro nutrients like calcium, magnesium, sulfur, iron, boron, zinc, and so on. These are either derived from
- Natural sources – what we call Organic Fertilizers for example, Cow dung, vermicompost and many other stuff.
- Inorganic or Chemical Fertilizers like NPK crystals, DAP, Urea and so on.
Now I will list out the harmful negative effects or the dangers of Chemical fertilizers and Pesticides that you frequently use in farming or home gardening. You please make a decision yourself after watching this video till the end.
- Ground water
Pollution: Nitorgen fertilizers
break down into nitrates and can easily go down into the soil. These are
water-soluble and can accumulate in groundwater for decades. And if you keep
adding more nitrogen over the years, this will have a cumulative effect. Moreover,
these effects of chemical fertilizers are compounded when you mix or use a
chemical pesticide.
You know the Fertilizer Urea, produces ammonia and contributes to acid rain, groundwater contamination and ozone depletion due to release of nitrous oxide by denitrification process. If we continue this in future, this hazard may increase several fold in the coming decades.
And remember! studies have shown that Groundwater contamination has been linked to stomach cancer, goitre (thyroid enlargement), birth defects in babies, and also hypertension.
Also Aquatic life is also significantly affected by water pollution and fish and other water animals may not get adequate oxygen and they can die. These are called Dead zones.
- Air Pollution: Excessive use of chemical NPKs can release greenhouse gases such as carbon dioxide and nitrous oxide into the atmosphere. These can cause respiratory problems, cardiac disease, and many cancers. A special mention about the Blue Baby Syndrome, medically called methemoglobinemia occurs in infants and one cause of this problem is attributed to chemical over use and pollution where due to reduced oxygen in blood, the baby turns blue.
- Fertilizer Burn: You can burn your favourite plants and crops if used excessively – specially leaf burn and root burn. This fertilizer burn can even kill your favourite plant in addition to the hazards it causes to the environment. This fertilizer burn will not happen when you use organic or natural fertilizers.
- Depletion of Beneficial Organic Matter, beneficial Microbes and even Minerals from the Soil – that is reduced SOIL FERTILITY: This loss of organic matter can lead to soil acidification, soil compaction and hardening and other ill effects which makes it vulnerable to soil erosions. Researchers also say that depletion of minerals from the soil can also lead to low quality foods with lesser mineral and vitamin content.
- Though chemical fertilizers will help plants grow faster; plants will not be healthy and strong as plants grown in this manner do not have enough time to mature and develop a strong root system and strong stems, or good nutritious fruits and vegetables. And also they will be less likely to survive because they will be more susceptible to pests and diseases as they lack good immune system against pest attacks.
The Bottom Line: is There is a large threat to environment, animals and human health; chemical fertilizers will ultimately end up leaking into our water bodies; ponds, streams, ground water etc. and contaminate water supply as a result of which humans as well as animals may suffer numerous short term and long term hazardous chemical effects on their health.
So, Lets together take a pledge today to stop using these chemical fertilizers and pesticides and start using organic fertilizers and pesticides to keep our mother earth safe, for the present and for the future!!!
Well, before I show you the actual recipe or the Formula for the making of our so called magic solution, you must know some Basic concepts. Please do not skip these 5 points am gonna discuss now. Will try to make it as short and as simple as possible, specially for beginners.
1. What do you mean by foliar Spray? Foliage means leaves! So the term foliar spray says it all, that is Spraying a liquid fertilizer on your plants foliage which aids in absorption of certain essential elements like calcium, magnesium through their stomata. Stomata are pores found in the epidermis of leaves which help in nutrient absorption and also gas exchange.
2. Calcium and Its importance: Calcium is the most important component of a plants cell wall. Hence for cell division and growth its indispensable, especially in rapid growers like tomatoes. So we will keep this point in mind and add calcium into our mix.
3. Magnesium and Its importance: Did you know Magnesium is the central atom in between four nitrogen atoms in the chlorophyll molecule. For beginners, Chlorophyll is the pigment present in leaves which is essential for photosynthesis – that’s plant food production. So we will keep this point in mind and add magnesium into our mix using our famous organic Epsom salt.
4. Soil PH concept: We have discussed in detail about the importance of soil ph in nutrient absorption in my video titled Ideal Soil PH for plants. You can check that HERE. Well! when it comes to foliar spray of fertilizer solution, its completely independent of the soil PH, because nutrients are absorbed through leaves.
- And last concept: Many Experts recommend applying egg shells andcalcium tablets to soil and some evenmake a smoothie juice or paste using all kitchen waste like banana peels, fruit peels and what not. This in perhaps unscientific according to me to directly apply to your plants. I don’t know! If you have any scientific explanation to this, please do write in the comment box. What I feel is why not utilize this idea of making this smoothie and keeping a dedicated heavy duty blender or mixer for this purpose for faster composting. Yes! if you are adding this paste to your compost bin and feeding your earth worms, this can accelerate composting process.
So you can utilize this concept of foliar feeding if your plants are not performing well despite all your efforts, care, fertilizing, watering promptly and what not! Many viewers keep asking the same question. So why not make it a habit of alternating your feeds – that’s fertilizing your plants once in 15 days with foliar spray to feed your plants. Because this idea is independent of soil PH value.
Now The Formula or the recipe of this Magic Fertilizer liquid.
I will quickly list out the ingredients one by one and quickly explain the benefit of each of these components.
1. Water: Nothing to explain about this universal solvent. We will formulate this recipe for 1 liter of water.
2. Milk: You can use skimmed milk or if available Raw milk is best. You can even use spoilt milk, butter milk or stuff like that. Use it with lower than 20 percent dilution in water that is 1:5 dilution. So you can add about 100 ml or 200 ml milk to our universal solvent. Milk is not only a source of calcium, but also an antifungal for treatment of powdery mildew and blossom end rot disease on tomato and other vegetable plants. It also kills many plant viruses like tobacco mosaic virus. In place if milk you can add 1 liter of a special water. Yes that’s special calcium rich water for plants. It s nothing but the left over water after you hard boil few eggs. The egg shells release a lot of calcium into this water during boiling.
3. Epsom Salt that’s magnesium sulfate which is a greatest source of magnesium and sulfur. This is easily available at a gardening store or at your local pharmacist and even online. So the dosage is max 5 gms or little lesser than a teaspoon per 1 liter of water.
4. Then the Most important ingredient for adding the major NPK elements into the foliar spray is COMPOST TEA. So, how do you make compost tea? Its really simple. Just Add a handful of decomposed manure or compost like cowdung powder or vermicompost per liter of water. You can make your own quantity of 2 liters or 5 liters depending on your garden size. Allow this to brew for atleast 1 week. Make sure you stir this atleast once every 24 hours to oxygenate this mix till 1 week. Then strain out the liquid using a cloth and use this liquid. I shall make a detailed video some other time on how to use some simple gadgets like an aquarium air pump to quickly make your compost tea.
Well, For now, Once the compost tea is ready, you should dilute this like 1:5 in water and then add about 1 liter to the above solution. Normally if you are using only the compost tea as a foliar spray, you need to use 1:10 dilution. But here we are making a 2.1 liter solution in total. I Hope you got my point!
That’s it, mix it thoroughly and load the spray bottle or use your electric sprayer or whatever and foliar feed your plants. Spray very early in the morning or late in the evening because leaf stomatas are well opened at this period so that absorption happens at its best.