Now let us now install a grow light for our indoor plants. Grow lights are not expensive now a days. You get simple grow light bulbs for smaller plants, full spectrum grow light panels which even support flowering and fruiting. I have shown them all in my earlier episodes on indoor gardening.
Now, coming to this led grow light strip. This is a good option for certain areas in your home and add to the beauty of your home interiors. These led strips come in various lengths like in meters. Depending on the requirement you can order these grow light strips from amazon or any other reliable shopping website. These are waterproof strips and come with a sticker at the back surface. You can see this partition panel and I have created these two compartments for indoor plants. I have done wiring from inside for power supply. The most elegant way to install these led strips is to use these aluminum profile light channels which again come in various sizes. Here I am using 17mm channels. You need to cut a groove for this 17 mm channel.

Now let us first assemble these led light strips. You can measure the length of the strip needed and how many strips you require and make a cut at this point marked on the strip. This not rocket science. Its simple DIY thing. If you want to join two strips together, you can use these connectors of proper sizes to hook in the ends of the strips. Or you can just solder wires to the ends. Make sure you have a color coding for positive and negative terminal and not to reverse the polarity. It’s clearly marked on the strip.
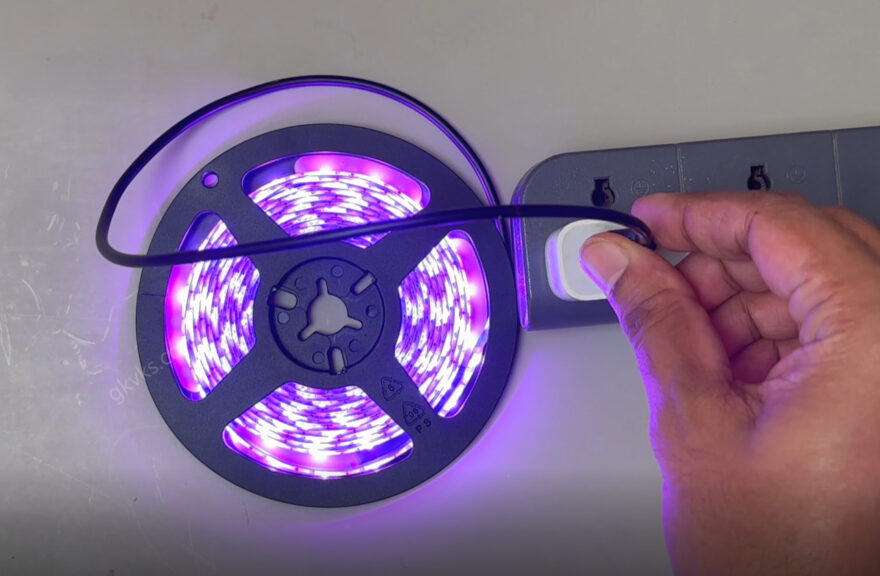
Depending on the specifications of your strip, you need to provide proper power supply, like in this case its 5 volts power needed for this strip for which you can connect it to any mobile charger or a socket with USB charging facility which has 5 volts supply. You can solder or join the wires from any USB cable to this led strip. Then you can stick the strip to the aluminum channel and fix the channel to your plant compartment area. That’s it. You can power these on for 10 to 12 hours a day depending on the plant you are growing under it. Make sure the distance of plant is not too much from light source.
These zero or low maintenance plants do not require any special fertilizers for growth and flowering. But you can add a handful of compost like cowdung or vermicompost or any compost once 3 to 6 months.
Here’s my list of top 10 low maintenance houseplants for lazy gardeners:
12: Norfolk Island pine: Also known by many as the Christmas Tree. This is a hard to kill plant in tropical climates and needs very little care to survive. It grows well in bright indirect sunlight and also direct sun. It needs watering every other day or even less depending on the climate you live in.
11: Succulents & Cacti: Most people think succulents are hard to maintain and they die even after proper and intensive care. This is the mistake they do. They actually thrive well on neglect. They need very less frequent watering like once or max twice a week. They do well in full sunlight as well as indirect bright light depending on the type of succulent.
10: Spider Plant (or Chlorphytums): This is one of the best starter plant. Spider plants are mostly grown in hanging baskets. But they thrive in any container or any type of soil or potting mix. They grow very well in shady places with indirect bright light. They do not need daily watering. you can water on alternate days or even once or twice a week depending on the climatic conditions.
9: Peace Lily: Peace Lily is one of the most beautiful low-maintenance flowering plants you can add to your home garden. Additionally, the Peace Lily is also a good air purifier plant. This can be grown indoor or outdoors and requires bright indirect sunlight. It has beautiful shiny green leaves with creamy-white hooded flowers. You can water it on alternate days or even lesser depending on the climate.
8: Jade Plant: This is actually a succulent plant which requires very less frequent watering, like once or maximum twice a week even in summer season. This plant requires at least 2 to 3 hours of direct sunlight for proper growth, preferably morning sunlight.
7: ZZ Plant: This is another attractive ornamental plant that requires very little care. It’s a beautiful plant with glossy green leaves and also an air purifier plant. It is a drought tolerant plant and requires very less frequent watering like once or twice a week. It can be grown indoors or outdoors in shady or bright locations. It doesn’t need direct sunlight.
6: Syngonium: This is another beautiful ornamental flowering plant with an attractive foliage. This needs alternate day watering or at least weekly twice watering. It grows in indirect bright locations as well as in direct sun. If kept in direct sun, avoid hot noon sun and water it daily.
5: Snake Plant (sansevieria): These are actually true zero maintenance plants and can survive the worst of the conditions. They require very less watering and even sunlight. They adapt to any conditions and grown in dark locations as well as bright locations and also in direct harsh sunlight. They come in many beautiful varieties and colors.
4: Lucky Bamboo: This is a dracaena species and grown mostly in water. But it grows equally well in soil too. If grown in water, this is a very low maintenance plant and requires changing water once in 10 to 15 days. Its grown indoors and needs very little light.
3: Philodendrons: These are again zero maintenance plants that need very little light to grow. They can be grown indoors or outdoors in shady places. They need less frequent watering like once or twice a week.
2: Aloevera: If you can’t remember the last time you watered your plants, aloe is perfect for you. This is a succulent plant which store water in its thick fleshy leaves and can survive many days without watering. It grows indoors as well as outdoors, but can get leggy if it does not get sufficient direct sunlight.
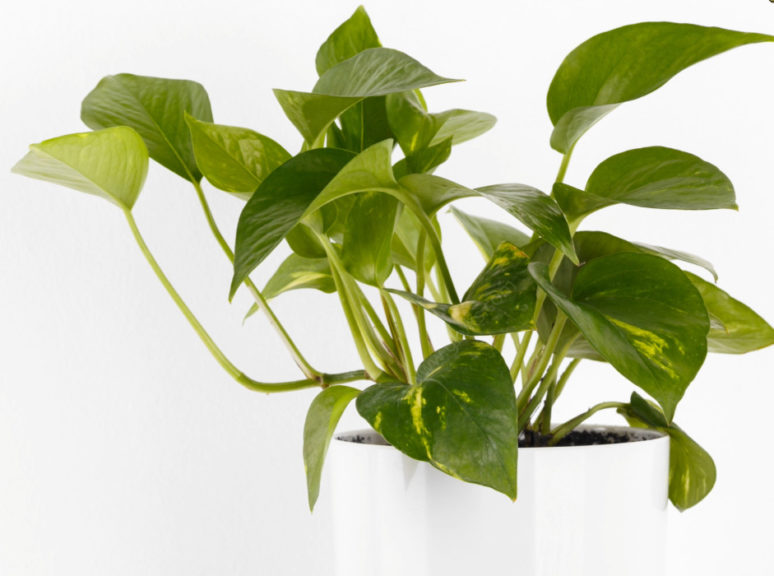
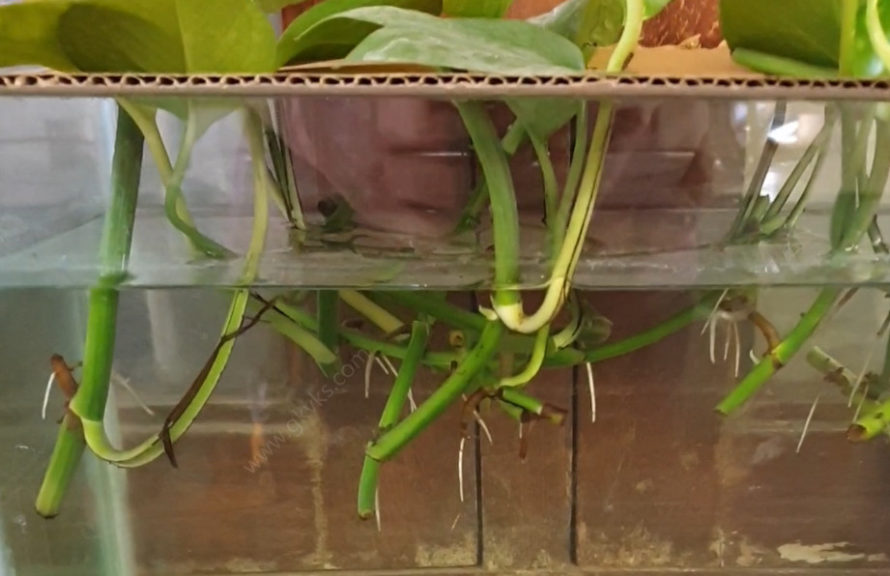
1: Money Plant or Pothos: This is also called Devil’s ivy, because it’s a hard to kill plant and survives even the worst conditions. Pothos come in a wide variety of beautiful colors and varieties like golden pothos, marble queen, marble prince, neon and so on. They are grow indoors mostly in water as well as outdoors in bright shady locations. You can check a detailed episode on Money plant and secrets to get very large size leaves in pothos, from a link in description below.
The other low maintenance plants that need a mention are: Dieffenbachias, Umbrella tree or schefflera, Plumeria or Champa tree, Dragon tree, Rubber tree, and Pepperomias – but not variegated ones – any variegated plant needs more sunlight exposure because the pigment chlorophyll essential for photosynthesis is lesser in variegated plants.
Now I will tell you two fruit trees I have grown that need no special care except watering, sunlight and occasional handful of compost. The first one and my most favourite tree is Mulberry tree, which can also be grown in containers to bear fruits. The second one is a fig tree. Choose grafted trees if you are growing in large containers.
Money plant or pothos botanically called Epipremnum aureum is basically a vine and the most common plant found in home gardens and grown indoors in a water container. It is called money plant because it is believed to bring prosperity and good fortune to you. Well, superstitions apart!, But this is one of the NASA recommended air purifying plant. It has many common names like golden pothos, Ceylon creeper, hunter’s robe, ivy arum, silver vine, marble queen, taro vine, devil’s vine or devil’s ivy and so on.
TYPES OR SPECIES OF MONEY PLANTS OR SIMILAR PLANTS:
Golden Money Plant or the golden pothos – it has bright green leaves with golden or yellow splashes.
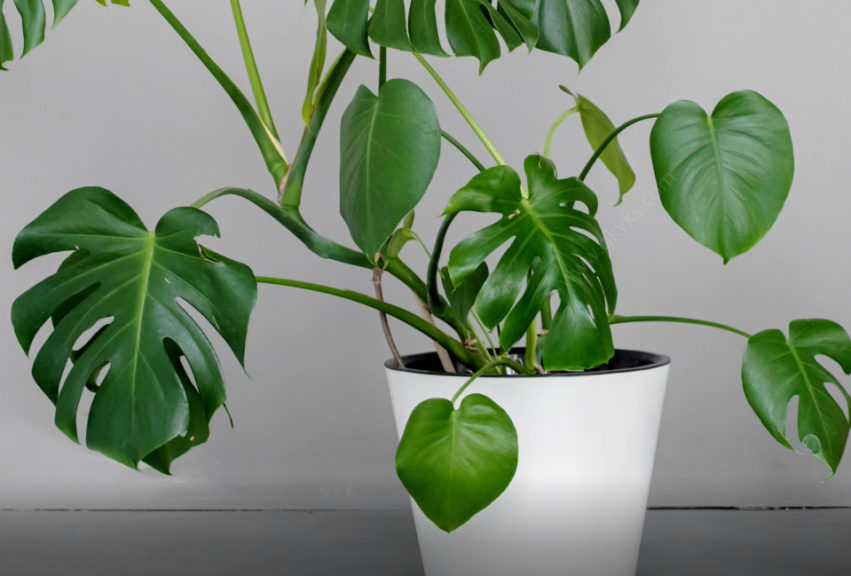
Split Leaf Money Plant or Monstera Deliciosa – This is a low light indoor plant. This is similar to Philidendeon Broken heart plant with beautiful design of notches within the leaf.
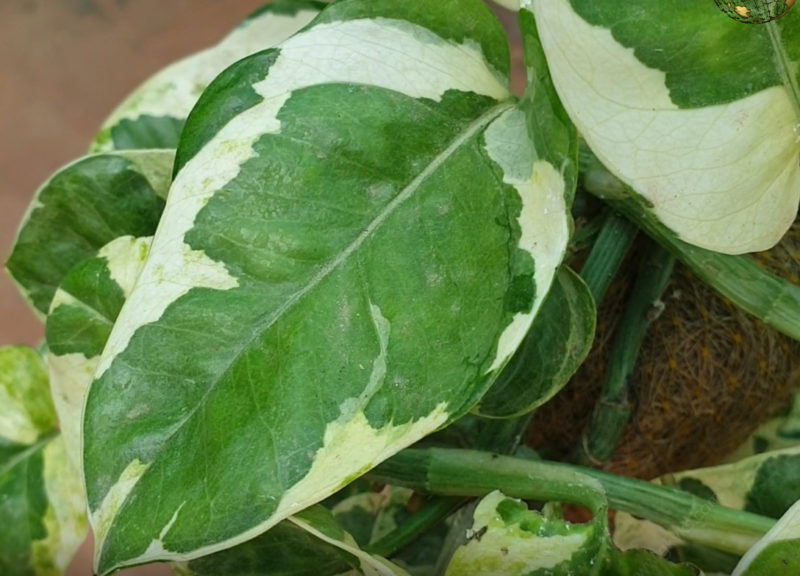
Marble Queen Money Plant – The leaves are creamy-white in color, so less green and less chlorophyll and hence this need more exposure to sunlight for proper photosynthesis.

Marble Prince Money Plant – This has distinct white and green colors on the leaves.
Silver Money Plant or Satin Pothos, Swiss Cheese Money Plant or Monstera obliqua, Chinese Money plant, Jade Money plant (Dark green heart shaped leaves), Neon money plant, Other similar plants but from different families include English ivy – plain and variegated, then various types of philodendrons.
Let’s first start with:
- PROPAGATION OF MONEY PLANTS: This we are discussing first because most of us do not purchase these from nursery or garden center, but instead, you get a small cutting of a money plant and try to grow at home either in water or in soil in containers. Now let’s learn some simple tricks to multiply your pothos plant easily. There are many methods of rooting money plant cuttings. One guaranteed method is soil layering – you just insert one or two nodes of a branch into the soil – mostly into a small pot. Within 2 weeks, you should start seeing roots and you can then cut of this from the mother plant and grow as an independent plant, either in water or soil. You can also successfully grow its cuttings but the most important point to remember is – planting the node into the soil and not just the stem without a node. Many gardeners show money plant can be grown from a single leaf, but this will be successful only if a node is included along with the leaf.
- Another Simple hack to use for faster rooting, especially if you are rooting in water is to use a quarter or half tablet of Aspirin 350 mg dispersible tablet every time you change water. You can check my detailed post on Aspirin and its benefits in gardening.
Now Let’s look into some important care tips and tricks to grow money plant. These are slightly different if you are growing them in Soil vs growing in water indoors. Let’s first quickly discuss on care of money plant in soil, like tricks on how to make the leaves bigger and how to get a bushier money plant. Also remember that they grow faster and better in soil than in water.
- Season: Money Plant can be grown in any season or any time of the year.
- Sunlight Requirement: Money plant can grow in direct sunlight as well as indirect sunlight and even indoors in your home lighting. Though, too much direct sunlight can burn the leaf edges, you need to remember this simple concept for any plant. The green color is imparted to the leaf by a pigment called chlorophyll which is essential for photosynthesis or plant food preparation in simple terms, for proper growth of the plant. If there is lesser green pigment on the leaves like in marble queen varieties or any variegated varieties, then more amount of exposure to sunlight is needed and vice versa. The best place to keep them is under a 50% shade net. They grow faster and healthier under these sun conditions. If you grow them indoors in containers, make sure you keep at the brightest spots like near entrances or near windows to get the bright light.
- Water Requirement: Money plant likes a lot of water, but at the same time it’s a drought tolerant plant and can live without water for many days. Watering Daily or Alternate days is sufficient. Make sure you water deeply and thoroughly and also check patency of drainage holes in containers to avoid water stagnation and root rot. Less frequent watering can result in burning or browning of tips and edges. Over watering can result in leaf yellowing and stunted growth.
- Soil Mix: If you provide a loose well-draining soil to money plant, the roots grow faster and hence the plant grows faster and healthy. You can mix some stuff like cocopeat or peat moss, sand, perlite, vermiculite or whatever you can, along with some 20% compost like cowdung or vermicompost to about 50% garden soil. This forms the best potting mix for money plant.
- Repotting Money Plant: This is only required when you have chosen a small container to grow money plant and the plant roots have bound to the container. If there is stunted growth and leaf yellowing, its time to repot in a larger container.
- Fertilizers: Money plants require very less amount of fertilizers and most of the nutrients are already found in the potting mix and they should be sufficient for 3 to 6 months. Because we grow money plant for its leaves, a handful of nitrogen rich fertilizer like decomposed cow dung or vermicompost, once every 3 months is more than sufficient for one standard container of money plant. Avoid using chemical fertilizers like urea or NPK as they can cause fertilizer burns. To get lush and large sized leaves, You can additionally foliar spray it with Epsom salt solution – like 1 teaspoon of Epsom salt in 1 litre of water and spray over the leaves once in about 10 days.
- Pests and Disease: Money plant is one of the top 5 pest resistance plants. So spraying a pesticide is optional. You can spray neem oil monthly once in a low dose of about 5ml per litre of water. But some diseases like fungal root rot can rarely kill the money plant. This happens mainly due to over watering.
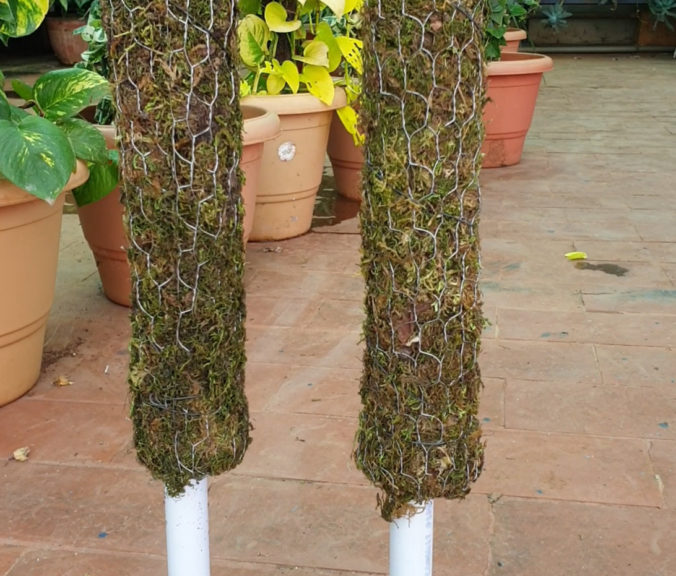
- Now, the most important part of this episode. How to get big sized leaves in money plant? Money plants have aerial roots which are adventitious roots which are many designed for clinging and climbing on to a surface like trees, rocks and other structure we artificially provide like the moss sticks, coir sticks, trellis and so on. The concept is, these aerial roots also absorb some moisture and nutrients as well. So, taking this advantage, we have to follow these two simple tricks and hacks to get big sized leaves and lush bushy fast growing money plant. No doubt the size of the leaves also depends on the type of money plants and its genetic make up.
First Trick to Apply is: Use a Climber stick like coco coir stick, a moss stick or your own DIY gunny bag pole to anchor the aerial roots. The best one is a moss stick which is made of sphagnum moss. You can easily anchor the aerial roots into the moss and tie it up to hold in place. Make sure whenever you water your money plant, you water the moss stick as well. Liquid fertilizer like compost tea poured on to the moss stick also gives great results.
The Second Trick is: When it grows one round to the top of the pole, you take it downwards and then when it reaches the soil, you do soil layering or take a dip of one or two nodes into the same container and then take it upwards. This helps development of multiple root system that supports a short segment or a certain length of the money plants and helps in a very steady and faster growth.
Now Lastly some quick points to remember while growing money plant in water indoors.

If you start from a cutting, choose a healthy cutting of about 1 foot long and must have at least 3 to 4 nodes in it. Insert at least two nodes into a clean container, preferably a glass bottle. Avoid using plastic bottles. The narrow-necked bottles are better as it provides more humidity around the main stem. Use clean water to grow money plants and change water once every 10 days for best results. Keep it in a bright location in your home like near a window. And It does not require fertilizers when grown in water.
Plant identification is the key to successful home gardening. If you know the plant by name, you can google it’s care tips and light requirements. Too much light for these plants can result in leaf burn or even death of the plant.
Variegated species are not recommended for low light areas, as the leaves will lose their coloration. As a general rule, variegated foliage requires more sunlight than darker green foliage.
PLEASE WATCH VIDEO BELOW FOR THE LIST:
- INTRODUCTION:
The genus Tillandsia comprises of over 650 species of air plants. They are called “Air Plants” simply because they get the majority of their nutrients from the air around them. They do not need soil to grow and don’t even think of planting them in soil! Tillandsias grow differently than most other house plants, so they can be confusing to the beginner.
Well, Air plants are actually epiphytes. Epiphytes are plants that grow, rather cling upon other plant or any object merely for support. Orchids is another example for epiphytes. These are commonly seen growing on branches of a tree and stuff like that.
There are many species of air plants. The leaves are silvery green in color and are covered with specialized cells (trichomes) that are capable of rapidly absorbing water that gathers on them. Another interesting fact about air plants is, each plant will flower once in its lifetime.
- THINGS TO DO FOR A NEWLY PURCHASED PLANT:
Most of these air plants can be purchased online. They are usually shipped in boxes with holes for air ventilation and the plants survive many days during the transit without any issues. The first thing you should do is carefully unpack them and submerge them in water for 1 hour, preferably upside down. One most important thing you should remember is not to use chlorinated water or even hard water. Best is to use water from your water purifier. Shake gently to remove excess water and dry them for few minutes in air, because water trapped in between the leaves can carry a risk of rot. You can then hang them in air in bright indirect light, like near a window place. Do not fertilize the plants at this stage. We will talk more on its care tips in the later part of this episode.
- ATTACHING OR INSTALLING AIR PLANTS:
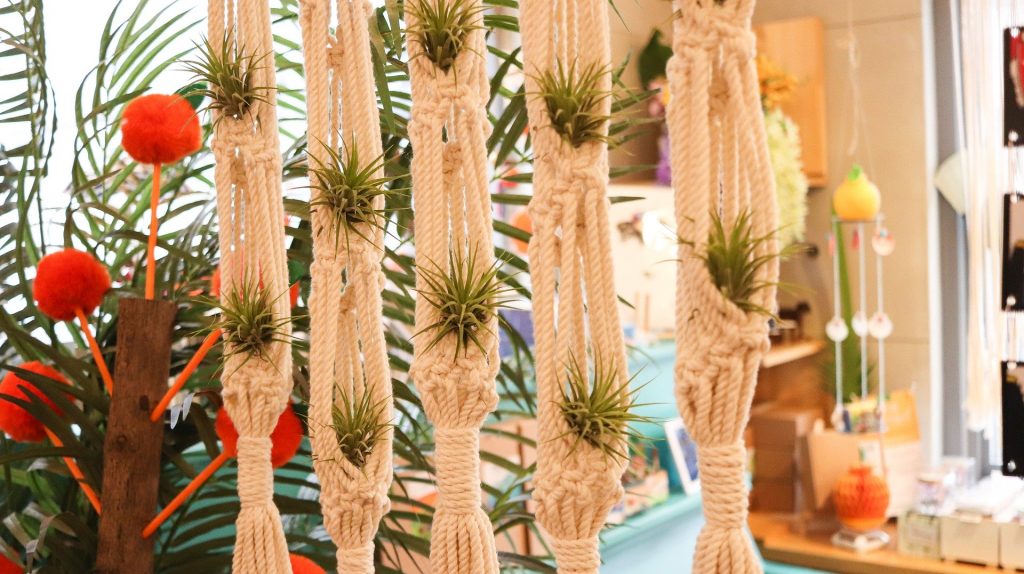
There are many many ways you can attach or install air plants. This depends on your decor skills and stuff like that. The simplest way is to hang them in air using a string. You can also mount them on rocks, sea shells, wooden logs, wooden pieces, flower vase and so on. The only thing you should remember is there should not be water accumulation because it can lead to rot and kill the plant. You can also mount them in a shallow pot or a small pot by using a card board like this. One important Don’t here is NOT to use copper wire for installing air plants, as this can kill your plant.

- AIR PLANTS IN GLASS GLOBES:
This is the most popular choice for installing air plants. This looks really fascinating and also the glass globe has holes for good ventilation. Few Do’s and Don’t’s you have to remember if you are using glass globes. The larger the globe, the better. Mist your plant every 4-5 days with one spray for tiny globes, or 2-3 sprays for larger globes of 3-5 inches in size or even more if the plant is in a large open globe. The key is to judge the drying time, the smaller the globe, the less circulation, the longer the plant will hold the moisture. If you over water the plant will die. Also Do not place your globes directly in front of a window where they get direct sun. Remember the glass will intensify the sunlight and the heat. Indirect light is best and some will even grow in low to moderate light.
- LIGHT REQUIREMENT & LED GROW LIGHTS:
Bright filtered light is the general rule, and the higher the humidity of the air the higher light will be tolerated. You can provide them artificial light for few hours. Make sure the distance between the light and the plant is something from 12 to 24 inches depending on the intensity of the grow light.
- WATERING YOUR AIR PLANTS:
As discussed earlier, always use water from your water purifier and not hard water or chlorinated water. You can soak your air plants for 1 to 2 hours, once every 15 days depending on the humidity levels. You can also mist your air plants two to three times in a week.
- FERTILIZER:
You can add a pinch of your orchid fertilizer into the mister and spray two or three mists once in a month. You can also use other water soluble NPKs in 1/4th the recommended strength for misting. If you want to provide natural fertilizers, simple soak them for an hour in pond water or even aquarium water once in a month.
- AIR CIRCULATION AND TEMPERATURE:
They should be given enough light and air circulation to dry in 4 hours or less after soaking. Do not keep plants constantly wet or moist. Optimum temperature range for Tillandsias is 15 – 30 degrees Centigrade.
- PROPAGATION:
Air plants will start producing offsets or Pups like each plant can produce between 2 – 8 pups. You can separate these babies once they grow to 1/3rd the size of the mother plant and plant them independently.
- DO’S AND DON’TS FOR AIR PLANTS:
- Never plant them in soil, they can rot.
- Protect them from extreme weather, especially frost.
- Do not keep them constantly wet for a long time.
- Do not forget to mist them 2 to 3 times a week, especially in non-humid conditions.
There are so many plant grow lights available in the market and choosing the best one can be a really tough job! So, Then How do you choose the right LED grow light to grow plants indoors?
There are many important factors to consider while choosing led lights, let’s split this into 5 sections. And please follow this video till the end. Will try to keep it as concise and simple without bothering you with too much physics.
- The Purpose of Buying a Plant Grow Light?
A grow light or plant light is an artificial light source to stimulate plant growth by emitting a light appropriate for photosynthesis. This light spectrum is similar to that of the sun. Grow lights are used for horticulture, indoor gardening, plant propagation from cuttings, seed germinations, Indoor food production – specially for those zones which do not receive adequate sunlight, indoor hydroponic gardening and to grow aquatic plants.
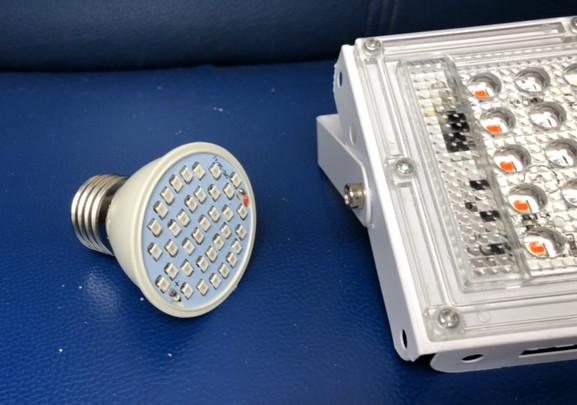
These are some of the cheaper options you can find online on amazon. Most of these are some cheap products without any warranty or proper specifications. If you want to grow indoor plants that need very less amount of light, then you can use these options. But at your own risk as there is no warranty and you won’t know how long they will last. The cost of these ranges anywhere from 5 dollar for a 5 watt bulb to 30 dollar for this type of model. But the light intensity and quality of photons they emit is too low and you may require multiple number of lights kept too close to the plants which is practically difficult.
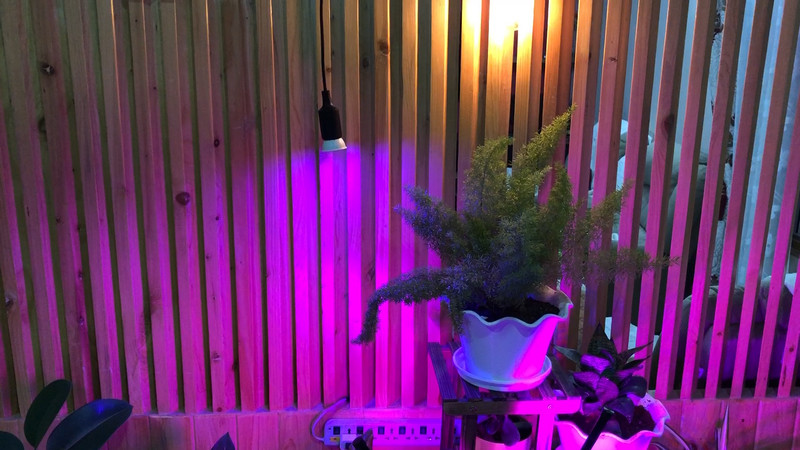
The best option is to invest on a good quality reliable grow light like atleast a TS-1000 grow light from Mar-Hydro Company. It’s a very reliable company and into this LED grow light business since 9 years. They have a lot of products and models of LED grow lights and even grow tents for different uses. You can check their website mars-hydro.com. I have linked that in description below.
This TS-1000 set up costs around 200 USD for this powerful 150 Watt light including this beautifully designed large grow tent.
Now lets move on to the next factor in choosing your grow light:
- LIGHT INTENSITY: This is the most important factor. It simply means the amount of light a bulb emits out. We will not go into physics or science of this. But To decide on this, check out the manufacturer’s recommended foot print to know the area in square foot covered by this light. For example, this TS-1000 model covers a 3 x 3 feet in bloom stage and 4 x 4 feet in the vegetative stage with a distance of about 18 inch and 24 inch from the source respectively. If you know a bit of physics, You should also look into PPF, PAR chart and PPE values given by the manufacturer to decide on the light intensity.
Few more tips on this: The light is most intense at the middle of the light source and less intense at the peripheries. Seedlings and Young plants require cooler light intensities than vegetative and blooming plants. So, this can be achieved by either increasing the distance of these from the light source or placing seedlings and younger plants at the peripheral areas.
- COLOR SPECTRUM: Make sure you pick the correct spectrum depending on which stage your plant is in like the vegetative stage or the blooming stage or a full cycle of growth from seedling to harvesting stage. There are two types of spectums for LED lights – Targeted and the Broad Spectrum. More blue spectrum is better for Veg, Red is better for flowering stage and some fixtures have a tunable spectrum like red only or blue or stuff like that.
This Mars-Hydro Ts-1000 is a broad spectrum led light which works perfectly from seedling stage to harvest stage. You only need to adjust the distance using the rachet mechanism provided. You can look at these multi color LEDs. This is actually very bright, though in camera it may not appear that much bright. This one also got a dimmer screw right here. You can dim this further depending on your needs. - WATTAGE: or the electrical power measured in Watts. This actually does not determine the intensity or the quality of light. This only gives you a general idea on how powerful your led grow light is. The model number like TS-1000 doesn’t mean 1000 Watts. Make sure you do not misinterpret this number. This Mars-hydro light is about 150 Watts. One thing you may need to know here is: How many watts are required for the area in square foot. Generally 30 to 50 Watt is required for 1 foot x 1 foot area of coverage. Like about 30 watt or even less for veg stage or indoor plants and about 50 watt per square foot for flowering plants.
- WARRANTY: 99 percent LED lights from good companies will never have any problem and they have a very high lifespan of atleast 50,000 hours of usage. But still go for a company that provides a warranty of atleast 1 year. Mars-Hydro offers a 3 year extensive warranty on every grow light they sell. That’s really good!
- You can use Discount code GARDENTIPS and avail a discount on their website mars-hydro.com.
Urban gardening or small-space gardening in containers is on
the rise! And the number of people growing plants indoors is also on the rise.
The most important aspect of container gardening is the potting medium used,
because this, along with light and moisture will be the most important factor
to help your plants grow healthier and disease free.
I never use the commercial potting mixes available, which are infact too expensive.
I rather prefer to make my own homemade potting mix recipe for both my indoor
and outdoor plants
Now, lets start looking at the ingredients we use to prepare our indoor soil mix, one by one. We will list out the formula or the recipe with the proportions of each ingredient used, shortly.
- Garden Soil: This forms the major component of an outdoor potting soil recipe because one of its major functions is plant anchorage which is very important for outdoor plants which can easily knocked down by strong winds. We will use garden soil in our indoor potting mix too but in smaller quantity.
- Cocopeat or Peat Moss: I prefer cocopeat because its easily available and inexpensive and has a neutral PH. Plus mixing this with garden soil removes the compactness of garden soil and makes it well draining. This forms the major ingredient of our indoor potting mix. Its available as a compact brick or in powdered form. The coco peat brick can be easily reconstituted into cocopeat powder by mixing it in water. One brick of about 5 kgs will give you a large volume of upto 75 liters of cocopeat powder.
- Compost: like vermicompost or decomposed cowdung or horse dung powder or both. Compost manure is an essential component of any potting mix to provide the major and minor plants nutrients like the NPK – nitrogen phosphorous and potassium along with the trace elements. We have already discussed this in our previous episode on the basics of indoor gardening.
- Neem Cake Powder: This is optional. But adding this will take care of any fungus and harmful bacterial growths and protects your plants.
- Bone Meal Powder: This is again optional but very useful if you are growing vegetables or flowering plants indoors under grow lights. This will induce flowering and fruiting if mixed in potting soil.
- Perlite, Vermiculite or Pumice: All these serve the same purpose of making a well draining potting mix plus adding a good aeration system for roots. Among these Vermiculite should be cautiously used, because it holds lot of moisture and can rot you plants especially succulents. Vermiculite can be used for water loving plants like lucky bamboo and others. Pumice and Perlite are the best options. Among these two, the main drawback of Perlite is it gets crushed into powder if you use it along with too much garden soil and in this case pumice is the best if available. Garden Pumice or horticultural pumice is available in various grades or sizes and it does not get crushed unlike perlite. You can find the links to purchase these items online in the description below.
Now quickly, before the formula
or recipe, lets know the difference between Potting Mix and Potting Soil.
Potting Mix is simply a mixture of all the above ingredients minus the garden
soil. That’s means it is a soil less medium. On the other hand, Its called
Potting soil when you use garden soil in the mixture. That’s simple! But most
often these two terms are used synonymously.
Well, here in this recipe, considering the importance of plant anchorage, we
will use garden soil too but in small quantity.
Now lets look into the actual recipe of this indoor potting soil.
- Cocopeat forms about 40 to 50 percent of this mix.
- Garden soil about 10 or 20 percent.
- Perlite or Pumice or both about 20 percent
- Compost like vermicompost or Cow dung compost or a mixture of both 20 percent depending on what you want to grow. For veggies and flowering plants, you can increase this to 30 percent. For ornamental plants 10 to 20 percent is sufficient. This can also be added later on to the top layer of the soil – a handful of it per container once or twice in a month.
Optionally you can add 5 percent bone meal plus neem cake powder.
We must know the importance of identifying a plant and its family. Whether you are a beginner or an expert, this information is crucial for proper care and management of a plant. And Misidentification of a plant can sometimes bring potentially serious consequences and might even lead to death of a plant.
PictureThis – An Android and iOS App that claims accuracy of upto 90% ! You can download and install this app from Android playstore or from iOS app store from link below:
https://picturethisai.onelink.me/AYRN/4f297c08
The Advanced Artificial Intelligence (AI) and deep learning
technology of PictureThis App can quickly scan the plant and recognize the
plant almost instantly within seconds. This is so important specially, if you
are visiting a nursery to purchase some plants for your home and garden. I have
discussed these nursery buying tips in a detailed video, you can check that
link at the end screen of this video.
Well, This app not only identifies the plant but also provide more details
about the plant like the Care tips, its genus or family, planting time, bloom
time, watering and sunlight requirement and many other details which are very
useful for any gardener. It also displays a gallery of additional images and
videos of the plant and maintains a record of your Collected Plants for future
reference.
It also has other advanced features like locating the identified plant distribution on google map. Then it also has a Community tab to learn by discussion and sharing of plant pics and tips. And moreover, they have exclusive support and care for their members.
Having said that, now let’s start testing this app and find out its accuracy. We will test few plants and give 2 points for each successful identification and finally calculate its accuracy as a percentage.
Let’s Begin the test – Watch Video below:
- Coleus: + 2 points!
- Hibiscus: + 2 points!
- Garden Rose: +1 point!
- Ficus Benjamina or Weeping Fig: + 2 points!
- Sanseviera or the Snake Plant: + 2 points!
- Anthurium Plant: + 2 points!
- Kalanchoe Thyrsiflora: 0 points!
- Donkey’s Tail – Sedum Plant: + 2 points!
- Mother of Thousands: + 2 points!
- Euphorbia Mili or Christ Thorn: + 2 points!
- Poinsettia: +2 Points.
- Rubber Plant: + 2 points!
- Vinca or Periwinkle: + 2 points!
- Plumeria or Nag Champa: + 2 points!
- Kalanchoe Variety: + 2 points!
So, Now lets Total our Results. We got 27 points out of 30. That means an accuracy is 90 %. That’s really awesome for any Artificial Intelligence software or an app.
Download LINK- https://picturethisai.onelink.me/AYRN/4f297c08
Anthurium, is actually a genus of about 1000 species of flowering plants. The actual botanical name of this plant is Anthurium andraeanum. So at home gardening level we will just call it Anthurium plant.
Common Names of this plant are: tailflower, painter’s palette, flamingo flower, and laceleaf.
The name Anthurium comes from the Greek words anthos, meaning flower, and oura, meaning a tail, actually referring to the spadix. This spadix is actually similar to Peace lily.
Anthurium is a
commonly grown ornamental shade plant or indoor plant with a bright colored
spath or modified leaf with a central spadix. The spath can be bright red or
pink in color. Anthurium is a short
plant with heart shaped leaves.
One most important point to note is that – All parts of the plant are poisonous
to humans and pets. Whether by contact or if ingested orally can cause
problems.
Now lets look at some important care tips while growing anthurium plant whether indoors or outdoors.
- Sunlight: Anthurium prefers indirect bright light and can be kept in shady places and even indoors. But bright light is important to produce flowering and keeping it fully indoors may not produce flowering. So keeping this mind, you can keep indoors at a spot which receives adequate indirect bright light. This plant is actually kept under a 50 percent shade net and its performing well with no leaf burns. Avoid direct sunlight exposure.
- Watering: This point is very important for Anthurium care and the most common mistake gardeners tend to do is overwater this plant. Anthuriums are far more tolerant of under-watering than overwatering, which is one of the most common reasons for a Anthurium plant to die. So what you can do is check once every alternate day by the finger dip method into the soil to check for moisture and if the soil is till damp, never water it now, check again after 1 or 2 days and then water the container.
- Soil: This has to be very well draining soil. If you bring your plant from a nursery and you find its planted in clay rich soil, please remove the clay rich soil by soaking the root ball in a tub of water which dissolves the clay rich soil. Then repot the plant in a larger container in a well draining soil. For anthurium, you can make it more well draining by adding extra perlite of about 20 percent into the potting mix.
- Fertilizer Requirement. I prefer only organic fertilizers once every 3 months. You can add a handful of decomposed cowdung or vermicompost. One more important stuff to add into the soil while repotting or any point of time is 1 or 2 teaspoons of bone meal powder which is rich in phosphorous and can induce flowering for a long period of time.
- Pest Control: Commonly affected by sucking pests like aphids, thrips and mites and also leaves eaten by caterpillars and slugs and snails. Weekly general garden spray of neem oil along with your other plants is sufficient to keep these pests and insects at bay.
- Propagation of Anthurium: It can be grown in many ways like from seeds, by dividing the root ball during repotting and separating into independent plants. You can also root anthurium cuttings in water or soil.
In this post
we will try to simplify plant identification and will make an attempt to
classify and identify about 100 common house plants and quickly know their important
care tips – like watering and sunlight requirement. Of course these
requirements vary depending on the zone you live in. Please watch each of the plants carefully for
identification whether or not you possess them, because this knowledge will
certainly help you when you visit a plant nursery to purchase a plant.
We will try to make this post as short and concise as possible along with a
video at the end for you to identify common house plants easily. And you can
find detailed videos and articles on most of these plants on website.
Let’s Classify Common House plants as:
- Ferns
- Vines, Creepers and Climbers
- Small Trees
- Ornamental Plants
- Succulents and Cactii.
- Flowering and Fruiting Plants.
- FERNS
1. Asparagus Fern
Level: Easy
Indoor: Difficult
Sunlight: Avoid direct Noon sun, Indirect Light/Shade: Yes
Watering: Daily or Alternate Days (Finger Dip to Check)
Fertilizer: Occasional (once in 3 to 6 months)
2. Fox Tail Fern
Level: Easy
Indoor: Difficult
Sunlight: Avoid direct Noon sun, Indirect Sunlight/Shade: Yes
Watering: Daily or Alternate Days (Finger Dip to Check)
Fertilizer: Occasional (once in 3 to 6 months)
3. Boston Fern
Level: Easy
Indoor: Difficult
Sunlight: Indirect Light/Shade: Yes
Watering: Daily (Finger Dip to Check)
Fertilizer: Occasional (once in 3 to 6 months)
- VINES,
CREEPERS AND CLIMBERS
- Philodendrons
Level: Easy
Indoor: Yes
Sunlight: Indirect Sunlight/Shade: Yes
Watering: Daily or alternate days (Finger Dip to Check)
Fertilizer: Occasional (once in 3 to 6 months)
- Money Plant / Pothos
Level: Very Easy
Indoor: Yes
Sunlight: Indirect Light/Shade: Yes
Watering: Grown in Water or Soil.
Fertilizer: None / Occasional (once in 3 to 6 months)
- Pepperomias and Hoyas
Level: Easy
Indoor: Possible
Sunlight: Direct or Indirect Light/Shade: Yes
Watering: Alternate Days.
Fertilizer: Occasional (once in 3 to 6 months)
- Wandering Jew
Level: Very Easy
Indoor: No
Sunlight: Indirect Light/Shade: Yes
Watering: Daily or Alternate Days.
Fertilizer: None / Occasional (once in 3 to 6 months)
- Bougainvillea
Level: Easy
Indoor: No
Sunlight: Direct Sunlight at least 4 Hours.
Watering: Daily or Alternate Days.
Fertilizer: Once in a month.
- Alamanda
Level: Moderate
Indoor: No
Sunlight: Direct Sunlight at least 4-6 Hours.
Watering: Daily or Alternate Days.
Fertilizer: Once in a month.
- Scarlet clock vine
Level: Moderate
Indoor: No
Sunlight: Direct Sunlight at least 4-6 Hours.
Watering: Daily or Alternate Days.
Fertilizer: Once in a month.
- Betel Vine (Edible Paan)
Level: Moderate
Indoor: No
Sunlight: Indirect Sunlight or Early Sun.
Watering: Daily.
Fertilizer: Once in 3 months (Nitrogen rich).
- Ajwain Plant
Level: Easy
Indoor: Possible
Sunlight: Direct or Indirect Light/Shade: Yes
Watering: Alternate Days.
Fertilizer: Occasional (once in 3 to 6 months)
- SMALL
TREES & SHRUBS
- Ficus (All Types)
Level: Easy
Indoor: No
Sunlight: Indirect Bright light or Early Sun.
Watering: Daily or alternate days.
Fertilizer: Occasional (once in 3 to 6 months)
- Norfolk Island Pine (Christmas Tree)
Level: Moderate
Indoor: Possible
Sunlight: Indirect Bright light or Shade-net.
Watering: Daily or alternate days.
Fertilizer: Occasional (once in 3 to 6 months)
- Juniper (Cypress)
Level: Moderate
Indoor: No
Sunlight: Direct Sun, Shade-net, Avoid Noon Sun.
Watering: Daily or alternate days.
Fertilizer: Occasional (once in 3 to 6 months)
- Schefflera (Umbrella Tree)
Level: Easy
Indoor: No
Sunlight: Indirect Bright light or Shade-net.
Watering: Daily or alternate days.
Fertilizer: Occasional (once in 3 to 6 months)
- Plumeria (Champa)
Level: Easy
Indoor: No
Sunlight: Direct Sunlight at least 4-6 Hours.
Watering: Alternate Days.
Fertilizer: Once in a month.
- Oleander (Kaner)
Level: Easy
Indoor: No
Sunlight: Direct Sunlight at least 4-6 Hours.
Watering: Daily or Alternate Days.
Fertilizer: Once in a month.
- Euphorbia Mili (Christ plant /
Crown of Thorns)
Level: Easy
Indoor: No
Sunlight: Direct Sunlight at least 4-6 Hours.
Watering: Alternate Days.
Fertilizer: Once in a month.
- Neem Tree
Level: Easy
Indoor: No
Sunlight: Direct or Indirect Bright Light
Watering: Alternate Days.
Fertilizer: Occasional (once in 3 to 6 months)
- Dragon Tree (Dracaena Marginata)
Level: Easy
Indoor: No
Sunlight: Direct or Indirect Bright Light
Watering: Alternate Days.
Fertilizer: Occasional (once in 3 to 6 months)
- Song of India
Level: Easy
Indoor: No
Sunlight: Direct or Indirect Bright Light
Watering: Alternate Days.
Fertilizer: Occasional (once in 3 to 6 months)
- Palms (Areca palm, Table or
Umbrella Palm)
Level: Easy
Indoor: Possible
Sunlight: Indirect Bright light or Shade-net.
Watering: Daily or alternate days.
Fertilizer: Occasional (once in 3 to 6 months)
- Crotons
Level: Easy
Indoor: No
Sunlight: Direct or Indirect Bright Light
Watering: Alternate Days.
Fertilizer: Occasional (once in 3 to 6 months)
- COPPERLEAF (acalypha wilkesiana)
Level: Easy
Indoor: No
Sunlight: Direct or Indirect Bright Light
Watering: Alternate Days.
Fertilizer: Occasional (once in 3 to 6 months)
- ORNAMENTAL
PLANTS
- Coleus
Level: Easy
Indoor: Yes
Sunlight: Indirect Bright light or Shade-net
Watering: Daily or alternate days.
Fertilizer: Occasional (once in 3 to 6 months)
- Sanchezia
Level: Easy
Indoor: Yes
Sunlight: Indirect Bright light or Shade-net.
Watering: Daily or alternate days.
Fertilizer: Occasional (once in 3 to 6 months)
- SYNGONIUM (arrow head)
Level: Easy
Indoor: Yes
Sunlight: Indirect Bright light or Shade.
Watering: Daily or alternate days.
Fertilizer: Occasional (once in 3 to 6 months)
- Baby Tears Plant
Level: Easy
Indoor: No
Sunlight: Indirect Bright light or Shade.
Watering: Daily or alternate days.
Fertilizer: Occasional (once in 3 to 6 months)
- AMARYLLIS
Level: Moderate
Indoor: No
Sunlight: Direct Sun light or Shade-net
Watering: Alternate days.
Fertilizer: once a month in growing season
- Spider Lilly
Level: Moderate
Indoor: No
Sunlight: Direct Sun light or Shade-net
Watering: Alternate days.
Fertilizer: once a month in growing season
- Rain Lily
Level: Moderate
Indoor: No
Sunlight: Direct Sun light or Shade-net
Watering: Alternate days.
Fertilizer: once a month in growing season
- Tube Rose (Rajnigandha)
Level: Moderate
Indoor: No
Sunlight: Direct Sun light or Shade-net
Watering: Alternate days.
Fertilizer: once a month in growing season
- Anthurium
Level: Moderate
Indoor: Yes
Sunlight: Indirect Bright light or Shade.
Watering: Alternate days.
Fertilizer: once in 1 or 2 months
- Peace lily
Level: Moderate
Indoor: Yes
Sunlight: Indirect Bright light or Shade.
Watering: Alternate days.
Fertilizer: once in 1 or 2 months
- Calatheas
Level: Easy
Indoor: Yes
Sunlight: Indirect Bright light or Shade.
Watering: Alternate days.
Fertilizer: Occasional (once in 3 to 6 months)
- Dieffenbachia
Level: Easy
Indoor: Yes
Sunlight: Indirect Bright light or Shade.
Watering: Alternate days.
Fertilizer: Occasional (once in 3 to 6 months)
- Spider Plant (Chlorophytum)
Level: Easy
Indoor: Yes
Sunlight: Indirect Bright light or Shade.
Watering: Alternate days.
Fertilizer: None or Occasional (once in 3 to 6 months)
- Adenium (Desert Rose)
Level: Moderate
Indoor: No
Sunlight: Direct Sunlight / Shade-net.
Watering: Weekly Twice.
Fertilizer: Once monthly
- Jatropha
Level: Moderate
Indoor: No
Sunlight: Direct Sun light or Shade-net
Watering: Alternate days.
Fertilizer: once a month
- Lucky Bamboo
Level: Easy
Indoor: Yes
Sunlight: Indirect sunlight or Shade
Watering: In Water or Daily Watering in Soil.
Fertilizer: none
- Insulin Plant
Level: Moderate
Indoor: No
Sunlight: Direct or Indirect Sun light or Shade-net
Watering: Alternate days.
Fertilizer: Occasional (once in 3 to 6 months)
- Poinsettia
Level: Moderate
Indoor: No
Sunlight: Indirect Sun light or Shade-net
Watering: Alternate days.
Fertilizer: Occasional (once in 3 to 6 months)
- SUCCULENTS
& CACTII
- Common Care Tips
Level: Moderate to Difficult
Indoor: Yes
Sunlight: Indirect Sunlight / Shade / Shade-net.
Watering: Weekly Twice or Thrice.
Fertilizer: Once 3 months.
Jade
Plant (Crassula), Crassula Ovata, Ecchiverias, Flowering Kalanchoes, Kalanchoe
Thyrsiflora, Mother of Thousands, Sedums, Sedum Adolphi (Golden Sedum), Fish-bone Cactus, String of Bananas, Donkey’s
Tail – Sedum morganianum, Snake
Plants (Sanseivera), Aloe Vera, Haworthias, Haworthia Zebrina, Gasteria, Pencil Cactus, Baby Sunrose,
Portulaca,
Cactus Types
- FLOWERING
& FRUITING
Common Care Tips
Level: Easy to Moderate
Indoor: No
Sunlight: Direct Sunlight at least 4 to 6 Hours.
Watering: Daily or Alternate Days.
Fertilizer: At least Once in a month.
- Hibiscus ( All Types)
- Rose
- Ixora
- Vinca (Periwinkle)
- Marigold
- Lemon
- Pomegranut
- Chickoo
- Custard Apple
- Guava