In today’s article, we will quickly debunk 20 interesting and unbelievable gardening myths and reveal some extremely useful scientific facts and tips related to Gardening.
- Fresh Cow Dung or Horse Dung is very Good for Plants?
This is absolutely false! Fresh Cow poop should never be applied for your plants, because it not only stinks but contains high levels of ammonia and salts which can burn your plants. It also contains harmful microorganisms like e-coli which are harmful to plants as well as humans. Plus, it also contains weed seeds which can produce a lot of weeds or unwanted plants in your garden. So always use decomposed cow-dung or horse dung for your plants. You can watch a detailed video on 5 hacks to quickly decompose cow dung from a link in description below or from end-screen link at the end of this video. Let’s move on..
- Is it Dangerous to Expose Roots to Light?
Well, This can be a very nice high school project for kids, to grow two similar plants, one in a transparent container and one in an opaque container and then compare these two. As you can see nothing happens to the plant grown in transparent containers. The actual concern is, root exposure to AIR and even the heat from sunlight that can cause drying and can damage your plant. But still you are advised to keep the roots in the dark. This is because of algae growth due to light and your roots are not getting enough oxygen because the algae is stealing the oxygen and nutrients for itself. So light as such does not hurt the roots, but air, heat and algae hurt the roots and kill the plant.
- Do Plants feel Pain?
There are many studies and researches conducted on this topic. Basically, Plants lack a nervous system – that is a brain and other neurological structures like nerves and pain receptors, so they should not feel pain, unlike in humans and animals where we have specialised pain receptors.
But according to some researches, “Plant can know of themselves being eaten” because studies have shown that plants release defence chemicals in response to caterpillars munching on them.
Other points include: Plants fight for territory, seek out food, evade predators and interestingly trap prey like what your see in carnivorous plants like the venus fly trap. They are as alive like any animal, and – like animals – they exhibit behaviour.
- Talking to You Plants will help them Grow?
People who really love plants and gardening will often tell you that talking to plants or even music has a beneficial impact on their overall health and growth. Despite many different scientific studies on this theory, there’s still no conclusive evidence that talking to plants helps them grow. One theory says that since plants take up carbon dioxide, and hence talking to plants releases carbon dioxide when we exhale. So, that explains it all.
- Plants can Die of Old age or aging. The oldest known tree in the world is the Great Basin bristlecone pine in the White Mountains of California which is over 5000 years old. Actually Trees grow indeterminately, meaning that with the right conditions, they can grow and grow and grow. But the only problem that limits them from reaching up to the sky is the food and water transport through xylem and phloem to the growing end from the roots. The taller the tree the more difficult it is to transport water from roots to the foliage near the top. But here what happens is instead of growing taller they increase in width and also branch out more, as you might have noticed some old trees with huge girth of their stems.
- Animal or Human Urine can be used as a Fertilizer. Yes, this is a Fact!For example, cow urine contains loads of NPK – that’s nitrogen, phosphorus and potassium which are the most essential plant nutrients for agricultural use. But it has to be applied in dilution of at least 1:20 in water.
- Is it Dangerous to go near Trees during Night Time? Well, In day time under the presence of sunlight – that’s photosynthesis, plants take up Carbon dioxide and release Oxygen. But during night they take in Oxygen and release CO2 and hence the air near trees will have lesser concentration of Oxygen and higher concentration of CO2. But, this impact will be negligible for small plants and at home gardens and only be noticeable near very large trees or in thick vegetation.
- Naphthalene balls or Moth Balls contain Naphthalene Acetic Acid and can be used as a rooting agent. It’s a Myth. NAA – Naphthalene Acetic Acid and IBA – Indole Butyric Acid are plant auxins or hormones which are entirely different compounds and used for rooting your plant cuttings. These two are entirely different from moth balls which are used to keep insects at bay.
- Watering plants on a hot sunny day will magnify the sunlight through the droplets acting as convex lenses and burn the leaves badly! No doubt, watering plants early in the morning or late in the evening is great! Because less water will evaporate during this time. But This theory that water droplets on leaves can act like mini magnifying lenses, focusing the sun’s rays and causing leaf burn has been completely disproved by physicists.
- Planting by the Moon affects plant growth and yield?
The idea that the Moon affects plant growth is an old one that is believed by many people. This is a myth! No study has proven the effect of moon on plant growth. And the only plants that use moon light for photosynthesis are certain types of phytoplanktons which are not normally found in gardens. - Crushed egg shells are a good source of Calcium to treat calcium deficiency? This is False! Even Powdered Egg shells take a long time to decompose and release that calcium into the soil and make them available for uptake by plants. You can make a water soluble calcium using egg shells by mixing it with distilled Vinegar to make this happen. You can find this detailed video from a link in description or from a link at top right corner of this screen.
- Saplings or seedlings need to be supported to protect them? True or False?
This is False! Many people recommend you to provide support to these young slender plants due to the risk of wind blowing them and things like that. Unless it’s a strong wind, tying a sapling or young plant to a support stick or any kind of support will actually do more harm than good. Research has shown that trees without support, over a period of time will develop thicker trunks, more supportive roots and more resistance to breakages.
- Do Magnets affect Plant growth?
This is a fact. Magnetism affects plant growth and seed germination positively. Studies have shown that when plants are exposed to a magnetic field with south pole facing towards the roots, Seeds germinate faster and plant grow faster and stronger in the presence of magnetic field in the soil. You can check a detailed video on this experiment from a link in description or from a link at top right corner of this video. - Can Harvested or Collected seeds be stored in a Refrigerator or Freezer?
This is not correct! Most seeds that are stored in a seed banks are first dried up so that the moisture content is reduced to about 10 percent and then these can be stored for several years. But if you freeze freshly collected seeds, the moisture content in these seeds will form ice crystals within and can destroy the seed viability. - Growing Fruit Trees in Containers is not possible due to limited space?
This is not true. You can grow them but you need little larger containers or fabric bags like more than 18 or 24 inch. You can watch a detailed episode on the top ten terrace gardening myths and facts from a link in description.
- Does Potting Mix Cause Legionnaires’ Pneumonia in Gardeners? True or False?
Do not worry! This is not True. Legionnaires’ Pneumonia is a severe form of pneumonia or lung infection mostly cause by inhaling the bacteria. Though these legionella bacteria survive in outdoor soil, it rarely causes infections. But still, prevention is better than cure. Better wear a mask while handling potting mix, specially people with weaker immune systems.
.
- How do I know my plant is still alive and how to save a dying plant?
There are many signs to know whether your plant can still survive. If your plant is looking dry and has shed its leaves, most of us think its dead. But actually, it may be alive or can be revived. Please watch my detailed episode on this topic demonstrating how to save a dying plant. I have linked that video in description below.
- Can we grow plants from leaves?
Yes! Some, but not all plants can be propagated from just a leaf or a section of a leaf. Leaf cuttings of most plants will not generate a new plant; they usually produce only a few roots or just decay. There are many ways you can grow leaves into a new plant, like 1. from a leaf petiole, 2. by dividing a leaf into multiple pieces for example fleshy succulent plants like sanseviera or the snake plant and other succulents. Other methods of propagation like cane or stub cuttings, root cuttings, leaf bud cuttings and so on.
- Gardening on Terrace is Bad for the Building. This is not completely true unless your building is too old with a poor construction. Otherwise if wisely planned, a garden on terrace will not be a problem, like placing the heavy containers along the walls on your terrace which are weight bearing or main walls of the building and things like that.
Water proofing the terrace is not always necessarily, unless you plan to build raised bed terrace garden. If you grow in container, you only need to check whether the water draining out of the pots is easily flowing out of the terrace and not stagnant.
- Does Electric Current affect Plant Growth? Well, there is a separate science called electro-culture farming which utilizes this effect. I have conducted a simple experiment on this topic to study the effect of electric current on plant growth. You can watch that episode from an end-screen link or from garden tips channel.
These zero or low maintenance plants do not require any special fertilizers for growth and flowering. But you can add a handful of compost like cowdung or vermicompost or any compost once 3 to 6 months.
Here’s my list of top 10 low maintenance houseplants for lazy gardeners:
12: Norfolk Island pine: Also known by many as the Christmas Tree. This is a hard to kill plant in tropical climates and needs very little care to survive. It grows well in bright indirect sunlight and also direct sun. It needs watering every other day or even less depending on the climate you live in.
11: Succulents & Cacti: Most people think succulents are hard to maintain and they die even after proper and intensive care. This is the mistake they do. They actually thrive well on neglect. They need very less frequent watering like once or max twice a week. They do well in full sunlight as well as indirect bright light depending on the type of succulent.
10: Spider Plant (or Chlorphytums): This is one of the best starter plant. Spider plants are mostly grown in hanging baskets. But they thrive in any container or any type of soil or potting mix. They grow very well in shady places with indirect bright light. They do not need daily watering. you can water on alternate days or even once or twice a week depending on the climatic conditions.
9: Peace Lily: Peace Lily is one of the most beautiful low-maintenance flowering plants you can add to your home garden. Additionally, the Peace Lily is also a good air purifier plant. This can be grown indoor or outdoors and requires bright indirect sunlight. It has beautiful shiny green leaves with creamy-white hooded flowers. You can water it on alternate days or even lesser depending on the climate.
8: Jade Plant: This is actually a succulent plant which requires very less frequent watering, like once or maximum twice a week even in summer season. This plant requires at least 2 to 3 hours of direct sunlight for proper growth, preferably morning sunlight.
7: ZZ Plant: This is another attractive ornamental plant that requires very little care. It’s a beautiful plant with glossy green leaves and also an air purifier plant. It is a drought tolerant plant and requires very less frequent watering like once or twice a week. It can be grown indoors or outdoors in shady or bright locations. It doesn’t need direct sunlight.
6: Syngonium: This is another beautiful ornamental flowering plant with an attractive foliage. This needs alternate day watering or at least weekly twice watering. It grows in indirect bright locations as well as in direct sun. If kept in direct sun, avoid hot noon sun and water it daily.
5: Snake Plant (sansevieria): These are actually true zero maintenance plants and can survive the worst of the conditions. They require very less watering and even sunlight. They adapt to any conditions and grown in dark locations as well as bright locations and also in direct harsh sunlight. They come in many beautiful varieties and colors.
4: Lucky Bamboo: This is a dracaena species and grown mostly in water. But it grows equally well in soil too. If grown in water, this is a very low maintenance plant and requires changing water once in 10 to 15 days. Its grown indoors and needs very little light.
3: Philodendrons: These are again zero maintenance plants that need very little light to grow. They can be grown indoors or outdoors in shady places. They need less frequent watering like once or twice a week.
2: Aloevera: If you can’t remember the last time you watered your plants, aloe is perfect for you. This is a succulent plant which store water in its thick fleshy leaves and can survive many days without watering. It grows indoors as well as outdoors, but can get leggy if it does not get sufficient direct sunlight.
1: Money Plant or Pothos: This is also called Devil’s ivy, because it’s a hard to kill plant and survives even the worst conditions. Pothos come in a wide variety of beautiful colors and varieties like golden pothos, marble queen, marble prince, neon and so on. They are grow indoors mostly in water as well as outdoors in bright shady locations. You can check a detailed episode on Money plant and secrets to get very large size leaves in pothos, from a link in description below.
The other low maintenance plants that need a mention are: Dieffenbachias, Umbrella tree or schefflera, Plumeria or Champa tree, Dragon tree, Rubber tree, and Pepperomias – but not variegated ones – any variegated plant needs more sunlight exposure because the pigment chlorophyll essential for photosynthesis is lesser in variegated plants.
Now I will tell you two fruit trees I have grown that need no special care except watering, sunlight and occasional handful of compost. The first one and my most favourite tree is Mulberry tree, which can also be grown in containers to bear fruits. The second one is a fig tree. Choose grafted trees if you are growing in large containers.
Here’s a list of useful gardening tools, especially for home and container gardening that will certainly make your life easier!
SELF WATERING NEEDLES: These inexpensive drip needles are quite simple but a powerful system for slow and self watering of potted plants. Just thread in any standard water bottle into this device – It easily fits most international standards bottles such as coca cola bottles, sprite bottles, pepsi bottles and so on. Cut the top of the bottle and insert this into the container close to the plant and fill it with water. Adjust the 360 degree drip flow knob to get desired flow of water or drops per minute depending on the watering requirement of you plant and there you have it. This is very useful especially if you are on a vacation for few days.
- ELECTRIC PRESSURE SPRAYER: Depending upon the size of your home garden, you can choose a hand held 2.5 litre rechargeable electric sprayer or a 10 litre knapsack electric sprayer that works on 12V DC and a rechargeable battery. Or if your garden is even larger, you can connect a 12V DC pump to a garden hose and use a multi-mode sprayer gun like this and use the misting mode to spray your pesticides and foliar feeds. Using manual sprayers is cumbersome and lacks that ideal pressure needed for spraying pesticides and also they are not durable.
- GARDENING GLOVES: Protection First! You can either purchase multiple pairs of inexpensive gloves like these or a pair of good quality gardening gloves with claws in right hand. These not only protect your hands from dirt, thorns and even harmful insects, but also replace trowels and hand rakes for digging, raking and planting.
- GRAFTING TOOL: Grafting is actually made so easy with this tool. A Neat and Sharp cut is essential for a successful grafting. This tool comes with U-cut and V-cut blades and a pruner or cutter at the tip. You can save a lot of time and increase the success rates of your grafting. Just punch the tool on the root stock first and then on the scion branch and this fits in so perfectly and healing happens much faster than compared with manual methods like using a grafting knife and stuff like that.
PURCHASE LINKS
- WATERING CANS: Depending on the size of your garden, you can choose either small watering cans like these ranging from 2 litres to 5 litres – plastic or metallic cans. Fancy Metallic cans like this will have an advantage of no leaks from the nozzle sides while watering unlike the plastic cans which leak from joints while watering. This is a must have tool even if you have a garden hose, specially for watering seeds and seedlings with the fine showering action.
- WATERING HOSE: Invest on a good quality flexible rubber watering hose pipe to avoid those irritating kinks from a poor quality hose and have a peace of mind while watering your plants. This great quality hose comes in half an inch or Three-fourth inch calibre to opt, depending on the pressure of your home water supply or the floor you live in. It also comes with an optional retractable reel if you want more peace of mind.
PURCHASE LINKS
- FALCON EASY PLANTER: This is a very handy tool for digging holes at 5cm and 10cm and very useful for transplanting and planting bulbs, root balls and plants. Simply place this planter tool on the soil, twist and push down to create your hole and then lift out. Drop your bulb or the plant into the hole and by the press of a button, the soil is then released automatically. It’s that easy! You can also use this to transplant small plants and seedlings quickly and efficiently.
PURCHASE LINKS
- Heavy Duty Garden Spade or Shovel: This is the classical Indian spade. This is very important if you are preparing your own DIY potting mix to thoroughly mix all ingredients in proper proportions.
- 3-in-1 SOIL PH METER: This is a great inexpensive must have gadget to check three things in your garden. Most importantly to test your Soil PH which is one of the most important factor for nutrient absorption by the roots. This also tests your soil moisture level to avoid over watering or under watering your plants. Plus it has a light meter to check the light levels for your plants.
PURCHASE LINKS - A SMALL CROWBAR OR WRECKING BAR: This is particularly useful for ground gardening like for digging pits, removing obstacles and similar stuff.
- TWIST TIE: This is another must have stuff specially for tying your plants to supports. Twist on, twist off and Reuse the same year after year!
- SOIL SCOOPS: This is so handy – like if you do not wish to get your hands into the dirt. What you see here is just a steel rice scoop and serves the purpose of a soil scoop while repotting plants.
- Garden Trowel: This tool is a miniature version of a garden spade. It is used for mixing soil, digging a hole, transplanting seedlings, levelling out soil and even dividing tubers. It can also be used for scooping out compost or potting mix from the bag specially while repotting your plants.
- Garden Rake, Fork, Cultivator and Weed Removal Tool: At home gardening level, all these are smaller tools that serve the purpose of raking or making your top soil loose for preparing or aerating the soil before planting seeds or seedlings and also before or after applying fertilizers. The deweeder tool is handy in removing small weeds from root level.
- PRUNERS AND CUTTERS: There are various types of pruners and cutting tools in gardening ranging from floral snips to hand pruner, pole pruner, garden saw, hedge shears to a simple tool like a scissor. Depending on the type and the load of gardening, you can choose a particular type of cutting. Please watch a detailed video explaining various types of Pruners.
PURCHASE LINKS
Let’s look into the Topics Covered in this episode:
- Plant Purchase: Seed grown vs Cuttings grown vs Grafted Trees.
- Repotting: Should I repot immediately after purchase?
- 10 Golden Rules to Follow while repotting a plant
- Common Care Tips for Growing Fruit Trees.
Let’s begin:
- Plant
Purchase:
I am sure most of us might have this question in mind: Growing from Seeds vs
Growing from Branch Cuttings or Choosing to Purchase a Grafted tree. Which one
do you thing you should opt for?
First of all, growing from seeds is a great fun thing to do and we all have done it many times for gardening fun and experimenting. But the major disadvantage of seed grown tree is they are not “true to seed” – meaning they may not produce identical fruit tree and more over it might take ages for the seed grown trees to products fruits, but of course there are some exceptions.
Secondly, Plants grown from cuttings including the air layering method may produce the genetic clones of the parent tree. Fruit trees such as figs, pomegranates, mulberries and many others are generally grown by this method. But the major problem with this method is they do not have enough roots developed to support fruit production and more over there are only fibrous roots and no tap roots which are important for fruit trees for anchorage. Whereas Seed produced plants have a well developed tap root system and this concept is used in Grafting. The ‘root stock’ which is the lower portion of the plant with strong root system and the ‘scion’ which is the branch from selected delicious fruit tree which is grafted on to the root stock.
Having Said that, its time to choose which trees to purchase for your container gardening. It’s obvious that grafted trees, specially dwarf varieties are the best one to grow in containers.
- REPOTTING: Whether Purchased online or offline from a local nursery, people often have a misconception that immediately repotting a newly purchased plant into a larger container and a nutrient rich potting soil will make your plant grow like crazy. This is not always true.
Now let’s discuss some Very important points and concepts, that you must keep in mind if you want to keep your newly purchased plant healthy and avoid the so called repotting or transplant shock.
To answer this question, let us ask 2 QUESTIONS:
- When Do I repot a New Plant Purchased offline, that’s from a Local Nursery or Garden Store?
- When Do I repot a Plant Purchased Online? Like from nurserylive.com or amazon
Now, lets quickly look into the conceptual answers to these queries.
- If your plant just came home from a local garden centre or nursery, DO NOT REPOT IMMEDIATELY. Let it adjust to its new environment for few days or atleast a week before repotting it. This is because the Plants are already in shock at their new residence until they get used to new factors like light, temperature, and humidity conditions.
- Then in second scenario, that is when you purchase a plant online. Repotting immediately is the best solution in most cases. Because, it is very much likely that the plants would have travelled hundreds or thousands of miles and many days without any water or moisture before reaching its final destination. The plant will be going through a recovery period and an acclimation period during these days of transport in whatever medium the seller packs them in. So, Why let the plant re-acclimate twice in this situation.
- The 10 Golden Rules of Repotting:
Let’s quickly list them one by one:
- Water the plant the day before you plan to repot.
- Perform Repotting in the evening hours to prevent shock to the plant during sunlight that is the day time which is the active period for photosynthesis. Let it get overnight period of rest and recovery.
- To Remove the Root Ball, Gently Tap the rim of the pot to a hard surface like a table or a counter. This is to loosen the root ball instead of pulling it with force which can damage the roots or the stem. If the root ball resists to come out, run a knife between the pot and the root ball to loosen the root ball.
- Inspect the root ball for things like: any root worms or maggots, root disease and if they are root bound to decide whether you want to repot in a larger container or perform root pruning.
- Choosing the Right Container: For fruit and Vegetable plants especially if you are growing on terrace, choose fabric grow bags as your first preference. This is because they are not only light but also follow the principles of AIR PRUNING and can grow into healthy trees using this principle.
Then It’s also very important to choose a pot that is of appropriate size for the plant. Like, You should never pot a 6 inch pot plant into a 14 inch or a very large pot. Go Step by Step, Choose one or two steps higher, like 6 inch pot, you can plant in 8 inch or 10 inch pot and so on.
- Drainage Holes: This is probably the most important factor you should consider. If you do not make enough drainage holes at the bottom of the pot, your plant will stand in water and lead to root rot and death of the plant.
- Choosing the Right soil: . As a general rule use a well draining nutrient rich soil with atleast 30 percent compost like vermicompost or decomposed cowdung. To make it well draining, you might have to add cocopeat or peatmoss to garden soil in proper proportions. Make sure you also add stuff like bone meal or soya bean meal for inducing flowering and fruiting. Check the best Potting Mix recipe or formula from my post.
- Partially fill the container with potting mix and then place the root ball exactly in the center of the pot. Then add additional soil to cover the empty space. Make sure the surface of that root ball is below the rim so you can cover it adequately with potting soil or compost and also this good space for properly watering your plant.
- Gently tap the pot on a hard surface to remove air pockets and to level the soil from within.
- Finally After Repotting, water the plant thoroughly and this remove the left over air pockets and stuff like that. Then to counter the Repotting or Transplant Shock, you can follow these simple steps: Water the plant with Epsom salt solution weekly once for a about a month. The dosage is 1 teaspoon Epsom salt per litre of water. Finally keep the plant in indirect sunlight or under a green shade net for atleast a week, before shifting to full sunlight.
Happy Gardening!
Do Plants Feel Pain?
Can Artificial LED grow lights help the plant in flowering and growth?
Can I use Coffee as an effective pesticide on plants and how?
Plus a nice funny question at the end.
So Lets begin!
- Do plants feel Pain?
There are many studies and researches conducted on this topic. Plants lack a nervous system – that is a brain and other neurological structures like nerves and pain receptors, so they should not feel pain, unlike in humans and animals where we have specialised pain receptors.
But according to some researches, “Plant can know of themselves being eaten” because studies have shown plants release defence chemicals in response to caterpillars munching on them.
Other points include: Plants fight for territory, seek out food, evade predators and trap prey like what your see in carnivorous plants like the venus fly trap. They are as alive like any animal, and – like animals – they exhibit behaviour.
- Can we grow plants from leaves
Yes! Some, but not all plants can be propagated from just a leaf or a section of a leaf. Leaf cuttings of most plants will not generate a new plant; they usually produce only a few roots or just decay. There are many ways you can grow leaves into a new plant, like 1. from a leaf petiole, 2. by dividing a leaf into multiple pieces for example fleshy succulent plants like sanseviera or the snake plant and other succulents. Other methods of propagation like cane or stub cuttings, root cuttings, leaf bud cuttings and so on. I will try to prepare a detailed episode on this topic when I get a chance.
- Can Artificial light be used for photosynthesesis and do plants flower in it.
Yes you can.
In fact, good quality LED grow lights are highly efficient, because they provide the exact spectrum of light your plants need. But, Remember one thing: sunlight is free, while good quality LED lights are quite expensive.
- Can I use coffee as pesticide on plants?
The Answer is YES: Coffee contains a chemical called caffeine which is considered neurotoxic to many pests like aphids.
You can make a Caffeine Spray. Many research studies have shown
that caffeine combined with other insecticides increases their killing
power. In one test, a small dose of caffine increased a known pesticide’s
potency by ten times.
So how do I make a Caffiene Spray. Its simple. You just have to make a cocktail
solution. I always prefer organic mixes. You can use any recipe of your organic
pesticide like neem oil, clove oil or whatever, and add one or two tablesspoons
of used coffee grounds or 1 or 2 teaspoons of fresh coffee if you like to use
it for your plants. Mix well and let it
marinate for about 24 hours and then strain it and spray it once a while with
your regular pesticide. That’s it. You can watch a detailed video on a Cocktail
mixed organic pesticide recipe.
Now lastly a Funny Question!
- How do I prevent my neighbours from stealing my plants and fruits from my garden?
Some might think of installing a burglar alarm or fencing it well or locking their gardens. But I suggest one simple remedy to this problem. First of all, interact with them and make friends with them even if you do not like them. Talk about exchanging your plants, seeds or cuttings. You take the first step and present them some of your good plants or cuttings. That is all!
RELATED VIDEOS AND LINKS:
Full Q and A Playlist: https://www.youtube.com/watch?v=5Uyvjf8gv4k&list=PLvE-WOB38X7bcd6kFShVvq0zyxLPD5ymQ
GARDEN SECRETS All VIDEOS Playlist: https://www.youtube.com/watch?v=FDIYZci5w2k&list=PLvE-WOB38X7YSKfmaBQc3cDNkvrnDGTyJ
Increase Flowering: https://youtu.be/FDIYZci5w2k
Air Pruning for Fast Growth: https://youtu.be/hkUOB1bHi2M
EASY PLANT CLONING IN WATER: https://youtu.be/lLvgE6ouNBA
Please LIKE, SHARE AND COMMENT on the video. Consider subscribing if you are new to this gardening channel.
Happy Gardening!
Purchase Gardening Stuff: http://www.gkvk.net/links
Does Light REALLY hurt your plants roots? And What Happens when you Expose Roots to Light?
Do Pot ted Plants need Soil Change periodically?
Do Naphthalene Moth balls contain the best and the most expensive rooting hormone – thats naphthalene acetic acid?
Now Lets Begin with the first question !
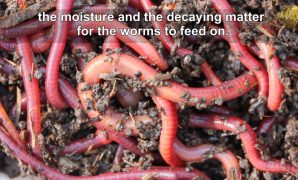
- Can we Put Earthworms into Soil of Potted Plants? The answer to this question is Partly Yes. First of all identify the useful earthworms like the red wrigglers. If yes, then you can drop a few into your container, but you must provide them with the moisture and the decaying matter for the worms to feed on. And then No to containers with small tender plants or seedlings because these can damaged by earthworms.
- Many Gardeners Say Putting Stones or a layer of gravel at the bottom of Plant Container is Useful and improves drainage? Actually it’s a myth and does not help the plant and it actually takes up the space of the soil. If you want to prevent soil from washing out or coming out of the drainage holes, better use a piece of net cloth or a plastic mesh.
But sometimes this layer of gravel can be useful and can prevent root rot. For instance, If you have drainage holes at the sides of your container, this can prevent water stagnation into the bottom zone where roots can be constantly wet in the stagnant water. As you can see in the illustration, raising this a bit with a layer of gravel helps encounter this issue. So, it always better to have drainage holes at the bottom of your container.
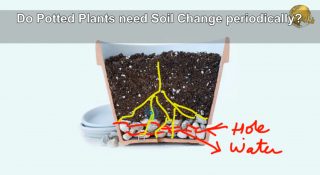
- Do Potted Plants need soil change periodically? Yes, This is partly true. They do need repotting once in a while depending on the plant growth and performance. If you pay close attention your plants you will definitely find some signs that indicate your plants need repotting or a soil change. Like:
– When Plant has Outgrown its container – that’s called Root Bound plants.
– When the Pot Soil is Compacted – You may not be able to insert your finger into it.
– When a plant keeps wilting often, even after a day or two even after good watering. Then
– Yellowing Leaves and Lack of New Growth are also important signs.
You can check my related video on the 10 Golden Rules of Repotting and also video on Recharging your expired soil.
Well the next interesting and controversial question is:
- What Happens when you Expose Roots to Light? Does Light REALLY hurt your plants roots?
This is infact complicated and controversial. To get an answer to this question, lets look into few scenarios and concepts. And this can also be a very good high school project for kids, like, to grow similar plants in transparent container and compare with an opaque container.
Consider these 3 scenarios:
- Growing a Money plant into a transparent container. Am sure all of us have done this. Here you expose roots to light whether direct light or indirect light.Then
- You might have seen many plants where roots develop from aerial parts of stem thats exposed to light and this does a supportive function.
- Root can also be exposed to light naturally from cracks in the soil from an earthquake, heavy rain and many other factors.
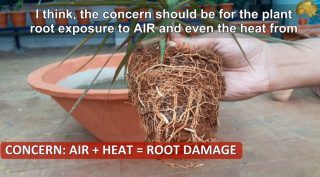
I think, the concern should be for the plant root exposure to AIR and even the heat from sunlight that can cause drying and can damage your plant, rather than the light itself causing any direct damage. But still you are supposed to keep the roots in the dark because of algae growth due to light and your roots aren’t getting enough oxygen because the algae is stealing the oxygen and nutrients for itself. So light as such doesn’t hurt the roots, but air, heat and algae hurt the roots and the plant.
Actually University researches have shown that even roots have light photo receptors in them and terms like Positive phototropism and Negative phototropism and much more.
If you are interested in full Journal artciles of these studies – Download Here:
http://www.gkvk.net/links/qa1.pdf and
http://www.gkvk.net/links/qa2.pdf
Purchase Gardening Stuff: http://www.gkvk.net/links
- Do Naphthalene balls or Moth Balls contain Naphthalene Acetic Acid which is the best Rooting Hormone? Or can these naphthalene balls be useful on plants as rooting agents or as pesticides?
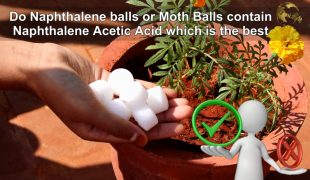
Well the answer to the first part of the question is a straight NO. NAA and IBA auxins are entirely a different compounds.
But When it comes to the benefits or the use of moth balls on plants or in garden, you should know how these naphthalene ball work. The vapors released by the mothballs build up and kill the moths in your clothes. They are infact good pest repellents around your garden, but these can be toxic to your pets and kids if ingested by them.
Please like and share this article on social media. Consider subscribing to my YOUTUBE Gardening Channel. Happy Gardening!
References:
https://onlinelibrary.wiley.com/doi/full/10.1111/tpj.12998
https://www.ncbi.nlm.nih.gov/pmc/articles/PMC4264407/
Well, before I show you the actual recipe or the Formula for the making of our so called magic solution, you must know some Basic concepts. Please do not skip these 5 points am gonna discuss now. Will try to make it as short and as simple as possible, specially for beginners.
1. What do you mean by foliar Spray? Foliage means leaves! So the term foliar spray says it all, that is Spraying a liquid fertilizer on your plants foliage which aids in absorption of certain essential elements like calcium, magnesium through their stomata. Stomata are pores found in the epidermis of leaves which help in nutrient absorption and also gas exchange.
2. Calcium and Its importance: Calcium is the most important component of a plants cell wall. Hence for cell division and growth its indispensable, especially in rapid growers like tomatoes. So we will keep this point in mind and add calcium into our mix.
3. Magnesium and Its importance: Did you know Magnesium is the central atom in between four nitrogen atoms in the chlorophyll molecule. For beginners, Chlorophyll is the pigment present in leaves which is essential for photosynthesis – that’s plant food production. So we will keep this point in mind and add magnesium into our mix using our famous organic Epsom salt.
4. Soil PH concept: We have discussed in detail about the importance of soil ph in nutrient absorption in my video titled Ideal Soil PH for plants. You can check that HERE. Well! when it comes to foliar spray of fertilizer solution, its completely independent of the soil PH, because nutrients are absorbed through leaves.
- And last concept: Many Experts recommend applying egg shells andcalcium tablets to soil and some evenmake a smoothie juice or paste using all kitchen waste like banana peels, fruit peels and what not. This in perhaps unscientific according to me to directly apply to your plants. I don’t know! If you have any scientific explanation to this, please do write in the comment box. What I feel is why not utilize this idea of making this smoothie and keeping a dedicated heavy duty blender or mixer for this purpose for faster composting. Yes! if you are adding this paste to your compost bin and feeding your earth worms, this can accelerate composting process.
So you can utilize this concept of foliar feeding if your plants are not performing well despite all your efforts, care, fertilizing, watering promptly and what not! Many viewers keep asking the same question. So why not make it a habit of alternating your feeds – that’s fertilizing your plants once in 15 days with foliar spray to feed your plants. Because this idea is independent of soil PH value.
Now The Formula or the recipe of this Magic Fertilizer liquid.
I will quickly list out the ingredients one by one and quickly explain the benefit of each of these components.
1. Water: Nothing to explain about this universal solvent. We will formulate this recipe for 1 liter of water.
2. Milk: You can use skimmed milk or if available Raw milk is best. You can even use spoilt milk, butter milk or stuff like that. Use it with lower than 20 percent dilution in water that is 1:5 dilution. So you can add about 100 ml or 200 ml milk to our universal solvent. Milk is not only a source of calcium, but also an antifungal for treatment of powdery mildew and blossom end rot disease on tomato and other vegetable plants. It also kills many plant viruses like tobacco mosaic virus. In place if milk you can add 1 liter of a special water. Yes that’s special calcium rich water for plants. It s nothing but the left over water after you hard boil few eggs. The egg shells release a lot of calcium into this water during boiling.
3. Epsom Salt that’s magnesium sulfate which is a greatest source of magnesium and sulfur. This is easily available at a gardening store or at your local pharmacist and even online. So the dosage is max 5 gms or little lesser than a teaspoon per 1 liter of water.
4. Then the Most important ingredient for adding the major NPK elements into the foliar spray is COMPOST TEA. So, how do you make compost tea? Its really simple. Just Add a handful of decomposed manure or compost like cowdung powder or vermicompost per liter of water. You can make your own quantity of 2 liters or 5 liters depending on your garden size. Allow this to brew for atleast 1 week. Make sure you stir this atleast once every 24 hours to oxygenate this mix till 1 week. Then strain out the liquid using a cloth and use this liquid. I shall make a detailed video some other time on how to use some simple gadgets like an aquarium air pump to quickly make your compost tea.
Well, For now, Once the compost tea is ready, you should dilute this like 1:5 in water and then add about 1 liter to the above solution. Normally if you are using only the compost tea as a foliar spray, you need to use 1:10 dilution. But here we are making a 2.1 liter solution in total. I Hope you got my point!
That’s it, mix it thoroughly and load the spray bottle or use your electric sprayer or whatever and foliar feed your plants. Spray very early in the morning or late in the evening because leaf stomatas are well opened at this period so that absorption happens at its best.
If you are interested in learning gardening stuff, please subscribe to my channel HERE.
Pruning means cutting or trimming the plant organs like branches, stems or even leaves for the sake of your plants health and sometimes to maintain plant shape and form. It is a very important task in gardening specially if you want your plants to perform well like to promote growth and flowering or fruiting. Another advantage of pruning is it allows you to remove the damaged or infected branches and leaves which can further spread and cause more damage.
In this Article, we will precisely look into many questions about plant pruning like:
a) When to prune which plants.
b) Types of Pruning
c) How to Prune and Why?
d) Pruning Tools
e) And many other concepts and tips on pruning.
PLANT SURGERY COMPARISON:
Before we proceed with these topics, first of all its important to know that pruning or cutting is actually wounding your plant. So doing it properly is really important. Pruning is actually a Plant Surgery similar to human or animal surgery, done either to save a plant from disease and also to make it look neat and good. Like the surgical wound, pruning also induces a wound or injury at the point of incision and this wound has to heal properly.
So Lets begin:
1. When to prune which plants? Let me start with a comparison. The best time to perform a surgery on a person is when they are in sleep, that’s during anaesthesia. This is the same for plants as well. As a general rule for most plants including flowering and fruiting plants they need to be pruned, specially hard pruning to be done while they are in a period of dormancy (that’s when they are asleep or inactive). This usually falls in late winter through early spring like in the month of January depending on your climatic zone. Another reason to perform this surgery in winter is the healing of wound is better in this cold season due to scientific reasons.
But some other plants need to be continuously pruned or trimmed I mean deadheaded or soft pruned, to maintain growth and flowering. We shall discuss this shortly.
Also remember to disinfect the cutting tools before your start snipping your plants. You can wipe the blades with any household disinfectant or you can also use hydrogen peroxide 3 or 6 percent and this is easily available at your local medical store.
2. Types of Pruning for house plants? Here we will learn Hard Pruning, Soft Pruning, Rejuvenation Pruning, Dead Heading and many other useful tips.
First we will start with:
Hard Pruning and Soft Pruning:Hard pruning or Annual Pruning as I discussed earlier is done in the dormant or inactive growth period of a plant during the late winter or early spring. In hard pruning, we cut off most of the plant stems and branches, atleast 50 percent to promote all new productive plant growth in the growing season.
Where as Soft Pruning can be performed any time of the year. Here we just trim the plant to onethird to half, the best example is pruning roses. This also includes dead heading. Deadheading means removal of dead or dried flowers from a plant which has just flowered. Sometimes it has to be a constant process and this diverts the plant energy into new growth and more flowering rather than drying up and consuming this energy into the seed formation process.
3. How to Prune? And Types of Pruning Cuts?
We will learn two important cuts here: Heading and Thinning Cuts:
Heading is the process of cutting or trimming branch tips, The cut is made anywhere on the branch or stem just half an inch above a node where it produces multiple branching usually two branches and this process makes your plant more bushy in the long run.One very important tip here:The cut is to be made at an angle of 45 degrees to allow water to run off. Because if a flat cut is made, water can stay on top of the wound which increases the chances of fungal or bacterial infection. Its also a good idea to Seal the wound with some stuff like wax or an antifungal powder or anything – even some recommend fevicol paste. If you can buy a tree paint or any commercially available pruning sealer, that’s still better. Some experts say its better to leave it open and let the plant heal itself specially for larger trees.
Thinning is the process of removing entire branches from a main stem by making a cut at its collar or just outside of the collar. Collar is the area where the branch connects with its main stem. Thinning helps sunlight to penetrate to interior foliage and promotes good air circulation and thus avoids fungus and bacterial growth.
If you are not sure how to and when to prune a particular plant, I still suggest you to atleast perform soft pruning atleast once in its growth cycle.
Regarding Choosing the right Pruning Tools, You can check that HERE.
Let me start with the 3 P’s of Successful Gardening.
1. Planning your Garden
2. Potting Mix Preparation and
3. Planting
So, Today we will discuss on the second P of gardening, that’s Preparing the best potting Mix for your plants based on some useful scientific concepts. Please watch the video till the end. First we will discuss the Criteria for the best potting soil for your plants and then the formula or the recipe for the best all-purpose universal potting mixture for your gardening.
Well, You need to Understand this Point: Why cant I just dig up the ground and use this soil for my plants? This is because we have two major limitations of this:
1. Compaction or hardening of soil – mainly with clayey soil which can suffocate the roots.
2. Lack of Nutrients in the soil- that’s the Major NPK elements (Nitrogen, Phosphorous and Potassium) and also the minor trace elements.
Hence, the need to prepare your own potting soil arises.
Hold on friends, some more important concepts to learn before I disclose my recipe. A few criteria you should be taking care while preparing your potting mix.
1. DRAINAGE: We all know, too much water can rot your plants. So a well draining soil that quickly drains out water within a particular duration of time is important for all plants. This is the most important criteria for growing succulents and based on this you adjust the proportions of stuff like sand, perlite and other stuff.
2. WATER RETAINING CAPACITY: This is quite opposite of the first factor. So we have to add materials in such a way that the water should neither drain out too quickly nor it should stagnate in the container.
3. NUTRIENTS: This is a very important criteria in container gardening. We have to add certain nutrients into the potting mix so that your plant can produce flowering or fruiting at right time and grows in a healthy manner.
Having said that, Now Lets Start making our Potting Mix with the best and easily available ingredients.
I am showing you two formulae, One you can use purely for teres gardening which is very light weight and will not have any compaction. This can also be an ideal seed starting mix so that the seeds can push the light weight ingredients in its germination process and also to some extent sterile.
And the second one is our all purpose mix for most of our plants. You can change the proportions as per your requirement, but generally this mix will be useful for any plant. So the formula is:
1. Good quality Garden Soil about 40 percent (by good quality I mean, it should not have large stones or other large sized stuff in it).
2. Cocopeat or Peat Moss: 30 percent. If you do not have this, you can use about 10 to 20 percent River Sand. Adding more sand may result in too fast drainage which might be useful for succulents and cacti.
3. 20 to 30 percent Compost like decomposed cowdung powder or Vermicompost or leaf compost or a mix of these. These first 3 ingredients should be the minimum for your plants.
4. You can further fortify this with 5 percent of any of these or a combination of these, that is Bone Meal powder for flowering and fruiting + Neem Cake or Any oil cake Powder for anti microbial and antifungal effect for root protection.
5. Then you can also add Trichoderma or pseudomonas powder and also some beneficial fungi called Mycorrhizae. You can watch a detailed video on these useful soil fungi from a link at top right corner of this video and also in the description.
The Second Formula of Potting Mix is a light weight mix suitable for roof top gardening and also as a great seed starting mix. Here you do not use garden soil, but only
1. Cocopeat or peat moss (50 percent)
2. Compost like decomposed cowdung powder or vermicompost (30 percent)
3. Perlite or Vermiculite about 20 percent (You can check out my detailed video on the differences and benefits of Perlite and Vermiculite from a card link at top right and also from description.
4. You can optionally add the same 5 percent ingredients like bone meal, neem mix, mycorrhizae etc as discussed earlier.
We are just doing this for gardening fun and experimenting and to have the feeling of possessing a pistachio tree in your collection. Because, similar to other fruit trees like for example citrus and apple, a pistachio tree grown from seed may not bear fruits for the whole of its lifetime. The main reason is you need at least one male and one female pistachio trees for pollination and fruit production.
Having said that, now we will look into the step by step process you can follow for successful pistachio seed germination :
Step 1: The first and most important step is Seed Selection. Most of the pistachios with shell or without shell what we consume are roasted and salted and these will never germinate. Please do not waste your time on these pistachios. You need Raw and unprocessed pistachios which should be easily available in your local grocery store or you can even purchase online. I have given the link to purchase this in description of the video.
Step 2: Selecting some healthy looking pista seeds out of the lot. Do not select damaged ones or split ones. You can choose atleast 10 healthy seeds because all of them may not germinate. Only about 50% of the seeds or less might germinate, and only a fraction of those germinated will make it to a small seedling and then may grow into a small tree. Also if the shell is intact, you need to carefully break the hard shell without damaging the inner seed.
Step 3: Soaking these seeds in water for 24 hours. Many receommend 48 hours. I have tried 48 hours too but they split open with too much soaking. So, We need them to just swell up a bit before keeping for the sprouting process.
Step 4: You can take the soaked seeds and use two methods. Toilet paper method or coco peat method. In coco peat or dirt method. You place the soaked seeds on a layer of cocopeat and cover the seeds with cocopeat and place it inside a polythene zip lock bag for germination.
I found better results with the toilet paper method. We will look into this in step 6.
Step 5: Cold Stratification: This is optional if your climate is too hot. Stratification is a process of treating seeds to simulate natural conditions that the seeds must experience before germination can occur. Many seed species have an embryonic dormancy phase, and generally will not sprout until this dormancy is broken. So, to increase the chances of germination, you can keep the seeds in refrigerator for about 4 weeks and then sow them at room temperature. I have tried with and without stratification and the results were almost same for me. But this process is compulsory for Almond seed germination, I have even experimented this on almond seeds and the almond seeds succeed only after this stratification process in refrigerator for about 50 to 60 days and then bringing them to room temperature for successful germination. You can watch the entire process of how to grow an almond tree from home almonds in my previous video.
So coming to Step 6: Take a container with a lid or you can even use a polythene bag or a zip lock bag. Place the seeds on a layer of toilet paper and sprinkle some water to make it moist and then place another layer of tissue paper and cover the lid. This is to keep it warm and also moist and this speeds up the germination process. Check every 2 or 3 days for root development and also to see if its moist.
Results: First result at 4th day and then after 8 days and then 15 days.
You should see results like this after 3 to 5 days or max one week. If there is no fungus and roots look healthy, you can transplant these sprouted pistachios in small containers with a clean potting mix with cocopeat and some vermicompost and keep in indirect light or under shade like on a window sill, till you get a seedling with two leaves. Then when it grows further, you can transplant in larger container. Here you can see I am successful getting almost atleast 3 to 4 plants. May be the other seeds might also give out shoots.
WATCH VIDEO FOR THE COMPLETE STEP BY STEP PROCESS: