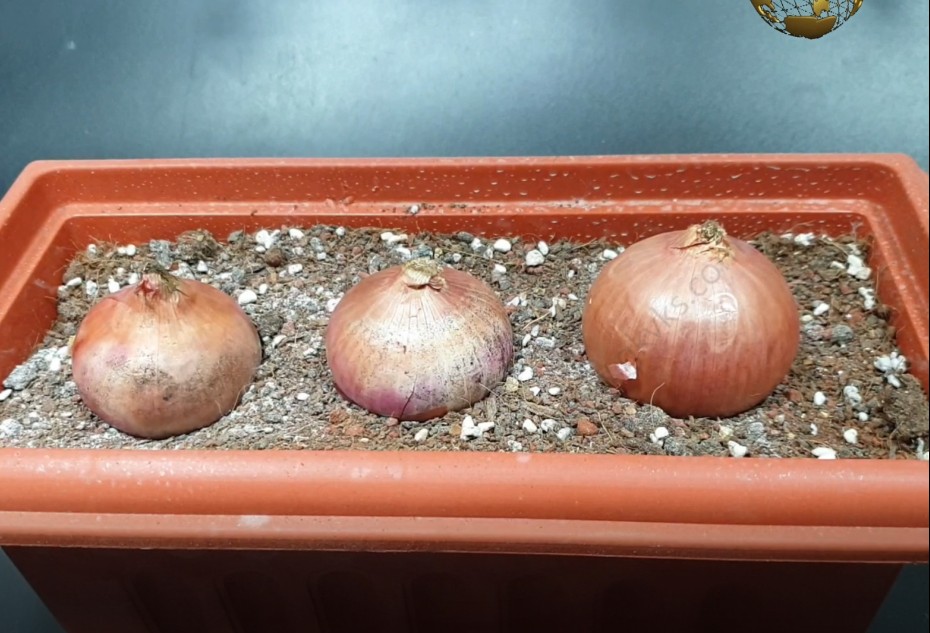
- ONIONS: Onions are actually grown from seeds to get bulbs. One seed generally gives one bulb. However if you want to harvest fresh organic spring onions, you can take some onions from your kitchen and plant them either directly into soil or even in water. If you grow in soil, make sure you have at least 30 to 40% compost in soil and also you need to water only if the top soil is fully dry. If you grow in water, you need to change water every week. You can harvest fresh spring onions after 20 to 30 days. The number of plants a single onion bulb can produce will vary from 1-6. In our case, you can see one bulb has produced 7 or 8 plants and their independent bulbs. For larger sized bulbs, you can separate these and plant them independently. Onions need full direct sunlight of at least 4 to 6 hours.
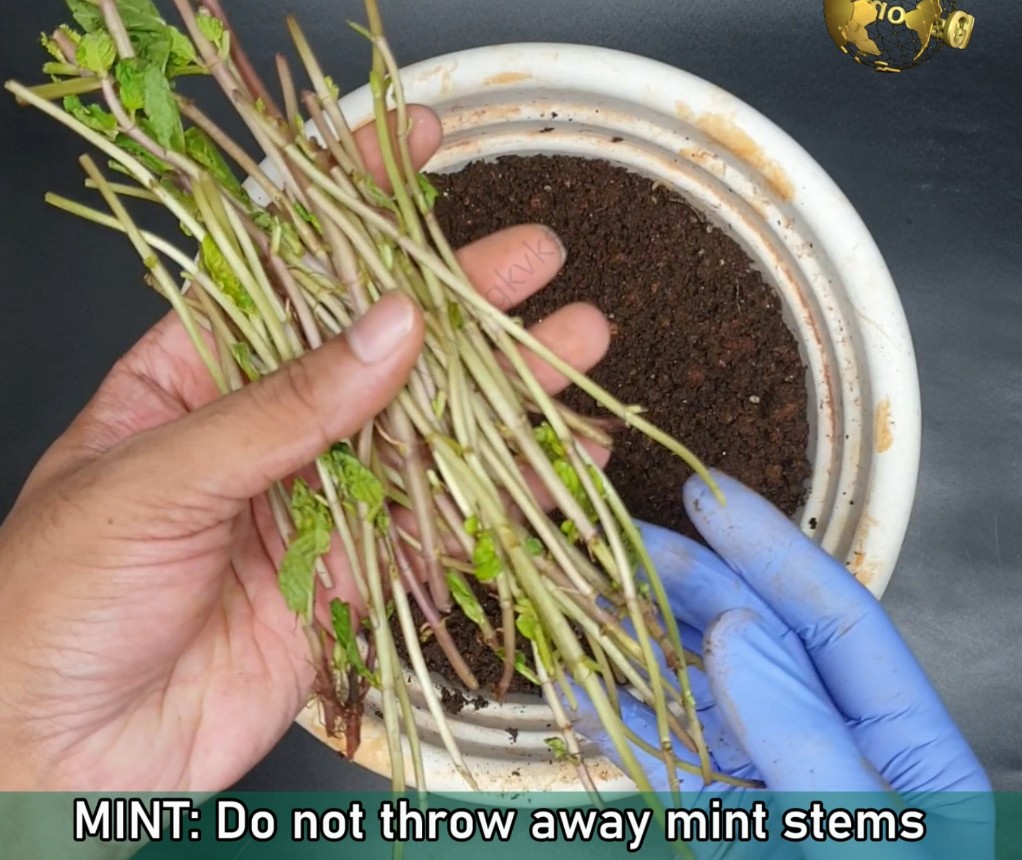
- MINT: Do not throw away mint stems into the bin. Just plant them back in soil or in a container to get an unlimited supply of mint leaves. You only require a container with well draining soil and some compost to grow mint. Every time you plant the stems, add a handful of compost like decomposed cowdung or vermicompost once and that’s sufficient till the harvest. Water them only if the soil is dry. Mint can be grown in bright indirect sunlight or filtered light under a green shade net.
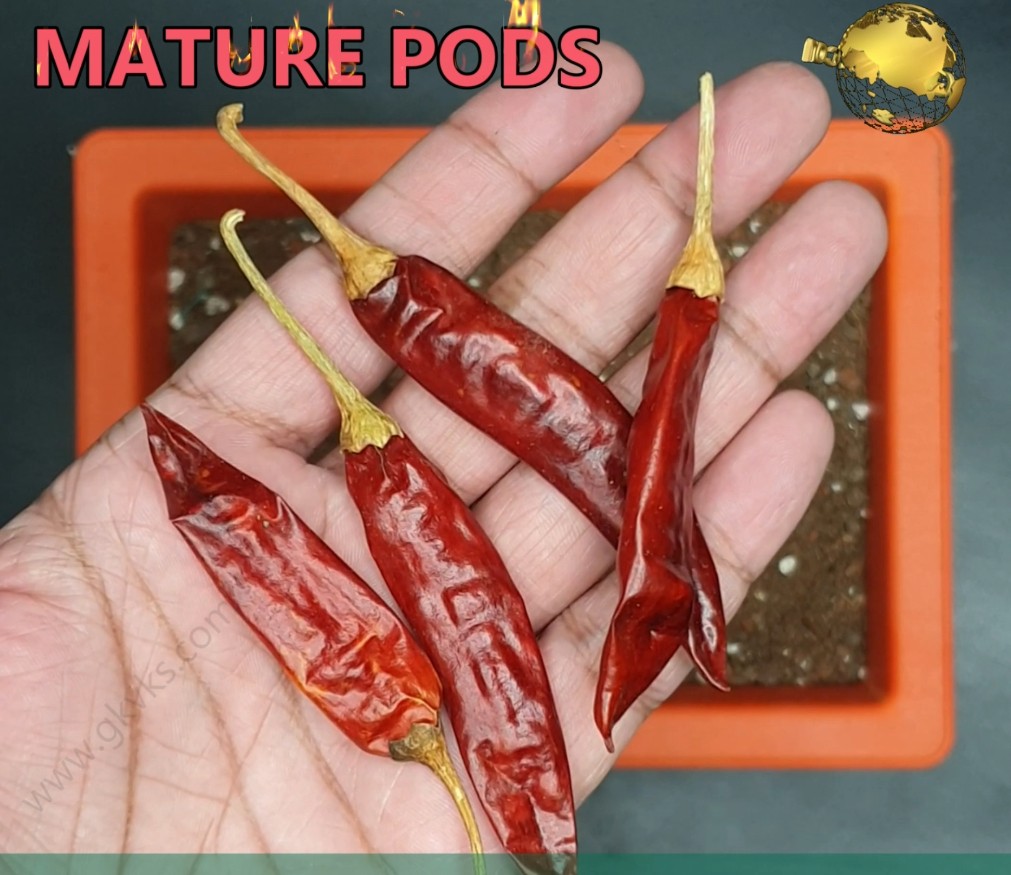
- CHILLI PEPPERS: It’s not really difficult to grow chillies from chillies. Take a mature chilli pod from your kitchen. Do not try this on immature green pods, because the germination rate is lower. Extract the seeds by splitting the pod. Take a shallow container or even seed trays if you have. The soil should be full of compost like at least 30 to 40% vermicompost or decomposed cow dung or both. Just sprinkle the seeds with some spacing and add a thin layer of soil or compost on top of this. Water them every other day. They start sprouting within a week. Once they reach about 4 inches you can choose the best ones and plant them in larger containers like 8 to 12 inch containers, which are sufficient for chilli peppers. You need full direct sunlight of around 4 to 6 hours to grow chilli peppers.
- GARLIC: Garlic can be easily rooted from a single clove. Each clove will produce a new plant. Take some good quality garlic from you kitchen or store room and separate its cloves gently. Plant them in any container of your choice with a good amount of compost in soil. They should start germinating within a week. If you planted them in smaller containers, you can transplant them in larger containers with a loose well draining soil. Garlic needs full direct sunlight of atleast 4 to 6 hours or can even be grown in filtered light under a green shade net.
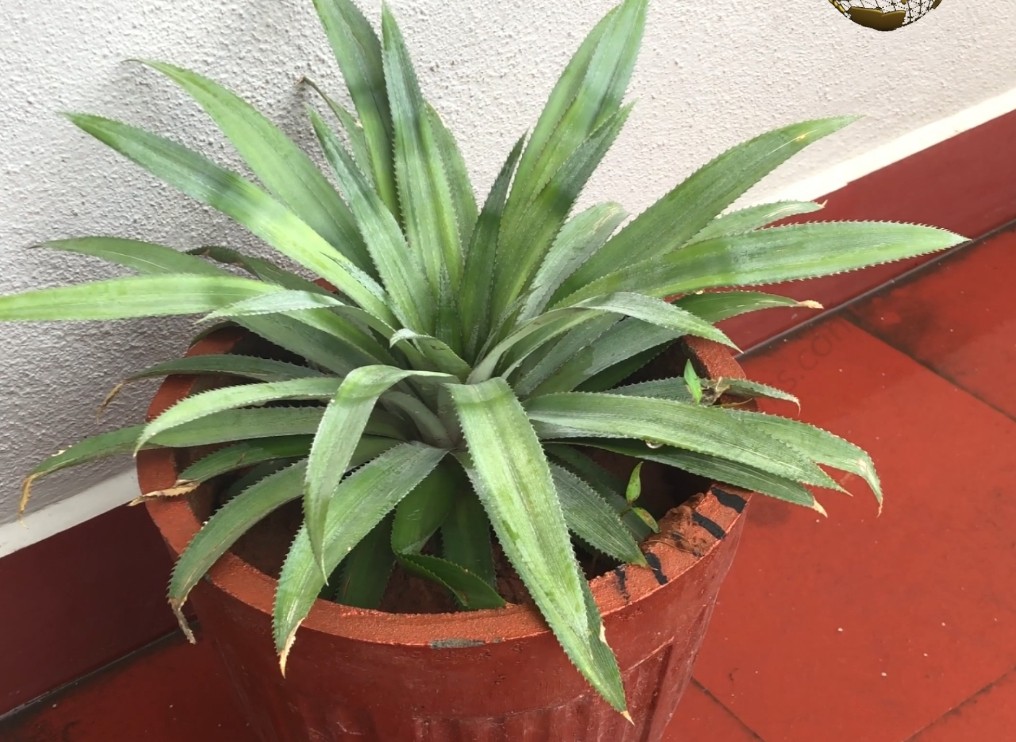
- PINE APPLE: Never throw away the pine apple tops especially if they look fresh and healthy. You can easily grow a pine apple tree from it. Make sure you strip few leaves at bottom to expose the white portion. You can leave it for a day or two to form the callous and then you can either plant it directly in a loose well draining soil or first root it in a glass of water. If you grow in water, you need to change water every week. You can drop a quarter tablet of aspirin 350 mg into water everytime you change it. This helps is faster and healthy rooting by boosting the plants immunity. You can check a detailed post on Benefits of Aspirin in gardening . Once the rooting starts you can transfer into a larger container of at least 12 inch with good amount of compost in it.
- CAPSICUM or BELL PEPPER: You have to use a mature pod like red or yellow and not the immature green capsicum for better germination results. Just extract the seeds by cutting this pod and plant them in a soil with good amount of compost. They start germinating within a week. Once they grow to about 4 inches, you can perform thinning of seedlings and choose the best ones to grow and transplant them in independent containers.
- CORIANDER (CILANTRO): This can be easily grown from seeds. To get the best harvest, you need to first split the seeds by scraping them in sand paper or stuff like that. Remember each Coriander seed is technically a fruit containing two seeds in it. Hence splitting them will produce more plants. Do not use any heavy object or too much pressure to split them, they can get damaged and may not germinate. Plant them in any container preferably in shallow containers and once they germinate and product first set of leaves, keep them in full sunlight, else they become too thin and leggy. Water them daily or alternate days depending on the climate. You can harvest cilantro multiple times by leaving an inch of the stem while harvesting, and this method regrows cilantro again and again.

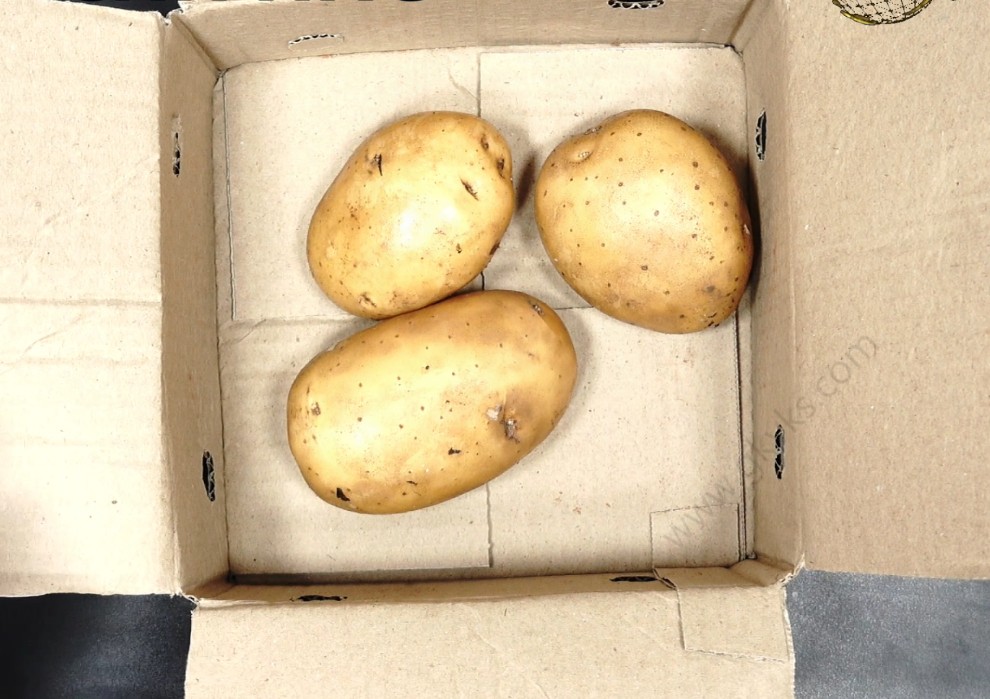
- POTATOES: Yes you can grow potatoes from grocery bought potatoes or seed potatoes purchased from a garden store. You can keep the potato for pre-sprouting that’s called Chitting a potato. You keep them for 15 days in a carton box in a dark place. Once it sprouts, plant it deeply in a loose soil in a large container of at least 15 inches depth and diameter. Once it starts growing shoots, keep on adding soil on top to make room for more tubers growing inside. Once the potato flowering starts, you can pinch or snip it off to divert energy to potato tuber formation rather than seed formation. You can harvest new or baby potatoes after 70 days and mature storage potatoes after 90 to 120 days.
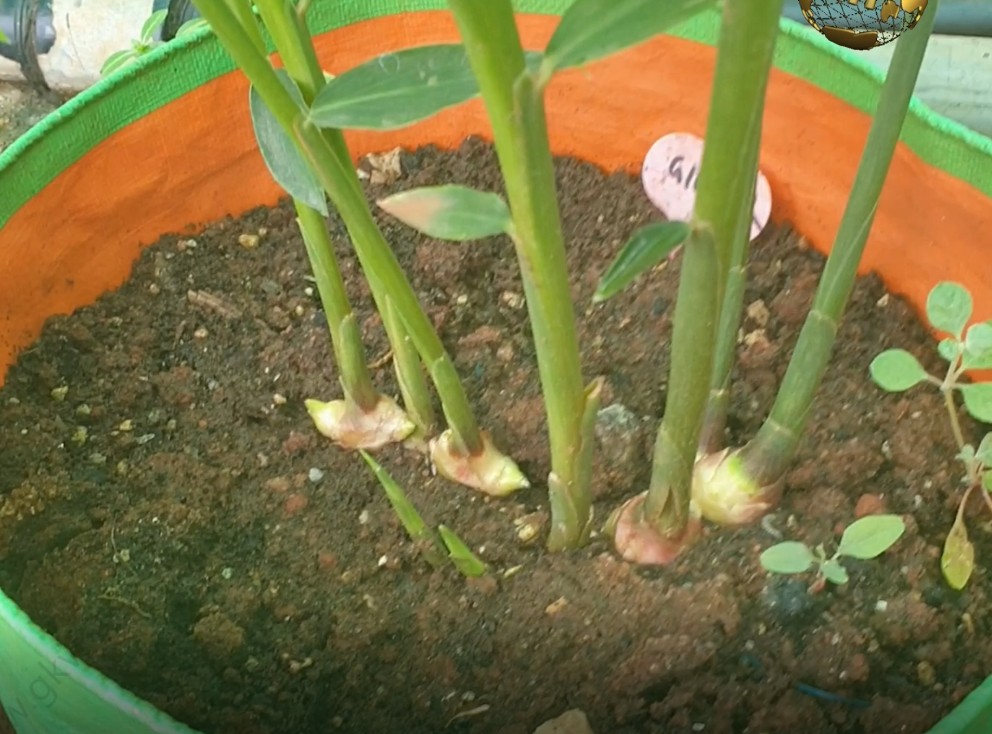
- GINGER AND TURMERIC: The process is same for both these rhizomes. You can soak them for 12 hours in water for faster germination. Plant them in smaller containers first for pre-sprouting or directly plant them in larger containers. Make sure potting soil has more than 50% compost in it and it should be a loose well draining soil. You can watch a detailed post on some of the best potting mix recipes.
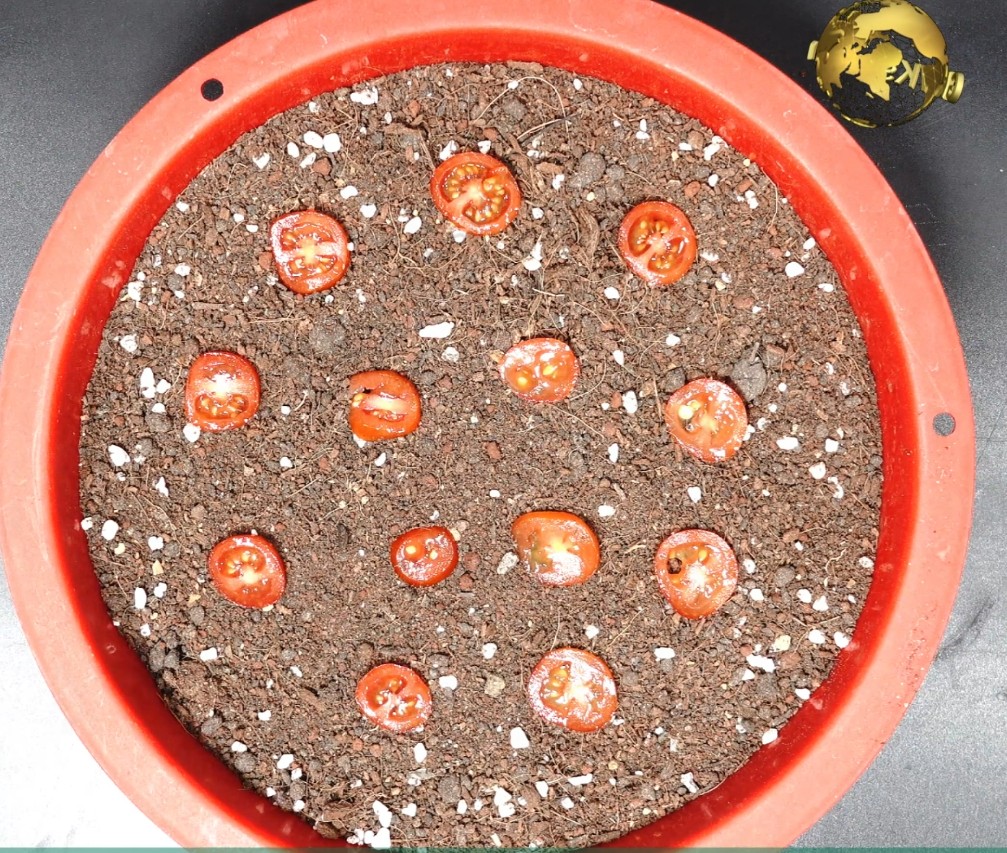
Well, Ginger and Turmeric start germinating within a week. Make sure you keep them in full sunlight or filtered sun light under a green shade net. Water them once the soil is dry. You can add a handful of compost once in 15 days. You can harvest them once the plant starts to wilt and become yellow. - TOMATOES: Yes you can easily grow tomatoes from tomatoes. Just slice them into multiple pieces of about half a centimetre thickness and plant them into a compost rich potting soil. You should see little ones germinating within a week. Now you can perform thinning of seedlings where you choose only the best ones and discard the weaker ones. Transplant into little larger containers at this stage. Though growing tomatoes looks really easy, you need to apply some tricks and procedures to get the best harvest, starting from its early growth phase, like what fertilizer to use, supports to use, removing tomato suckers and many tricks that make tomatoes healthier with a better yield. Please check my post on 10 Tricks to grow lots of tomatoes here.
Tomatoes are usually the first veggie many newbie gardeners grow from seeds. To Improve your success and achieve a healthy harvest, let’s learn these 10 tips on growing tomatoes starting from the seedling tips till the harvesting stage. These tips apply to any variety of tomato you grow, whether determinate or indeterminate types.
- SEED PLANTING TIPS: You can easily grow tomatoes from seeds or tomatoes from tomatoes. You can plants seeds in small containers or seed trays. We will not go into these details in this episode. We will only tell you the tricks to be applied at this stage. Once they germinate and grow into little ones, you can choose the best ones and transplant them to small 4 to 6 inch pots and discard the weaker seedlings – that’s called thinning of seedlings. The first Trick to apply at this stage, that is the early growth stage, during or after the first transplant. The main idea is to strengthen the root system of this young plant. A strong root system will make the plant healthier, disease resistant and is responsible for the quality and quantity of harvest. At this stage, you must add a source of phosphorous to help the plant produce stronger roots – the best one is the organic rock phosphate – about half a teaspoon per seedling. If you do not have this, you can also add steamed bone meal powder.
- The Final Transplant: Here again you need to apply two tricks. When the plant reaches to about 8 to 10 inches tall you can transplant this into the final spot whether growing in ground or in containers. On ground, maintain atleast 1 to 2 feet spacing between plants. If you are transplanting to containers, choose large containers, like at least 15 inches in size. The larger, the better. Well, the two tricks to apply here: One is you add 1 to 2 tablespoons of Organic rock phosphate into the hole and place the roots in direct contact with this. You can also use finely powdered steamed bone meal. This source of phosphorous is sufficient for the entire growth cycle of the plant. The second trick to apply is: Planting as Deep as possible. You can see the tomato stem has hundreds of tiny hair and these when come in contact with soil forms stronger roots. So, you plant it as deep as possible by removing the bottom leaves. These two tricks will form a robust root system which in turn will produce a high yielding, disease resistant tomato plant.
- STAKING: Staking or supporting the tomato plants is a very crucial step to get a healthier plant and a good harvest. There are many ways to stake tomatoes – like using good quality tomato cages. This type of cage or trellis is not recommended, as its not durable. I will show you two easiest methods to support tomato plants. One is making your own trellis using some wooden sticks or even bamboo sticks. Just firmly tie three sticks on top and insert the base into the soil. The second method is using a string support. One string per plant. But you have to anchor the string to the soil by using some method, like a thick iron wire or these type of rods and loops which are easily available online. Insert this to the soil and tie a string, one end at the bottom and the other end to another support, something like this overhead crossbar. Do not twist the string tightly onto the stem. For this you can use these cheap plastic plant clips – which are completely safe and useful to hold the plant to the string without compressing the stem.
Lastly, the least you can do is just insert wooden sticks around the plant to support the growing plant. This is because the tomato stem is tender and if not supported can break easily or it can take awkward bends and the whole system may look awkward.
- PRUNING & SUCKERS: This is another important trick to perform for great results and to prevent disease. Tomato suckers or side shoots are the growths that appear in the junction between the stem and a branch of a tomato plant. Removing these suckers is recommended, simply to divert the nutrients for the growth of main stem and its main branches. Your plant may have more fruit if you let the suckers grow, but the tomatoes will be smaller in size.
Then, generally, pruning of the lower branches is also recommended, especially for the indeterminate variety of tomato plants. But I recommend this even for determinate varieties. The main reason is to maintain good air circulation which can prevents many diseases. Another tip here is: As the plant grows taller, keep removing the older leaves or older branches from the bottom zones. - SUNLIGHT: Tomatoes love to be in full direct sunlight for at least 6-8 hours of continuous sun. So, whether you are growing on ground or containers, you have to choose a location which receives maximum amount of sunlight.
- WATERING: Tomatoes love to be in moist soil right from the seedling stage. As a general rule, You may have to water them daily and depending on the temperature you may have to water them even twice. Installing drip irrigation system helps a lot. You can also mulch the top soil with dried leaves, dried grass clippings, straw or even mulching sheets. This not only prevents water evaporation but also prevents weed growth.
Well, When you water once daily, water thoroughly and deeply so that the deeper roots are well hydrated. Inadequate watering can result in poor absorption or uptake and supply of nutrients to different parts of the plant. Blossom End Rot problem seen in tomatoes is due to calcium deficiency mainly due to this transportation issue and may not be due to soil deficient of calcium. So proper watering is very important to prevent the blossom end rot issue which is an irreversible process. - SOIL AND FERTILIZERS: You can use your usual well draining loose potting soil for container gardening with at least 30 percent compost in it and 30 percent garden soil and another 30 percent cocopeat plus some 10 percent other stuff like bonemeal, neem powder, perlite, vermiculite and so on. We have discussed this in one of our old video titled universal potting mix. You can check that from HERE. Well, we have already discussed about the role of Organic Rock Phosphate and how important it is for a healthy root system and fruiting. You can add a handful of compost like decomposed cowdung or vermicompost to the top soil once in a week or 15 days. Then optionally you can also add seaweed zyme granules once in a while or foliar feed with liquid seaweed extract. You can also foliar spray Epsom salt like 1 teaspoon per litre of water, once in 15 days. And If you think, your soil is calcium deficient and you want to make yourself 100% sure of preventing Blossom End Rot disease, then you can add an additional source of calcium into the soil. You can check my video on the Various sources of calcium and how to make free soluble calcium to treat acute calcium deficiency.
- POLLINATORS: Encourage beneficial insects and pollinators like butterflies and honey bees to encourage pollination and fruit formation. Do not use chemical pesticides, they can drive away or even kill these useful pollinator insects. But, you may have to protect your fruits from birds pecking on the fruits after the fruit formation.
- PESTICIDES: Common tomato pests include Aphids, whiteflies, caterpillars, slugs and snails, tomato hornworms, cut worms and so on. Tomato yellow leaf curl virus needs a special mention. As I said earlier, a strong disease resistant plant will never have this type of disease. This virus curl has no treatment like any other virus in the world. Just discard and dispose off the plant so that it doesn’t affect the other plants close by. The last bonus tip is actually an immunity booster to tomato plant. Will discuss it shortly.
Prevention is better than cure. To avoid any pest attack, weekly once spraying of our broad spectrum Neem Oil is the best solution. Say No to Chemicals and Insecticides. For seedling stage, spray 5ml neem oil per litre of water and for mature plants 10 ml of Neem oil per litre of water. You can optionally add half a teaspoon of baking soda into this spray. Always do a patch test on a leaf to check the potency of you preparation, before spraying on the entire plant. - COMPANION PLANTING: Planting some companions close to tomatoes will help prevent pests. You can plant basil, parsley, cilantro, garlic, marigolds and many others.
- BONUS TIP: Many researches have shown that Tomatoes use a hormone similar to salicylic acid to trigger a response called ‘systemic acquired resistance’ or SAR. This response helps a tomato plant fight off bacteria, fungi and other diseases. Aspirin is acetyl salicylic acid. Spraying aspiring from the seedling stage onwards makes your tomato plant immune to many diseases. You can drop half a tablet of Aspirin 350 mg dispersible tablet into 1 litre of water and spray on the plant, once in a while like once in 15 days or so.
Happy Gardening!
Before we discuss on the Pros and Cons, Let’s first learn how to grow tomatoes upside down starting from the seedling stage.
You can grow tomato plants very easily from seeds in smaller containers or seedling trays first and then transplant them to larger containers. If you do not have seeds, you can grow them from fresh tomatoes. If you want to grow tomatoes upside down, choose a light weight variety like the cherry tomatoes.
Take any clean Potting soil containing peat moss or cocopeat and garden soil in 1:1 ratio with some 30% compost like vermicompost or decomposed cow dung.
Make multiple slices of about 3-4mm thickness and just place them in a container like this. Then cover with a thin layer of potting mix and make sure it’s not planted too deep. Finally water this thoroughly and place in a shady place like your window sil.
You should see the results within a week.
When they reach a size of about 3 to 4 inches, transplant them in little larger containers independently. Adding a pinch of phosphorous supply like the organic rock phosphate or bone meal powder in this early growth stage will help in stronger roots and a healthy disease resistant future plant. When these grow to about 8 to 10 inches, it’s time for the final transplant to a larger container.
To make them grow upside down, take any container like this hanging basket type container. Make a hole of about 1 inch diameter like this. Then take a piece of foam and cut through it like this. Remove the root ball of your tomato sapling and gently remove the dirt from the roots. Insert the roots through the hole and place the foam like this from the inner side of the container. Finally pour the potting mix into the container. Make sure you have good amount of compost and also mix a table spoon of phosphorous supply like bone meal or rock phosphate into this mix. Water the plant thoroughly and hang it at a favourite place in your garden. You might have to water it daily or you can even mulch the top with some mulching stuff to avoid water evaporation too quickly. You can also connect the drip feeder if you have a drip irrigation system.
Well, Now Let’s check out the Pros or the Reasons to Grow Tomatoes Upside Down:
- Small Space Gardening: You can grow tomatoes with little to no garden space. If you have a small balcony, you can grow them easily.
- Flexibility: Tomatoes need full sun and if you do not have sufficient sunlight in one area like in a balcony, you can easily shift to another area with full sunlight. Like for example, east facing balcony for morning sun and west facing balcony for evening sun. And moreover, they can be easily moved away from bad weather conditions.
- No Staking or Cages required: Staking is usually required to help the plant support the weight of the growing fruit. Smaller varieties like Cherry tomatoes do well when grown upside down.
- Pests and Diseases are limited: One reason is they are hung at a height and there is good air circulation around and the soil borne diseases are limited.
Now, let’s look at the Cons or Drawbacks of this system: - Requires More Frequent Watering – like atleast daily watering and hence difficult to grow in summer season. So, you can mulch the top with some mulching stuff to avoid water evaporation too quickly. You can also connect the drip feeder if you have a drip irrigation system in your garden.
- Weight Bearing Problem: When the plant is loaded with fruits, this system will have problems, especially with beefsteak tomatoes. Smaller cherry tomatoes are the best to grow in this inverted planters.
- Fruit Ripening Issue. Tomatoes need sunlight to ripen the fruits. Fruits may not ripen well due to sunlight issues at the bottom part.
- U shaped Bends and Turns: This happens due to photo-tropism, where the tips of the branches turn upward towards the light and cause these U-shaped bends and turns.
But, Nonetheless, every hobby gardener must give this a try!