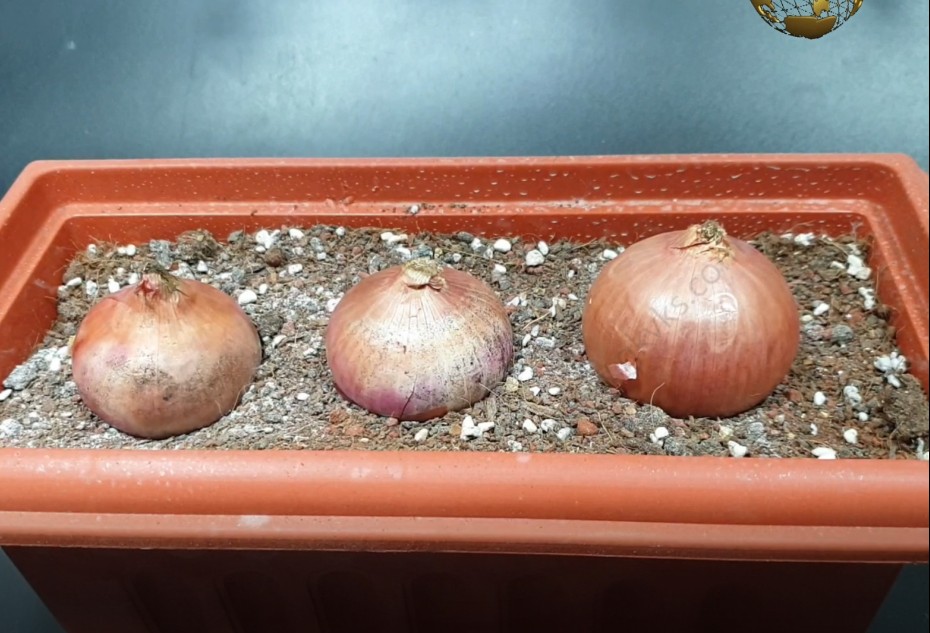
- ONIONS: Onions are actually grown from seeds to get bulbs. One seed generally gives one bulb. However if you want to harvest fresh organic spring onions, you can take some onions from your kitchen and plant them either directly into soil or even in water. If you grow in soil, make sure you have at least 30 to 40% compost in soil and also you need to water only if the top soil is fully dry. If you grow in water, you need to change water every week. You can harvest fresh spring onions after 20 to 30 days. The number of plants a single onion bulb can produce will vary from 1-6. In our case, you can see one bulb has produced 7 or 8 plants and their independent bulbs. For larger sized bulbs, you can separate these and plant them independently. Onions need full direct sunlight of at least 4 to 6 hours.
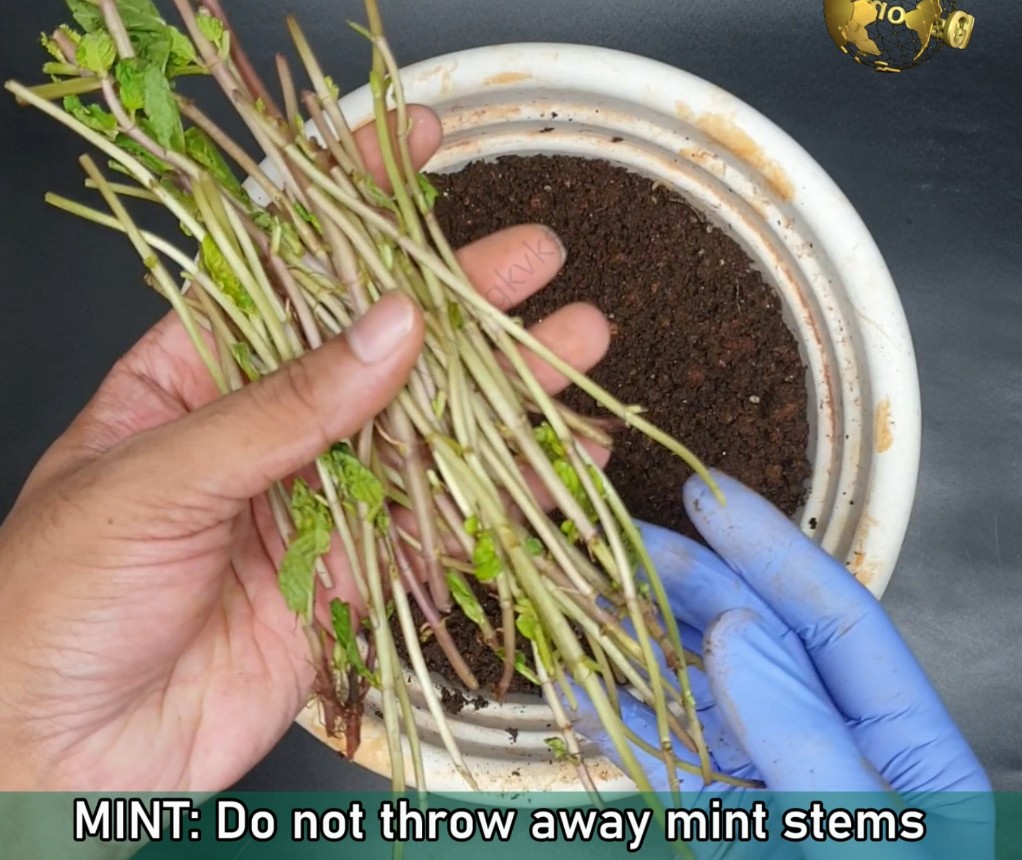
- MINT: Do not throw away mint stems into the bin. Just plant them back in soil or in a container to get an unlimited supply of mint leaves. You only require a container with well draining soil and some compost to grow mint. Every time you plant the stems, add a handful of compost like decomposed cowdung or vermicompost once and that’s sufficient till the harvest. Water them only if the soil is dry. Mint can be grown in bright indirect sunlight or filtered light under a green shade net.
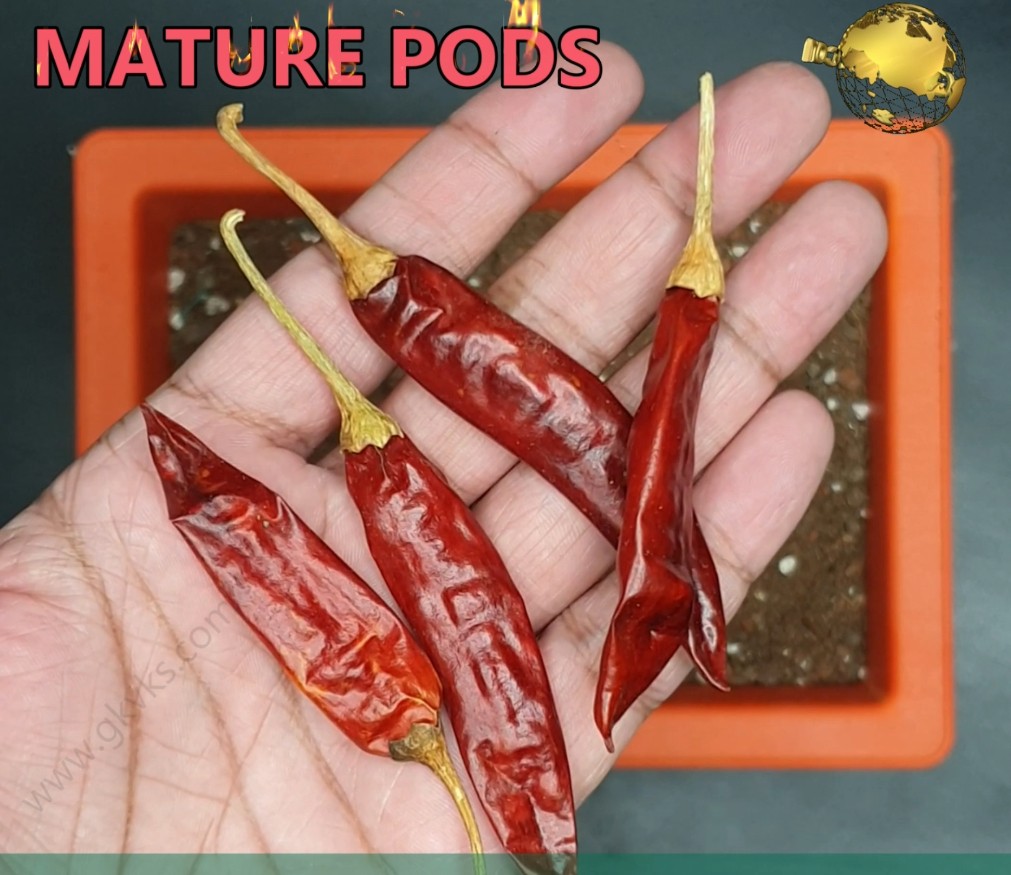
- CHILLI PEPPERS: It’s not really difficult to grow chillies from chillies. Take a mature chilli pod from your kitchen. Do not try this on immature green pods, because the germination rate is lower. Extract the seeds by splitting the pod. Take a shallow container or even seed trays if you have. The soil should be full of compost like at least 30 to 40% vermicompost or decomposed cow dung or both. Just sprinkle the seeds with some spacing and add a thin layer of soil or compost on top of this. Water them every other day. They start sprouting within a week. Once they reach about 4 inches you can choose the best ones and plant them in larger containers like 8 to 12 inch containers, which are sufficient for chilli peppers. You need full direct sunlight of around 4 to 6 hours to grow chilli peppers.
- GARLIC: Garlic can be easily rooted from a single clove. Each clove will produce a new plant. Take some good quality garlic from you kitchen or store room and separate its cloves gently. Plant them in any container of your choice with a good amount of compost in soil. They should start germinating within a week. If you planted them in smaller containers, you can transplant them in larger containers with a loose well draining soil. Garlic needs full direct sunlight of atleast 4 to 6 hours or can even be grown in filtered light under a green shade net.
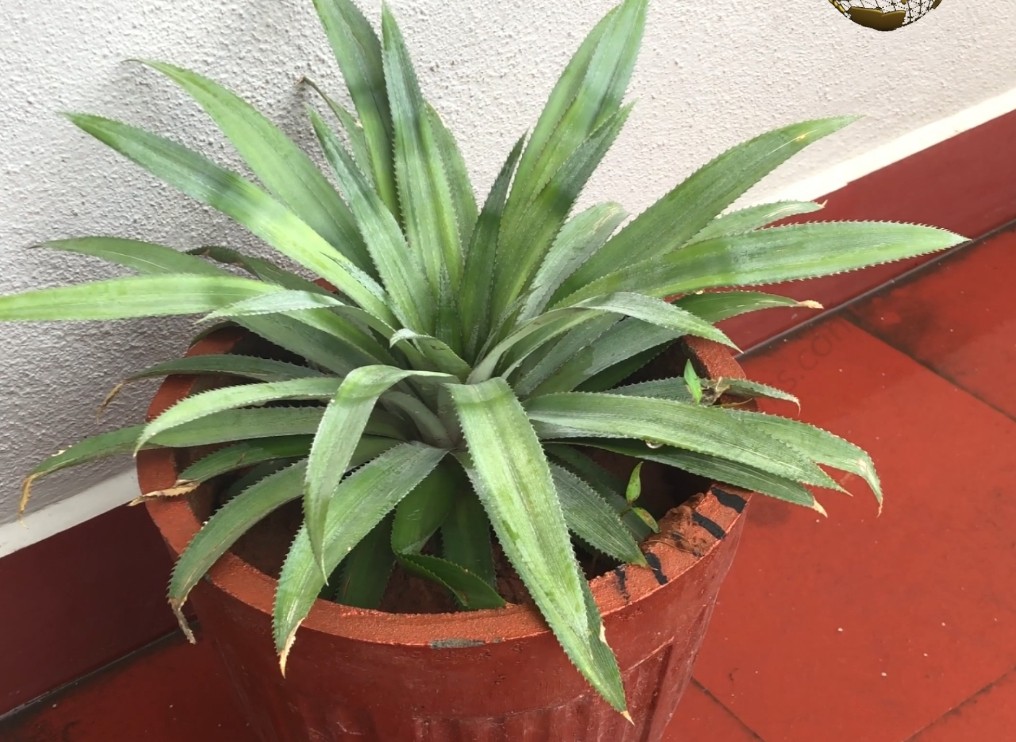
- PINE APPLE: Never throw away the pine apple tops especially if they look fresh and healthy. You can easily grow a pine apple tree from it. Make sure you strip few leaves at bottom to expose the white portion. You can leave it for a day or two to form the callous and then you can either plant it directly in a loose well draining soil or first root it in a glass of water. If you grow in water, you need to change water every week. You can drop a quarter tablet of aspirin 350 mg into water everytime you change it. This helps is faster and healthy rooting by boosting the plants immunity. You can check a detailed post on Benefits of Aspirin in gardening . Once the rooting starts you can transfer into a larger container of at least 12 inch with good amount of compost in it.
- CAPSICUM or BELL PEPPER: You have to use a mature pod like red or yellow and not the immature green capsicum for better germination results. Just extract the seeds by cutting this pod and plant them in a soil with good amount of compost. They start germinating within a week. Once they grow to about 4 inches, you can perform thinning of seedlings and choose the best ones to grow and transplant them in independent containers.
- CORIANDER (CILANTRO): This can be easily grown from seeds. To get the best harvest, you need to first split the seeds by scraping them in sand paper or stuff like that. Remember each Coriander seed is technically a fruit containing two seeds in it. Hence splitting them will produce more plants. Do not use any heavy object or too much pressure to split them, they can get damaged and may not germinate. Plant them in any container preferably in shallow containers and once they germinate and product first set of leaves, keep them in full sunlight, else they become too thin and leggy. Water them daily or alternate days depending on the climate. You can harvest cilantro multiple times by leaving an inch of the stem while harvesting, and this method regrows cilantro again and again.

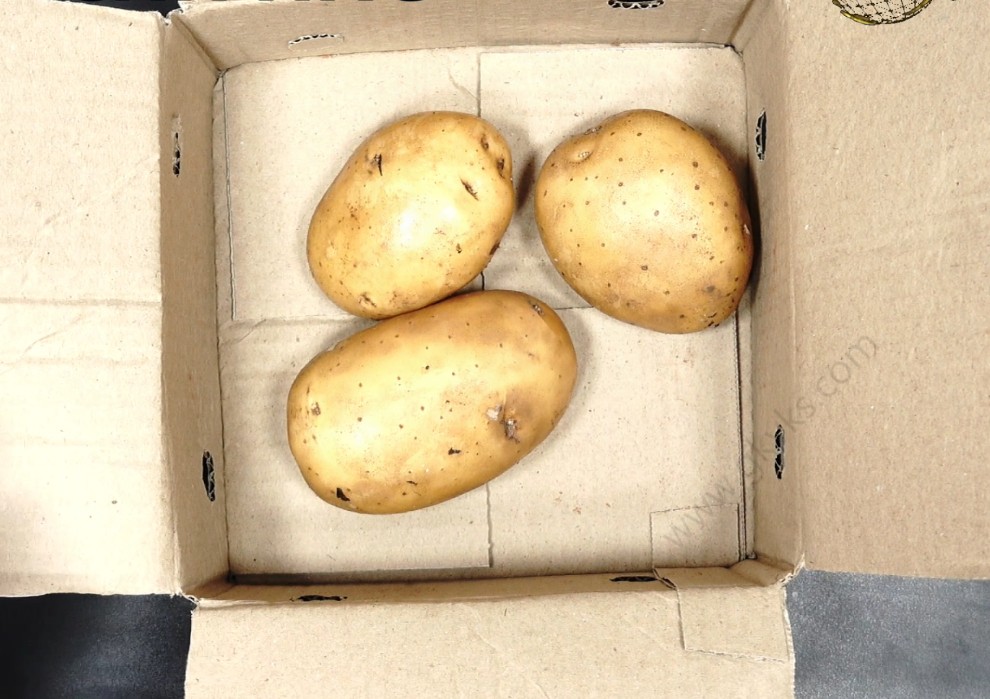
- POTATOES: Yes you can grow potatoes from grocery bought potatoes or seed potatoes purchased from a garden store. You can keep the potato for pre-sprouting that’s called Chitting a potato. You keep them for 15 days in a carton box in a dark place. Once it sprouts, plant it deeply in a loose soil in a large container of at least 15 inches depth and diameter. Once it starts growing shoots, keep on adding soil on top to make room for more tubers growing inside. Once the potato flowering starts, you can pinch or snip it off to divert energy to potato tuber formation rather than seed formation. You can harvest new or baby potatoes after 70 days and mature storage potatoes after 90 to 120 days.
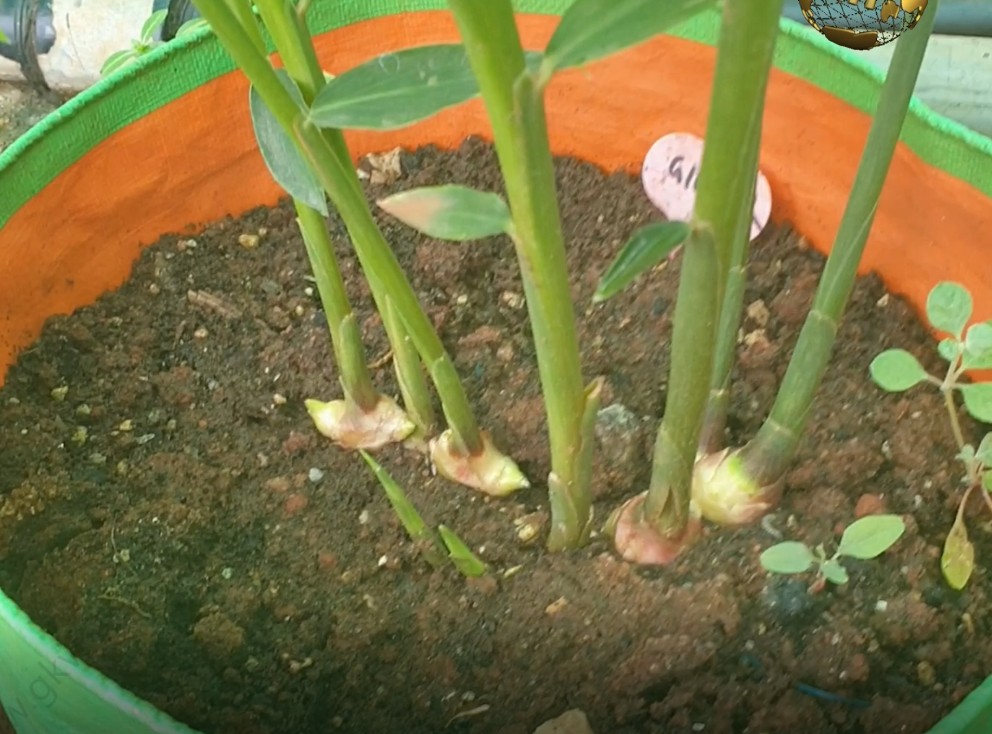
- GINGER AND TURMERIC: The process is same for both these rhizomes. You can soak them for 12 hours in water for faster germination. Plant them in smaller containers first for pre-sprouting or directly plant them in larger containers. Make sure potting soil has more than 50% compost in it and it should be a loose well draining soil. You can watch a detailed post on some of the best potting mix recipes.
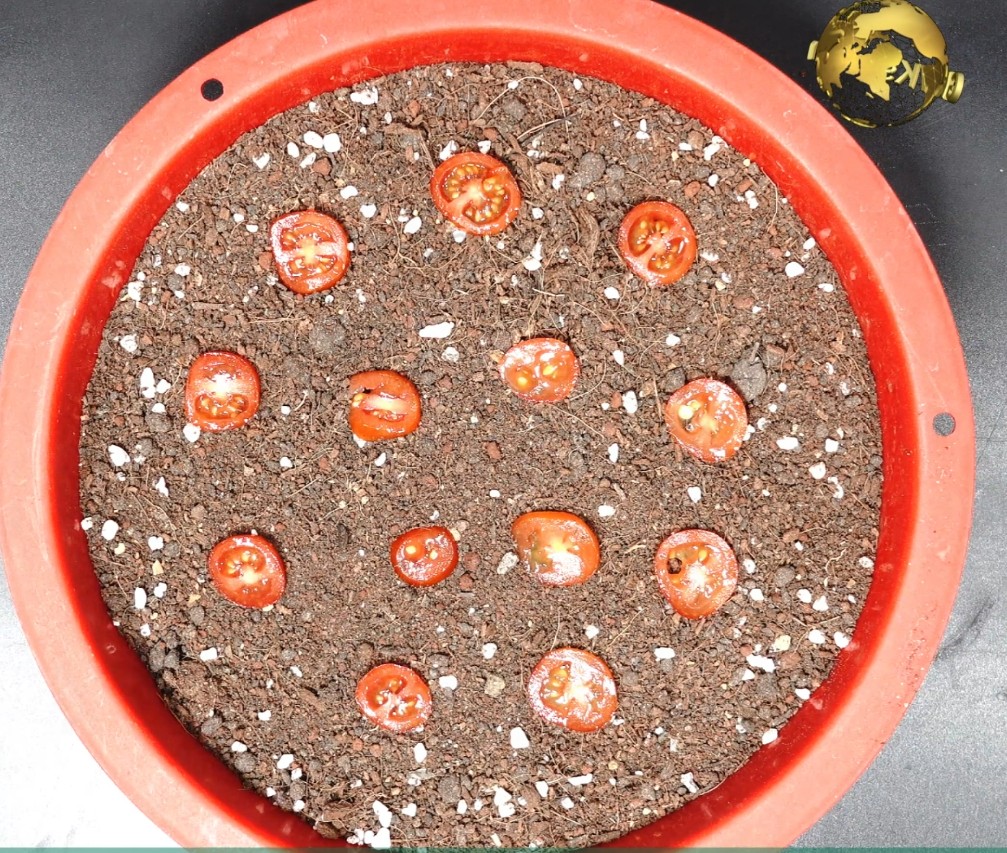
Well, Ginger and Turmeric start germinating within a week. Make sure you keep them in full sunlight or filtered sun light under a green shade net. Water them once the soil is dry. You can add a handful of compost once in 15 days. You can harvest them once the plant starts to wilt and become yellow. - TOMATOES: Yes you can easily grow tomatoes from tomatoes. Just slice them into multiple pieces of about half a centimetre thickness and plant them into a compost rich potting soil. You should see little ones germinating within a week. Now you can perform thinning of seedlings where you choose only the best ones and discard the weaker ones. Transplant into little larger containers at this stage. Though growing tomatoes looks really easy, you need to apply some tricks and procedures to get the best harvest, starting from its early growth phase, like what fertilizer to use, supports to use, removing tomato suckers and many tricks that make tomatoes healthier with a better yield. Please check my post on 10 Tricks to grow lots of tomatoes here.
Potatoes can be grown in ground or in containers. It’s better to grow in containers, mainly because harvesting is a lot easier and it can be grown throughout the year, especially in the tropical zones.
You can grow potatoes from store bought potatoes, but try to choose organically grown potatoes if possible. Potatoes are actually grown from Certified Seed Potatoes which are usually disease free.
But you can easily grow a healthy potato plant with a good harvest from store bought potatoes. Let’s start this step by step.
Step 1: Chitting Potatoes: Chitting simply means pre-sprouting potatoes, before planting them. Chitting potatoes is not a compulsory step to growing potatoes, but it can give the crop a head start so that it matures quicker.
So, How to Chit potatoes? First of all make sure you have good “eyes” in your potatoes. This is where your potatoes will grow sprouts. Place the potatoes in a paper carton box, of course with some holes in the box for ventilation. Leave it undisturbed for at least 2 to 3 weeks to get your seed potatoes.
Step 2: Cutting: This is optional. If you want more plants and have less seed potatoes, you can cut them into pieces, but each piece should have a sprout in it. But you have to leave the cut ends to heal for about 2 days so that they form a callous at the wound. Otherwise, there is a risk of rot.
Step 3: Soil Preparation: Potatoes need a loose well draining potting mix to grow. You can use 30% garden soil + 30% cocopeat or peatmoss + 30% compost like decomposed cowdung or vermicompost + some 10% other stuff like neem powder, perlite and so on. I also add one or two spoons of trichoderma viride powder which is a biofungicide, but this is optional.
Step 4: Choosing Containers: You need a large deep container, like at least 15 inch container for best results. You can use fabric grow bags, some plastic tubs or pots or whisky barrel container or any large container. Make sure you have lot of drainage holes at the bottom. Generally you can harvest upto 10 potatoes per container per plant.
Step 5: Planting: Potatoes have to be planted deeper into the soil. If you are using cut pieces, you plant with the sprout facing upwards. Otherwise it doesn’t matter. Just plant them deep and cover with the soil.
Best time to plant potatoes is about 2 weeks before the onset of spring for most zones, but in few zones in the tropics, you can grow anytime.
Step 6: HILLING: Once the shoots start to grow, you can keep adding potting soil on top to get more space for the potatoes. This is called Hilling of Potatoes. Then at this early stage, that is, once the shoots start to appear, you can add one tablespoon of Organic rock phosphate powder to supply phosphorous to make the root system stronger which in turn can yield a better harvest. Alternately, you can also use fine steamed bone meal powder.
Also try to spray neem oil to keep away potato pests like once in a week or 10 days. 5 to 10 ml neem oil + few drops of liquid soap + half a teaspoon of baking soda to combat any fungal spots on the leaves which is quite common in moist conditions.
Step 7: Watering: Once you plant the potatoes, you can water the container once and leave it alone for atleast 3 to 4 days without watering to prevent the risk of rot. Once the shooting starts, you can water them once every other day depending on the climate or by using the finger dip method to check the soil moisture.
Step 8: Sunlight: Potatoes need at least 6 to 8 hours of direct sunlight. So, depending on this you choose the growing location.
Step 9: Potato Flowering: The potato plant start to flower anytime after 40 to 50 days. But one trick you have to perform at this stage is just snip off the flowering stalk. You can just pinch it or snip them off with shears. We want all the energy diverted towards the roots and potato formation and not on seed formation. Potato flowering indicates the plant is just matured and small tubers have started to form.
Step 10: Harvesting: For most certified seed potatoes, you can harvest after 70 to 80 days. But for some varieties it can be as long as 120 days. This is difficult to determine for store bought potatoes. This is the one of the drawbacks of growing store bought potatoes. To harvest your potatoes, stop watering at least a week before harvest date. One important sign that can indicate your potatoes are ready to harvest is the potato plant begins to wilt and starts to become yellow and is about to die. This sign indicates your potatoes are ready to harvest. One important point relating to harvest is whether you want New Potatoes or Storage Potatoes. New potatoes are small and thin skinned potatoes usually harvested before 70 days. You can carefully harvest a few new potatoes and then cover the plant with soil and leave it for another 2 to 3 weeks to harvest the Storage potatoes which are the main-crop potatoes. The one sign that indicates this maturity is the potato plant completely becomes yellow, starts wilting and begins to dry.