Pruning or trimming your plants, is one of the most important and useful practice in gardening that needs to be performed irrespective of the type of plant you are growing in your garden. Pruning practices are indispensable for your plant health and you should never avoid pruning on emotional grounds. You all must be aware of the benefits of pruning – whether to get rid of diseased branches or to promote branching and plant growth or even improving flowering and fruiting. You can check my detailed video on Pruning tips and Concepts here.
There are many gardeners who are not aware of the correct type of pruners they need, like for instance – which of these two you would choose. What is this flat surface and why? Choosing wrong pruner for a wrong task can adversely affect you plants as well as your gardening practice.
So, now let us look at the different types of Pruners. Pruners are also called as Pruning shears or hand pruners or secateurs and even garden scissors:
- Hand Pruners or Hand Shears: These are the most commonly used cutters in home gardening. These are of two types:
- Anvil pruners
- Bypass Pruners
So, most gardeners are not aware of the purpose of these two types of pruners.
Anvil pruners have a straight upper blade that cuts against a flat lower plate – that looks like an anvil. These Anvil pruners tend to CRUSH the stem as they cut, and are best for woody branches that won’t be harmed by crushing. So remember to use them only on woody or semi woody branches and not soft branches that can be crushed.
Whereas the Bypass pruners have curved scissor-like blades that overlap. These are ideal for cutting younger and soft branches but can also be used for cutting semi woody and woody branches. These are the commonly used pruners in home gardening. Also they are best for making stem cuttings at 45 degree cutting angle for propagation of plants from stem cuttings and also easy to use. The durability varies from brand to brand. In my experience this one is the best heavy duty pruner I have used till date and also pretty cheaper and can cut even thicker branches like upto 20mm. If you want a simple light pruner which can cut upto 10mm this much cheaper parrot beak pruner will do its job. Now we will quickly check out some more cutting tools one by one.
- Lopping Pruners or lopping shears: These have long handles that provide a little more reach than hand shears and are they are suitable for heavy duty pruning for upto three-fourth to 1 inch diameter cuttings.
- Pole Pruners: Pole pruners are made of blades attached to hooks. These hooks are mounted on long poles and a chain or cord controls the blade, which is usually spring-loaded. Pole pruners can typically reach branches that are 12 feet or more above the ground. These are typically used when the use of ladder is not possible.
- Hedge Pruners or Hedge Shears: These are designed for rapid trimming of hedges. The hedge shears come in a variety of sizes and designs. They have long, straight or angled blades that are sharp enough to cut several branches at once shot. The longer blades of hedge shears ensure an even cut across the plant branches to maintain a neat and balanced border. You can also use them to make a neat border of many other plants as well like bougainvillea bush and stuff like that.
- Pruning Saw: These come in variety of sizes and blades with teeth that are fine or coarse and even a folding type like this one. This looks pretty handy and sturdy for home gardening purpose. These are typically used for Stems that are more than 1-1/2 inches in diameter which are usually too large for hand pruners or lopping shears.
- Flower Cutter (floral snips). This is a simple bypass pruner to cut small branches or flowers. These are light weight and have a spring system. And they are best for performing dead heading and also PINCHING technique for more branching and making your plant bushy.
- Grass trimmer: If you have a lawn and you don’t want to invest on a lawn mover, this is the tool for you. You can check this high quality grass trimmer and find out more details about it – links below.
- Last but not the least, A simple good quality Scissor does a lot of job. Am sure all of you agree with this. This is quite handy and most useful all-purpose cutting tool in gardening.
PRODUCT LINKS:
1) GardenJoy 12V Li-ion Electric String Trimmer
https://www.5startool.com/gardenjoy-12v-li-ion-electric-trimmer.html
10% off code: GARDENTIPS
2)Consumer-oriented model tools within affordable range on 5startool:
5Startool site-wide 10% discounted code: GARDENTIPS
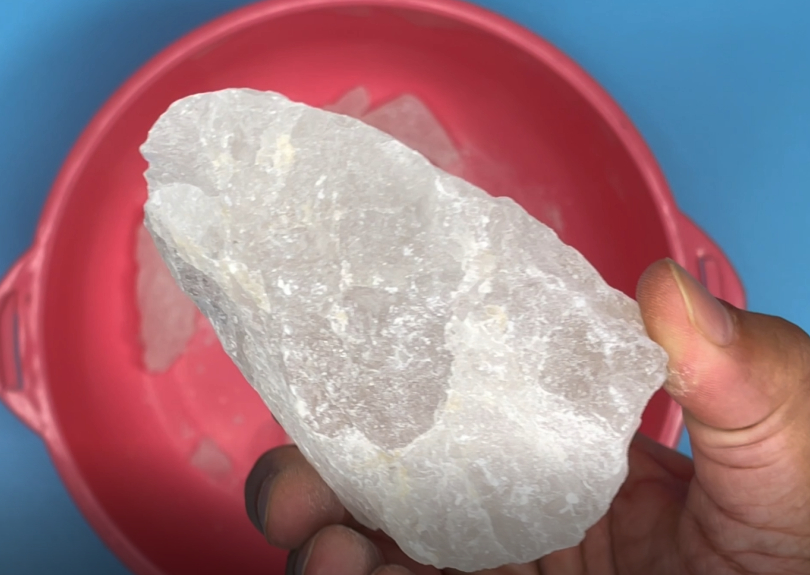
Alum or Potash Alum is a hydrated double salt available in crystal form or in powdered form or even in liquid form. This can be white alum or red alum, but the compound is the same. It’s chemical name is Potassium Aluminium Sulphate. This compound is eco-friendly and has no hazardous effects on plant, animal, or human ecosystems. It is easily available at any grocery stores or supermarkets and even in some garden stores. This is also available in various shapes like these blocks. These are actually meant to use as an after shave disinfectant.
Food-grade alum is approved by the FDA for household use and also medical use. But how is alum useful in gardening and what are the benefits of Alum in garden or on plants? Let’s list out these five best uses of alum for plants one by one.
5. ALUM PESTICIDE: Alum acts on pests by two modes: one by infiltrating into the body surface of the pest and second by ingestion by the pest. Alum pesticide in 10 to 20% concentration is found to be very effective on many pests including aphids, whiteflies and mealy bugs which are the most common pests in our gardens. It’s also effective in vegetable gardening to kill cabbage worms, cut worms, and other bugs. This pesticide can be used as an alternative to neem oil. Neem oil is not available in many parts of the world.
How to make Alum pesticide?
We will show you the recipe for 1 litre of water in 3 quick and simple steps.
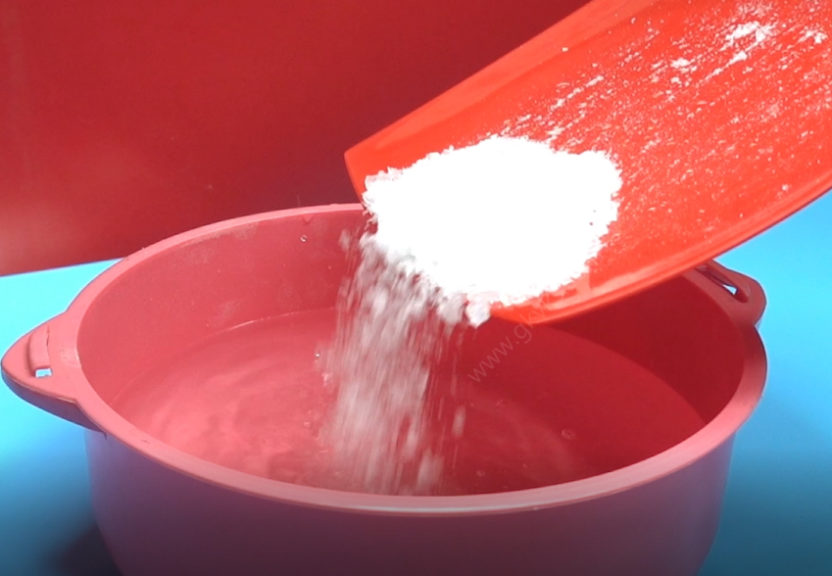
Step 1: Take 100 to 200 grams of alum. For home gardening you can use 100 gms of alum but to kill larger pests like cabbage worms or cutworms, you can take 200 gms.
Crush the larger crystals into smaller ones or use Alum Powder.
Step 2: Take 1 litre of clean water in a spray can or any container and add 100 to 200 gms of alum as discussed, depending on the pest type and intensity.
Step 3: Now add a surfactant like liquid soap or glycerine like about 5 to 10 ml.
You can now load into your spray bottle, Shake it well and spray it on the affected plants. Make sure you do a patch test on a leaf first to test the potency, before spraying on the entire plant.
4. TO REPEL INSECTS: Alum keep slugs and snails away and also certain other insects like cockroaches. Just sprinkle some alum powder or coarse crystalline powder over the affected areas.
3. MOSQUITO CONTROL: It’s an effective larvicide and kills mosquito larvae in stagnant waters in your home and garden. Just sprinkle alum powder over these stagnant waters and you are done.
2. SOIL AMMENDMENT: The first thing you must know is “Alum is NOT a fertilizer”. First and foremost use of alum in garden is to alter the soil PH.
For beginners: Soil PH plays a very important in plant growth and a balanced soil PH is really important for absorption of nutrients by the roots. A pH level of 7.0 is neutral, a pH below 7.0 is acidic, and a pH above 7.0 is alkaline. Also People living in Dry climates often have an alkaline soil, while climates with higher rainfall typically have acidic soil. Generally, most plants do well with soil pH between 6.0 and 6.5 – i.e, a slightly acidic PH. However, there are some plants which love a more acidic soil like hydrangeas, grapes, strawberries, blueberries, and even our rose and hibiscus trees. These are called acid loving plants.
But, before adding alum to soil, you first need to check your soil PH. A simple PH testing tool like this is really useful. You can also purchase a digital soil PH testing tool like this. If you do not have soil PH meter, you can roughly test your soil PH – like whether alkaline or acidic, using baking soda and vinegar hack. You need to add alum only if your soil is alkaline.
If you soil is alkaline or neutral you need to add 1 teaspoon of alum powder per litre of water or 1 tablespoon of alum per gallon of water. Mix it well and then water this to your plant thoroughly and check soil PH after 10 to 15 days. Repeat again if necessary.
1. INCREASE FLOWERING: Sometimes, your plant may not be flowering at all, even with proper sunlight, watering and fertilizing. The fault may lie in improper soil PH. Like acid loving plants including rose and hibiscus need a soil PH of 5.5 to 6.0 for proper absorption of nutrients. In such cases, you need to alter the soil PH as discussed in point number 4. This will certainly boost flowering in these plants.
- TURMERIC IS A TROPICAL PLANT
- CHOOSE YOUR TURMERIC RHIZOMES – Must be Free of Wrinkles, With Visible Eyes,
- CUT INTO MULTIPLE PIECES – EACH PIECE MUST HAVE 2-3 EYES
- OPTIONALLY LEAVE THE PIECES IN AIR FOR HEALING FOR 2 DAYS.
- SOAK FOR 12 HOURS IN WATER
- SOIL PREPARATION: A Well Draining Soil with Atleast 50% compost like decomposed cowdung or vermicompost. Cocopeat + compost or Peatmoss + Compost
- CHOOSE ANY CONTAINER FOR ROOTING. YOU CAN CHOOSE A LARGE CONTAINER LIKE 12 TO 15 INCH CONTAINER OR FABRIC BAG AND PLANT DIRECTLY. MAKE SURE THERE ARE MULTIPLE DRAINAGE HOLES. FILL THE CONTAINER WITH POTTING MIX.
- PLANT TURMERIC PIECES WITH EYES FACING UPWARDS OR SIDEWAYS. ATLEAST 1 OR 2 INCHES DEEP. COVER THEM WITH POTTING MIX.
- WATER THOROUGHLY TILL IT COMES OUT OF DRAINAGE HOLES.
- KEEP IN INDIRECT BRIGHT LIGHT.
- KEEP THE SOIL MOIST BUT NOT SOGGY
- RESULTS: SHOOTS START IN 4-5 DAYS AND CONTINUE TO GROW.
- TRANSPLANT TO LARGER CONTAINERS. ONE OR TWO PLANTS PER LARGE CONTAINER
- FERTILIZE MONTHLY WITH TWO HANDFULS OF COMPOST AND KEEP IN A LOCATION WHICH RECEIVES ATLEAST 4 HOURS SUNLIGHT PREFERABLY EARLY MORNING SUN OR UNDER A GREEN SHADE NET FOR FULL DAY.
- HARVESTING TURMERIC: YOU CAN HARVEST AFTER 8 TO 9 MONTHS WHEN THE TURMERIC PLANTS BECOMES YELLOW AND DIES.
Let’s start with a brief introduction and basic concepts before we list out the fertilizers. Please do not skip this information.
We all know that the Major nutrients or Macronutrients found in fertilizer are nitrogen (N), phosphorus (P) and potassium (K) – that’s NPK and each fertilizer has a ratio of these nutrients mentioned on the labels. This NPK ratio is very important to decide what you want to achieve from your plants. Nitrogen (N) is required for growth of foliage, that’s leaves of the plant. Phosphorus (P) is important for strong root growth and flowering and fruiting. Potassium (K) helps regulate important functional processes in a plant and make the plant healthy.
The Minor trace elements or Micronutrients are also important and include iron (Fe), boron (B), chlorine (Cl), manganese (Mn), zinc (Zn), copper (Cu), sulphur and many more.
We also know that the use of Chemical or Synthetic fertilizers is harmful and hazardous to all living organisms on earth. On the other hand, we also know the benefits of using organic fertilizers.
Having said that, Now let’s list them one by one with few important points on each of them. Please watch it till the end! And by the end of this episode, I bet, you will be really amazed to know so many organic options for fertilizers and many non-animal substitutes for vegan gardeners.
- Cow Dung Manure: This has been the universal fertilizer since ages. Not only cow dung, you can also use horse dung, goat dung and so on. But remember, it has to be fully decomposed to be used as a fertilizer. Generally, It has a NPK ratio of 2:1:1 +/- 0.5 and this has a decent amount of all three major nutrients. Apart from mixing it in your potting mix in about 30% proportion, generally a handful of cowdung once every month or twice a month is good enough for most flowering and fruiting plants. You can find a detailed post on cow dung tips and tricks.
BUY ONLINE: Cowdung https://amzn.to/2VLWldO - Vermicompost: This is nothing but earthworm poop or earthworm castings. Generally, It has a NPK ratio of 2:1:1 +/- 0.5 and can be used in place of cow dung manure or a mixture of both. Apart from mixing it in your potting mix in about 30% proportion, generally a handful of vermicompost once in a month or twice a month is good enough for most of flowering and fruiting plants.
BUY ONLINE: Vermicompost https://amzn.to/37uVim4 - Blood Meal: This fertilizer is created using powdered animal blood. Generally, This has a NPK ration of 12:1.5:0.5. This means it is high in nitrogen, and low in other elements. One important point to remember while using blood meal is it is highly acidic and over dose can cause fertilizer burn which usually happens with chemical fertilizers. But the advantage of using blood meal is its highly fast acting like the chemical fertilizers and can be used to quickly heal ailing plants with nitrogen deficiency. Add half to 1 teaspoon near the roots of the plant and water the plant and You should see the results within 2 weeks.
BUY ONLINE: Blood meal https://amzn.to/2YC4EbI - Fish Meal: as the name suggests, its made from fish and fish bones.Generally, It has a NPK ratio of 5:2:2 or may be different depending on the company label. This too is fairly fast-acting fertilizer similar to blood meal and apart from nitrogen, It has decent amounts of phosphorus and calcium as well.
BUY ONLINE: Fish meal https://amzn.to/2C6GQFt - Chicken or Poultry Manure: This generally has NPK of 4:3:3 +/-1 and has more nitrogen content than cowdung. This is also fast acting and hence over dose can burn your plants. Use very little dosage, similar to blood meal. The Best way to use these 3 fertilizers – that’s blood meal, fish meal and chicken manure, is to add a small amount to the soil before planting or to quickly heal a plant with nutrient deficiencies.
BUY ONLINE: Chicken manure https://amzn.to/3e1tsAr - Bone Meal: This needs no introduction. This is made from powdered animal bones which is available either as fine steamed bone meal powder or coarse powder for slower release, that’s for the entire growth cycle of a plant. This generally has NPK of 4:20:0. This is high in phosphorous content and very important for strong roots and healthy flowering and fruiting. Adding one table spoon per medium sized container mixed into the potting soil is sufficient for the entire growth cycle.
BUY ONLINE: Bone meal https://amzn.to/3htq4Am - Rock Phosphate: This is a vegan alternative to bone meal with high phosphorous content with NPK of about 0:20:0. You can either add this while you are preparing potting mix – 1 table spoon mixed with a potting mix volume of a 12 to 15 inch container or use 1 to 2 teaspoons of once in about 3 months per plant of its already in soil or potted.
BUY ONLINE: Rock phosphate https://amzn.to/2Ty5m8l - Seaweed: This fast-acting fertilizer is available for free along most coastlines. Its NPK is about 2:1:4. Its high in potassium as well. It also has plenty of micronutrients like zinc and iron. Seaweed is considered highly beneficial to plants that need high levels of potassium. Commercially it’s a available as either Zyme Granules or Seaweed liquid extract which also contains humic acid, fulvic acids and other useful amino acids. You can add half to one teaspoon per plant once in a month to nourish them with seaweed nutrients. Liquid seaweed extract can be used to quickly revive an ailing plant of nutrient deficiencies by spraying it on the leaves – that’s called foliar feeding and also by watering the plant. The dosage is 10 ml per litre of water. Make sure you spray more on the underside of the leaves, because the stomata or the openings are more in number on the underside.
BUY ONLINE: Seaweed zyme https://amzn.to/30HoUeW Seaweed liquid https://amzn.to/3dZRtYR - Humic Acid and Fulvic Acid: These are rather growth enhancers and final break-down constituents of the natural decay of plant and animal materials. Humic acids are an excellent natural and organic way to provide plants and soil with a concentrated dose of essential nutrients, vitamins and trace elements. Humic acids chelate complex nutrient compounds in the soil to convert them to a form suitable for plant absorption. This reduces the fertilizer usage by upto 30% and increases flowering and fruiting by up to 70%.
So, How to use this? The Dosage is 1 teaspoon per litre of water. Mix it well and water 1 cup, that’s about 250 ml of it per plant. If you are using liquid add 3 ml per litre and water your plants. You should see results within 2 weeks.
BUY ONLINE: HUMIC acid – https://amzn.to/3h7kGTr - Organic Micronutrient Granules: This type of fertilizers contains both major NPK nutrients and micronutrients like Calcium, Sulphur, Zinc, Copper, Iron, Boron, Molybdenum, Manganese, Chlorine, etc. You can add about 1 teaspoon of it per plant once in a month. You can watch a detailed post on various micronutrient deficiency patterns.
BUY ONLINE: Organic micronutrients https://amzn.to/2BjAMZT - Neem Cake and Neem Cake Powder: This is both a good fertilizer as well as a good soil pesticide. It’s actually the left over product after neem oil extraction, any cake for that matter is a left over product. You can mix about 10% of it while preparing your potting mix to avoid soil pests. You can also sprinkle it around your existing plants. You can also make a liquid fertilizer or neem cake tea by adding one handful per litre of water and allow it to brew for atleast 24 hours and then water your plant directly or by further diluting in water.
BUY ONLINE: Neem cake https://amzn.to/2AypK2Q - Mustard Cake and Powder: This is another natural source of NPK and increases flowering in plants. The use is similar to how we discussed for Neem cake powder.
BUY ONLINE: Mustard cake. https://amzn.to/2XWZ04V
- Epsom Salt: This is the best source of magnesium for plants. It’s chemically magnesium sulfate. Magnesium is the central most atom of the chlorophyll molecule. You all know chlorophyll is very essential for photosynthesis – that’s plant food production. You can watch a detailed post on the uses of Epsom salt and how to use it.
BUY ONLINE: Epsom salt https://amzn.to/3d02ZlB - Soyabean Meal: This also need a special mention, especially for vegans who can use this as a substitute for bone meal for phosphorous supply.
- OTHER ORGANIC FERTILIZERS: that need a mention, like Alfalfa Meal, Azomite, Cotton seed meal, Feather meal, Green Sand and so on.
MAKING A COCKTAIL:
Now let’s see how to prepare the cocktail fertilizer mix. With so many Organic Fertilizers in hand, using them all one by one is a tough task. So what I always do is mix them all and total the NPK value approximately and use them with a certain dosage per plant. This time I decided to mix only the dry stuff excluding vermicompost and cow dung manure. Let’s mix all the other ingredients and make a cocktail mix and total the NPK value and use accordingly. Do not worry too much about over dosage, because most are organic fertilizers and will not harm your plant. To get a better idea on totalling the NPK and making this cocktail universal fertilizer, You can watch a detailed post on how to make a mixed fertilizer recipe.
Happy Gardening!
- Gardening needs Patience! Gardening takes time to master, and plants take time to blossom, cuttings take time to root, seeds take time to germinate. Not every plant will be a winner for you! Do not give up if you fail or your plant dies!
- Go Scientific! Always gain the right knowledge on plant care tips. Beware of unscientific shortcuts, gardening hacks, fertilizers and stuff like seen on the internet. Use your common sense and reasoning before jumping into some non-sense tips.
- Do you know the Surest way to kill a plant? Apart from Over watering or under watering, the biggest killer is Over-Caring a plant! You know – Too much is Too Bad!
- Do not get upset when a plant dies! It’s not failure–it’s an opportunity to learn from your mistakes.
- Thumb Rule for Watering: Over watering is one of the biggest killer! Use the finger dip method to check for moisture – dip an inch of your finger into the soil. Water it only if its dry.
- The most common reason plants fail to bloom is not enough sun. As a general rule most flowering and fruiting plants needs at least six to eight hours of direct sunlight in a day.
- Many plants wilt in hot sun, even if soil is moist. Do not water them seeing the wilt. Overwatering can kill them. Examine your plants in early morning when its cooler and if they are still found wilted, water them!
- Butterflies are the most beautiful visitors to your garden. Attract them by planting their favourites like butterfly bush, zinnia, lantana, marigold, salvia, pentas, firebush and other plants.
- Encourage beneficial insects and pollinators like butterflies and honey bees in your garden. Do not use powerful chemical pesticides on your plants. It can kill them!
- Avoid wetting the leaves when you water. Wet foliage encourages disease and fungus in most plants.
- A kinked Garden hose is a waste of time and energy. Invest in a good quality garden hose for peace of mind!
- Fruits and Vegetable plants need full sunlight of atleast 6 to 8 hours and leafy greens do not! They can be grown even in partial sun or indirect bright light in shady spots.
- You know, you are a True Gardener, if you accept a gift of Cowdung Manure and feel happy on your birthday or similar occasion?
- Neem oil is the best and safe organic pesticide to get rid of a lot of pests and diseases in your garden.
- Say No! to Chemicals! For Treating a pest affected plant, always start with the least toxic option first like neem oil or even plain soap water. Go for the powerful options only as the last option. You know you can make a more potent organic pesticide by mixing neem oil with other oils like clove oil and eucalyptus oil.
- You know you could burn your plants or even loose them if you apply overdose of chemical fertilizers like NPK, DAP or Urea. On the other hand, Your plants are absolutely safe with organic fertilizers like cow dung compost or vermicompost.
- Prepare a Garden Maintenance schedule or time table and reminders on your calender like watering, pruning, fertilizing, pest control and other important gardening tasks to follow regularly to keep your plants healthy.
- Grouping Plants of similar family for better maintenance like succulents and cacti which need watering once or max twice a week. Water loving plants, Flowering plants and shade loving plants all must be grouped separately for proper maintenance.
- Choose the Right Plant for the Right Location depending on its sunlight requirements like a sun loving or flowering plant and shade loving plants. That’s again Grouping of Plants.
- Soil is the King! Your garden will only be as good as your soil. Take your time to prepare the best potting mix. The right proportions of various ingredients including soil, compost and other stuff are important for best results.
- Most of the plants love sunlight plus a well draining soil to perform well. Always Remember this you purchase a new plant or repot a plant.
- Focus on Preventing diseases and problems more than curing them. Prevention is better than cure. Even if your plants are pest free, spray a pesticide like neem oil atleast once in a fortnight.
- Make it a habit to Remove weeds and other unwanted plants at least once in a week.
- Top soil raking or tilling should be performed once in 15 days or atleast once in a month to improve soil aeration.
- Fertilize your plants at the same time when you till or rake your top soil. A handful of an organic fertilizer like decomposed cowdung powder or vermicompost can keep your plant healthy.
- Know your plant by its name and family. This is very important to learn about the requirements of a plant like water, sunlight, fertilizers and so on. You can use some useful plant identification apps on your phone like PictureThis App or even the Free Google Lens tool in your google search app to identify plants.
- Soil PH and Temperature can be very important! Make sure you have this type of simple soil PH and moisture meter and also the soil thermometer. Also learn more about the ideal soil PH required for plants and ways to alter soil PH.
- Soak your seeds! Most seeds benefit from pre-soaking and germinate faster. Soak them for several hours or overnight in room temperature water before sowing them.
- Always use gardening protection wherever applicable, like use garden gloves while handling potting mix and cacti. Wear a mask while applying a pesticide.
- Pruning or trimming plants is an important task in gardening. Know the best time to prune your plant. For most plants its just at the end of its dormancy period which falls mostly in late winter or early spring. Do not hesitate to trim your plants to make them more bushy and increase flowering and fruiting.
- Keep you garden clean and avoid water stagnation to avoid breeding of mosquitoes and other harmful insects. After all Health is Wealth!
- Rule of Thumb for Watering: Generally for most plants, its better to water less often but thoroughly till it reaches all the roots. Instead of watering more frequently with small sips of water, thorough watering like until the water drains out of the drainage holes is the recommended method.
- For Cloning your favourite plant and growing its cuttings – always making a Sharp Cut at 45 degree angle half an inch below a node with a clean cutting tool.
- Container selection is also very important in gardening. Choose the right size and type of container like clay and cement planters for keeping in full sunlight and Plastic and others for keeping in shade or even indoors.
- Use organic fertilizers and not chemical fertilizers. You can mix various fertilizers like cow dung powder, vermicompost, neem cake powder, bone meal powder etc to make a cocktail to offer the best nutrients to your plants.
- When you purchase seeds, always go for F1 or F2 hybrid seeds and even Heirloom seeds for best results.
- When you purchase plants from a nursery, examine the plant for any pests. One infected plant can spread the pests to your entire garden.
- Repot your potted plants in the next larger container once every 1 or 2 years.
- You can reuse your old potting soil by removing roots and other debris and adding fresh compost to it.
- Always check the patency of the drainage holes specially just before rainy season. If water is not flowing out, use a sharp tool to make the drainage hole patent.
- Keep ants away from your garden. Ants can carry sucking pests like aphids and mealy bugs to the growing tips of plants and they have a symbiotic relationship. Use remedies like Borax powder or Diatomaceous earth powder to get rid of ants.
- Never mix saw dust or any raw stuff into your potting mix as this can cause nitrogen deficiency in your plants. Nitrogen Stealing effect applies as the saw dust steals nitrogen form the soil in its decomposition process.
- Do not Kill earth worms in your soil or containers. They are gardeners best friends and make the soil fertile.
- Install a Shade net for your plants in summer season to protect them scorching summer sun.
- Gardening keeps you healthy and is a cure for depression, anxiety and many other diseases.
- Learn to interpret leaf yellowing and leaf browing at tips and edges. Do not Panic! Know the reason and treat accordingly. Check out all related video links below.
- Learn to interpret leaf curling, like upward curl or downward curl, or curl due to pests and things like that and treat accordingly.
- Sow the rights seeds in the right season like summer or winter vegetables and flowers. You can use a Garden planner software or google this for the zone you live in.
- Grow plants faster and healthier using air pruning pots, fabric grow bags and coco coir pots.
- Work Smart! Use some sensible Gardening Shortcuts and Hacks to save time and achieve success. Please Watch these 100 Gardening Hacks and Shortcuts from links below.
RELATED VIDEOS:
100 BEST GARDEN HACKS: https://www.youtube.com/watch?v=ILDnpeCELeY
BEST LIQUID FERTILZIER: https://www.youtube.com/watch?v=cf_0OjYHklU
GET 500% MORE FLOWERS: https://www.youtube.com/watch?v=FDIYZci5w2k
LEAF YELLOWING DIAGNOSIS: https://www.youtube.com/watch?v=2ullQwnB6ms
LEAF CURLING DIAGNOSIS: https://www.youtube.com/watch?v=Rz1Uk9GYrQI
RULES OF CLONING: https://www.youtube.com/watch?v=lLvgE6ouNBA
SAW DUST IN GARDENING: https://www.youtube.com/watch?v=262FSISLHAE
GARDENING SHOCKING QUESTIONS: https://www.youtube.com/watch?v=HDbr7MQNNIk&list=PLvE-WOB38X7blmKGKN6G9lFGQHjSvStg7
Well, Now these beautiful little adenium seedlings are about 2 months old.
This is the best time to repot them into independent containers, because the nutrient requirement will increase as they grow and also increased chances of overcrowding and due to this the more aggressive ones will siphon supply off the nutrients from their neighbours affecting the weaker ones.
At about 2 months, they are about 2 to 3 inches in length and remember they are not so delicate or sensitive as you might think. You can transplant or repot them easily. But you need to remember few important points during the process of repotting and post transplant care.
Here are some 10 useful points to remember:
- Choosing Containers: You can use 4 to 6 inch clean new containers or clean up existing containers with baking soda or any mild disinfectant and make sure they have good number of drainage holes.
- Potting Mix: You can use any succulent potting mix with about 50 percent sand, Garden soil and perlite and other optional stuff as mentioned in one of my post on Potting mix for succulents and cacti.
- Taking out Seedlings: You can use the spoon method to carefully dig out the little ones by holding a leaf and gently digging and pulling out. This should be easy because we have germinated the seeds in sand and cocopeat.
- Inspect the seedlings and discard any rotting or rotten ones.
- Repotting: Have a look at the structure and the markings. The first mark is to demarcate the level above and below the soil. Make sure you insert the plant’s future caudex above the level of soil. If its too below the soil level, it can lead to rot and death.
- Optional Tap Root Cutting: This step can be performed after 6 months or 1 year to make the caudex more fatter. This time it may be little risky to cut the tap root at the mark shown here. I have shown all steps to make the caudex thicker in one my older episodes last year.
- After Repotting: Its always safe to either spray and antifungal solution like bavistin or water these with dilute antifungal mixed in water.
- Water Requirement: Check the soil for moisture before watering. Over watering can kill these little ones. Roughly you can water once in 3 to 5 days.
- Fertilizer: If you have added some compost into the potting mix, they don’t require any feeding for atleast 2 or 3 months. If you use NPK water soluble feed, water them with a 50 percent dilute solution of this once in 15 days for faster growth.
- Sunlight: This is very important. After repotting keep them in indirect light or even shade for 3 to 4 days and then shift to full sunlight once they are out of transplant shock.
Epsom salt is an easily available inexpensive naturally occurring mineral salt that has a variety of applications. It is used in medical science, agriculture, gardening and even for many home remedies for health and beauty.
Epsom salt is chemically Magnesium Sulphate and obviously
contain the element Magnesium.
Did you know Magnesium is the central atom in between four nitrogen atoms in
the chlorophyll molecule. For beginners, Chlorophyll is the pigment present in
leaves which is essential for photosynthesis – that’s plant food
production. Its so much important and that’s the reason why Magnesium is rightly
called as the MAJOR MINOR ELEMENT.
For beginners, the Major elements required for plant growth are the NPK –
nitrogen, phosphorous and Potassium and Minor elements like Magnesium, calcium,
boron, zinc, iron and others.
Now let s list out the best uses of Epsom salt in gardening and farming and how to and how much Epsom salt to use for each gardening task. Please watch this episode till the end.
- Seed Germination: Magnesium is proven to help in seed germination and helps by strengthening the cell walls and leading to much stronger seedlings. You should be aware of this problem called Damping off which affects the seedlings resulting in rotting and death of young plants.
Of course this topic needs another detailed episode to discuss in detail. But for now remember, to prevent this problem, Make a solution of 1 teaspoon of Epsom salt in 1 litre of water and spray it on the seedlings once ot twice daily. 1 teaspoon is roughly 5 gms by weight. - Improve Foliage Appearance and Strength: Meaning increase the greenery of your leaves or even lawn grass. As I said earlier, Magnesium is an essential component in the production of chlorophyll which is the green pigment in plants. For this you can make a foliar spray made of 1 teaspoon in 1 litre of water. Spray this once every 15 days to keep your plants lush green. If you are lazy or do not have time to make a foliar spray, you can even sprinkle 1 or 2 pinches of epsom salt around your plant soil. It is water soluble and can easily get in through the roots of the plant whenever you water the plant. Another method is drenching the plant with Epsom salt solution when you are watering your plants. For this you can use half a teaspoon per litre of water and drench your plants whenever you are watering them. This way it will uptake magnesium from the roots as well as from the leaf stomata.
- Treatment and Prevention of Leaf Curling which is due to magnesium deficiency. Of course there are many reasons for leaf curl and leaf discoloration whether upcurl or downcurl and there is a pattern to identify different micronutrient deficiencies. I have discussed in detail about leaf curl in one of my episodes.
To treat leaf curl, you can mix two teaspoons or 10 gms in 1 litre of water and spray this on your plant foliage. Make sure the foliar spraying is done max at the underside of the leaves, because the stomata or leaf opening for absorption are located in large numbers at the underside of the leaves. - Transplant Shock or Repotting Shock: When we repot a plant, the roots and the plant invariably face a bad situation what is called as transplant shock which can even kill your plant. To counter this You can follow two method. When you take out the root ball for repotting, you can just soak it for an hour in Epsom salt solution. Or alternately you can just water the plant with the Epsom salt solution immediately after repotting. The dosage is again the same proportion – 2 teaspoons in 2 litres of water per plant. Water this weekly once or till the plant recovers.
- Nutrient Absorption: Magnesium is a component of many fertilizer products because it facilitates the roots to uptake or absorb vital nutrients like nitrogen, phosphorus, sulfur and other nutrients.
- Magnesium-hungry crops and plants, like potatoes, roses, tomatoes, lemon trees, carrots, and peppers are very much benefited. You get healthier Fruits and Vegetables when you use Epsom salt once every 15 days or atleast once a month.
- Garden Pests like Slugs and snails are killed by Epsom salt. Directly sprinkle on these common garden pests.
- Get beautiful, healthy and big sized roses by using Epsom salt. As I mentioned rose is one of the magnesium hungry plants. Adding Epsom salt along with decomposed cow dung or vermicompost once every 15 days to your rose plant around the soil can really make a difference. You can also perform a foliar spray of Epsom salt solution as mentioned. The dose is same like 1 teaspoon in 1 litre of water.
- Adding it in Potting Mix: Magnesium sulfate is pH neutral, so it won’t significantly alter the soil PH. You can watch my detailed article on the Universal Cock-tail fertilizer powder we prepared by mixing a lot of stuff.
Please Like, Share and comment below with your queries and feedback.
Happy Gardening!
Neem oil is a vegetable oil extracted from the Miracle Tree – that’s the Neem Tree. The botanical name of neem tree is Azadirachta indica. Azadirachtin and Nimbin found in neem oil are the two major compounds responsible for its antibacterial and antifungal actions.
This neem tree is native to the Indian subcontinent and can be easily grown at home gardening level even in large containers.
Before we discuss on which Neem oil you should purchase for best efficacy in gardening, we will list out the best uses of neem oil for your plants and gardening.
- Its Byfar the best Organic Pesticide available worldwide. It has an excellent safety profile and the best efficacy to treat a large number of pest attacks on your plants. It is infact a broad spectrum pesticide effective on pests like Aphids, Mealybugs, Whiteflies, Caterpillars,leaf miners, fungus gnats, Thrips and mites, Greenflies, Grasshoppers and other Scale insects. It kills pests in all their lifecyle stages like the adult stage or the larval stage.
- It has the Anti bacterial, anti viral and anti fungal properties not only for use on plants but also prescribed for humans and pets for various skin and hair problems.
- Its also effective on Slugs and snails which eat away a lot of your garden overnight. I have an important episode to identify some hidden pests and insects in garden by examining the leaf signature they leave after feeding on the leaves. You can watch that episode from a link in the video description or from an end screen.
- It highly Effective in the Treatment of Black spot Rose disease, Rose die back disease and Powdery mildew. We have detailed episodes on each of these plant diseases and problems. You can watch those episodes from the description links.
- Neem cake is an excellent organic fertilizer for your plants. Neem cake is the by-product left over after the process of extraction of neem oil from neem seeds or neem fruits. Its not only a source of NPK and micro nutrients for plant growth, but when mixed with soil acts as a soil conditioner and also antibacterial and antifungal. You can avoid fungus gnats if you incorporate about 10 percent neem cake powder in your potting mix.
- last but not the least is, unlike the chemical pesticides, It does not affect the beneficial pollinators like butterflies and honey bees which are so important for a fruitful gardening.
Now, we will discuss the most important aspect of this video, based on which the quality, composition and efficacy of neem oil depends – that’s the method of extraction of neem oil from seeds.
There are three methods:
- Heat Pressing method.
- Solvent extraction method and
- Cold Press method.
Heat pressing method – as the name implies, its using heat for crushing or pressing the seeds to extract oil.
Solvent extraction means using a solvent like alcohol is used to extract neem oil. This solvent extracted neem oil usually has a low price, because it is turbid and contains a significant amount of water and metals with low content of the important compounds namely azhadiractin and nimbin.
Heat extracted neem oil also has moderate loss of the useful compounds and less effective.
Whereas the Cold pressed Neem oil extracted without applying any heat, is the best and effective source for neem oil. So, when you are purchasing from a local garden store or online, make sure you check the method of extraction mentioned on the bottle or product description. You can purchase cold pressed neem oil here.
How to use Neem oil properly for the best effects?
Before I start with the neem oil recipes for plants, the safety profile of neem oil. It has few effects when concentrated form is ingested like stomach irritation causing gastritis and vomiting. Then Eye irritation and contact dermatitis can develop on contact specially in children. Otherwise it has an excellent safety profile and its completely biodegradable.
Now the recipe for Neem Oil you can make at Home.
Before this, few important points you must remember:
- Because it’s an oil, it doesn’t mix well with water and must be mixed with some kind of surfactant like liquid soap or even shampoo for proper mixing and the coating effect on the plant leaves.
- Make sure you do not spray neem oil during the sunlight – best time to spray is in evenings after the sun fades.
To Make the best broad spectrum PESTICIDE FOLIAR SPRAY FORMULATION for 1 litre:
Take 1 litre Warm Water and add 10 drops of liquid soap like your handwash or
even some shampoo. Then you add 5 ml to
10 ml of Neem oil into this. 5 ml if you want to spray as a maintenance
pesticide spray for your garden where you do not have much pests.
10 ml if you have lot of pests on your plants.
Mixing this thoroughly before use is very important.
Perform a PATCH TEST to know how strong it is. This means you Just spray this
on one or two leaves and then wait for a couple of hours to see if the leaf is
wilting or burning due to too much concentration of neem oil. If you pass the
patch test, you can spray it on your whole garden safely. Patch test may be
important for newbie gardeners or if you have purchased a new brand of neem oil
from some company for the first time.
Also make sure you spray the underside of the leaves as well.
- How frequently should I use neem oil? Depending on the severity of pests, use it twice a week for pest eradication phase and then weekly once for 1 or two months and finally if everything is clean use it once every 15 days as a preventive measure.
Happy Gardening!
How would you feel, when oneday on your early morning garden inspection you find part of your garden disappeared while you slept, or realize your flower buds are torn apart and very badly damaged?
I am sure after seeing this damage, Your first instinct is likely to spray some powerful chemical pesticide all over your plants to kill those culprits without even investigating further. This is not a right decision. Please Spend a little time to find out what’s eating your plants and then take necessary action particularly prescribed for that pest or insect.
Yes, Today we will look into Identifying those common pests by scanning their leaf signatures – that’s the leaf damage pattern they leave after feeding on your plants. So lets begin.
Chewed Leaves or Slime Trails
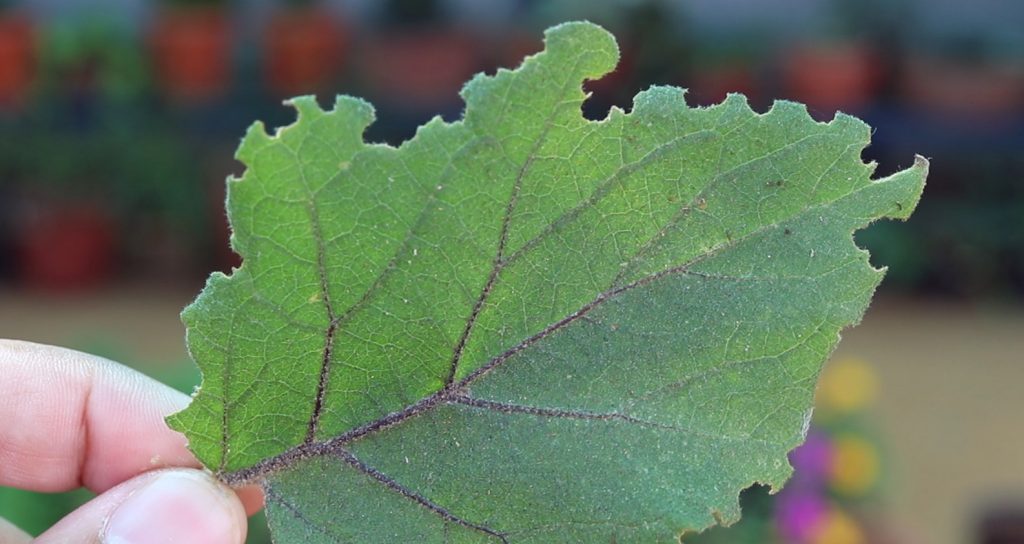
- Chewed Leaves or Slime Trails: If you seeirregular-shaped holes in the leaf (but not along the edges) and if you seeslime trails or lines, then most likely the Culprits are Slugs and Snails. So Whats the Solution? There are lot ofremedies for slugs and snails but Beer Trap is the most effective oneconsidered by many. Pour some beer in a saucer and leave it overnight. Thisattracts and kills these creatures. Chewed Leaves along the edges: Leafcutting bees are the culprits. So whats the solution? Generally unless its tooextensive damage, you need not take any step to kill or drive away these bees,because they are beneficial insects and required for pollination in yourgarden.
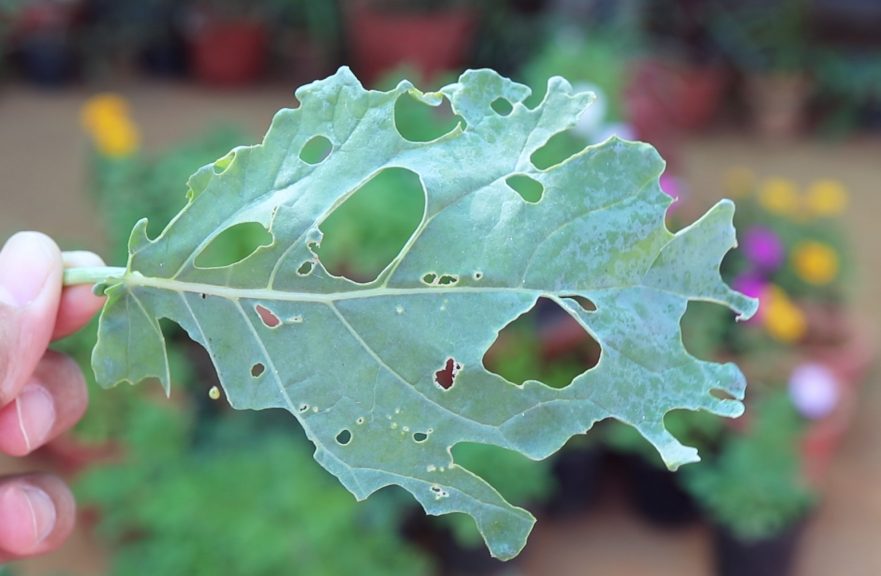
- Chewed Leaves with central holes in betweenveins – like Skeletonised leaves. The culprit here is Caterpillars if largerholes, then the other insects which can cause this pattern are Beetles, Earwigsand Saw flies. So whats the remedy. For caterpillars, hand pick and eliminatethem including their eggs from the leaves. After doing this apply a neem oil +soap solution weekly twice. 10 ml neem oil + 10 drops or 10 ml of liquid soapor shampoo and spray it thoroughly including the undersides of the leaves.
Skeletonised leaves
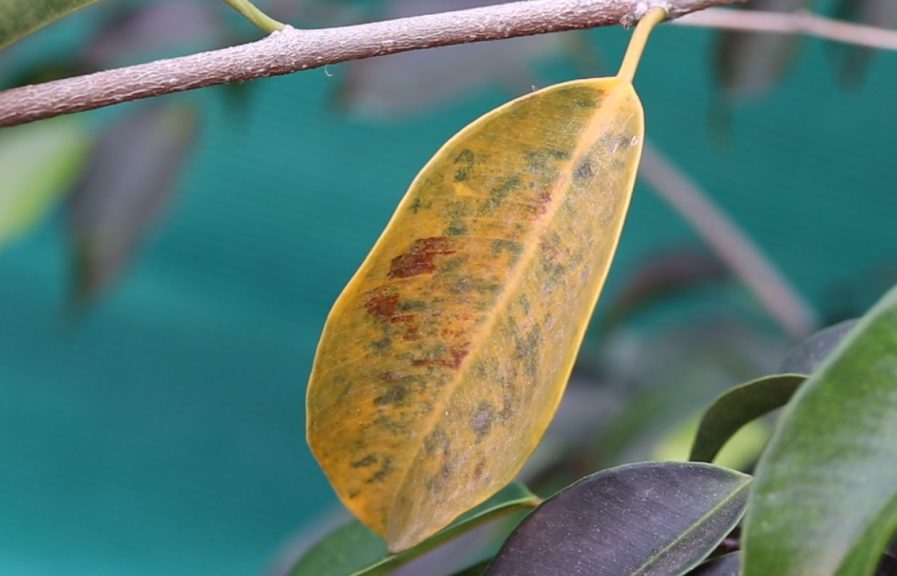
Discolored Leaves + Sucking Damage: Thisis commonly caused by Thrips and Spider Mites, common thrips are the CubanLaurel Thrips. As you can see here, the leaf is discoloured and then foldedonto itself to form a pouch or cover these creatures and its eggs. If leftuntreated, these thrips will multiply drastically and can cause a considerabledamage to your plant. So Whats thesolution? You can use the same Neem oil + soap spray weekly twice or can addanother oil like clove oil or eucalyptus oil if they are too extensive. If theystill persist, then go for a chemical sprays like those containing Imidaclopridas the last resort. If you still want organic solution like me, consideranother option called diatomaceous earth (DE).
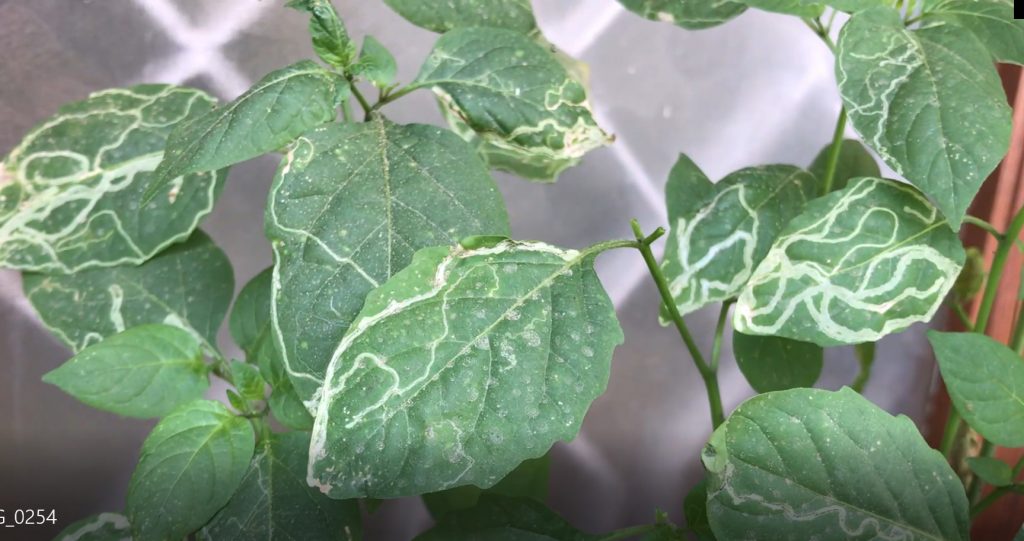
Zig zag leaf mining Pattern: Obviouslythese are called Leaf miners. Leafminers are very tiny larvae of a variety ofinsects like flies, moths and beetles. Leafminers do not actually cause majorinjury to the infested plant, but rather give an unattractive look to theplant. This mining pattern of zig zag lines on the leaves are produced as thesetiny larvae burry and eat along the infested leaves. If you want to control these, Neem oil is thebest solution. You can watch my detailed video on leaf miners and its remediesfrom HERE.
Sucking Damage and Deformed Leaves and Leaf Curls: Common Sucking pests are Aphids,Whiteflies and Mealy Bugs. The mealy bugs are very common and are found suckingthe new growth and tips. Infact, Mealybugs as well as Aphids have a symbioticrelationship with Ants which protect these pests from predators and also carrythem to the plants. The Ants in turn get the honeydew sugars excreted out oftheir anus as their gift. So, Whats the Solution? I have been using theMagic organic mix containing multiple ingredients along with neem oil tocontrol these. But they need a weekly spray with this solution depending on theseverity. There are lot of solutions to these pests including alcohol basedsprays, neem oil and many others. Please check a video on this topic HERE.
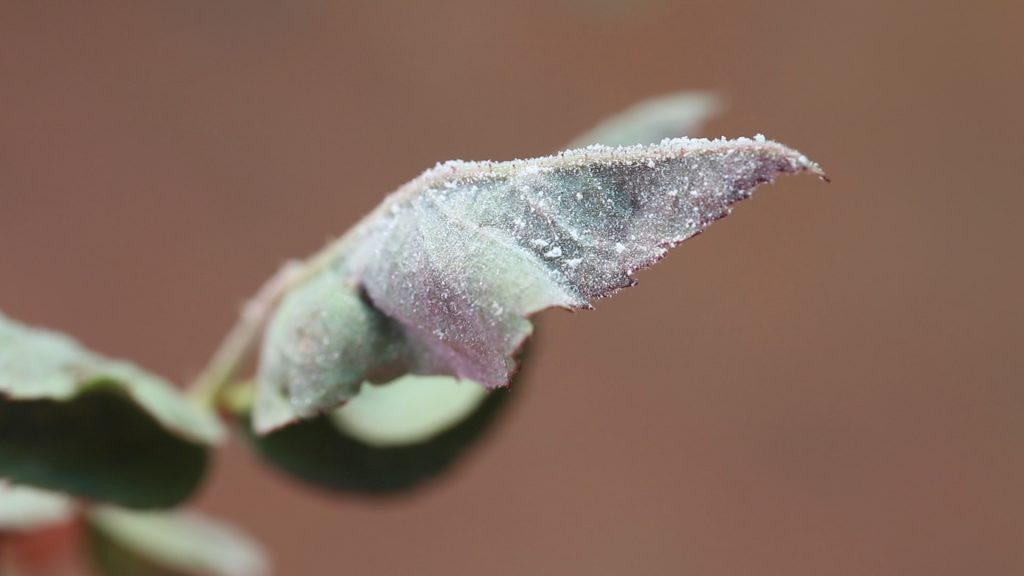
Leaf Galls or Leaf Bumps: This is astrange and rare pattern which presents as tumour like boils on the leafsurface. This is considered to be due to irritation or stimulation of plantcells due to feeding or egg-laying by insects such as aphids, wasps and mites.

Plumeria is a genus of flowering plants in the family, Apocynaceae. Most species of this plant are deciduous shrubs or small trees. These are mainly grown as ornamental plants in warm regions and produces nice flowers called champa flowers with a very pleasant fragrance like a scent.
It is called by various names like Champa tree in India , chempakam, Kath Golap, aaraliya or temple tree, Japanese frangipani and so on..
Plumeria species can be propagated easily by cutting leafless stem tips in spring. Cuttings are allowed to dry at the base before planting in well-drained soil. Cuttings are particularly susceptible to rot in moist soil.
There are more than 300 named varieties of Plumeria like plumeria rubra (red flowers), plumeria alba (white flowers) . This plant is very much similar to Adenium (desert rose) – which also has many varieties like alba and rubra and also both belong to the same genus of Apocynaceae.
The main differences are in appearances like:
Adeniums are large trunked with the bottom resembling a bulb, but as a whole they are small plants with smaller leaves. Adenium Root can also be enlarged like tubers.
Plumeria small trunked without any form of elongated tubers, and these plants that can grow big and tall, with long leaves and large shapes.
Plumeria species have a milky latex that, like many other Apocynaceae which contains poisonous compounds that irritate the eyes and skin.
So, coming back to plumeria propagation. We will start the rooting process of a cutting I brought from this beautiful white larger plumeria or champa tree with white flowers – that’s plumeria alba – alba means white.
You are seeing this mud wrapped around the base of the cutting, the person who gave me this cutting thought it would dry up and may not produce result if its left for drying, but in case of plumeria we have to dry this rooting area for about two days before planting in soil. So I am cleaning off this and allowing it to dry.
These Cuttings are allowed to dry, not in direct sunlight but just under room temperature. We do this because they are more prone to rot with fungus if kept too moist and directly insert in soil.
The success rate of these plumeria cuttings is great and that’s really encouraging for beginners in gardening. So, the basic procedure for this and also adenium is as follows:
- Take out all the leaves , but do not strip the node off. Why do we do this? The reason is that – The cuttings with all their leaves intact may be placing a greater water stress on the shoot which may not be able to grow roots easily. Some recommend cutting the leaves to half, because its believed that hormones are released in to the stem for rooting if we do this, but again this is perhaps an hypothesis.
- Here we are using the antifungal or rooting hormone like the one commercially available rooting hormones or your own organic rooting powder. This organic rooting hormone is nothing but the cinnamon bark powder which we use in our kitchen recipes as garam masalas.
- Just dip the base of the cutting which needs to be inserted into soil with this rooting hormone powder. Do not directly insert or make hole with the cutting because the rooting powder might just strip off the cutting and mix with soil. So, make a hole with another stick or any thing wider than your cutting stem and then carefully insert the cutting into the hole. The depth here is about 6 inches because the cutting here is longer. You can vary this depending on the size of your cutting.
- Then one more important thing is just pour small amount of water and leave it for alteast 2 -3 days and then recheck the moisture of the soil and sprinkle some water if you feel its fully dry. Because we do not want our cutting to rot due to overwatering.
- The roots should develop in about 40 to 50 days.
- Check the results at our instagram page.