In Today’s post, let us look into 15 household items and their miraculous uses for plants and garden.
15. Soap: Bar soap apart from cleaning purpose, there are some really powerful uses in gardening. You can scrape your nails into a bar soap before handling a potting mix and stuff like that. The dirt won’t enter your nail beds and this hack allows you to clean your hands easily after the job.
Liquid soap or even shampoo is used as a simple pesticide if you do not have any pesticide. Just add 10 to 20 drops or 1 or 2 teaspoons of liquid soap to 1 litre of water and spray on the affected plant. This will clear pests like mealybugs, whiteflies and aphids which are the most common pests in garden. Dish washing liquid soap is actually more potent than handwash liquid soap.
14. Chalk Sticks: Chalk is chemically Calcium Carbonate. You can take white chalk sticks and bury them into the soil while planting your veggies. That’s in initial stages. This really works wonders for plants like Tomatoes, Peppers, squashes, egg plants and almost any vegetable plant. You can bury two chalk sticks per container for these vegetable plants safely if you soil PH is around 6.0. For other plants to provide slow release calcium source, you can bury one chalk stick per container.
13. Turmeric: Turmeric powder has many effective uses in garden like: It repels ants when sprinkled around the plants. You can get rid of soil pests particularly fungal root rot and fungus gnats in the soil by mixing turmeric in soil. You can mix about 1 tablespoon per gallon of soil while making potting mix or 1 tablespoon of turmeric in 1 gallon of water or 1 teaspoon per liter of water and thoroughly water your affected plant with this solution. Its also helpful in healing tree wounds and in grafting as it prevents fungal rot. Another common use of turmeric is in rose die-back disease.
12. Vinegar: You can use vinegar to clean your rusty garden tools and pots. To make your soil more acidic for acid loving plants like hydrangeas, rose, hibiscus and so on and increase flowering in these plants. To do this, Mix one table spoon of white vinegar to one litre of water and water you acid loving plants with this solution once every 15 days to reduce the soil PH. Vinegar is also a strong pesticide. Its almost 100% effective in clearing powdery mildew fungus. To make this spray add One cup of White Vinegar to 1 litre of water and shake well and spray it on the affected leaves. It is also effective against white files and mealy bugs. It is also an animal repellent. Just soak some pieces of cloth and stuff them at entrances or behind pots to deter animals that can spoil your garden.
11. Baking Soda: Apart from cleaning your dirty garden tools and stuff with baking soda, you can also use it for other purpose like sprinkle to drive away Foul Smell from your Compost Pile or compost bin. To kill cabbage worms – Sprinkle Baking soda + flour like wheat flour in 1:1 ratio on the cabbage or broccoli leaves. The worms munch on this and die within 1 or 2 days. Baking soda also encourages flower blooming. Make a solution of 1 teaspoon baking soda in 1 litre of water and spray on your plants with flower buds or unopened flowers.
10. Asafoetida or Hing: The most effective use of asafetida is to treat leaf curl disease in plants. Add 5 gms of asafetida powder to one liter of sour butter milk. Mix well, leave for an hour, then sieve the solution and load your spray bottle. Spray over your affected plant. Repeat this every 3 days for 3 – 4 times. Leaf curl disease which is common in pepper and tomato plants will be completely cured by this treatment. Asafoetida can also be used to repel animals in your garden. Just hang some pieces of it in your garden entrances. Animals hate the pungent odor of asafetida. It also repels other insects and termites.
9. Charcoal: Hard wood charcoal has lots of amazing uses in garden like filling your pot bottom with charcoal pieces reduces pot weight. It can be used for mulching and garden décor. Mixing charcoal in soil can act as a good fungicide and prevent root rot, especially for expensive succulent plants. It also increases soil PH, when your soil is too acidic. It also works as a soil conditioner making the soil well draining. It also hold the fertilizers added for a longer duration and make them act like slow release fertilizers. Sprinkled charcoal powder helps deter many insects like the voracious beetles which can create havoc in your garden or on your crops.
8. Alum: Alum or Potash Alum can help to boost flowering. It makes the soil acidic for acid loving plants like hydrangeas, rose, hibiscus and so on. Just 5 gms alum powder per litre of water and water your plants once in a month. Alum is also a good pesticide in higher concentrations, like 100 grams per litre of water and spray on the plants to kill many pests including cabbage worms, cutworms, slugs and snails, etc. It is well known for mostquito control as a larvicide when sprinkled over the stagnant waters.
7. Banana Peels: Banana peel is one of the highest organic sources of potassium. It helps strengthen the plant and increases flowering and fruiting. You can make banana peel tea or banana peel fertilizer powder if you intend to store it. To make banana peel tea, soak pieces of banana peels in water for about 3 to 5 days. Use this banana tea in 1:5 dilution to water your plants once in a month. To make banana peel fertilizer powder, sun dry pieces of banana peels for 2 to 3 days till they are crispy enough to make a powder. Add one tablespoon of this powder once in a month and see the effect.
6. Aloevera: Aloevera has numerous benefits not only to the human body, but also to plants, like: It helps in faster rooting. Just insert a cutting into a piece of aloe vera and plant into soil. Rooting is faster and success rate is higher. Diluted aloe vera gel sprayed or watered to your seeds helps in faster and healthier germination. High levels of certain compounds found in aloe vera confer immunity or resistance against many plant diseases. Aloevera can also be used as a potent pesticide if mixed with other agents like neem oil, especially for pests resistant against certain pesticides.
5. Onions Peels: contain many useful substances like sulphur, quercetin, potassium, phosphorus, zinc, and so on. So, do not throw away the onion peels. The simplest use of these peels is to use them for mulching. If you have time you can make a fertilizer out of these onion peels. Just soak the peels in water for 1 to 2 days and water the solution to your plants once in a month to notice the benefits.
4. Tea and Coffee Waste: Do not throw this away. It can certainly boost flowering in your plants. It contains tannic acid which helps plants like Rose and hibiscus to increase flowering. You can wash the waste for any sugars and directly add to your plants or collect this and sun dry this powder and use it for your plants. You can also add this waste directly into your compost bin for making a rich compost.
3. Cinnamon: Cinnamon powder from your kitchen is well known for its wonderful uses in gardening. It can be used as a rooting agent to increase the chances for rooting cuttings. Just dip the cutting into cinnamon powder and plant it. It also deters ants when sprinkled around your plants. Its antifungal properties also fight fungal attacks to your seedlings. Just sprinkle fine cinnamon powder over your seedling and prevent dampening off.
2. Eggshells: Though eggshells are a great source of calcium, do not add crushed egg shells directly to your plants. It takes many years to decompose and release that calcium into the soil. You need to instantly release this calcium from eggshells by using Vinegar. Make eggshell powder first and then add a cup of vinegar to it. Stir it well and leave for an hour. The acetic acid breaks the eggshell compound and release free calcium into this solution. You can then dilute this solution to 1: 10 or 1:20 and then water your plants to treat or prevent acute calcium deficiency problems like tomato blossom end rot disease and other problems like bud or flower or fruit drop off and increase your flowering and fruiting. You can also add egg shells to compost bin for a calcium rich compost.
1. Aspirin: Aspirin is acetyl salicylic acid. Salicylic acid is a plant auxin and a rooting hormone which is proven to accelerate rooting and also it confers immunity against many plant diseases. You can use a dispersible 350 mg Aspirin tablet. Just a little of it will do the trick. A quarter or half a tablet is sufficient. You can read all detailed articles on these individual stuff by searching our website for that particular stuff.
We all know that Composting can return a significant portion of the nutrients we waste back to the Earth, where they can do so much good for plants, animals and also humans. Conventional methods of composting like Bokashi’s anerobic method or even the conventional method of aerobic composting can take a lot of time like atleast a couple of months, before we can use the finished compost for our plants. And these methods involve quite cumbersome procedures and techniques like turning the compost pile every other day and stuff like that. I have done a detailed tutorial on Composting A to Z like the Basics of Composting, various methods of composting, what are greens and browns, etc. You can check that post HERE.
In this article, we will demonstrate you an absolute fastest way to compost your food waste in less than 24 hours. Thanks to the latest technology by reencle which brings you this Kitchen-to-Garden-Fertilizer-Composter. Its an electric composting machine which can turn food scraps into garden fuel.
Let us unbox and test this fastest composting machine and check how fast it can compost food scraps within few hours. This handy gadget effectively composts up to 2 pounds of food waste every 24 hours and returns 90% of it back to nature!
Now, Let us quickly learn How this gadget works? Reencle’s technology emulates the animal or human digestive system, that’s pretty much similar to how the beneficial microbes in your gut help digest what you eat. The specific microbe that does the job is the Reencle-Microbe , They have just named it as Bacillus. Like in Human digestive system the process of digestion starts by breaking of larger chunks of food by the teeth, this work is done by Reencle mixing rods which chop larger food waste particles into smaller ones. In Human system, the Stomach churns the food, secretes Gastric juices and enzymes that help in digestion – that’s both mechanical and chemical action. In Reencle composter, this job is done by the Reencle Microbe Bacillus which breaks down and transforms food waste into compost. This Bacillus has great ability to decompose organic matter such as Carbohydrates, proteins and even fats.
Now, Lets quickly look at the this Elegant gadget. What’s in the Box?
When you order a Reencle, you get 1 x Reencle Prime Composter, 2 x Reencle Prime – Carbon Filters (1 x pre-installed, 1 x replacement filter), 1 x ReencleMicrobe Packet, 1 x Reencle Handy Shovel, 1 x Power cable, A user manual with 1-year warranty, and also a composting guide sheet.
Let me show you the parts of this composting gadget. This is the Small lid, The bid lid, the stirring or the mixing tank with rods and blades. These are the touch buttons. This is a foot motion sensor which automatically senses and open the door when you approach near the machine. This one is Purifier carbon filter behind, you get another spare filter with your order. These knobs on either side for lifting the composter. You can check complete details and order at Reencle website reencleus.com. You can find the link in the description below. This is not a very expensive gadget. It costs about 499 dollars with the new year sale going on.
Now let’s Start Composting using Reencle.
The first thing to do is to prepare or activate the composting microbes. This looks like saw dust powder initially with lot of useful stuff in it. You can also see paddy husk, activated charcoal pieces and lot of stuff. Just open the lid and pour the entire packet of this microbe powder into the machine and then add about 1.5 litres of clean water to it and close the lid. Turn the machine on and leave it for 24 hours. After few hours you can open the lid to check. If its looking too dry, then add or spray some more water. Water condensation on the underside of the lid is a good indicator of sufficient hydration of the compost mix.
After 24 hours, you are ready to start making your first compost. Simple concept here is – the new activated microbes are not strong enough to digest too much of load and all types of food waste in the initial 3-4 weeks. You start with lighter foods like Rice and bread first. Also its better to make smaller pieces of the food items for faster and smooth composting.
Now, After 12 hours, you don’t see any food waste, its all disappeared. Its really fast. It completely composted after 24 hours. So this way for initial few weeks you can add lighter foods.
After this period, you can add most of the food waste, except a few items which I shall mention shortly. Make sure you cut large-sized food waste into smaller pieces. Also rinse and put salty and seasoned food waste.
Acceptable food wastes which can compost faster include – Fruits, Vegetables, Cooked Meat and Fish, Grains, Noodles, Cookies, Bread, Cooked egg, etc.
Acceptable Food Wastes that can slowly decompose include – Pizza Crust, Watermelon peels, banana peels, Radish, Cabbage, Cucumber, Sweet potato and other Raw vegetables.
Unacceptable Waste includes – obviously plastics, Bones, Butter, Cream, Oils, Raw Meat, Roots, Uncut Fruit and Vegetables, Large seeds of Stone Fruits, Hard shells like walnuts, Egg shells. Eggshells will not decompose but will only be broken down into small pieces. Egg shells take a long time to decompose. You can check my detailed post on egg-shells and its uses in garden.
I am sure, you will have a lot of questions in your mind about Reencle composter. You can check their website and an online guide book that answers most of these questions.
If you want to take composting to the next level and generate a 24 hour supply of nutrient rich fertilizer for your home garden, this is a great gadget to invest and I would certainly recommend this product. You will be really happy to see the compost ready in 24 hours which can never happen in conventional methods of composting. I shall use this compost on my plants, experiment more on this and get back to you with an update later on.
Happy Gardening and A very happy new year!
It might sound weird but, there are many incredible Uses of Charcoal in the Garden. If you want to develop a healthy garden, please watch this episode till the end.
There are many types of charcoal available to purchase. But the good news is charcoal is very inexpensive to buy, though online prices are a bit on higher side than offline purchase. You get Hardwood and Softwood charcoal. Hard wood charcoal is best for gardening. Will tell you why as we proceed further. You also get special charcoals like coconut shell charcoal, bamboo coal, horticultural charcoal, activated charcoal and so on. It doesn’t matter, you can just use hard wood charcoal for your garden.
PURCHASE LINKS:
Wood Charcoal https://amzn.to/3FsyoNh
Coconut Charcoal https://amzn.to/3KTRKw3
Let us discuss the benefits of charcoal in gardening.
10. FILLING YOUR POT BOTTOM: Charcoal is porous and light weight and filling your container with pieces of charcoal at the bottom of your container, instead of using heavy weight rocks and pebbles, reduces your pot weight and you can lift or move your pot easily. This is a great boon for terrace gardeners.
9. CHARCOAL MULCHING: You don’t always need straws and twigs for mulching your top soil. You can use spread small charcoal pieces and enjoy the benefits of mulching. Mulching creates a protective covering over the soil surface and prevents moisture evaporation from the soil. It also helps to prevent weed growth over the soil.
8. GARDEN DÉCOR: Using a layer of small pieces of charcoal as mulch, especially around light-colored plants is a nice and unique way to create a different look in your garden!
7. AS AN ANTI-FUNGAL: Mixing charcoal to soil is an effective strategy to treat or prevent fungal infections in plants, especially succulents and adeniums which are more prone to fungal rot. Just include 10% of small pieces of charcoal in your potting mix to keep harmful fungi at bay.
6. INSECT KILLER: Sprinkle powdered charcoal over your plants. This helps deter many insects like the voracious beetles which can create havoc in your garden or on your crops.
5. PESTICIDE RESIDUE REMOVAL: The absorption qualities of charcoal powder, especially activated charcoal, helps in neutralizing the harmful effect of pesticides. Mix 500 grams of charcoal powder to 1 gallon of water (1 gallon is 3.78 litres). Spray or sprinkle this over the pesticide treated plants. This is very useful in edible gardening.
4. REDUCE FERTILIZER FREQUENCY: Charcoal will also absorb any fertilizer you put into the garden and will hold it over a long period of time, providing the plants a slow, steady supply. Here, you need to know one thing – Hard wood holds more nutrients than soft wood.
3. INCREASE SOIL PH: If your soil is highly acidic like PH of 5 or below, you need to increase the soil ph to desired level. A soil ph of 6.0 +/-0.5 is considered ideal for most plants. The potassium content in charcoal and also wood ash raises the pH balance of the soil and neutralizes the acid. Just don’t add too much ash, because if you increase the soil ph too much – like over 7, the plants may not do well, because most of the nutrient absorption in soil happens at a PH of around 6.0. So, How much of charcoal to add per container or per plant? You can add 100 gms or max 200 gms of charcoal per standard container – like a 12-inch container. Of course depending upon your soil PH level. You can read a detailed post on soil ph and its importance in improving flowering HERE.
2. IN POTTING SOIL: Charcoal acts as an excellent soil conditioner, thanks to its low cost, and in fact it’s a suitable replacement of lime in soil additive mixes. It makes the soil a well-draining soil which is very important for plant growth. It is the high porosity of charcoal that benefits plant soils because it offers more of the oxygen that plant roots need to stay alive.
1. REMOVES BAD ODOURS IN SOIL AND COMPOST: You can sprinkle charcoal powder over your compost to reduce foul odors that may arise during composting. Also, when included in potting soil, charcoal soaks up the nauseating odors of compost and manure, while leaving the nutritional integrity of the mixture intact.
- Rooting Hack: For faster and guaranteed rooting of stem or branch cuttings, take a small piece of fresh aloe vera leaf and insert the cutting into it and then plant into the soil. Roots grow as early as 10 days depending on the plant you choose.
- Candle Hack: Seal the upper cut end of your plant stem or branch cutting using few drops of candle wax. This helps prevent moisture evaporation and result in faster rooting.
- No Browns for Composting? Use a paper shredder and use the shredded paper and card board to add into your compost bin for faster and smell free composting.
- Easy Tomato Stakes: Tomato plants require support to avoid awkward bends and also to get the best yield. String Support your Tomato plants using a small piece of GI metal wire. Make it into a U-shaped loop and insert it near the roots. Tie one end of a string to this and the other end to some support at the top.
- Banana Peel Fertilizer for Flowering: To make banana peel tea, soak pieces of banana peels in water for 2 to 3 days. Dilute this liquid with water in 1:5 ratio and water your plants to provide potassium to your plants which increases flowering in plants and also makes the flower size bigger.
- Anti-Gravity Plant Support: While growing climber veggies, do not take them to a height above 6 feet, but instead support in a slope like fashion, like take it to a height and then slope the growing ends downwards to assist in long-distance transport of water and nutrients for healthy growth. The arch like trellis is the ideal support fence for growing climber or creeper veggies.
- Hairs to Roots: Insert tomato seedlings as deep as possible to increase the density of roots formed from tiny hairy projections from tomato stems and this makes the plant stronger to produce the best yield.
- Big Leaves: To get large sized leaves in your money plant, use a moss stick or coir stick to anchor the aerial roots to it. Wet the moss stick whenever you water the money plant.
- Onion + Aloe Vera Rooting Agent: Making a paste using onion and aloe vera gel and dipping the cuttings into it for few minutes before planting in soil will help in faster and guaranteed rooting.
- Spoon Transplant: To transplant your seedlings, use a spoon, dig out as much soil with it including the roots of the plant and hold the leaves of the plant and not the STEM to pull out, because this can squeeze and damage the water and food conducting tubes – xylem and phloem and the little plant may die.
- Grow From Junk: Never throw away a pine apple crown, just remove the bottom leaves and keep the bottom inserted into a glass of water for a week and then transfer to a container. It will bear fruits within a year.
- Eggshell Water: One eggshell contains about 2gms of calcium. When you boil eggs, a small percentage of this calcium and phosphorous is released into the water. Do not throw away this water, but use it to water your plants that require a lot of calcium – like tomatoes and peppers as well as flowering plants.
- Cello Tape Pest Trap: Wrap the cello tape in reverse on your fingers and use the sticky part to touch on leaves infested with pests like aphids, whiteflies and mealybugs.
- Clay Soil Hack: Remove Clayey or sticky soil from roots using this simple Hack: When you bring your plant from a nursery and start repotting, most often you find they have stuffed the plant in a clay-rich sticky soil. You can remove this soil without damaging the roots by soaking the root ball in water for few minutes till this soil dissolves. Then you can repot this plant in a well-draining potting mix.
- Root Teasing: Always Loosen up or tease your roots before repotting into a new container.
- Toilet Paper Cloning Hack: Use Aloe vera and Toilet paper to produce roots faster during air layering your favourite plant.
- Aspirin Hack: During conventional air layering to produce faster and better roots, use one tablet of aspirin 350mg per litre of water and add this water you’re the potting mix and then wrap it around the injured stem for faster and dense root formation.
- Hydroponic Cloner: For faster rooting, make your own hydroponic plant cloner using a plastic bucket and an aquarium pump. Healthy Roots develop within 8 days.
- Free Calcium: Egg shells easily dissolve in vinegar and release free calcium to your plants. Make egg shell powder and the add about a cup of vinegar to a cup of egg shell powder and stir nicely and leave it for any hour. Then dilute this to 1:100 or more to water your plants and treat acute calcium deficiencies which can produce blossom end rot disease in your fruits and veggies.
- Simplest Plant Cloner: Use any container and place a couple of aquarium air stones to pump oxygen into the water. This helps in faster and guaranteed rooting of any plant cuttings in water.
- Wheel-Barrow: No Wheelbarrow to move garden stuff? Do not worry, the cheapest alternative is a large cloth or an old bed sheet. Just load on the heavy objects and drag it along.
- Aspirin for Rooting: When you propagate cuttings in water, do not forget to add a small piece of Aspirin tablet into it for faster and stronger root development.
- Seed Split Trick: Split the Cilatro or Corinader seeds before planting them the sand paper paper method and apply gentle scraping pressure to split the seeds and do not crush or damage them using a heavy objects like these. This helps to grow enormous cilantro harvest.
- Scrape and Sow: Use sand paper to scrape the hard seed cover of certain seeds like apple, chickoo and those with hard seed over for faster seed germination.
- Treat Leaf Curl Virus using Asafoetida: Take 500ml of sour butter milk. Add one teaspoon or about 5 gms of Asafoetida powder to it and mix well. Let it stay for 1 or 2 hours. Sieve this solution and Spray thoroughly over the affected plant including the underside of the leaves. Repeat this, every 3 days for 3 – 4 times to completely cure the leaf curl disease.
- Egg Shell Planter: You can use egg shells to sow seeds. To make drainage holes, scrape with a sand paper and use a thin drill bit to make a hole without breaking the shell.
- Egg Trays: Card board Egg trays can be used as seed germination trays. You can directly transplant the seedling along with the card board into the soil, as this is bio-degradable.
- Chalk Sticks: Chalk is chemically Calcium Carbonate. You can bury a chalk stick into the soil while planting your veggies. This really works wonders for plants like Tomatoes, Peppers, squashes, egg plants and almost any vegetable plant.
- Strong Roots: Strong Roots means a healthier plant with a better yield. In its early growth phase, adding a source of phosphorous like bone meal powder or organic rock phosphate powder will produce stronger roots and produce a better harvest.
- Seed Viability Check: An Easy method to check viability of your larger seeds is to pour them into a bowl of water. If the seeds are floating, this means they are dry and not viable. Discard them and use only those seeds that sink to the bottom.
- No Garden Gloves? Scrape your nails into a soap before working with your garden soil or potting mix. This helps in cleaning your hands easily later on and also the dirt won’t enter into your nail beds.
- Repel Animals: A simplest way to repel Some animals like cats, dogs and rabbits – is to soak a some pieces of cloth with vinegar and stuff them in some areas of your garden. These animals cannot withstand the smell of vinegar and may not return if you repeat this process for few days. Similarly using Asafoetida wrapped in a piece of cloth will deter these animals and certain insects.
- Magnifying Lens: Use a Magnifying Glass to closely examine and diagnose your plant pests and insects to identify them and follow the treatment accordingly.
- Tea Fertilizer: You can also use tea waste or coffee grounds on flowering plants as an organic fertilizer to boost blooms.
- Tea waste compost: Add used tea waste or coffee grounds into your compost bin for faster composting because earth worms digest them very fast.
- Seed Spacing: You can do perfect seeds spacing for Tiny seeds like spreading them apart in a row on toilet paper – for better visibility and even spacing and sowing. You can make a seed tapes either in a row or a square or round seed board specially for carrot seeds for even spacing and better growth and ease of harvesting.
- Over-Ripe: Garden vegetables and fruits that become over-ripe are an easy target for pests. Remove them as soon as possible to avoid pest growth.
- Faster Germination: A simple hack for faster germination and healthy seedlings is to soak seeds in Epsom salt solution for a couple of hours before planting – like half a teaspoon of Epsom salt in 100 ml of water. You can also spray Epsom salt solution on your seeds and seedlings for healthy outcome.
- Pick Small: You can Pick small seeds for sowing with a stick or tooth pick dipped in water.
- Acidify Soil: For Acid loving plants like Rose, Hibiscus or Hydrangeas, use 5gms of Alum powder in 1 litre of water once every 15 days and this will boost flowering.
- Soil PH Test Using Litmus Paper: Mix Water and Soil in 1:1 ratio. Dip the litmus paper and match the color with your color coding chart that came along with your litmus paper kit.
- A Rough Soil PH Test Method: Take a soil sample and pour some vinegar. If it fizzes and bubbles you have an alkaline soil. What if the soil is acidic? Add baking soda one or two teaspoons and mix it with soil. Then wet the soil baking soda mix with distilled water. If it fizzes and bubbles your soil is acidic, because the acidic content in soil reacts with a base or alkaline stuff like baking soda.
- Free Bio Seed Pots: Never throw away the toilet paper card board roll. But use it to make seedling cups which are bio degradable and can be directly planted into soil without disturbing roots.
- Paper pots: You can also make seed pots by rolling newspaper and even this is bio degradable and similarly you can directly transplant with the pot into the soil or into a larger container.
- Mosquito Repelling Plants: Growing plants like Lemon grass, Citronella, catnip, basil, marigolds, eucalyptus and many other plants helps deter mosquitoes.
- Turmeric Treatment: You can use turmeric powder from your kitchen treat and prevent rose-dieback disease after pruning your rose bush.
- Silica Gel Packets: Never throw away these tiny sachets, use them in your seed storage container as desiccants which increases your seed life and protects them from fungus.You can also use these to preserve and protect powdered gardening stuff like bone meal, fungicide powder, rooting hormone, etc. Just tape the sachet to the underside of the container lid and that’s it.
- DIY Watering Can: Take the base of a soda bottle and place it around one end of a pvc pipe. Heat it up with a lighter. It should shrink and clamp around the open edge. No glue needed. Use a pin and poke some holes in the bottle base. Next, cut the edge of the pipe at an angle using a saw blade. Next insert the pipe into the inlet and use some hot glue to hold it in place. Optionally, colour it to get that beautiful look.
- Mini Green House: Use plastic bins or containers as mini green houses or poly houses for faster seed germinations.
- Do Not Kill: Avoid spraying a pesticide on the flowers. This is to avoid any harm to beneficial Pollinator insects like butterflies and honey bees which are essential for pollination and fruit formation.
Just google – “eggshells in garden” and your Google search will reveal hundreds of articles about the miracles of eggshells in the garden. Like using them for pest control, fertilizer or a source of calcium to plants, treat blossom end rot disease and what not! But do these claims hold water?
Let’s take a look at the apparent benefits of using eggshells in the garden and find out those which actually work and those which you can ignore.
- EggShells repel slugs and snails? The theory is: Broken eggshells have sharp edges, and if slugs crawl on them, they will get cuts on their bodies, and they die. This is a myth, and slugs and snails are not harmed by egg shells. You can see clearly them crossing the crushed egg shell barrier easily.
But some people say, egg shells have to be finely crushed to inflict injury to these creatures. You can see they are able to cross much sharper objects like a knife in this clip. So, this is completely disproved and will never work! - EggShells are rich in Calcium? Yes, this is a fact and they contain not only calcium – which is about 34%, but also rich in magnesium 0.3%, phosphorus 0.04% and potassium 0.03%. But remember eggshells do not contain any significant amounts of any major plant nutrients like the NPK – Nitrogen, Phosphorous and Potassium. If this is true, then!
- Crushed Egg Shells are a good organic fertilizer for plants? Crushed egg shells added on to the soil will take years to decompose and release those nutrients into soil, especially calcium. So adding crushed egg shells will not help to treat acute calcium deficiency in plants. Many experiments have been conducted on this, where finely powdered egg shells actually help but still take at least 4 weeks to start decomposing and release some nutrients into soil. So as a slow release fertilizer finely powdered egg shells can be used in the prevention of calcium deficiencies in plants like tomatoes and peppers, particularly the blossom end rot disease. But they never work for acute treatment of calcium deficiency.
- Sun dry or Microwave Eggshells before use? Yes this is better! To use egg shells, you need to sun dry them for a couple of days or microwave them for few minutes to get rid of any pathogens and then grind with a mixer or grinder, or with mortar and pestle. You can also buy egg shell powder for garden from online stores like amazon.
- Brown Eggshells are Better than white eggshells? Chicken eggs can come in different colors, and it’s common to find both brown and white eggs in the supermarket. Several studies have found that shell color has no significant effect on egg quality and composition. The only real difference is the pigment in the shell.
- EggShells in Compost Bin? Yes adding eggshells to your compost is perfectly fine, but they take years to break down. Adding finely crushed or powdered egg shells will help in faster decomposition and produce a nutrient rich compost over a period of time. And in making vermicompost, the red wriggler earthworms love egg shells and so they make an excellent addition to vermicompost.
- Eggshells release calcium when boiled in water? This is a fact, One eggshell contains about 2,000 mg of calcium. But boiling process releases only about 0.2% of the calcium as well as potassium into the water, which is a very small amount. But still something is better than nothing and it’s a free source. So next time you boil eggs, do not throw away the water, cool it and water it to your plants for instant source of calcium and potassium.
- Eggshell as a seed starting pot? Well, this is actually silly, but works! Nothing extraordinary about it. You add soil into the egg shell and sow the seeds, but it won’t offer much space as the seedling grows and also plants cannot suck the calcium right out of the shell and it’s better to start seeds in a seedling tray or small containers than taking the pain to start in egg shells. Moreover its really difficult to make a drain hole in an eggshell. It’ really a cumbersome process. You can make a hole in egg by scraping with a sand paper and using a dremmel tool and a drill bit.
- Eggshells for Mulching? There are better options for mulching like straw, dry leaves, wood chips, mulching sheets and so on. Egg shells are nothing superior and you need a lot of them to cover the area for mulching.
- Eggshells to treat Blossom End Rot? This simple hack will produce instant supply of soluble calcium or free calcium using egg shells to instantly supply calcium or treat calcium deficiencies like Blossom End Rot problem (BER) in tomatoes and peppers. To make this solution, you take any amount of finely powdered egg shells – like say 1 cup or 250 gms. Now you add nearly equal amount of distilled white vinegar to it – say about 250 ml. You can even add more amount of vinegar to dissolve egg shells quickly. But your need to dilute it with more water later before watering your plants. Now stir this mixture well and leave it for 1 or 2 hours. Intermittent or continuous stirring will make the process faster. Now add about 3 to 4 liters or a gallon of water to this or mix it to a gallon of water and then water your plants suffering from acute calcium deficiency or the BER problem. That’s it!
Have you ever used eggshells in your garden? Have you sprinkled them around your plants? Did you have success? Please comment below with your feedback and queries.
What’s in this article?
- A brief Introduction
- Why use this product?
- What are the various uses?
- How to use it for Mass multiplication, As a Bio fertilizer, As a Bio Pesticide,
- For Seed Treatment,
- how to make DIY micronutrient fertilizer using this product.
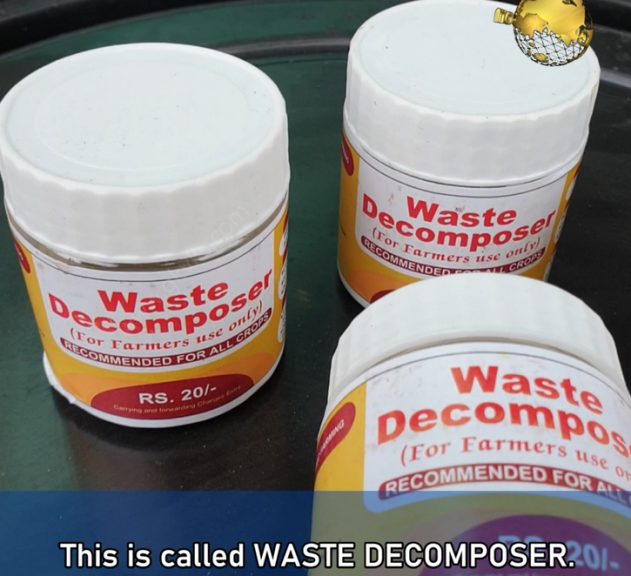
Currently, about 2 billion metric tons of waste is produced annually worldwide and only about 5 percent of this is recycled for composting. This means the waste is not managed properly and instead either dumped or openly burnt which can be really bio hazardous. To overcome this problem, the NCOF, ministry of Agriculture, India, developed a great product which is a consortium of micro-organisms, mainly azotobacter isolated from desi cow dung. And this took 11 years to standardise the mass multiplication technique at the farm level.
So, What is this Product Called? This is called WASTE DECOMPOSER. This is perhaps the world’s cheapest bio fertilizer and bio pesticide made till date. This product comes in a bottle of 30 gms costing just 20 INR per bottle, that’s less than 20 cents for international viewers and you need to buy only once because you can easily reproduce or do mass multiplication of this product and use it repeatedly for ever. A single bottle of waste decomposer decomposes bio-waste of more than 10000 metric tons in just 30 days and this bottle has a shelf life of 3 years. This is unbelievable.
So, Where to purchase this waste decomposer bottle? You can order this online from NCOF website or even amazon and these links below. International users can possibly import this product.
Amazon: https://amzn.to/2Spjj7G
NCOF website: https://ncof.dacnet.nic.in/
Now let’s learn how to use Waste Decomposer?
The first thing you should do is perform mass multiplication of waste decomposer. There is nothing sophisticated about it. It’s really a simple process. I will show you step by step.
Take a Large Plastic Barrel like this one, preferably a 200 litres container. You can take even 100 litres or whatever you have.
Fill this drum with water.
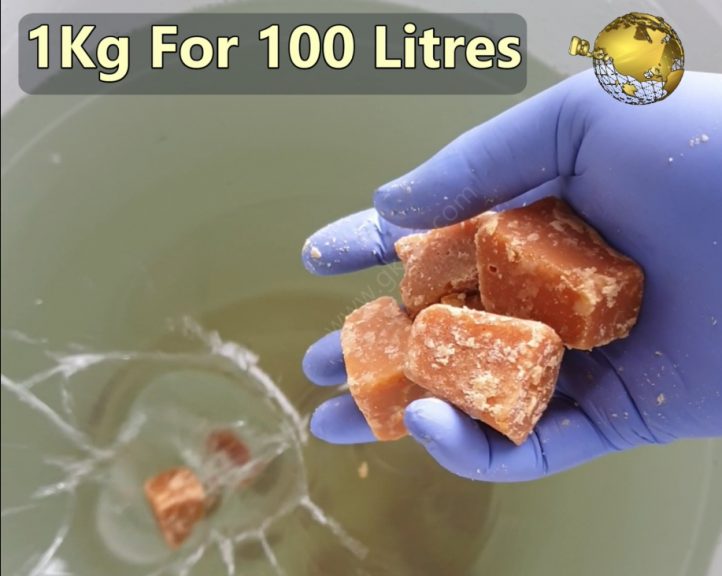
Now add 2 kilograms of Jaggery for 200 litres of water or 1 kilogram for 100 litres. This is the food for these microorganisms.
Now take 1 bottle of waste decomposer and pour all its contents. Make sure you avoid direct contact of its contents with bare hands. Mix it thoroughly using any stick or any pipe.
Then cover the container with a cloth. You need to open this daily and stir the solution once in 24 hours.
After 5 days or max 7 days depending on the climate, this solution turns creamy which means now you have 200 litres of water decomposer ready to use.
We will discuss on the uses of this solution shortly. To restart mass multiplication, now you don’t need to buy waster decomposer again. After use, Just leave around 20 litres of this solution in the barrel and add water again, then add jaggery again and repeat the procedure to maintain this for ever.
Now let’s discuss on The Various uses of this waste decomposer:
1. SEED TREATMENT: Simply spray or sprinkle waste decomposer solution uniformly over the seeds. You can even soak the seeds if you are doing this on a large scale. This works on all types of seeds. Keep the treated seeds in shade for about 30 minutes and then plant the seeds. Seed treatment with waste decomposer shows 98% early and uniform germination and provides protection against various seed borne diseases and also plays a role in strengthening the plants defence mechanisms.
2. FERTILIZER AND SOIL TREATMENT: Watering with waste decomposer solution significantly changes the biological as well as the physical properties of all type of soil within 21 days of application and it also helps to generate earthworm population in the soil which is so beneficial. You can dilute the waste decomposer in 1:2 ratio with water, that is one part waste decomposer to 2 parts water and water your plants once every 15 days or even once in a month. This is also proven to control many soil borne diseases in crops.
3. FOLIAR SPRAY: It acts as a potent bio pesticide when sprayed on plants.You need to dilute it to 1:3 ration to use it as a foliar spray. This helps control a variety of fungal, bacterial and viral diseases in crops when sprayed once in 10 days for 4 times in the growth cycle of a crop.
4. COMPOSTING: This is a compost accelerator and your compost will be ready within 30 to 40 days depending on the type of waste used for composting. For conventional pile method of composting, you need to sprinkle waste decomposer for every layer of compost and maintain the basics of aerobic composting like maintaining moisture, aeration by turning the compost pile and stuff like that. You can check my 4 episode series on composting from a link in description below. If you do composting at home in small scale, you can sprinkle waste decomposer solution once or twice and get that compost ready within 30 to 40 days.
Now, Let’s prepare the DIY micronutrient rich organic fertilizer using this waste decomposer, as recommended by the national centre for organic farming.
The basic principle of making this micro nutrient fertilizer is: Adding foods that are rich in proteins, vitamins and major and minor elements including Nitrogen, phosphorous, potassium, iron, copper, zinc, calcium, magnesium, boron and so on. Adding these into the waste decomposer results in break down of these elements into soluble forms by the microorganisms, enzymes and organic acids present in waste decomposer.
Well, Now let’s prepare this fertilizer and learn how to use this for your plants.
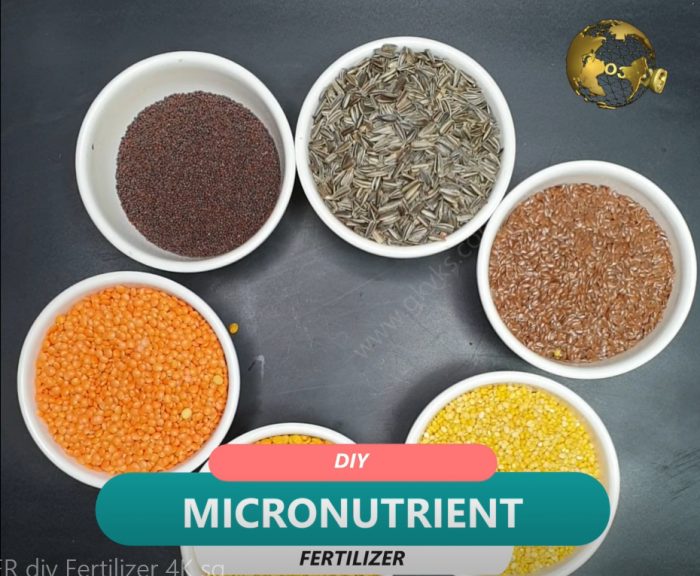
First of all – Things You Need: We will prepare this in around 25 litres of waste decomposer solution. Do not worry too much on the quantity and over dosage. This is not a problem with organic fertilizers.
1. Atleast 3 varieties of Oil seeds like 100 gms each of sunflower seeds, mustard seeds, flax seeds, or any other like soya, castor oil seeds, nigella seeds or any 3 varieties.
2. 3 varieties of Pulses or lentils of your choice like Red Lentil (Masoor dal), Yellow or Green split gram (Moong dal), Bengal gram (Chana dal), You can also take Red gram (Arhar dal), Black gram (urad dal) and so on.
3. Some 4 to 5 old iron nails or any small pieces of junk iron stuff.
4. Some copper source – like some old copper wires extracted from wires lying in your junk yard or any old copper vessel if you have one.
5. Some Zinc source – like one or two dry cells which are made up of zinc container.
Firstly, powder these seeds and pulses, this helps in faster decomposition. Add these into 25 litres of waste decomposer. Now add iron nails, then copper wires, then the zinc source. Mix it well and leave it for 10 days. Do not forget to stir this once daily.
After 10 days, your potent nutrient rich organic fertilizer is ready. So, How do we use this. You can use it in 2 ways. One, as a liquid fertilizer to water your plants and secondly as a foliar spray to instantly feed your plants through leaves stomata.
For watering your plants, you need to dilute this to 1:5. That is one part of this liquid to 5 parts of water. Where as for foliar feed, you can dilute this to 1:10 and spray thoroughly on your plants including the undersides of your leaves, because the stomata or the leaf openings are more concentrated at the bottom side of leaves.
In our previous posts we discussed on the fundamentals of composting including Types of Composting, the Carbon Nitrogen ratio and demonstrated the anaerobic or bokashi composting method step by step.
In Today’s episode, let’s learn How to perfectly make compost at home in 5 easy steps:
Step 1: CHOOSING YOUR CONTAINER
There are many ways to compost. You can either use an open pile composting method or use a compost bin. Open pile composting or using a simple chicken mesh boundary is the simplest way to start, but it has its own disadvantages. The best way to compost at home is use a compost bin. Bins have the advantage of being neat, keeping animals, rodents and insects away and preserving heat. You can build your own DIY compost bin from some plastic buckets or even drums or barrels. You can even build a tumbling compost bin. Or you can just purchase these from a garden store or online. The size and type of bin you build or purchase will depend on how much compostable material you generate on a day to day basis. A rotating Tumbler compost bin has many advantages, like you need not turn up the compost pile for oxygenation manually, instead you just give few rotations once daily and this will also speed up the composting process. The twin drum has an advantage of providing continuous supply of compost, like when one drum is full, you leave it for few weeks for final maturation and then start adding materials in the second bin. And repeat this process to get a continuous supply of compost.
PURCHASE TUMBLER BINS HERE:
Twin Tumbler Compost Bin https://amzn.to/3960iyp
Single Tumbler Compost https://amzn.to/2CL4ibs
Step 2: CHOOSING THE LOCATION
For conventional pile composting, a sunny location and a flat surface on soil is better. For drum composting or if using a tumbling composter this is not so crucial. However keep in a place which is open with good air circulation, and also keep in mind there is a liquid leak below the compost bins. This compost tea can be collected and makes a good liquid fertilizer for plants if used in adequate dilution.
Step 3: ADDING GREENS AND BROWNS
This we have discussed in detail in part 2 of our composting series. For greens and kitchen waste recycling you can add them daily to your compost bin along with browns. If your daily collection is too little, you can store in refrigerator and then add to your bin. Greens are nitrogen rich and mostly wet materials like waste kitchen scraps like vegetables scraps, fruit scraps, fresh grass cuttings, animal manure but not your cat or dog poop, then bird or poultry droppings, feathers, fleshy plants and leaves, flowers, tea and coffee waste, egg shells, nail clippings, human and animal hair, and so on.
Browns are carbon rich dry materials like dry fallen leaves, dried flowers, wood chips, twigs, straw, shredded paper, shredded card board or paper cartons, and also the toilet paper rolls, toilet paper or used napkins or facial tissues, coffee filters and tea bags, cotton, sawdust, pine needles, Pencil Shavings, dried grass clippings, peat moss, cocopeat or coconut fibers, used paper plates, nut shells, wine corks, toothpicks, paper cupcakes, used match sticks, wood ash or ashes from the fireplace, coal, and so on.
Well, We will not go into discussing the Carbon : Nitrogen Ratio in this episode. You just have to remember the Green to Brown Ratio while adding stuff into compost bin.
As a General Rule: A 1-to-1 Ratio works well with the Add as You Go Pile as well as for the Batch Pile and is safe for beginners. This will aid you in creating about a 50:1 C/N Ratio, adequate enough to get a warm pile. This means, For every bowl of greens, you add one bowl of browns and a little bit of compost activator.
Step 4: COMPOST STARTER or ACCELERATOR OR ACTIVATOR
If you are starting for the first time or first batch, you need to add those microorgansisms to start the composting process. This can be either a commercial compost maker powder; but remember not to add the Bokashi bran powder which is exclusively meant for anaerobic composting which we have discussed and demonstrated in detail in episode 3 of this composting series. You can check that link in description below. So, you can add this powder like 1 or 2 teaspoons or as recommended in your packet and, every time you add greens and browns and then rotate the tumbler or turn your compost a few times for good oxygenation. If you have a half finished compost or even a fully finished compost or decomposed cowdung can be added as a starter. You can also add the finished compost from your Bokashi bucket into this aerobic compost bin.
Step 5: MATURATION AND HARVESTING
when the bin is 70 to 80% full, stop adding further waste into it and leave it for 6 to 8 weeks for compost cooking and final maturation. But make sure you tumble the compost bin on a daily basis or if you are doing the compost pile method, you need to turn the compost pile every other day for proper aeration, otherwise it will develop foul smell and fail. If you are getting a sweeter pleasant smell, then everything is going fine. After 6 to 8 weeks or even more, you can collect your final compost and use this pure fertilizer for your plants. You can leave about 10% in the bin which acts as an accelerator for the next batch. Finished compost will be dark, crumbly and smell like earth.
In our previous two posts we discussed on the fundamentals of composting, Types of Composting and the materials that can be added and those that are prohibited in compost bin plus we also discussed on the CN ratio and the Greens vs Browns Ratio. In this post, we will demonstrate how to do Bokashi composting correctly to get that perfect organic compost at home – with no foul smell and within a short period of time plus you also get a glass or two of nutrient rich compost tea which you can dilute and water your plants.
Bokashi composting is anaerobic method of composting, meaning it happens in the absence of air or oxygen and is actually a fermentation process carried out by special anaerobic microorganisms, first developed by a Japanese professor – Dr. Teuro Higa. The term Bokashi is a Japanese word that means “fermented organic matter.” This method was mainly developed to recycle wet nitrogen rich kitchen waste quickly, unlike the conventional aerobic composting which takes atleast 4 to 6 weeks to form complete compost.
So, What are the materials that best work with this type of composting. Anything can be composted, but the carbon rich browns like dried leaves, saw dust, grass clippings, paper, card board, etc will take a long time to decompose in this method or might even halt or fail the process of composting. Anaerobic Composting works best with nitrogen-rich materials as they are mainly wet – the kitchen scrap including left over cooked or raw food, vegetable and fruit scraps, cooked or uncooked meat and fish except bones – this is actually avoided in aerobic composting and vermicomposting, but this is the beauty of Bokashi composting! You can also add egg shells, tea and coffee grounds, tea or coffee bags and other stuff which is common for greens in aerobic composting as discussed in our previous post. Avoid adding large seeds like mango seeds, bones, rubber bands, condoms, metallic objects and so on.
Well, now Let’s learn Bokashi step by step. One thing to note before we start is: You can either do batch composting or one shot composting. In batch composting you add your kitchen waste on a day to day basis, opening the compost bin lid. I recommend One shot composting, like Add it, close it and forget it. One Simple Tip for you: Collect your daily kitchen waste in bags and store the waste in your refrigerator.
Step 1: The Container: This is typically any air tight container called Digester. You can use any barrel or a bucket with a lid which can seal it perfectly. This container should have a tap at the bottom to collect our nutrient rich compost tea once or twice in a week.
Step 2: Preparing the Bottom: First of all place about 20 to 30 gms of jaggery or molasses at the bottom of the container. This accelerates the fermentation process and is a food for our hard working microbes. Then Place the plastic grate at the bottom of the bucket with the knob facing upwards. This space of about 3 inches is required for the fluids to collect at the bottom which we drain out as the Bokashi Tea. Then Make sure the tap is closed and then Place a piece of newspaper over it.
Step 3: Bokashi Bran: or Bokashi powder is a magic ingredient in this system. This is a vegan stuff and contains the essential microorganisms to perform the composting process quicker than the conventional method of composting. This powder is inexpensive and easily available.
Step 4: Layering: First layer you sprinkle the bokashi bran over the bottom – two table spoons. Then you add a 1 to 2 inch layer of kitchen waste over this. For every 1 – 2 inch waste, sprinkle atleast two tablespoons of bokashi bran. Then again add 1 – 2 inch kitchen scraps and then again sprinkle bokashi powder. Make sure you chop large chunks of waste into smaller pieces for faster composting. Crush and add egg shells.
Step 5: Compression: In this step you compress the layers as and when you are adding the waste layer by layer. This will displace out the air pockets which may be present in between the waste. This is also an important step for successful smell free composting.
Step 6: After your finish multiple layers. Add a thick layer of bokashi powder like about 3 tablespoons and take and extra step to keep it air tight. Place a piece of cardboard on top of the layers and press it. Then Finally Close the Lid properly to make sure there is no chance of air entry.
Step 7: Location: You can keep it indoors or in any location where there is no sunlight.
Step 8: Collecting Bokashi Tea: This tea must be collected every 3 or 4 days to avoid foul smell and composting failure. This tea can be used as a liquid fertilizer for your plants. It must be diluted with water at a 100:1 ratio, that’s 100 parts water to 1 part bokashi juice, that’s approximately 2 teaspoons of juice for every litre of water. Mix well and water your plants to give them an instant supply of nutrients.
Step 9: Leave it Undisturbed for at least 15 days before you harvest. But don’t forget to collect the bokashi tea twice in a week.
Step 10: Harvesting: This is the only drawback of Bokashi. Just as pickled onions or mangoes are still the same size and shape, your pickled food scraps preserve their looks, unlike aerobic composting where the stuff shrinks considerably during decomposition. But the advantage is its high nutritive value, but the harvested bokashi after 15 to 20 days needs further processing and cannot be added directly to plants. You need to dig a trench in soil and add this final product and cover it with atleast 6 inches soil. Allow another 3 to 4 weeks for final processing and then plant over it or use this finished compost on your plants. If you also have the conventional aerobic composting going on, you can just dump this into it for faster and perfect processing.
In our next post we will demonstrate conventional aerobic composting method, step by step.
Composting is a controlled and accelerated rotting down of organic matter into nutrient rich compost. Aerobic Composting uses the natural processes of rotting and decay by microorganisms in the presence of oxygen and produces heat and hence it is sometimes called hot pile composting. Whereas Anaerobic or Bokashi composting is the job done mainly by microorganisms in the absence of air which is more like fermentation process.
Aerobic Composting requires 4 things: Carbon, Nitrogen, Oxygen and Water in just the right amount for proper composting. Out of these, we need to provide Carbon and Nitrogen in the right ratio, what is known as the C:N ration or Carbon Nitrogen Ratio. Things that are rich in Carbon are called the Browns and those that are rich in Nitrogen are known as the Greens.
To be correctly composted, a material needs to have the following two important characteristics: 1. The waste material must be organic and biodegradable.
2. The waste material must contain things that are liked by micro-organisms to feed on.
So what types of waste can we can use in aerobic composting method. Firstly, let’s start with what we should NOT put onto our compost bin or compost heap. So let lists the Don’t’s First:
- Glass, metal and plastics are obviously prohibited in both types of composting.
- Oil, fat, meat, fish or dairy products are avoided because of their tendency to attract insects like flies and rodents. But these products are allowed in Bokashi composting.
- Hard woody branches, stems or roots which take a very long time to decompose.
- Rubber bands, Latex condoms, diapers and other obvious stuff like metallic objects like for example safety pins.
Having looked at the things to be avoided, now let’s look at what we can add, and there are literally thousands to choose from. The micro-organisms and even macro-organisms like earthworms need to have a balanced diet and just like animals or humans they need “energy” in the form of food to survive. This energy is supplied to them by carbohydrates which contain Carbon. But micro-organisms also need proteins in the form of Nitrogen and also Phosphorus. Aerobic composting works best if these organisms are fed a mixture of carbon rich materials known commonly as “Browns” and nitrogen rich materials known commonly as “Greens” in proper ratios.
Let’s List the Browns First: Browns are mostly dried woody materials which are high in carbon. Without the browns your greens will decompose too quickly and turn into a smelly pile – that’s called putrified pile. Here’s the List of Browns:
like dry fallen leaves, dried flowers, wood chips, twigs, straw, shredded paper, shredded card board or paper cartons, like this and also the toilet paper rolls, toilet paper or used napkins or facial tissues, coffee filters and tea bags, cotton, sawdust, pine needles, Pencil Shavings, dried grass clippings, peat moss, cocopeat or coconut fibers, used paper plates, nut shells, wine corks, toothpicks, paper cupcakes, used match sticks, wood ash or ashes from the fireplace, coal, etc.
Now Let’s List the Greens: Greens are mostly wet materials like waste kitchen scraps mostly vegetables scraps, fruit scraps, fresh grass cuttings, animal manure but not your cat or dog poop, bird or poultry droppings and feathers, fleshy plants and leaves, flowers, tea and coffee waste, egg shells, nail clippings (if no nail polish), human and animal hair, etc.
Having said that, now lets look at the Greens Vs Browns Ratio and the Carbon:Nitrogen Ratio. The right mixture of greens and browns, known commonly in the gardening world as the Carbon-to-Nitrogen ratio or C/N ratio, is important for proper composting. We want Composting and not Putrefaction or rotting.
So what is the ideal C/N ratio for an aerobic composting? Most experts suggest a CN ratio of 25 to 30:1, which means 25 to 30 parts carbon rich material to 1 part nitrogen rich material. High Carbon may result in too slow composting whereas high nitrogen may result in foul smelling putrefaction.
HOW TO USE THE C:N RATIO? Do not misinterpret this CN ration! This ratio describes the chemical composition of a material and does not mean that you need a volume of brown materials that is thirty times greater than the amount of green matter! Don’t make this mistake! Here comes the Green to Brown Ration to our rescue. You have to understand this carefully. The Ideal Green to Brown Ration is 2:1 but it can also be 1:1 for those who are starting to compost. This means for one bowl of greens, you can add one bowl of browns. Let me explain this. Every material has its own C:N ratio, like for example Food Scraps has a Carbon:Nitrogen Ratio of 17:1, meaning 17 parts Carbon to 1 part Nitrogen). Saw dust has very high C:N ration of 500:1. Hence this calculation depends on what you add to your compost bin and it gets more and more complicated. You can store this table for reference of C:N values of various materials.
For Ideal Composting – Do Remember these 2 Golden Tips:
- A 2-to-1 ratio of Greens to Browns is your best bet when creating a Batch Pile. This will aid you in creating about a 30:1 C/N Ratio. Adequate enough to get a hot pile.
- A 1-to-1 Ratio works well with the Add as You Go Pile as well as for the Batch Pile and is safe for beginners. This will aid you in creating about a 50:1 C/N Ratio, adequate enough to get a warm pile.
In our Next posts of this composting series, we will demonstrate how to do Aerobic and Anaerobic or Bokashi composting at home.
WHAT IS COMPOSTING?
Composting is a natural process of breakdown or decomposition of various organic materials otherwise regarded as waste products and finally produces a nutrient rich product which is known as the compost.
WHY SHOULD YOU COMPOST?
Most of the solid wastes in our cities comprises of our yard waste and kitchen or food waste. By composting or recycling these items, it makes it possible to reduce the overall amount of waste being sent to landfills and mass-burn incinerators. The final compost, is nutrient-rich and can be used to amend poor soils and fertilize gardens instead of using chemical fertilizers which are hazardous to all organisms on earth.
TYPES OF COMPOSTING:
There are three types: aerobic, anaerobic (like Bokashi’s composting), and vermicomposting. Each one has its own pros and cons.
- AEROBIC COMPOSTING: In aerobic composting method, air or oxygen is introduced to help break down organic materials. The composting pile needs to be turned for aeration every other day. This can accomplished by using a fork tool or using a tumble style or barrel composter. We will discuss and demonstrate how to easily do aerobic and also anaerobic or bokashi’s composting later, after we discuss some fundamental concepts of composting.
- ANAEROBIC COMPOSTING: This is exactly opposite of aerobic composting. Actually some do not include this in composting and rather call it a fermenting process. Japanese method called Bokashi composting is the best example of anaerobic composting. Anaerobic composting takes almost no effort at all. Just add scraps into the composter, and leave it air tight for many days. Many people think Anaerobic composting stinks like hell but this is not true if done properly and this can be avoided with the use of Bokashi method which we will demonstrate and discuss later.
- VERMICOMPOSTING: Vermicomposting uses earthworms, oxygen and moisture to safely break down organic material with very less odours. Basically, worms do most of the job along with the bacteria. This method is the most preferred method due to its many advantages.
FUNDAMENTALS & REQUIREMENTS FOR COMPOSTING:
These basics are really important and please do not skip these points.
Well, Composting requires the following three components: 1. human management, 2. aerobic conditions, and 3. development of internal biological heat. Composting Process by organisms require four equally important components to work effectively:
- Carbon — for energy. And the microbial oxidation of carbon produces the heat. High carbon materials to be added to compost bin are generally brown and dry stuff like dried leaves, twigs, saw dust, charcoal and so on. We will discuss on the materials that can be added and those prohibited in the later episodes of this composting series. Well, the second ingredient is
- Nitrogen — which is essential to grow and reproduce more organisms to oxidize the carbon. High nitrogen materials generally tend to be green like the wet scrap from your kitchen like fruits and vegetables. We will also discuss on the importance of Carbon:Nitrogen ratio later on.
- Oxygen — for oxidizing the carbon and for the decomposition process. This is supplied by good aeration of the bin and also by turning the compost pile every other day.
- Water — All life needs water – that’s for the microorganisms and also the earthworms if you are vermicomposting. And Water in the right amounts is very important for decomposition process and to keep the temperature regulated. Too much or too little water is bad for composting.
The Composting microorganisms are introduced into the pile to start the process of decomposition by either adding a good quality garden soil or a manure like vermicompost or even cowdung manure. You also have many commercially available compost makers for this job.
Well, In our next postswe will list out the materials that can be added and those that are prohibited along with the some basics on the C:N or the Carbon:Nitrogen Ratio. Then we will demonstrate easy methods for both aerobic and Bokashi composting methods for home gardening.