It might sound weird but, there are many incredible Uses of Charcoal in the Garden. If you want to develop a healthy garden, please watch this episode till the end.
There are many types of charcoal available to purchase. But the good news is charcoal is very inexpensive to buy, though online prices are a bit on higher side than offline purchase. You get Hardwood and Softwood charcoal. Hard wood charcoal is best for gardening. Will tell you why as we proceed further. You also get special charcoals like coconut shell charcoal, bamboo coal, horticultural charcoal, activated charcoal and so on. It doesn’t matter, you can just use hard wood charcoal for your garden.
PURCHASE LINKS:
Wood Charcoal https://amzn.to/3FsyoNh
Coconut Charcoal https://amzn.to/3KTRKw3
Let us discuss the benefits of charcoal in gardening.
10. FILLING YOUR POT BOTTOM: Charcoal is porous and light weight and filling your container with pieces of charcoal at the bottom of your container, instead of using heavy weight rocks and pebbles, reduces your pot weight and you can lift or move your pot easily. This is a great boon for terrace gardeners.
9. CHARCOAL MULCHING: You don’t always need straws and twigs for mulching your top soil. You can use spread small charcoal pieces and enjoy the benefits of mulching. Mulching creates a protective covering over the soil surface and prevents moisture evaporation from the soil. It also helps to prevent weed growth over the soil.
8. GARDEN DÉCOR: Using a layer of small pieces of charcoal as mulch, especially around light-colored plants is a nice and unique way to create a different look in your garden!
7. AS AN ANTI-FUNGAL: Mixing charcoal to soil is an effective strategy to treat or prevent fungal infections in plants, especially succulents and adeniums which are more prone to fungal rot. Just include 10% of small pieces of charcoal in your potting mix to keep harmful fungi at bay.
6. INSECT KILLER: Sprinkle powdered charcoal over your plants. This helps deter many insects like the voracious beetles which can create havoc in your garden or on your crops.
5. PESTICIDE RESIDUE REMOVAL: The absorption qualities of charcoal powder, especially activated charcoal, helps in neutralizing the harmful effect of pesticides. Mix 500 grams of charcoal powder to 1 gallon of water (1 gallon is 3.78 litres). Spray or sprinkle this over the pesticide treated plants. This is very useful in edible gardening.
4. REDUCE FERTILIZER FREQUENCY: Charcoal will also absorb any fertilizer you put into the garden and will hold it over a long period of time, providing the plants a slow, steady supply. Here, you need to know one thing – Hard wood holds more nutrients than soft wood.
3. INCREASE SOIL PH: If your soil is highly acidic like PH of 5 or below, you need to increase the soil ph to desired level. A soil ph of 6.0 +/-0.5 is considered ideal for most plants. The potassium content in charcoal and also wood ash raises the pH balance of the soil and neutralizes the acid. Just don’t add too much ash, because if you increase the soil ph too much – like over 7, the plants may not do well, because most of the nutrient absorption in soil happens at a PH of around 6.0. So, How much of charcoal to add per container or per plant? You can add 100 gms or max 200 gms of charcoal per standard container – like a 12-inch container. Of course depending upon your soil PH level. You can read a detailed post on soil ph and its importance in improving flowering HERE.
2. IN POTTING SOIL: Charcoal acts as an excellent soil conditioner, thanks to its low cost, and in fact it’s a suitable replacement of lime in soil additive mixes. It makes the soil a well-draining soil which is very important for plant growth. It is the high porosity of charcoal that benefits plant soils because it offers more of the oxygen that plant roots need to stay alive.
1. REMOVES BAD ODOURS IN SOIL AND COMPOST: You can sprinkle charcoal powder over your compost to reduce foul odors that may arise during composting. Also, when included in potting soil, charcoal soaks up the nauseating odors of compost and manure, while leaving the nutritional integrity of the mixture intact.
Aloe vera plant needs no introduction. I am sure most of us have an aloe vera plant in their homes, either indoors or outdoors in the garden. Aloe vera is one of the NASA recommended air purifying plant, which has been proven to remove the harmful benzene and formaldehyde from indoor spaces.
Now, let us look into 3 simple and useful tips on how to grow thick and fleshy Aloe Vera leaves.
- SUNLIGHT: This is one of the most important factors that decides the thickness of your aloe vera leaves. The common reason for thin, long or leggy aloe vera leaves is keeping them indoors in spaces with not enough light. No doubt, it’s a hardy plant that survives low light conditions, but it won’t grow to its full potential if you do not keep in in direct sunlight. Remember to get a thick and fleshy aloe vera plant, you must provide direct sunlight of at least 6 to 8 hours. Like starting from early morning sun till noon sun. Try to avoid the harsh noon sun, which can sometimes burn the leaf tips and edges, especially in summer season. If you prefer to keep it all day in direct sunlight, you can install a 50% green shade net to protect it from harsh sun and let it enjoy the pleasant sun for the entire day. If you are growing indoors, you need to keep it in full direct sun light at least 2 to 3 times in a week or you can grow it under a good quality LED grow light.
- ROTATION TECHNIQUE: This is another useful trick to keep your plant healthy and get those thick and fleshy aloe vera leaves. To keep your plant growing evenly, rotate the container at least a couple of times every week so that all of its leaves get an equal amount of sun light for photosynthesis.
- WATERING: This watering trick for aloe vera is the most important tip to get thicker and fleshy aloe vera plant. You know, aloe vera is a drought-resistant succulent plant which stores most of its moisture in its leaves in the form of gel. We all know the medicinal and various other uses of this aloe vera gel. We will not discuss about that in this video. To understand this trick, you need to know what happens to aloe vera when you deprive it of water. If you let the soil go very much dry for too long, your plant will begin to use the water reserves in its leaves, causing them to shrivel and shrink. Of course, we do not want this to happen. So, the right technique to water aloe vera plant is, Yes! Deprive it of water, but not too long. Make it a lot thirsty first and then provide it will lots of water to drink. Practically, this is done by allowing the top 2 inches of soil to dry out completely. You can check this using the finger dip method or a moisture meter if you have. Water it only if the top soil is completely dry. And Watering should be thorough and deep till the water flows out of the drainage holes. This simple hack helps to grow aloe vera leaves thicker and fleshy.
If you want to know the complete care tips for aloe vera plant like fertilizer, pot selection and other useful points, you can check my detailed post on aloe vera care tips.
Whether you are growing succulents & cacti indoors or outdoors, it’s really important to learn how to care for succulents and some very important Do’s and Don’ts. Let us find out how not to kill your succulents and how to keep them healthy and happy.
- MEANING OF SUCCULENT: Succulent means full of juice : juicy. So these are plants with fleshy tissues adapted to water storage. Some random examples of succulents are: Echeverias, Haworthias, Aeoniums, Gasteria, Sedums, donkey’s tail, All varieties of Kalanchoes, Jades and Crassulas, Aloe vera, All types of cactus like fairy castle cactus, Bunny ears cactus, Pincushion cactus, christmas cactus, and, the most beautiful Adeniums or Desert roses.
- SUNLIGHT: Most people think succulents are indoor plants. No doubt they can be grown indoors with proper care or that extra or special care. But succulents love full sunlight and do well with at least five or six hours of direct sun per day. This again depends on the type of succulent. And also, immature succulents or seedlings need lesser sun and have to be gradually introduced to sunlight like the Hardening Off procedure we follow for vegetable seedlings like 1-hour sun exposure for day 1, 2 hours for day, 3 hours for day 3 and so on. We will discuss more useful tips and tricks like how to avoid elongating and ugly growing succulents in the later part of this episode.
- WATERING: This is another very important factor for successful and healthy growth of succulents and cacti. The watering frequency depends on the season of the year. In spring to summer, the succulents grow to their full potential, like any other plant. And in winter season the growth is slowed down and many succulents go into a state of dormancy or inactivity, just like other plants. So, the watering requirement is drastically reduced in winter season. Now, lets talk about how to water, how much to water and how frequently to water. This is very important because overwatering can result in mold and rot and can kill the plant. Succulent and cacti are different from other plants with thick fleshy tissues like leaves or stems are adapted to water storage. So, a lot of water is already stored in these tissues and hence, the water requirement of these plants is very less compared to other plants.
While watering a succulent or a cactus, you need to stick to two rules to prevent over watering and rot. The first rule to follow is the Finger Dip method: Insert your finger to at least one inch into the soil to check the moisture. Water them only if soil is completely dry. You can also dip a moisture meter if you have. And second rule is to avoid water spillage over the fleshy leaves to prevent rot. For this you can use a watering can with a long nozzle to water over the soil and avoid water spillage over the leaves. Then thirdly water it thoroughly and deeply till the water flows out of the drain holes. Generally, in most tropical climates, watering weekly once or max twice a week is sufficient if kept in direct sun. - POTTING SOIL: This is another important factor for healthy succulent growth. Succulents and cacti need a soil mix that drains very quickly, so regular potting soil is not recommended to grow succulents. So, you need to add stuff that helps drain out water very quickly. One such succulent potting mix formula is:
30 to 40% of Garden Soil, 30 to 40% Sand, 10% to 20% pebbles or some small coarse rocks or pumice or perlite if available, 10 to 20% Compost like cowdung or vermicompost, Optionally you can add some 10% Charcoal – small pieces. Do not use cocopeat for succulents especially if you grow them indoors or keep them under indirect sunlight, because it can retain water and might result in mold and rot due to water retention.
- POT SIZE: Choosing the right sized container is also important for healthy growth of succuelnts and again this depends on the type of succulents you are growing. Most succulents have a shallow and delicate root system which do not need too deep containers and it can increase the risk of rot. For most succulents we recommend a wider shallow container for best results, because a wider container with enough space will help in propagation of succulents which produce offsets or babies from sides, which can be separated and grown as independent plants. Also make sure there are multiple drainage holes in the container you choose. You can also grow multiple succulents in a wide container. Make sure you give some spacing between each plant.
- FERTILIZERS: Succulents do not need much fertilizers, but you can give them light feedings like a teaspoon of vermicompost or decomposed cowdung once in 3 months and increase this during the active season – that’s the spring and summer season.
- PEST CONTROL: Mostly affected by mealybugs and the soil by the fungus gnats. You can spray neem oil once in about 15 days as preventive measure or weekly once to get rid of these if already infested. You can even water the succulent once with the same neem oil solution to get rid of fungus gnats. The dose os 5 to 10 ml neem oil per litre of water. The best alternative to kill fungus gnats is 250 ml hydrogen peroxide 3% per litre of water and water the soil.
- CLEANING SUCCULENTS: Wipe off the leaves and spines gently with a damp cloth to get rid of dust and this helps in better photosynthesis.
- REPOTTING: You have to take special care while repotting a succulent, because they are more prone to mold and rot after repotting. To avoid problems, always mix some antifungal powder or some neem cake powder into the potting mix during repotting.
- PROPAGATION: There are several, simple ways to propagate succulents. First method is: Growing from Cuttings: This is best applied in case the succulents have grown too leggy with elongated stems. This elongation of stem happens when there is little sunlight or if kept in indirect light. They elongate their stems for seeking sunlight. As a result they look ugly and take bad bends and turns. So, as discussed – keep them in full direct sun and make it a habit to rotate the containers once in a while to avoid bends and provide uniform sunlight. Well, coming back to propagation, Take the cuttings and leave it in air to dry for 2 days for callous formation – that’s something like wound healing and sealing to prevent rot. Then insert the cutting into a loose draining soil. Just keep the soil moist, do not water it too much. It should start rooting in 2 weeks.
The Second method is Propagating from Leaves: Yes, you can grow succulents from a single leaf. Just remove an actively growing healthy leaf from a mature succulent plant. Make sure you strip from the base, taking out the entire leaf. Leave this to air dry for 2 days and then just place it superficially over the soil. You should see a tiny plant popping out of this leaf with formation of tiny roots.
The Third Method is from Offsets or Babies, which are produced from the mother plant like aloe versa, haworthias and echeverias. Most of the succulents produce these babies which can be separated from the mother plant and planted independently.
The Fourth Method is growing from seeds: This is the slowest method to grow succulents. But if you have the time and patience, give it a try! Seeds of mature plants are located in the seed pod produced after flowering. The seeds can be collected from the pods and planted in a clean seed sowing mix or sand.
Ponytail palm also known as the bottle palm tree or the elephant foot tree. It’s actually not a palm tree. It’s in fact a succulent plant and a member of the Agave family.
Pony tail palm is a very beautiful and a popular houseplant with a bulb-like trunk and beautiful long curly leaves which looks like a pony tail.
This bulbous trunk is similar to the fat caudex of adenium or the desert rose and in both the function is to store water within the plant. Hence, both these plants require infrequent watering. Now let’s look into its important care tips:
- Sunlight: As I said earlier, the term palm used to name this plant as ponytail palm is a misnomer. It is not a palm. Many newbies may think it to be a palm such as Areca palm and keep in full shade. This is not true. Ponytail palm actually need full bright sunlight similar to adenium. But this is such a forgiving plant, it survives and adapts even to low light conditions. But for best results keep in full sunlight. In summer, to protect it from very hot sun, you can keep it under a 50% green shade net.
- Watering: This is a succulent plant and needs less frequent watering. This is infact a very hardy plant but the most common reason for its death is over watering. So be cautious while watering this plant. Best is finger dip method. You dip one or two inch of your finger to check for moisture. Water it only if its dry. Whenever you water, give it a deep and thorough watering until the water comes out of the drainage holes.
- Fertilizer: This plant requires adding a handful of some decomposed cowdung or even vermicompost once every 3 months. That is all is needed for this plant. Do not try to add more fertilizers to this plant, especially the NPKs and other chemical fertilziers.
- Pot Size and Repotting: It is best to allow them to become root bound before repotting them. And when you do repot them, use a pot that is only one or two inches larger than the previous pot. If you repot them into a larger pot, they can get too much water at once, which can lead to rot.
- Potting Soil: They need a good well draining soil with lots of sand mixed in your regular garden soil. Best is to use a succulent soil mix like using sand, perlite, garden soil, charcoal and other stuff in different proportions. One such recipe you can follow is:
Garden Soil: 30 to 40% + River or Construction Sand 30 to 40% (Never use beach sand). Then you can add pebbles or chips about 5%, Then about 10% Compost like decomposed cowdung or vermicompost. Then about 10% Perlite, small Charcoal pieces, neem cake powder, etc if you have them. That’s it! - Propagation: Mature plants usually develop pups or babies which are actually side shoots arising from the mother plant, very much similar to other plants like Aloe vera and others. These smaller pups can be separated away from the mother palm and grown as independent plants.
Adenium obesum, also known as desert rose, is a succulent plant with red, pink, white, and many varieties of flowers. Adenium is an extremely beautiful plant and sometime called Natural Bonsai, because of its thick stems and the modified fat lower stem called as Caudex.
Let’s Start with:
How to grow Adenium from Seeds: The most important criteria to grow from seeds – the Seeds must be fresh and healthy or from a reliable source. The ones you get online may be old and may not germinate. If you have one adenium and you take proper care of it, you should good flowering and then seed pod formation soon. It’s best to grow from fresh seeds or buy a plant from a nursery or even online. You can purchase adenium online because it’s a drought tolerant plant and easily survives without water even for 7 days.
Well, When you are growing adenium from seeds, you need to apply some tricks and hacks for successful germination.
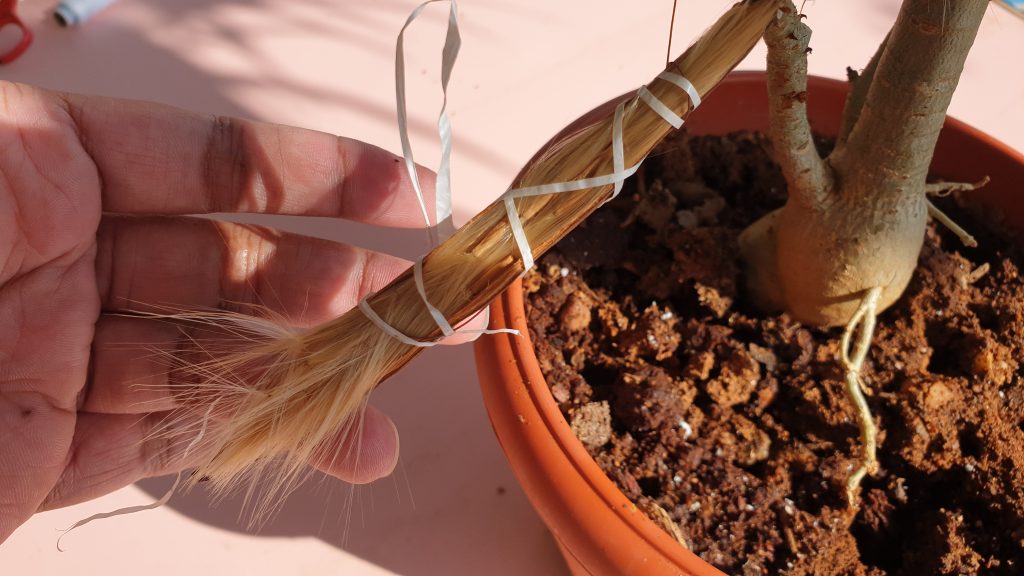
First thing you need to do when you notice an adenium seed pod is tie some thread around the pod to prevent spillage of seeds before the seed pod matures and releases seeds. It has a special seed dispersal mechanism by wind, where each seed had this fluffy stuff which is easily carried away by wind. Here you can see, I have protected the seed pod from its natural dispersal mechanism. When the seed pod starts drying and cracks open, it’s the time to harvest the seeds. Separate the seeds by gently pulling this fluffy stuff……. So these are fresh adenium seeds we just harvested!
Now the first secret to get a great success rate in germination? These seeds are very delicate and are more prone to fungus. So what you need to do immediately is pour in some antifungal powder like bavistin or SAAF or any antifungal powder like Carbendazin + mancozeb combination. You can also add a mixture of cinnamon and turmeric powder if you don’t have antifungal. Coat the seeds with this antifungal powder whether you keep them aside for storage or plan to sow them immediately.
Now the next important step: The growing medium. You can use sand or some cocopeat mixed in it or soil plus sand plus cocopeat. If you have perlite, this is another great stuff. The idea is to have a loose well draining light weight soil mix for the seeds to sprout. You can mix small amount of anti fungal powder into this mix which combats the fungal rot.
Plant the seeds and cover with a thin layer of potting mix and do not plant too deep, they may not sprout. Then finally, you also mix some antifungal into the water or spray can and use the same solution to spray or gently sprinkle some water once every two days.
You can see they should start germinating within a week. On third or fourth week, you should see the beautiful tiny caudex of these babies. When they are about two months old, you repot these into independent containers. During transplant, you need to remember few important points during the process of repotting as well as post transplant care, like:
- Choosing clean containers or if using old containers, you can clean them using baking soda.
- Then comes the Potting mix: You can use any succulent potting mix. Or make your own using a simple recipe: like 50 percent sand, 40 percent Garden soil and 10% compost like cowdung or vermicompost. You can also mix perlite and other stuff if you have. You can find a detailed episode on succulent potting mix recipe from a link in description.
- Then comes Repotting: Have a look at the structure and the markings. The first mark is to demarcate the level above and below the soil. Make sure you insert the plant’s future caudex above the level of soil. If its too below the soil level, it can lead to rot and death.
- Then finally, water this once preferably mixing some antifungal in water and leave it in indirect sunlight for the first week. Water them occasionally like once a week or so depending on the climate.
General Care Tips for Growing Adeniums:
- SOIL: This is the most important factor for successfully growing adenium. It’s a desert rose and hence prefers a sandy soil. Make sure you have at least 50 percent sand or perlite mixed in your potting soil. You can check my detailed episode on making the best succulent potting mix recipe from a link in description.
- WATERING: If your soil is really well draining, the frequency of watering does not matter much, like for instance if you have lot of rains in your zone, its almost like daily watering. And also make sure, you have good drainage holes in your container. Otherwise, generally watering weekly twice or even once is the general rule for adenium like any other succulent depending on the climate of the zone you live in.
- SUNLIGHT: This is a very important factor for proper flowering. Adenium needs maximum sunlight and good humidity for flowering and growth. Atleast 6 hours of direct sunlight is a must! Also encourage pollinator insects like honey bees and butterflies to encourage seed pod formation.
- FERTILIZERS: Most recommend chemical fertilizers like water soluble NPK, but I always use organic ones like simple decomposed cowdung or vermicompost like a handful of it once a month. And during repotting mixing a table spoon of steamed bone meal or Organic rock phosphate for vegans. This much is sufficient to make the roots stronger and induce enormous flowering in all seasons except in it dormant season – that’s winter.
- PEST CONTROL: Its commonly affected by sucking pests like aphids, mealy bugs and mites. Weekly spray of 5 to 10 ml neem oil in 1 litre of water will easily control this problem.
5 Tricks to make caudex grow thicker:
Some Adeniums develop a thicker caudex themselves, perhaps determined by the genetic characteristics of the plant, but others may require human interventions. Apply these 5 Tricks and hacks to make the adenium caudex powerful and thicker.
- POT SIZE & SHAPE SELECTION: Select a pot that is wider than deep. This forces the root system to become exposed to air as it grows and we call it Training your Adenium or Adenium Bonsai Training or adenium root training. Depending on the size of your plant, take a wider container, roughly about 2-3 inches extra space around the existing caudex. And the depth of the pot of about 4 to 6 inches should be fine.
- WATERING TRICK – ONLY water it when it’s starving and very thirsty. That is when your soil is fully dry like using the finger dip method. 1 OR 2 INCH inches of your finger. And whenever you water it GIVE FULL WATERING. This frequency depends on the climate. Like in summer, the frequency increases where as in winter, this can be weekly once. Make sure the soil is well draining as discussed already.
- CUTTING THE CENTRAL ROOT – the tap root of adenium. The caudex is actually the storage organ of adenium – This is an adaptation from mainly the stem and also partly the root. This cutting helps to make the caudex wider and thicker. But perform this step at your own risk very carefully, because there is a risk of rot and death of the plant. Before carrying out cutting, try to wash or spray the root with Hydrogen peroxide solution, about 1 teaspoon in 1 liter or water. Or first wash the dirt in running water and then spray some h2o2 solution on the roots. Make sure when you perform cutting, disinfect the cutting tool with a hydrogen peroxide solution or any disinfectant. You can cut it carefully without cutting or damaging some side roots. After cutting apply a Fungicide powder like SAAF. SAAF is a brand name for combination fungicide with Carbendazim and Mancozeb. You leave this in air for 2 days to form a callous wound. Then you can repot by placing some flat object like a plastic lid below this root flat and then repot.
- PRUNING: PRUNING of branches helps to increase caudex. This is because most of the plant energy is diverted to growing thicker caudex rather than leaf and flower development. You can leave few branches or leaves for photosynthesis. The pruning will not only increase caudex size, but also increase branching and flowering. Remember to seal the cut end with candle wax or a fungicide powder to protect your plant from rot. If it’s a grafted adenium, you should always cut above the graft. IF its seed grown plant, you can hard prune or cut at the level of caudex, so that more branches emerge out from the caudex itself. The best time to prune adeniums as recommended by many experts is after the spring or when temperatures are high. You can check my episode on some Important Pruning Tips and precautions from a link in description below.
- REPOTTING and RAISING THE CAUDEX to Half to One Inch, every 3 to 6 months. This trick will not only increase the caudex size but also give a beautiful bonsai look to the plant.
How to save a Dying Adenium or How to treat Adenium Rot:
There are two problems to diagnose. One is root rot which can lead to stem rot and death of the plant. The second problem to differentiate from the first one is soft caudex or soft stems which may or may not destroy the plant.
You can carefully look for Some signs of root rot or impending danger like:
a. Leaves becoming yellow and dropping,
b. Caudex pimples – like If you see some pimple like spots popping up on the caudez, this may indicate too much water inside the caudex and the plant is trying to creat exit pathways for this excess water.
c. Softening of the caudex or branches is another sign. Normally the caudex and branches are firm when you press with fingers. But if its getting soft, then there is a danger.
d. Inspect of any Injury. Generally injured stems or caudex can start to rot from the injury point. This is called Focal rot and is easy to treat when diagnosed in early stages.
Well, The Treatment steps vary depending on the signs and symptoms.
If it’s a focal rot, you need to cut off that portion using a clean knife and then apply antifungal powder over the wound and just leave it to heal and keep it in full sunlight. Do not pour water over this wound.
If the caudex is becoming soft, you can remove the plant and inspect its roots. Then soak this in a strong fungicide solution for few minutes and then hang it in air in sunlight for 2 to 4 days. It should start shrinking and possibly start healing. If its getting firm, then you can repot in a fresh potting soil and then water with antifungal mixed and leave it undisturbed for a week.
- INTRODUCTION:
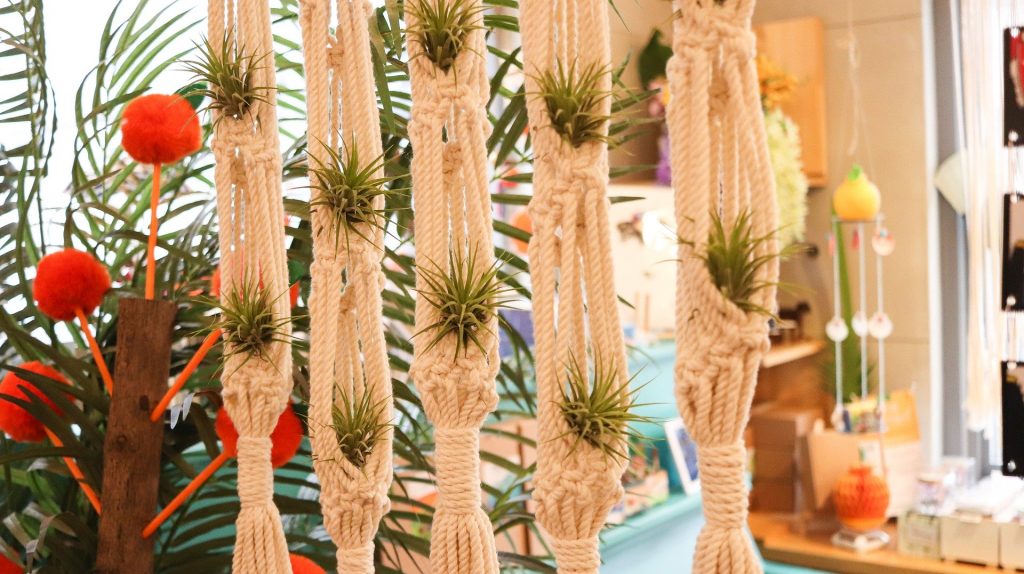
The genus Tillandsia comprises of over 650 species of air plants. They are called “Air Plants” simply because they get the majority of their nutrients from the air around them. They do not need soil to grow and don’t even think of planting them in soil! Tillandsias grow differently than most other house plants, so they can be confusing to the beginner.
Well, Air plants are actually epiphytes. Epiphytes are plants that grow, rather cling upon other plant or any object merely for support. Orchids is another example for epiphytes. These are commonly seen growing on branches of a tree and stuff like that.
There are many species of air plants. The leaves are silvery green in color and are covered with specialized cells (trichomes) that are capable of rapidly absorbing water that gathers on them. Another interesting fact about air plants is, each plant will flower once in its lifetime.
- THINGS TO DO FOR A NEWLY PURCHASED PLANT:
Most of these air plants can be purchased online. They are usually shipped in boxes with holes for air ventilation and the plants survive many days during the transit without any issues. The first thing you should do is carefully unpack them and submerge them in water for 1 hour, preferably upside down. One most important thing you should remember is not to use chlorinated water or even hard water. Best is to use water from your water purifier. Shake gently to remove excess water and dry them for few minutes in air, because water trapped in between the leaves can carry a risk of rot. You can then hang them in air in bright indirect light, like near a window place. Do not fertilize the plants at this stage. We will talk more on its care tips in the later part of this episode.
- ATTACHING OR INSTALLING AIR PLANTS:
There are many many ways you can attach or install air plants. This depends on your decor skills and stuff like that. The simplest way is to hang them in air using a string. You can also mount them on rocks, sea shells, wooden logs, wooden pieces, flower vase and so on. The only thing you should remember is there should not be water accumulation because it can lead to rot and kill the plant. You can also mount them in a shallow pot or a small pot by using a card board like this. One important Don’t here is NOT to use copper wire for installing air plants, as this can kill your plant.

- AIR PLANTS IN GLASS GLOBES:
This is the most popular choice for installing air plants. This looks really fascinating and also the glass globe has holes for good ventilation. Few Do’s and Don’t’s you have to remember if you are using glass globes. The larger the globe, the better. Mist your plant every 4-5 days with one spray for tiny globes, or 2-3 sprays for larger globes of 3-5 inches in size or even more if the plant is in a large open globe. The key is to judge the drying time, the smaller the globe, the less circulation, the longer the plant will hold the moisture. If you over water the plant will die. Also Do not place your globes directly in front of a window where they get direct sun. Remember the glass will intensify the sunlight and the heat. Indirect light is best and some will even grow in low to moderate light.
- LIGHT REQUIREMENT & LED GROW LIGHTS:
Bright filtered light is the general rule, and the higher the humidity of the air the higher light will be tolerated. You can provide them artificial light for few hours. Make sure the distance between the light and the plant is something from 12 to 24 inches depending on the intensity of the grow light.
- WATERING YOUR AIR PLANTS:
As discussed earlier, always use water from your water purifier and not hard water or chlorinated water. You can soak your air plants for 1 to 2 hours, once every 15 days depending on the humidity levels. You can also mist your air plants two to three times in a week.
- FERTILIZER:
You can add a pinch of your orchid fertilizer into the mister and spray two or three mists once in a month. You can also use other water soluble NPKs in 1/4th the recommended strength for misting. If you want to provide natural fertilizers, simple soak them for an hour in pond water or even aquarium water once in a month.
- AIR CIRCULATION AND TEMPERATURE:
They should be given enough light and air circulation to dry in 4 hours or less after soaking. Do not keep plants constantly wet or moist. Optimum temperature range for Tillandsias is 15 – 30 degrees Centigrade.
- PROPAGATION:
Air plants will start producing offsets or Pups like each plant can produce between 2 – 8 pups. You can separate these babies once they grow to 1/3rd the size of the mother plant and plant them independently.
- DO’S AND DON’TS FOR AIR PLANTS:
- Never plant them in soil, they can rot.
- Protect them from extreme weather, especially frost.
- Do not keep them constantly wet for a long time.
- Do not forget to mist them 2 to 3 times a week, especially in non-humid conditions.
This video is a complete guide to aloe vera plant care and covers:
- Basic Information On Aloe Vera Plant
- Aloe Vera Plant Benefits
- Important Tips For Growing Aloe Vera Plant
- How Often To Water Aloe Vera
- How Much Sun Does An Aloe Vera Plant Need
- Best Potting Soil For Aloe Vera Plants
- Best Fertilizer For Aloe Vera
- Propagating Aloe Vera Plants
- BASIC INFORMATION ON ALOE VERA: Aloe vera is basically a cactus like succulent plant and this is just one of hundreds of different types of aloe plants and the most common type and commonly called medicinal aloe vera. Aloe vera is a stemless or very short-stemmed plant and can grow upto 100 cm tall. Its either grown as an ornamental plant for it beautiful look or as a medicinal plant to extract aloe vera gel from its fleshy leaves.
- ALOE VERA PLANT BENEFITS: Will not go into details of this topic. To mention a few, Most people are already very familiar with the medicinal and healing properties of aloe vera plants. These days you’ll find aloe vera gel in everything from skin and haircare products, to drinks, supplements, and food products. Another great benefit of growing aloe vera as a houseplant is that it helps to purify the air in our homes. I have discussed about NASA recommended Air purifier plants in a detailed post.
- ALOE VERA PLANT CARE TIPS: There’s really not much to it, and guess what – your aloe vera might just do better if you ignore it, Yes! they thrive on neglect. But, still there are a few things you need to do to keep your aloe vera growing and multiplying at its best. The two most important parts of aloe vera plant care are proper watering and lighting.
- HOW OFTEN TO WATER ALOE VERA? The most common mistake people make when it comes to aloe vera plant care is overwatering. In nature, aloes grow in desert climates where they hardly get any rain. Aloe vera succulent plants hold water in their leaves, so they can go a very long time without water. Overwatering will cause root rot, and eventually cause the stem of the plant to rot, eventually killing the whole plant from the bottom up. Aloe vera plants like to be watered more during the summer than the winter months. It’s best to allow the soil to dry out completely between waterings. The best method to water aloe vera is using the Finger Dip method. Dip one inch of finger into the soil to check moisture. Water it if its completely Dry. And when you water it, do it thoroughly, allowing all of the excess water to run out the bottom drainage holes. So, The Point to remember is Thorough and Infrequent watering is the Rule for Aloe vera and all succulents and cacti.
- HOW MUCH SUN DOES AN ALOE PLANT NEED? The second most important thing about aloe vera plant care is proper lighting. Aloe vera plants will grow their best when given lots of light. Outdoors, aloe vera can be grown anywhere from full sun to partial shade. They tolerate any amount of light. But its better to avoid direct noon sunlight. When it comes to shade and indoors, they generally tend to get leggy if they do not receive adequate light. They also do well under LED grow lights if grown indoors. If you don’t have enough sunlight in your home, then you should definitely get a grow light for your aloe vera. You can check details on these topics on Indoor plants here.
- BEST POTTING MIX FOR ALOE VERA PLANTS: The best soil or potting mix for aloe vera is one that drains very quickly, and doesn’t hold water. You can either use commercially available succulent and cacti mixes or you can prepare your own DIY succulent soil mix. One such recipe I use is:
- Any Good quality Garden Soil – roughly about 30 to 40 Percent.
- Sand: You can use River sand / Construction Sand and not the sea or beach sand for this which is high in sodium chloride that’s salt. The proportion to use is about 30 to 40 Percent. You can also use Coco peat or Peat moss instead of sand for aloe vera but it’s not recommended specially for succulents, because it retains moisture and some succulents have a risk of Rot.
- Gravel chips or pebbles or even Small Marble or granite Chips. This can be roughly about 10 percent.
- Compost: This is actually not required for succulents, because the natural habitats of most succulents and cacti is a desert. But still adding 10 percent of compost like vermicompost/leaf compost/cowdung powder. Also consider adding about 5 – 10 percent of Neem Cake Powder, that really effective in preventing rot from fungus and other harmful pathogens.
- Perlite + charcoal like Wood Charcoal pieces or biochar pieces: These ingredients keep the soil very loose and well aerated. Charcoal also has some antifungal properties as well to prevent root rot. All these mixed to about 10 percent can be added to the recipe.
7. FERTILIZER FOR ALOE VERA: Aloe vera plants don’t really need to be fertilized. But like most plants, they will certainly benefit from being fed once in a while, specially during their active growing season like spring through summer. I recommend using organic plant fertilizer on your aloe vera, rather than the chemical stuff – especially if you plan to harvest and use the gel. Compost like vermicompost or decomposed cow dung – a handful of it once in a month is more than sufficient for aloe vera plants. And this can also help to encourage flowers in aloe vera plants.
8. PROPAGATING ALOE VERA PLANTS: The mother Aloe vera plant will grow
offsets (a.k.a aloe vera pups) around the base of the plant, and these babies
can be carefully removed from the mother plant and potted up on their own to
create a new plant. It’s as easy as that! But how do you encourage production
of more babies or offsets from mother plant? Simple trick or solution to this
is using a wide container for growing the future mother plant. Plant this at
the center of this containers and you should see a lot of offsets coming soon. Aloe
vera roots do not grow too deep and hence shallow wider containers are
preferred when you are repotting.
You can also grow aloe vera from seeds. The mature aloe plant produces
flowering once in a while. This mother plant produces once in a year. But your
need to provide full sunlight to induce flowering. You can collect its seeds
pods and grow new aloe plants from these seeds.
Can you grow aloe vera from a single leaf or leaf cuttings? I have tried this many times but was completely unsuccessful. Let me know in the comment box below if you have rooted an aloe vera from a leaf.
Well, Now these beautiful little adenium seedlings are about 2 months old.
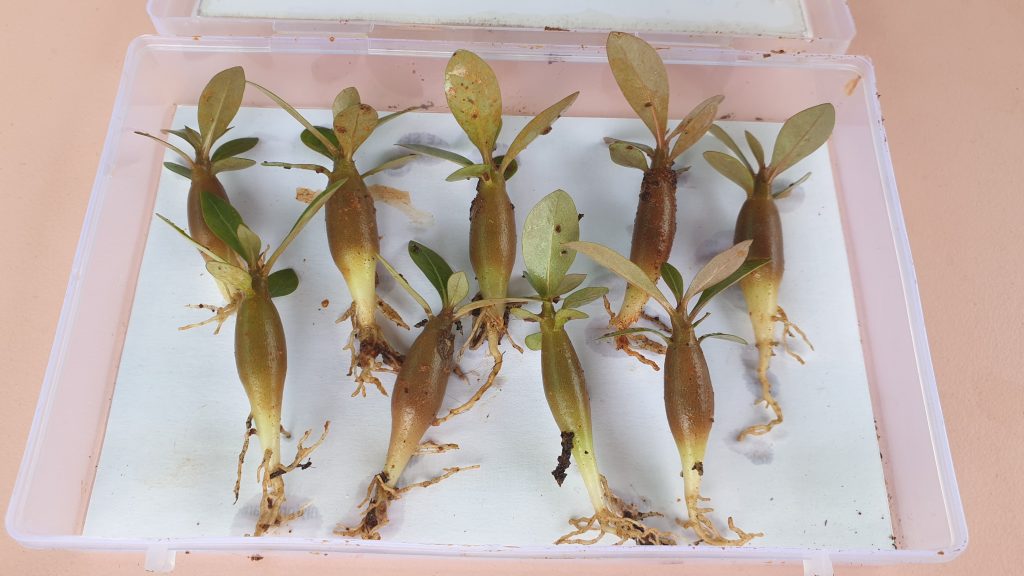
This is the best time to repot them into independent containers, because the nutrient requirement will increase as they grow and also increased chances of overcrowding and due to this the more aggressive ones will siphon supply off the nutrients from their neighbours affecting the weaker ones.
At about 2 months, they are about 2 to 3 inches in length and remember they are not so delicate or sensitive as you might think. You can transplant or repot them easily. But you need to remember few important points during the process of repotting and post transplant care.
Here are some 10 useful points to remember:
- Choosing Containers: You can use 4 to 6 inch clean new containers or clean up existing containers with baking soda or any mild disinfectant and make sure they have good number of drainage holes.
- Potting Mix: You can use any succulent potting mix with about 50 percent sand, Garden soil and perlite and other optional stuff as mentioned in one of my post on Potting mix for succulents and cacti.
- Taking out Seedlings: You can use the spoon method to carefully dig out the little ones by holding a leaf and gently digging and pulling out. This should be easy because we have germinated the seeds in sand and cocopeat.
- Inspect the seedlings and discard any rotting or rotten ones.
- Repotting: Have a look at the structure and the markings. The first mark is to demarcate the level above and below the soil. Make sure you insert the plant’s future caudex above the level of soil. If its too below the soil level, it can lead to rot and death.
- Optional Tap Root Cutting: This step can be performed after 6 months or 1 year to make the caudex more fatter. This time it may be little risky to cut the tap root at the mark shown here. I have shown all steps to make the caudex thicker in one my older episodes last year.
- After Repotting: Its always safe to either spray and antifungal solution like bavistin or water these with dilute antifungal mixed in water.
- Water Requirement: Check the soil for moisture before watering. Over watering can kill these little ones. Roughly you can water once in 3 to 5 days.
- Fertilizer: If you have added some compost into the potting mix, they don’t require any feeding for atleast 2 or 3 months. If you use NPK water soluble feed, water them with a 50 percent dilute solution of this once in 15 days for faster growth.
- Sunlight: This is very important. After repotting keep them in indirect light or even shade for 3 to 4 days and then shift to full sunlight once they are out of transplant shock.
To begin! I received these 5 bare rooted baby adenium plants about an year back, gifted by my dearest gardener friend Ram. These travelled over a 1000 miles to reach the destination in a great condition, This is because these are excellent drought tolerant plants and rightly called desert rose. So, you can safely purchase adenium plants online if it’s not available at your local nursery.
For beginners, Adenium Obesum is a succulent plant which stores lot of water in its stem and also the modified part of the stem called the Caudex. We have discussed these in detail in my other adenium videos.
Before I reveal you the three nursery secrets on growing adenium, I will quickly brief you on 5 important care tips for adenium.
- SOIL: This is the most important factor for successfully growing adenium. It’s a desert rose and hence prefers a sandy soil. Make sure you have atleast 50 percent sand or perlite mixed in your potting soil. For details on the perfect potting mix for adenium or any succulent, I have detailed episode on this topic. You can check that link at the end screen of this video.
- WATERING: If your soil is really well draining, the frequency of watering does not matter much, like for instance if you have lot of rains in your zone, its almost like daily watering. And also make sure, you have good drainage holes in your container. Otherwise, generally watering weekly twice is the general rule for adenium like any other succulent.
- SUNLIGHT: This is a very important factor for proper flowering. Adenium needs maximum sunlight and good humidity for flowering and growth. Atleast 6 hours of direct sunlight is a must!
- FERTILIZERS: Most recommend chemical fertilizers like water soluble NPK, but I always use organic ones like simple decomposed cowdung or vermicompost like a handful of it once a month. And during repotting mixing a table spoon of steamed bone meal will do the job and induce enormous flowering in all seasons except in it dormant season – that’s winter.
- PEST CONTROL: Its commonly affected by sucking pests like aphids, mealy bugs and mites. Weekly spray of 10 ml neem oil in 1 litre of water will easily control this problem.
Now, lets look into the three Nursery secrets on how to grow adenium from seeds.
To start this story, I purchased adenium seeds from amazon and followed all tips perfectly to germinate adenium seeds. I have shown this in a detailed video some time ago. You can check a link to that episode in the description below. But the result of these amazon seeds was really bad, not even a single seed germinated.
Then recently, one of my adeniums started developing a seed pod. First thing you need to do when you notice adenium seed pod is tie some thread around the pod to prevent spillage of seeds before the seed pod matures and releases seeds. It has a special seed dispersal mechanism by wind, where each seed had this fluffy stuff which is easily carried away by wind. Here you can see, I have protected the seed pod from its natural dispersal mechanism. When the seed pod starts drying and cracks open, it’s the time to harvest the seeds. Separate the seeds by gently pulling this fluffy stuff as shown in this pic.
So these are fresh adenium seeds we just harvested!
Now the first secret to get a great success rate in germination? These seeds
are very delicate and are more prone to fungus. So what you need to do
immediately is pour in some antifungal powder like bavistin or any antifungal
powder like Carbendazin + mancozeb combination like the SAAF brand powder. Coat
the seeds with this antifungal powder whether you keep them aside for storage
or plan to sow them immediately.
Now the second nursery secret: The growing medium. You can use pure sand or some cocopeat mixed in it. What they actually do is, take fine sand and sterilize it by keeping in full sunlight for atleast 2 or 3 days or if you are growing in small scale, you can even microwave this sand. I think if you are using anti fungal powder, this step is perhaps optional.
Now the third secret and then finally the results of this process on day 6, day 10, day 12 and day 15 in the video at the bottom of this post.
And one more thing: You also mix some antifungal powder into this sand or cocopeat. And while sowing the seeds try to maintain a space of atleast an inch to avoid overcrowding. You can do this better, here I have not done this perfectly.
Then finally, you also mix some antifungal into the water or spray can and use the same solution to spray or gently sprinkle some water once every two days. Do not flood the seeds with water, this can damage the seeds.
Please Watch the RESULTS on Day 5 till Day 15 in the Video below.
In this post
we will try to simplify plant identification and will make an attempt to
classify and identify about 100 common house plants and quickly know their important
care tips – like watering and sunlight requirement. Of course these
requirements vary depending on the zone you live in. Please watch each of the plants carefully for
identification whether or not you possess them, because this knowledge will
certainly help you when you visit a plant nursery to purchase a plant.
We will try to make this post as short and concise as possible along with a
video at the end for you to identify common house plants easily. And you can
find detailed videos and articles on most of these plants on website.
Let’s Classify Common House plants as:
- Ferns
- Vines, Creepers and Climbers
- Small Trees
- Ornamental Plants
- Succulents and Cactii.
- Flowering and Fruiting Plants.
- FERNS
1. Asparagus Fern
Level: Easy
Indoor: Difficult
Sunlight: Avoid direct Noon sun, Indirect Light/Shade: Yes
Watering: Daily or Alternate Days (Finger Dip to Check)
Fertilizer: Occasional (once in 3 to 6 months)
2. Fox Tail Fern
Level: Easy
Indoor: Difficult
Sunlight: Avoid direct Noon sun, Indirect Sunlight/Shade: Yes
Watering: Daily or Alternate Days (Finger Dip to Check)
Fertilizer: Occasional (once in 3 to 6 months)
3. Boston Fern
Level: Easy
Indoor: Difficult
Sunlight: Indirect Light/Shade: Yes
Watering: Daily (Finger Dip to Check)
Fertilizer: Occasional (once in 3 to 6 months)
- VINES,
CREEPERS AND CLIMBERS
- Philodendrons
Level: Easy
Indoor: Yes
Sunlight: Indirect Sunlight/Shade: Yes
Watering: Daily or alternate days (Finger Dip to Check)
Fertilizer: Occasional (once in 3 to 6 months)
- Money Plant / Pothos
Level: Very Easy
Indoor: Yes
Sunlight: Indirect Light/Shade: Yes
Watering: Grown in Water or Soil.
Fertilizer: None / Occasional (once in 3 to 6 months)
- Pepperomias and Hoyas
Level: Easy
Indoor: Possible
Sunlight: Direct or Indirect Light/Shade: Yes
Watering: Alternate Days.
Fertilizer: Occasional (once in 3 to 6 months)
- Wandering Jew
Level: Very Easy
Indoor: No
Sunlight: Indirect Light/Shade: Yes
Watering: Daily or Alternate Days.
Fertilizer: None / Occasional (once in 3 to 6 months)
- Bougainvillea
Level: Easy
Indoor: No
Sunlight: Direct Sunlight at least 4 Hours.
Watering: Daily or Alternate Days.
Fertilizer: Once in a month.
- Alamanda
Level: Moderate
Indoor: No
Sunlight: Direct Sunlight at least 4-6 Hours.
Watering: Daily or Alternate Days.
Fertilizer: Once in a month.
- Scarlet clock vine
Level: Moderate
Indoor: No
Sunlight: Direct Sunlight at least 4-6 Hours.
Watering: Daily or Alternate Days.
Fertilizer: Once in a month.
- Betel Vine (Edible Paan)
Level: Moderate
Indoor: No
Sunlight: Indirect Sunlight or Early Sun.
Watering: Daily.
Fertilizer: Once in 3 months (Nitrogen rich).
- Ajwain Plant
Level: Easy
Indoor: Possible
Sunlight: Direct or Indirect Light/Shade: Yes
Watering: Alternate Days.
Fertilizer: Occasional (once in 3 to 6 months)
- SMALL
TREES & SHRUBS
- Ficus (All Types)
Level: Easy
Indoor: No
Sunlight: Indirect Bright light or Early Sun.
Watering: Daily or alternate days.
Fertilizer: Occasional (once in 3 to 6 months)
- Norfolk Island Pine (Christmas Tree)
Level: Moderate
Indoor: Possible
Sunlight: Indirect Bright light or Shade-net.
Watering: Daily or alternate days.
Fertilizer: Occasional (once in 3 to 6 months)
- Juniper (Cypress)
Level: Moderate
Indoor: No
Sunlight: Direct Sun, Shade-net, Avoid Noon Sun.
Watering: Daily or alternate days.
Fertilizer: Occasional (once in 3 to 6 months)
- Schefflera (Umbrella Tree)
Level: Easy
Indoor: No
Sunlight: Indirect Bright light or Shade-net.
Watering: Daily or alternate days.
Fertilizer: Occasional (once in 3 to 6 months)
- Plumeria (Champa)
Level: Easy
Indoor: No
Sunlight: Direct Sunlight at least 4-6 Hours.
Watering: Alternate Days.
Fertilizer: Once in a month.
- Oleander (Kaner)
Level: Easy
Indoor: No
Sunlight: Direct Sunlight at least 4-6 Hours.
Watering: Daily or Alternate Days.
Fertilizer: Once in a month.
- Euphorbia Mili (Christ plant /
Crown of Thorns)
Level: Easy
Indoor: No
Sunlight: Direct Sunlight at least 4-6 Hours.
Watering: Alternate Days.
Fertilizer: Once in a month.
- Neem Tree
Level: Easy
Indoor: No
Sunlight: Direct or Indirect Bright Light
Watering: Alternate Days.
Fertilizer: Occasional (once in 3 to 6 months)
- Dragon Tree (Dracaena Marginata)
Level: Easy
Indoor: No
Sunlight: Direct or Indirect Bright Light
Watering: Alternate Days.
Fertilizer: Occasional (once in 3 to 6 months)
- Song of India
Level: Easy
Indoor: No
Sunlight: Direct or Indirect Bright Light
Watering: Alternate Days.
Fertilizer: Occasional (once in 3 to 6 months)
- Palms (Areca palm, Table or
Umbrella Palm)
Level: Easy
Indoor: Possible
Sunlight: Indirect Bright light or Shade-net.
Watering: Daily or alternate days.
Fertilizer: Occasional (once in 3 to 6 months)
- Crotons
Level: Easy
Indoor: No
Sunlight: Direct or Indirect Bright Light
Watering: Alternate Days.
Fertilizer: Occasional (once in 3 to 6 months)
- COPPERLEAF (acalypha wilkesiana)
Level: Easy
Indoor: No
Sunlight: Direct or Indirect Bright Light
Watering: Alternate Days.
Fertilizer: Occasional (once in 3 to 6 months)
- ORNAMENTAL
PLANTS
- Coleus
Level: Easy
Indoor: Yes
Sunlight: Indirect Bright light or Shade-net
Watering: Daily or alternate days.
Fertilizer: Occasional (once in 3 to 6 months)
- Sanchezia
Level: Easy
Indoor: Yes
Sunlight: Indirect Bright light or Shade-net.
Watering: Daily or alternate days.
Fertilizer: Occasional (once in 3 to 6 months)
- SYNGONIUM (arrow head)
Level: Easy
Indoor: Yes
Sunlight: Indirect Bright light or Shade.
Watering: Daily or alternate days.
Fertilizer: Occasional (once in 3 to 6 months)
- Baby Tears Plant
Level: Easy
Indoor: No
Sunlight: Indirect Bright light or Shade.
Watering: Daily or alternate days.
Fertilizer: Occasional (once in 3 to 6 months)
- AMARYLLIS
Level: Moderate
Indoor: No
Sunlight: Direct Sun light or Shade-net
Watering: Alternate days.
Fertilizer: once a month in growing season
- Spider Lilly
Level: Moderate
Indoor: No
Sunlight: Direct Sun light or Shade-net
Watering: Alternate days.
Fertilizer: once a month in growing season
- Rain Lily
Level: Moderate
Indoor: No
Sunlight: Direct Sun light or Shade-net
Watering: Alternate days.
Fertilizer: once a month in growing season
- Tube Rose (Rajnigandha)
Level: Moderate
Indoor: No
Sunlight: Direct Sun light or Shade-net
Watering: Alternate days.
Fertilizer: once a month in growing season
- Anthurium
Level: Moderate
Indoor: Yes
Sunlight: Indirect Bright light or Shade.
Watering: Alternate days.
Fertilizer: once in 1 or 2 months
- Peace lily
Level: Moderate
Indoor: Yes
Sunlight: Indirect Bright light or Shade.
Watering: Alternate days.
Fertilizer: once in 1 or 2 months
- Calatheas
Level: Easy
Indoor: Yes
Sunlight: Indirect Bright light or Shade.
Watering: Alternate days.
Fertilizer: Occasional (once in 3 to 6 months)
- Dieffenbachia
Level: Easy
Indoor: Yes
Sunlight: Indirect Bright light or Shade.
Watering: Alternate days.
Fertilizer: Occasional (once in 3 to 6 months)
- Spider Plant (Chlorophytum)
Level: Easy
Indoor: Yes
Sunlight: Indirect Bright light or Shade.
Watering: Alternate days.
Fertilizer: None or Occasional (once in 3 to 6 months)
- Adenium (Desert Rose)
Level: Moderate
Indoor: No
Sunlight: Direct Sunlight / Shade-net.
Watering: Weekly Twice.
Fertilizer: Once monthly
- Jatropha
Level: Moderate
Indoor: No
Sunlight: Direct Sun light or Shade-net
Watering: Alternate days.
Fertilizer: once a month
- Lucky Bamboo
Level: Easy
Indoor: Yes
Sunlight: Indirect sunlight or Shade
Watering: In Water or Daily Watering in Soil.
Fertilizer: none
- Insulin Plant
Level: Moderate
Indoor: No
Sunlight: Direct or Indirect Sun light or Shade-net
Watering: Alternate days.
Fertilizer: Occasional (once in 3 to 6 months)
- Poinsettia
Level: Moderate
Indoor: No
Sunlight: Indirect Sun light or Shade-net
Watering: Alternate days.
Fertilizer: Occasional (once in 3 to 6 months)
- SUCCULENTS
& CACTII
- Common Care Tips
Level: Moderate to Difficult
Indoor: Yes
Sunlight: Indirect Sunlight / Shade / Shade-net.
Watering: Weekly Twice or Thrice.
Fertilizer: Once 3 months.
Jade
Plant (Crassula), Crassula Ovata, Ecchiverias, Flowering Kalanchoes, Kalanchoe
Thyrsiflora, Mother of Thousands, Sedums, Sedum Adolphi (Golden Sedum), Fish-bone Cactus, String of Bananas, Donkey’s
Tail – Sedum morganianum, Snake
Plants (Sanseivera), Aloe Vera, Haworthias, Haworthia Zebrina, Gasteria, Pencil Cactus, Baby Sunrose,
Portulaca,
Cactus Types
- FLOWERING
& FRUITING
Common Care Tips
Level: Easy to Moderate
Indoor: No
Sunlight: Direct Sunlight at least 4 to 6 Hours.
Watering: Daily or Alternate Days.
Fertilizer: At least Once in a month.
- Hibiscus ( All Types)
- Rose
- Ixora
- Vinca (Periwinkle)
- Marigold
- Lemon
- Pomegranut
- Chickoo
- Custard Apple
- Guava